はじめに
世はコロナ全盛。たまには役立つものを作らないと!!
どうせなら、初めてのchrome extensionで。
トータル25時間ほどです。
TL;DR
- 『Google Meet、ちゃんとみんな出席してるかな?』
- Google Meet Attendance Management
- githubに公開しましたので、ぜひ開発に協力して頂けると嬉しいです!(やり方はあまりわからない…)

confirmボタンを押すと、現在の出席者数、カレンダーの出席予定者数、出欠を色分け(赤:欠席)で表示することができます。
(マスク部分が多くて、ごめんなさい)
きっかけ
最近はテレワークが広まってきていますね。
私もGoogle Meetで会議に参加することがあるのですが、参加人数が多くなってくると、誰が出席していて、誰が会議を忘れているのか探すのに一苦労している場面を見かけます。
そこで、Google Calendarで出席予定のユーザと、Google Meetの出席者を照らし合わせて表示する拡張機能を作ってみようと思います。
やったこと
とりあえず何か動かしてみる
chrome extensionの作り方は何もわからないので、まずは以下のextensionを実際に動かしつつ、自分用に変更していきました。
Chromeの拡張機能を自作する
OAuth2(認証チュートリアル)
後者で失敗したことは、チュートリアルの序盤でdeveloperのダッシュボードにアップして、keyを取得する部分があるのですが、keyはむしろいらなかったです。
(keyは自動で設定されるので、manifest.jsonに記載すると逆に怒られたw)

本来、公開用のkeyと開発用のkeyを合わせることで、同じoauth2.0のエンドポイントが使えるらしいのですが、諦めました(毎回、手動で切り替えてました)

また、ダッシュボードのアップには、developerになる必要があり、さらに初回のみ5$の請求がありました。まだ序盤なのにw
設計を考える
とにかくシンプルにしました
- カレンダーから出席予定者を取得する(
google calendar API) - Meetの参加者を取得する
- 照らし合わせて、出欠を色合いで表示する
あったらいい機能
- 拡張アイコンのバッジで
2/3のように参加者数を表示(今回採用したpage_actionでは出来ませんというサイトがいっぱいあった) - UI頑張る
- ユーザ名でソートボタン
- 各種、オプション(予定が未定のユーザをどうするか、など)
Google Calendarの出席予定者を取得する
// 抜粋
// oauth認証を通して、APIにアクセス出来るようにします
chrome.identity.getAuthToken({ interactive: true }, function (token) {
    let init = {
      method: 'GET',
      async: true,
      headers: {
        Authorization: 'Bearer ' + token,
        'Content-Type': 'application/json'
      },
      contentType: 'json'
    }
    // 会議の時間を始まりから終わりまで含有してないと取得できない
    // 形式は以下
    // const params = {
    //   timeMin: '2020-07-06T00:59:59.000+09:00',
    //   timeMax: '2020-07-06T23:39:59.000+09:00'
    // }
    let from_date = new Date()
    let to_date = new Date()
    //現在の時刻から±5hoursの予定を取得
    from_date.setHours(from_date.getHours() - 5)
    to_date.setHours(to_date.getHours() + 5)
    const params = {
      timeMin: from_date.toISOString(),
      timeMax: to_date.toISOString()
    }
    //calendarAPIのパラメータに渡せるように整形する
    const queryString = Object.keys(params)
      .map((name) => `${name}=${encodeURIComponent(params[name])}`)
      .join('&')
    // 現在のタブを取得
    chrome.tabs.getSelected((tab) => {
      // タブ(Meet)のURLを取得
      targetHangoutLink = tab.url.split('?')[0]
      //出席予定者のemail
      let attendees = []
      //出席予定者の{email:displayName}(アカウント名が独自で設定されてる場合)
      let attendeesName = {}
      // 出席予定者をcalendarから取得
      fetch(
        'https://www.googleapis.com/calendar/v3/calendars/primary/events?' +
          queryString +
          '&key=change-your-API-key',
        init
      )
        .then((response) => response.json())
        .then(function (data) {
          for (let index = 0; index < data.items.length; index++) {
            //itemsは取得できたカレンダー予定の配列
            const item = data.items[index]
            if (
              //MeetのURLが一致する予定なら
              item.hangoutLink === targetHangoutLink &&
              item.attendees !== undefined
            ) {
              item.attendees.forEach((user) => {
                // 出席予定のユーザ, 未回答ユーザも含める
                if (
                  user.responseStatus === 'accepted' ||
                  user.responseStatus === 'needsAction'
                ) {
                  attendees.push(user.email)
                  if (user.displayName) {
                    // アカウント名設定があれば(昔の名残で、小文字化している)
                    attendeesName[
                      user.email
                    ] = user.displayName.toLowerCase()
                  } else {
                    //アカウント名が設定されていない場合は@マークの前半部分を取得する
                    attendeesName[user.email] = user.email
                      .split('@')[0]
                      .replace('.', ' ')
                      .toLowerCase()
                  }
                }
              })
              //同じMeetURLの予定が複数取得できた場合、変になりそうなのでbreakする
              break
            }
          }
        })
    })
})
これで、現在開いているMeetの出席予定/未定のユーザ(email, displayName)をカレンダーから取得することが出来るようになりました。
ただ、カレンダーにグループメールなどを登録している場合、それぞれのユーザが出席予定にしていても、itemではneedsAction(未定扱い)と表記されていたので、未定のユーザも取得するようにしています。
Google Meetの参加者を取得する
想像以上にややこしいセクションでした。
特に、
- 拡張のポップアップと現在開いているページは異世界(変数渡し大変)
- コールバック問題
まずは、設定ファイルからみていきましょう。
{
  "name": "Google Meet Attendance Management",
  "short_name": "GMAM",
  "version": "1.02",
  "description": "You can check the Google Meet attendance of users who are going to attend in the Google Calendar.",
  "manifest_version": 2,
  "author": "shoot16625",
  // extensionで利用する要素を定義します
  //(左から)
  //現在アクティブなタブ(複数)へのアクセス許可
  //ページの詳細情報へのアクセス許可
  //apiの使用許可
  "permissions": ["activeTab","declarativeContent", "identity"],
  //backgroundの世界
  "background": {
    "scripts": [
      "background.js"
    ],
  //falseなら、eventが起きたときだけ動作
  //trueなら、ずっと実行し続ける
    "persistent": false
  },
  //現在のウィンドウページの世界(ココでMeetの参加ユーザを取得する)
  "content_scripts": [
    {
      "matches": ["https://meet.google.com/*"],
      "js": ["jquery3.5.1.min.js", "content.js"]
    }
  ],
  //認証の世界
  //clicent_idは上から三番目の写真内のoauth2のもの
  "oauth2": {
    "client_id": "chenge-your-client_id.apps.googleusercontent.com",
  //カレンダーの読み込みのみ許可
    "scopes":["https://www.googleapis.com/auth/calendar.events.readonly"]
  },
  //拡張ボタンの世界(出欠の結果を表示する部分)
  "page_action": {
      "default_popup": "popup.html",
      "default_title":"Attendance Manager",
      "default_icon": {
        "32": "images/memo32.png"
      }
    },
  "icons": {
    "16": "images/memo16.png",
    "48": "images/memo48.png",
    "64": "images/memo64.png",
    "128": "images/memo128.png",
    "256": "images/memo256.png",
    "512": "images/memo512.png"
  }
}
当初は、oauth2の設定をpage_actionの中に書いていて動かないぞっ!!となって、1日目が終了しましたw
ちなみに、manifest.jsonではコメントアウトは許可されていません。(json自体ダメなんだっけ?)
次に、backgroundの世界で、拡張iconを押したときの処理を記載します
// 制限が厳しいjsにしているらしい
'use strict'
chrome.runtime.onInstalled.addListener(function () {
  //初期化
  chrome.declarativeContent.onPageChanged.removeRules(undefined, function () {
    chrome.declarativeContent.onPageChanged.addRules([
      {
        //extensionのルールを記載
        conditions: [
          new chrome.declarativeContent.PageStateMatcher({
            // meetのurlでのみ、拡張機能を有効化
            pageUrl: { hostEquals: 'meet.google.com' }
          })
        ],
        //page actionをアクションする
        actions: [new chrome.declarativeContent.ShowPageAction()]
      }
    ])
  })
})
次に、拡張iconを押した時に出てくるpopupのHTMLを記載します。
ちょーシンプルw
<!DOCTYPE html>
<html>
  <head>
    <style type="text/css">
      button {
        height: 20px;
        width: 80px;
        outline: none;
      }
      .scrollbar {
        overflow: auto;
        max-height: 450px;
      }
      .scrollbar > div {
        font-size: 14px;
        padding-left: 3px;
        padding-right: 5px;
      }
    </style>
  </head>
  <body>
    //buttonをつけた
    <button id="confirm-button">confirm</button>
    //出欠の結果を表示
    <div id="display-attendance" class="scrollbar"></div>
    <script src="popup.js"></script>
  </body>
</html>
出席予定者が多すぎると、表示が画面の外に行ってしまいそうなので、スクロールできるようにしました。(自動で2段,3段に分けるのも試したかった…)
次に、htmlのボタンがクリックされた時に、現在出席しているユーザを取得するようにします。
  // 現在出席しているユーザを取得するため,content.jsにリクエストを投げる
  let attendingUsers = []
  waitPageLoad((currentTab) => {
    chrome.tabs.sendMessage(currentTab.id, 'send to content.js', function (
      item
    ) {
      attendingUsers = item
      //以下、カレンダーの予定を取得する機能など
      }
})
// タブの情報を取得する
// https://www.itoukun.com/2019/11/09/chrome-extension-%E3%81%AE-unchecked-lasterror-value-error-could-not-establish-connection-receiving-end-does-not-exist-%E3%81%AE%E5%AF%BE%E5%87%A6%E6%B3%95/
function waitPageLoad(callback) {
  // 取得するタブの条件
  const queryInfo = {
    active: true,
    windowId: chrome.windows.WINDOW_ID_CURRENT
  }

  chrome.tabs.query(queryInfo, function (result) {
    // 配列の先頭に現在タブの情報が入っている
    const currentTab = result.shift()

    if (currentTab.status === 'complete') {
      // ロードが完了していたら、コールバックを実行
      callback(currentTab)
    } else {
      setTimeout(() => {
        // まだロード中だった場合は、ちょっとwaitして再帰的にこの処理を繰り返す
        waitPageLoad(callback)
      }, 100)
    }
  })
}
これで、content.jsにそのページの情報を取得して返してもらえるよう要求します。
ただ、waitPageLoadをかまさないと、以下のサイトのようなエラーが…
chrome extension の Unchecked lastError value: Error: Could not establish connection. Receiving end does not exist.の対処法
私の場合は、リクエストが返ってくる前に先の処理(カレンダーの予定を取得)を進めてしまい、うまくいきませんでした。(たぶん)
よって、サイト内のwaitPageLoadでリクエストが返ってくるまで次に進まないようにしました。(ありがとうございます)
extensionでは、try, catch, Promiseが使えないのだ…
次に、content_scriptsの世界で、現在開いているMeetの要素にアクセスし、出席しているユーザを取得してpopup.jsにreturnします。
'use strict'
//sendMessageが飛んできたら
chrome.runtime.onMessage.addListener(function (request, sender, sendResponse) {
  // 出席しているユーザら
  let userNames = []
  // ユーザをリストから取得する関数
  let getUserNames = function () {
    // meetでユーザーがリスト表示されているクラス
    let users = document.getElementsByClassName('cS7aqe')
    for (let index = 0; index < users.length; index++) {
      const user = users[index]
      let userName = user.textContent
      userName = userName.replace('さん', '')
      userName = userName.replace('(', '(')
      userName = userName.split(' (')[0]
      userNames.push(userName)
    }
  }
  // ユーザーのリストを表示する(お気持ち程度)
  document.getElementsByClassName('gV3Svc')[0].click()
  // リストのトップに移動しておく
  $('.HALYaf').scrollTop(0)

  // 200人くらい取れる?
  const move = 400
  let index = 0
  let userNum = 0
  //取得したユーザリストに変化が無くなったら、ループを終了
  let ended = 0
  let id = setInterval(function () {
    userNum = userNames.length
    //表示されているユーザらを取得
    getUserNames()
    // 重複削除
    userNames = Array.from(new Set(userNames))
    //前回のuserNamesと今回のuserNamesに変化がなかったら
    if (userNum === userNames.length) {
      // 4回連続でuserNamesが変わらなかったら終了
      ended++
    }
    if (index >= 30 || ended === 4) {
      clearInterval(id) //idをclearIntervalで指定している
      //popup.jsに結果を返す
      sendResponse(userNames)
    }
    //スクロールして100msec待機(要素生成待ち)
    $('.HALYaf').scrollTop(move * index)
    index++
  }, 100)
  // これが無いと、コールバック内でsendResponseが使えない(ハマった)
  return true
})
調査してみると、Meetには出席しているユーザ全員がhtmlの要素として現れている部分がありませんでした。(非常に厄介だ)
よって、
ユーザ一覧で表示されているユーザ名だけ取得 -> 少し下にスクロールする -> 要素が生成されるのを待つ
を繰り返すことで、全ユーザを取得できるようにしました。(extensionのver.1.0.2にて修正適用)
また、スクロールしたいdivのclass名は、複雑でどれがどれだかわからないので、片っ端から試しましたw。
出席予定者と現在の出席者を照会して、表示する
ここまでで、必要なデータは揃いましたので、最後に表示しましょう!!
//calendarからデータを取得したところから続き

// 出席しているユーザのemail
let attendingEmail = []
// {出席予定:実際に出席しているユーザ名}
let attendance2attending = {}
attendees.forEach((expectedUser) => {
  for (let index = 0; index < attendingUsers.length; index++) {
    const attendingUser = attendingUsers[index].toLowerCase()
    if (
      // ex. taro yamada === format(taro.yamada@gmail.com)
      // ex. Taro Yamada === format(taro.yamada@gmail.com)
      attendingUser === attendeesName[expectedUser]
    ) {
      attendingEmail.push(expectedUser)
      attendance2attending[expectedUser] = attendingUser
      // 同じ名前のattendingUserは複数カウントしない
      break
    } else {
      //欠席ユーザは空を代入
      attendance2attending[expectedUser] = ''
    }
  }
})
// popup.htmlに結果を表示
elem = document.getElementById('display-attendance')
let text = `<div>attending:${attendingEmail.length}</div>
<div>attendance:${attendees.length}</div>`
for (let index = 0; index < attendees.length; index++) {
  //userのemail
  const user = attendees[index]
  let color = 'skyblue'
  if (attendance2attending[user] === '') {
    // 欠席ユーザ
    color = 'tomato'
  }
  text += `<div style="background-color:${color};">${user}</div>`
}

// カレンダーとマッチしなかった参加ユーザも表示する

const matchAttendingUser = new Set(
  Object.values(attendance2attending)
)
let hasUnknownUser = true
for (let index = 0; index < attendingUsers.length; index++) {
  if (
    matchAttendingUser.has(attendingUsers[index].toLowerCase())
  ) {
  } else {
    if (hasUnknownUser) {
      // unknownユーザがいたら、最初にunknownと表示
      text += `<div>unknown</div>`
      hasUnknownUser = !hasUnknownUser
    }
    //参加予定のユーザと一致しなかったら
    text += `<div>${attendingUsers[index]}</div>`
  }
}
elem.innerHTML = text
以上で、出欠管理extensionが完成しました(パチパチ!!)
Chrome Web Storeに公開しよう
公開はdeveloper dashboardから可能です。

公開に必要な記入事項は結構あります。
特に、プライバシーの欄でmanifest.jsonで記載したpermissionについての記載が必要です。

さぁ、必要なものは揃ったので公開してみたのですが、初回はrejectを食らいました。あわあわ
「ストアでのスパム行為と掲載順位」

アイテムの一部の説明フィールド、アイコン、スクリーンショットが提供されていないため、
不審なアイテムと判断されています。
結果として、問題はアイコンが不足している点でした。
確かに、公開の参考ページなどにはアイコンの設定欄があるのですが、最近はありません。
どの欄か探していたのですが、下図の画像アセットの部分でした。
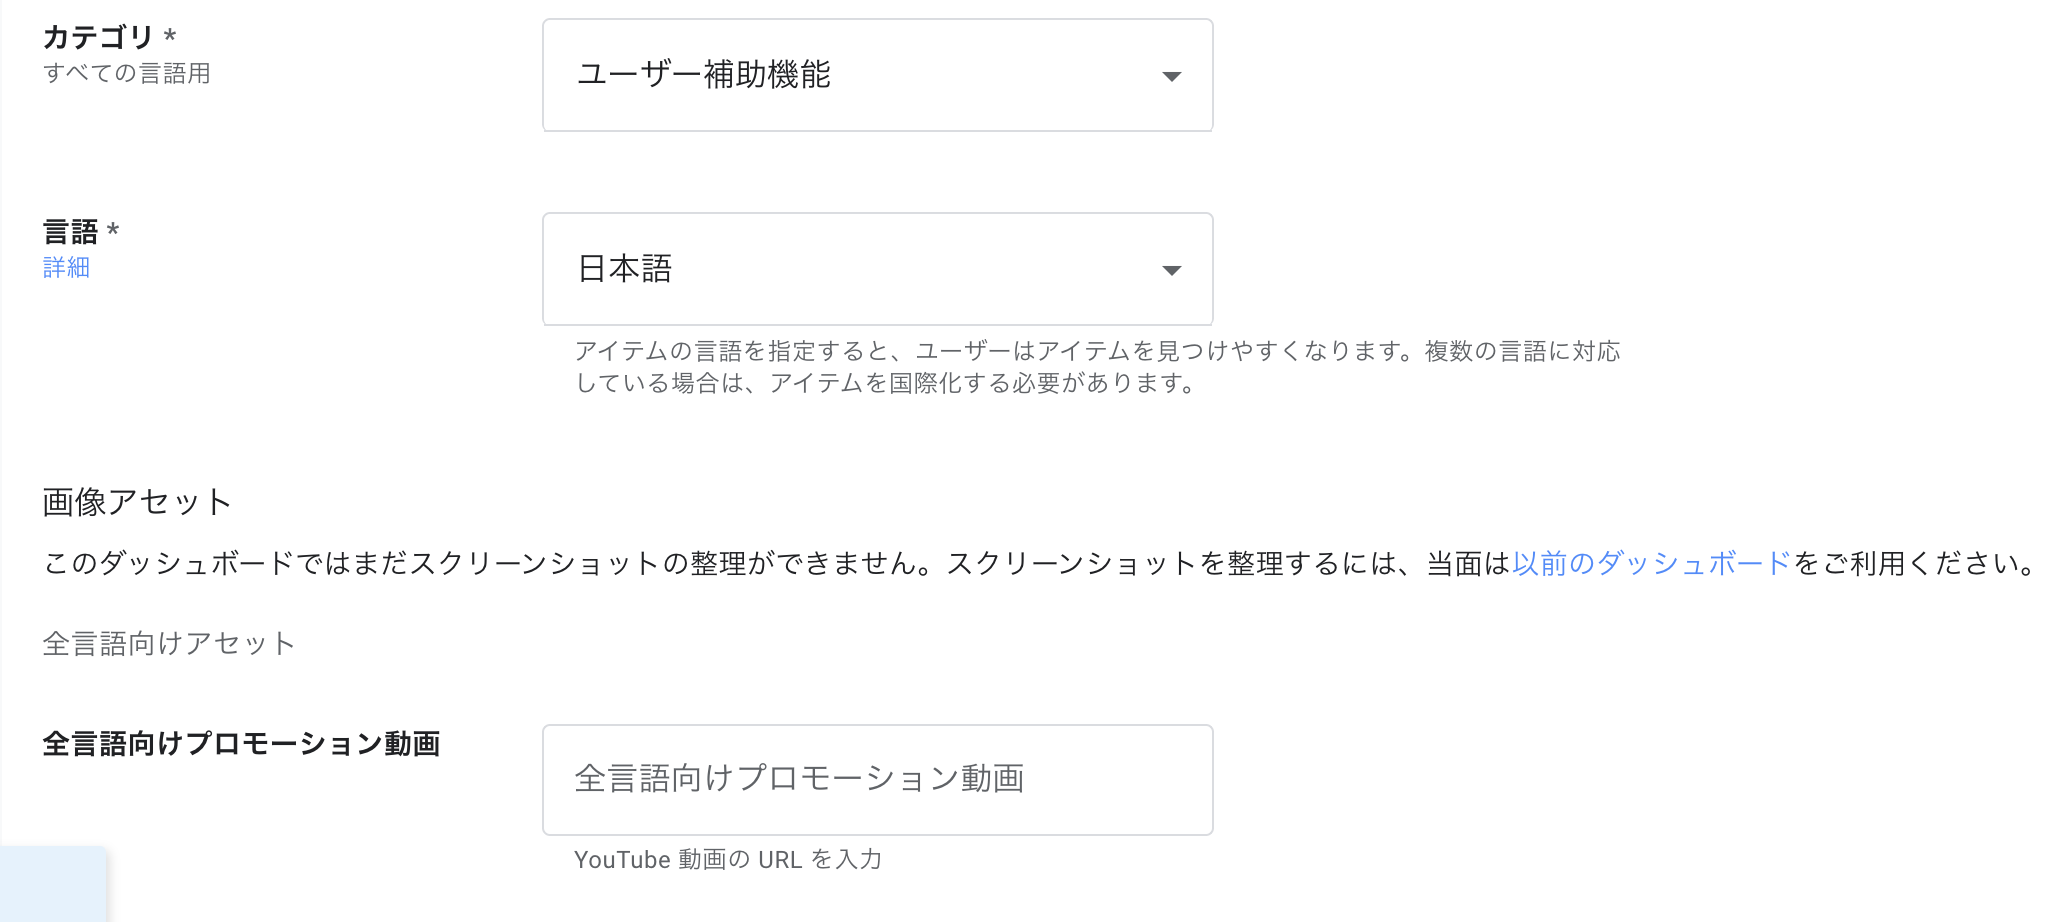
さぁ、アイコンを設定して、再公開すると、(審査に30日程度かかりますと煽られましたが)2,3時間でWeb Storeに公開されていました!!
OSSにしよう
よくわからないけど、私はgithubにpublicでアップすることをOSSと認識しているので、認証などは伏せてアップしておきました。
終わりに
必要最低限の機能しかありませんが、ニッチな需要はありそう。
ぜひ、開発のお手伝いをいただけると幸いです。
(今までのQiita投稿で最も丁寧に書けた気がします。)
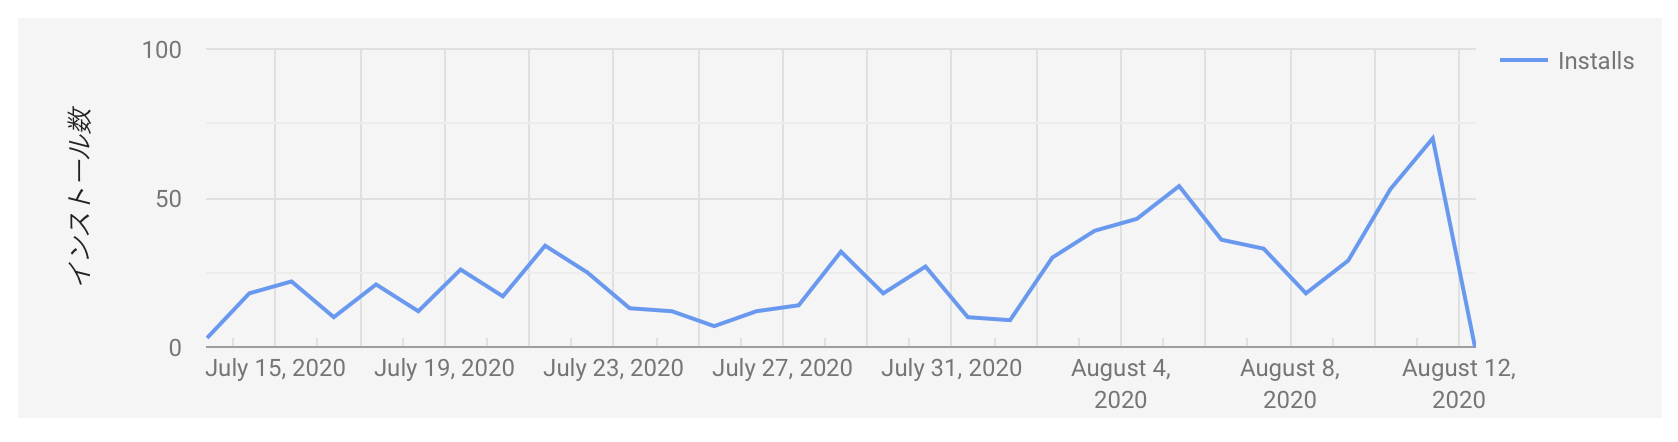
[更新]2020/08/13
公開から一ヶ月ほど経ち、総インストール数が500人を突破しました!!
特に、インド・アメリカからのアクセスが多いようです。
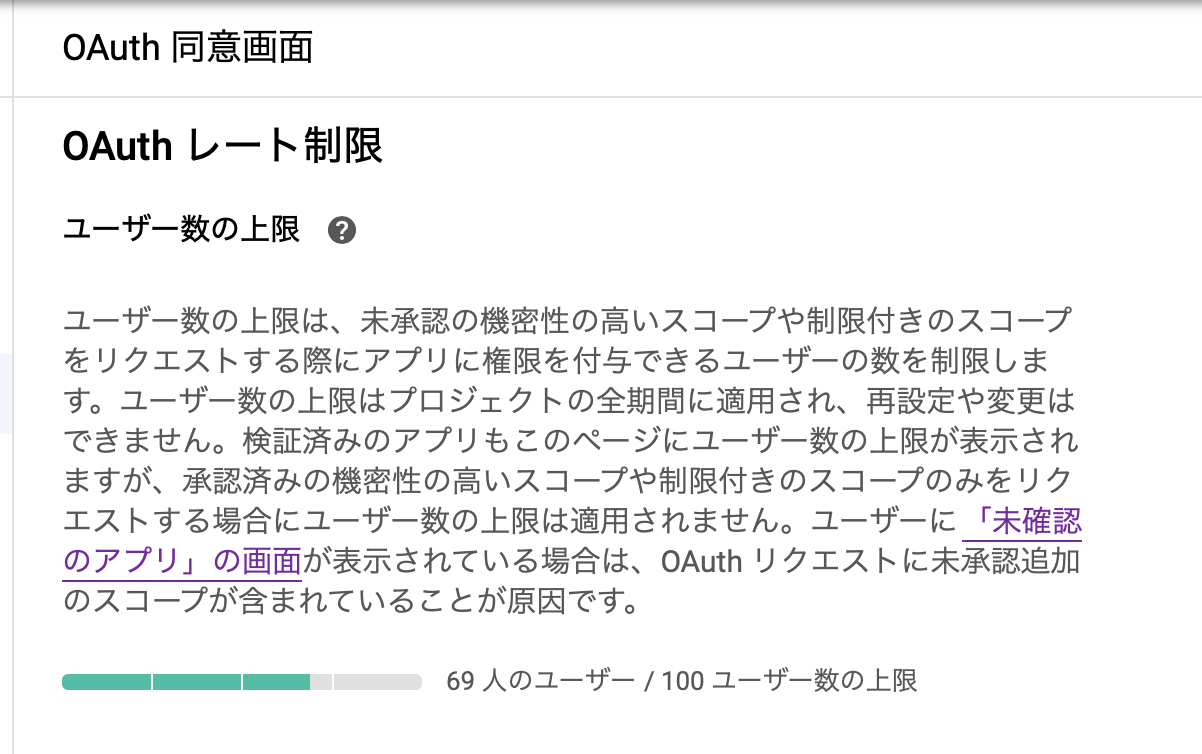
また、そのうち10%くらいは利用がありそうなのですが、OAuthレート制限がもうすぐ100人になるよと、連絡が届きました。
アプリのリンクやプライバシーポリシーの確認が必要みたいなのですが、拡張機能の場合はどうしたら良いか分からず、とりあえずWebStoreのURLを送信してみました。
たぶん、無理かと思うけど。
使いたい方はお早めに!!
[更新]2020/09/02
半月程かけて、ついにアプリが承認されました!!
これにより、以下の大きなメリットが受けられるようになりました。
-
OAuthレート制限に引っかからない -
未検証のアプリですという警告画面が出なくなる
検証に必要だったこと
具体的に必要だったことを以下にまとめておきます。
- 自分のドメイン
- アプリのホームページ&プライバシーポリシー (https://app.shijimi.work/)
- Google APIを利用する認証画面のデモ動画(英語、client_idが見えるようにする必要があるが、アプリの場合はなしでOK)
- 認証用のGoogleボタン
[更新]2021/07/08
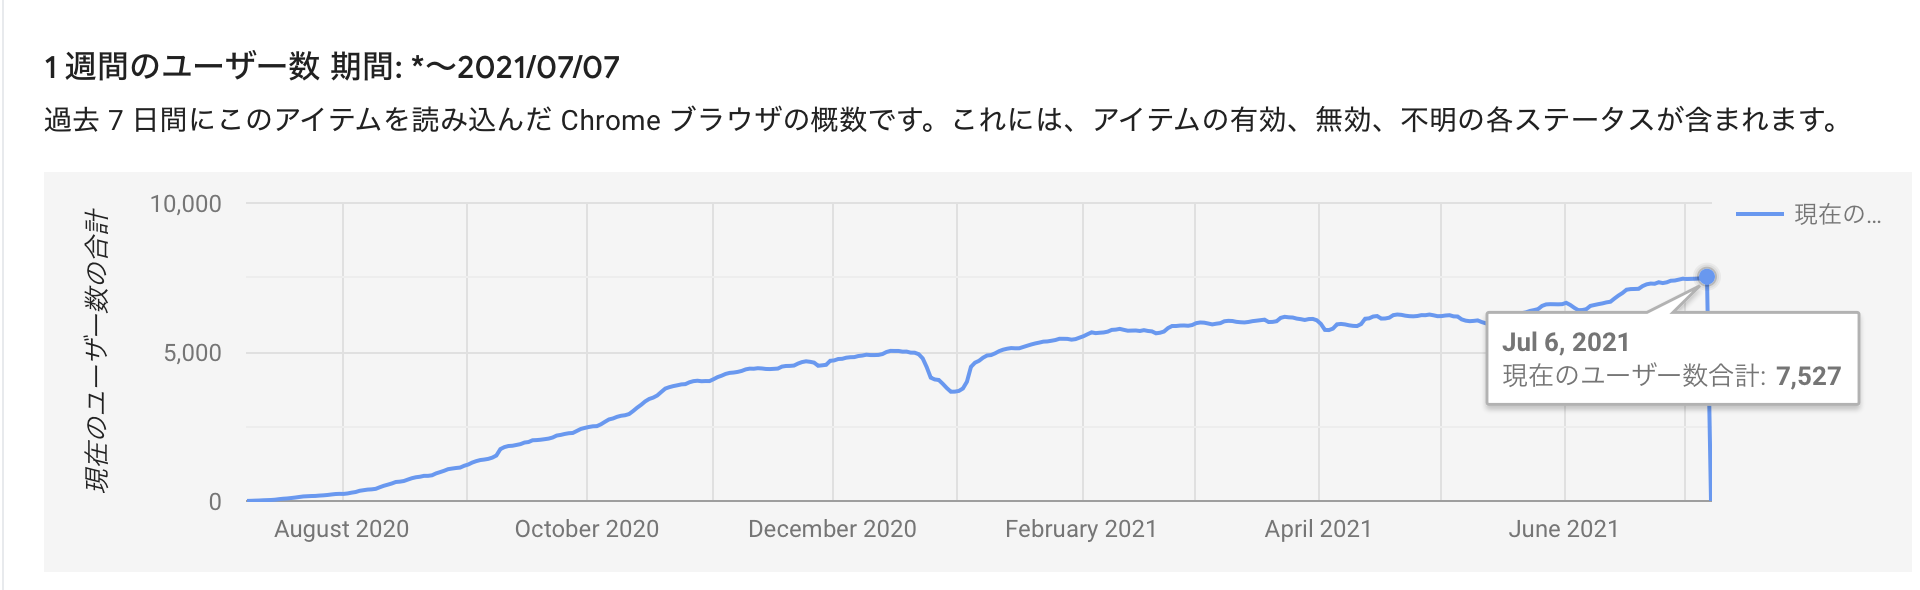
あっという間に、公開から一年が経ちましたね!!
最近は7,500ユーザといったところです。😀(この1週間のユーザー数ってインストールユーザと同義でいいんですかね?)
一時、停滞期がありましたが、復活してきて嬉しいですね。