Part 1: プロジェクトの作成
Part 2: データ保存のためのクラスを作成
Part 3 (最終回)では、コントローラとビューについて説明したいと思います。
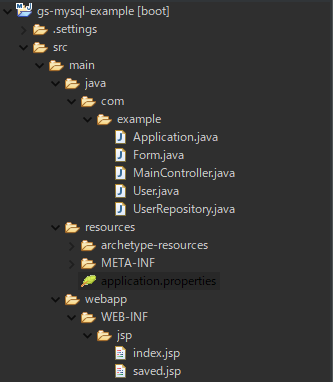
具体的には以下のフォルダー構造の中のMainController.java、index.jsp、saved.jspのコードを紹介したいと思います。
コントローラには三つのメソッドが定義されています。
indexメソッド
ルート(localhostの場合、localhost:8080)にアクセスされた場合の処理
index.jsp(ホームページ)を表示します。
showAllUsersメソッド
/all にアクセスされた場合の処理
まず空のStringを用意し、forループを利用し、各ユーザの名前、メールアドレスを追加してきます。最終的に生成されたStringをResponseBodyとして返し、データベースに登録されているユーザの一覧を表示します。
addUserメソッド
フォームのAddボタンが押された場合の処理
Formクラスのオブジェクトに保存された入力データをデータベースにデータに移します。データ保存後、saved.jspに移動し、登録された名前とメールアドレスを表示します。
コード
MainController.java
package com.example;

import org.springframework.beans.factory.annotation.Autowired;
import org.springframework.stereotype.Controller;
import org.springframework.ui.Model;
import org.springframework.web.bind.annotation.GetMapping;
import org.springframework.web.bind.annotation.ModelAttribute;
import org.springframework.web.bind.annotation.RequestMapping;
import org.springframework.web.bind.annotation.RequestMethod;
import org.springframework.web.bind.annotation.ResponseBody;

@Controller
public class MainController {

	// This means to get the bean called userRepository
	// Which is auto-generated by Spring, we will use it to handle the data
	@Autowired
	private UserRepository userRepository;

	@RequestMapping(value = "/", method = RequestMethod.GET)
	public String index(Model model) {
		return "index";
	}

	@GetMapping("/all")
	public @ResponseBody String getAllUsers() {
		String body = "";
		for (User user : userRepository.findAll()) {
			body += user.getName() + ": " + user.getEmail() + "<br>";
		}
		return body;
	}

	@RequestMapping(value = "/add", method = RequestMethod.POST)
	public String addUser(
			Model model, @ModelAttribute("loginForm") Form form
	) {
		model.addAttribute("name", form.getUserName());
		model.addAttribute("email", form.getUserEmail());

		User n = new User();
		n.setName(form.getUserName());
		n.setEmail(form.getUserEmail());
		userRepository.save(n);

		return "saved";
	}
}
ビュー
以下がビューのコードです。
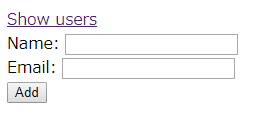
フォーム(index.jsp)
<%@ page language="java"
  contentType="text/html;charset=UTF-8"
  pageEncoding="UTF-8" %>

<%@ taglib prefix="f" uri="http://www.springframework.org/tags/form"%>

<!DOCTYPE html>
<html>
  <head>
   <meta charset="utf-8">
   <title>From</title>
  </head>
  <body>
    <a href="/all">Show users</a>
    <f:form modelAttribute="form" action="add" method="post">
      <div>
        <label for="userName">Name: </label>
        <input type="text" id="userName" name="userName">
      </div>
      <div>
        <label for="userEmail">Email: </label>
        <input type="text" id="userEmail" name="userEmail">
      </div>
      <div>
        <input type="submit" value="Add">
      </div>
    </f:form>
  </body>
</html>
データ登録完了画面(saved.jsp)
<%@ page language="java"
  contentType="text/html;charset=UTF-8"
  pageEncoding="UTF-8" %>

<%@ taglib prefix="f" uri="http://www.springframework.org/tags/form"%>
<!DOCTYPE html>
<html>
  <head>
   <meta charset="utf-8">
   <title>From</title>
  </head>
  <body>
    <p>Saved</p>
    <p>Name: ${name}</p>
    <p>Email: ${email}</p>
    <a href="/">Home</a>
  </body>
</html>
実行
プロジェクトを実行するためにApplication.javaを作成します。
package com.example;

import org.springframework.boot.SpringApplication;
import org.springframework.boot.autoconfigure.SpringBootApplication;

@SpringBootApplication
public class Application {

    public static void main(String[] args) {
        SpringApplication.run(Application.class, args);
    }
}
作成が終わったら、プロジェクトを右クリックし、Run As->Spring Boot Appを選択します。
この状態で、localhost:8080にアクセスすると以下のホームページが表示されます。