0
0

Delete article

Deleted articles cannot be recovered.

Draft of this article would be also deleted.

Are you sure you want to delete this article?

More than 1 year has passed since last update.

reCAPTCHAの整理(v2)

Posted at

仕組み

reCAPTCHAにサイトを登録する

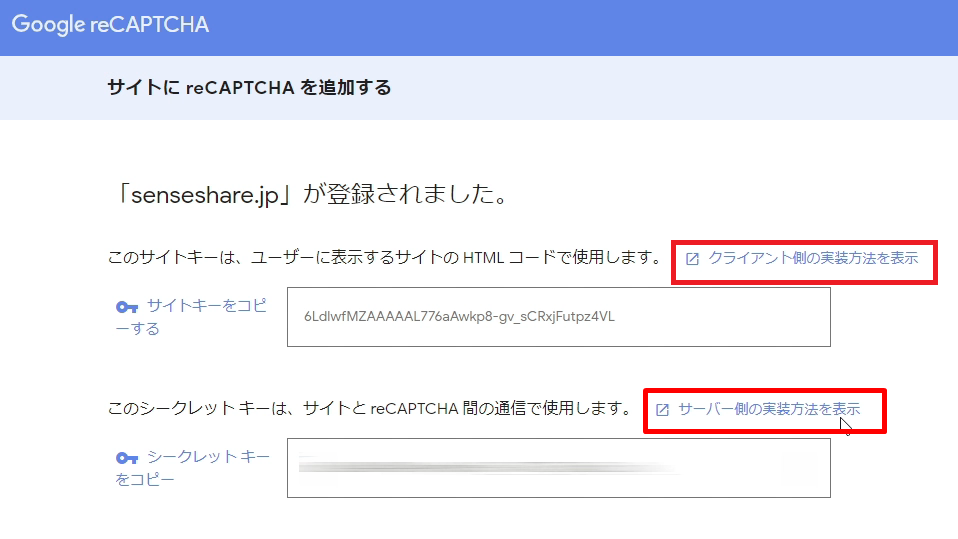
まず以下のページでreCAPTCHAに設置するサイトを登録する。
登録すると Site KeyとSecret Keyが発行される。
https://www.google.com/recaptcha/admin/create
ff841db0-e9bd-33b2-ebd4-0f0d245efef1.png

クライアント側
https://developers.google.com/recaptcha/docs/display

サーバーサイド側
https://developers.google.com/recaptcha/docs/verify

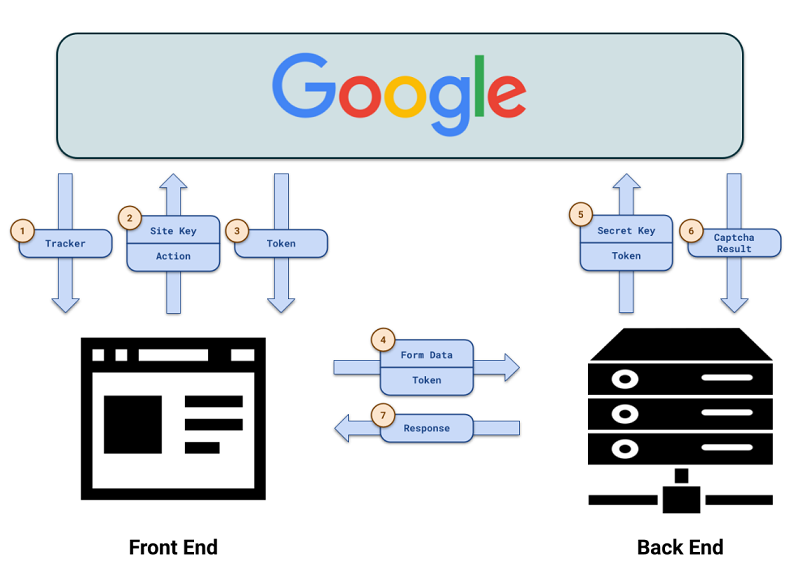
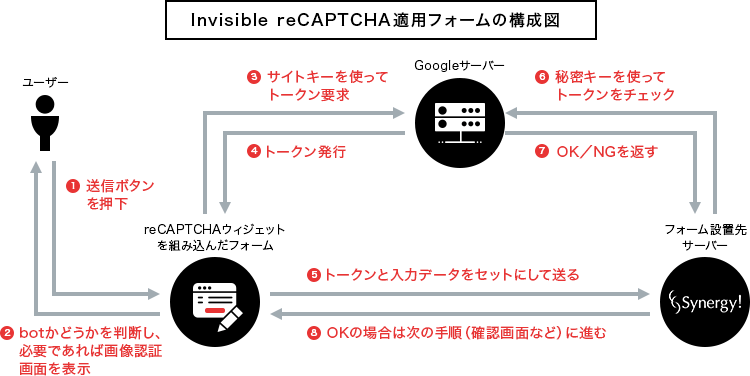
大まかな流れ

reCAPTCHAを通るとトークンが発行され、
それをフォームデータと共にサーバー側に送り、
Secret KeyとトークンをGoogleサーバーに送り認証してもらう。返ってきた結果(true/false)で処理する

・参考イメージ1

e28b6453-2d6f-40a6-f6ab-a92cb4ca97c2.png


・参考イメージ2(InvisibleタイプのreCAPTCHA)

bcd45562-3818-9867-33bc-37d7f60bb2d6.png

[参考]

実装例

php

perl

注意点

サーバー側の実装をせずにクライアント側だけ実装した時の問題点

クライアント側でデータを操作されて、reCAPTCHAを通さずに、Submitできてしまう。
(ユーザーがreCAPTCHAによるキャプチャ認証を通して発行したトークンかどうかを確認できない)
[参考]

サーバー側の実装をクライアント側にした時の問題点

データを容易に操作出来たり、Secret Keyがむき出しなるなど現実的ではない
Google公式のドキュメントでもクライアント側とサーバー側の実装を分けているのはこういった理由があるからだろうと思う。
[参考]
0
0
0

Register as a new user and use Qiita more conveniently

  1. You get articles that match your needs
  2. You can efficiently read back useful information
  3. You can use dark theme
What you can do with signing up
0
0

Delete article

Deleted articles cannot be recovered.

Draft of this article would be also deleted.

Are you sure you want to delete this article?