Contiv networking with Kubernetes デモ環境構築から 使い方
Cisco が オープンソースで開発している Contiv コンテナネットワークプラグインを Kubernetes上で構成したデモ環境をLaptop(Macbook上)に作る手順と、かんたんな使い方についてまとめておきます。
Contiv って何?って方は、シスコのオープンソース コンテナ ネットワーク プラグイン「Contiv」 も見てみてください。
Contiv の特徴
Contivは、運用者の観点から必要な機能を実現するための非常に柔軟なポリシー制御フレームワークと実装を提供するネットワークプラグインです。
Contivは、コンテナネットワークプラグインであり、マルチホストでコンテナ間ネットワークを接続する際に利用する Calico や Flannel, Weave などと同じ位置づけでになります。各プラグインの特徴をまとめたのが下記の表になります。
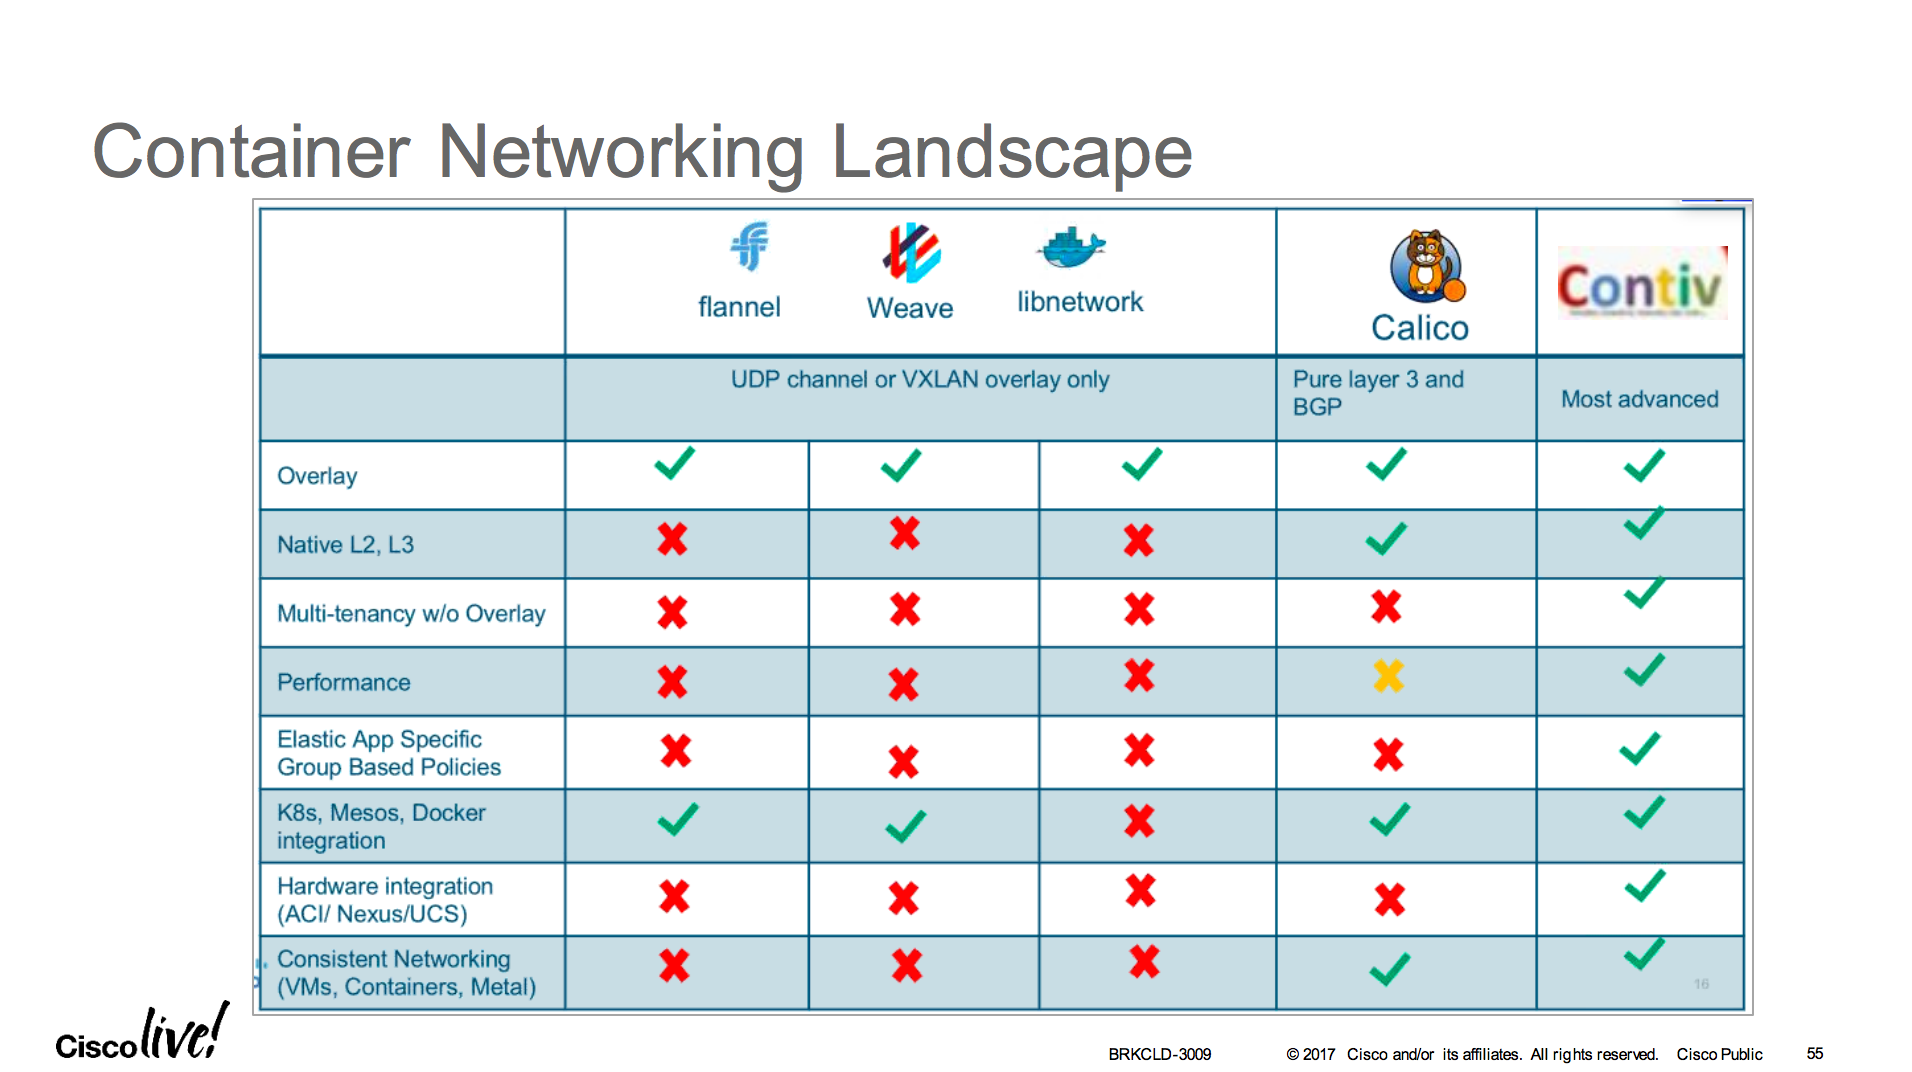
- Contivは、オーバーレイ、L2ネイティブ、L3ネイティブ、さらにはACIなど、様々な接続オプションに対応してます。
- Contivは、K8s, Docker swarm など様々なプラットフォームに対応してます。
- 帯域・QoSなど柔軟なポリシー制御、マルチテナントやRBAC, GUIなど、運用に必要な機能が組み込まれています
参照元(無料アカウント作成が必要):
https://www.ciscolive.com/online/connect/sessionDetail.ww?SESSION_ID=93797&backBtn=true#.WNOFCDhVNc8.link
Prerequisite
- Vagrant 1.9.1 以上
- Virtual Box 5.1.14 以上
- Git
- Docker 1.12 以上
はじめに: 2台の仮想マシンで Contivコンテナネットワークを試す
まず Contiv を使ってみたことがない方は、こちらのチュートリアルを試すところから始められることを、おすすめします。
http://contiv.github.io/documents/tutorials/container-101.html
Vagrantfile が用意されているので、ダウンロードして vagrant up するだけで、2台の VM が立ち上がりContivの環境がすぐに利用できます。チュートリアル自体は非常に良くできているので、ステップバイステップで行なえば、Contivで出来ることについておおよそ掴んでいただけると思います。
Contiv/Kubernetes デモ環境を Mac book 上に作る
setup
1. まず、Contiv の install repository を Git clone します。
$ mkdir Contiv
$ cd Contiv
$ git clone http://github.com/contiv/install
2. make demo-k8s
下記の手順で、Kubernetes の環境を構築します。デフォルトで 2台のVMが立ち上がります。ノード数を増やしたい場合は、環境変数で CONTIV_NODES でノード数を設定します。
せっかくなので 3台立ち上げます
$ export CONTIV_NODES=3
また、make を実行する際は、Contiv の ヴァージョンを 環境変数 BUILD_VERSION として渡す必要があるので、予め設定するか、下記の通り指定して make を実行します。
$ cd install
$ BUILD_VERSION=1.0.0-beta.3 make demo-k8s
5分から10分くらいかかります。
Installation is complete
=========================================================

Contiv UI is available at https://192.168.2.50:10000
Please use the first run wizard or configure the setup as follows:
Configure forwarding mode (optional, default is bridge).
netctl global set --fwd-mode routing
Configure ACI mode (optional)
netctl global set --fabric-mode aci --vlan-range <start>-<end>
Create a default network
netctl net create -t default --subnet=<CIDR> default-net
For example, netctl net create -t default --subnet=20.1.1.0/24 default-net

=========================================================

<省略>

Install SUCCESS

NOTE: Because the Contiv Admin Console is using a self-signed certificate for this demo,
you will see a security warning when the page loads.  You can safely dismiss it.

You can access the Contiv master node with:
  cd cluster && CONTIV_KUBEADM=1 vagrant ssh contiv-node1
完了するとこのような形で、 Contiv UI のアドレスなどが表示されます。デフォルトでは、bridge(L2) モードになっているので、Routing(L3)にしたい場合もしくは、ACIモードにしたい場合は、上記に表示されているコマンドを使って変更します。
3. login
$ cd cluster
$ CONTIV_KUBEADM=1 vagrant ssh contiv-node1
ログインしたら、kubectl コマンドで、ノードが3台立ち上がっていること、netctl コマンドで、Contiv がインストールされていることが確認できると思います。
[vagrant@contiv-node1 ~]$ kubectl get nodes
NAME           STATUS         AGE
contiv-node1   Ready,master   18m
contiv-node2   Ready          14m
contiv-node3   Ready          11m
[vagrant@contiv-node1 ~]$ netctl version
Client Version:
Version: 1.0.0-beta.3
GitCommit: e820dd7
BuildTime: 02-17-2017.23-55-08.UTC

Server Version:
Version: 1.0.0-beta.3
GitCommit: e820dd7
BuildTime: 02-17-2017.23-55-08.UTC
[vagrant@contiv-node1 ~]$
4. Web login
デフォルトのユーザー名/パスワードは admin / admin です
実際に Contiv で ネットワーク を作ってみる
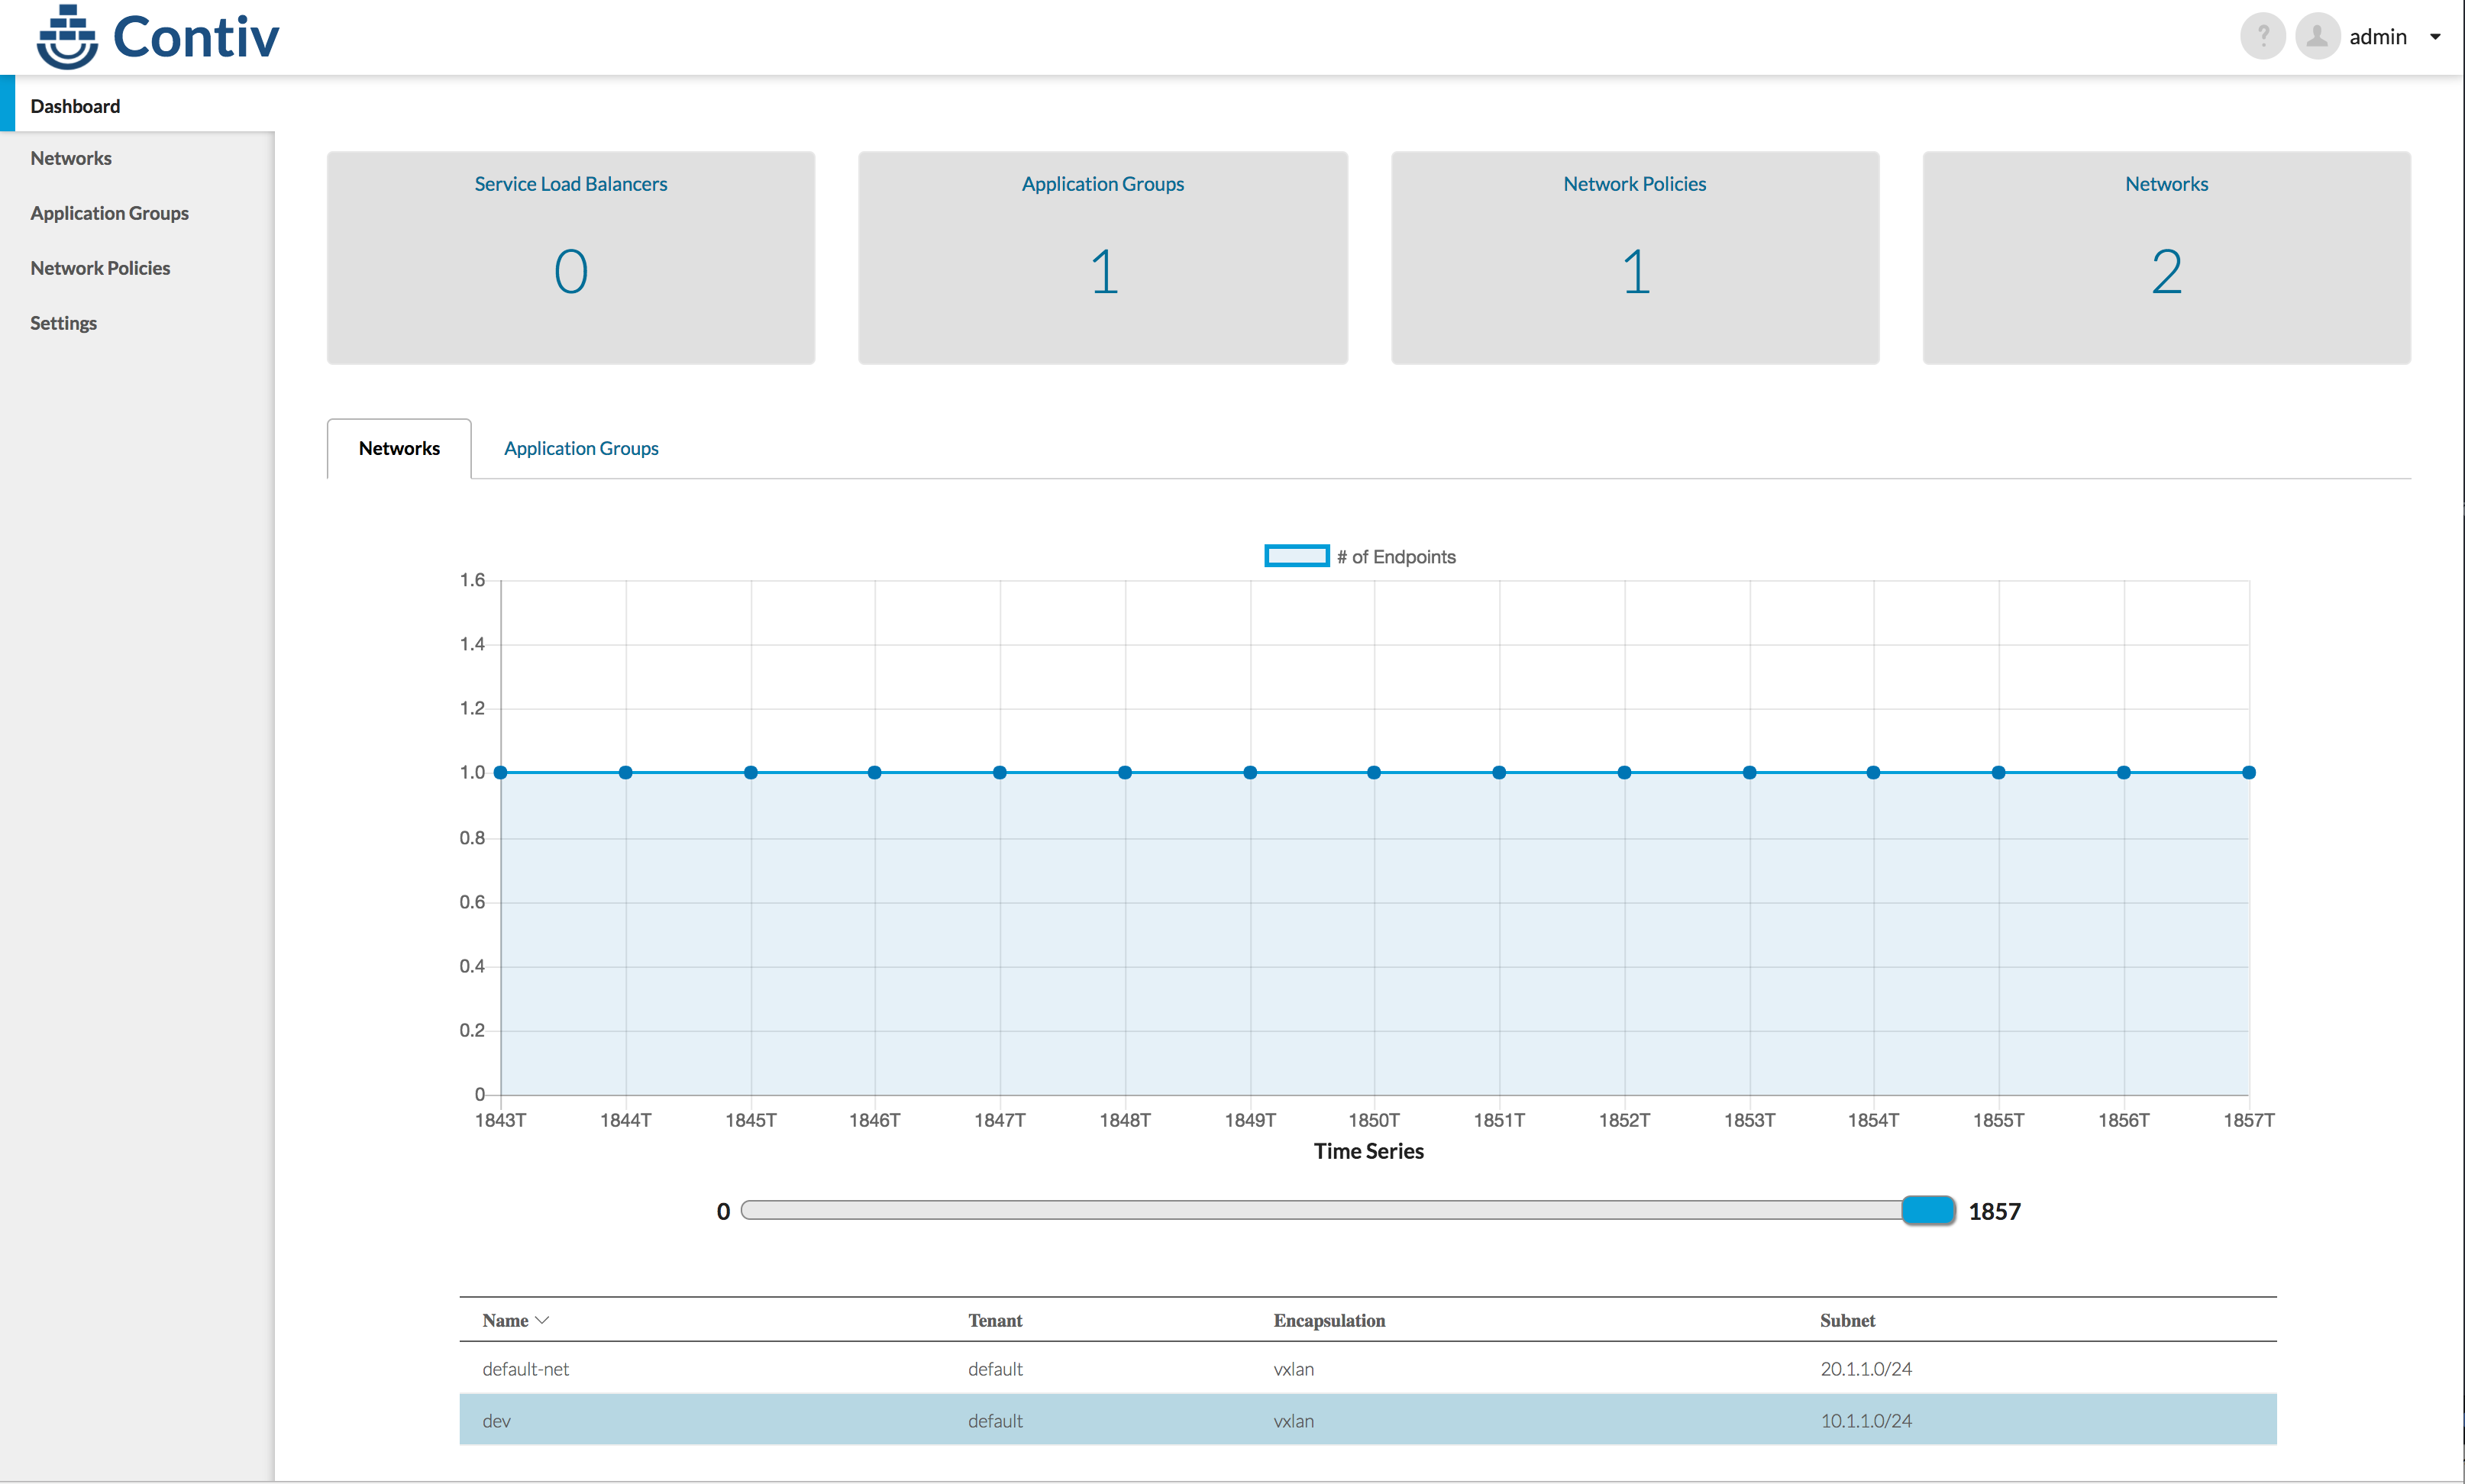
1. 現在のネットワークを確認する
netctl net ls コマンドで確認できます
[vagrant@contiv-node1 ~]$ netctl net ls
Tenant   Network      Nw Type  Encap type  Packet tag  Subnet       Gateway  IPv6Subnet  IPv6Gateway
------   -------      -------  ----------  ----------  -------      ------   ----------  -----------
default  default-net  data     vxlan       0           20.1.1.0/24
2. 新しくネットワークを作る
netctl net create コマンドで作れます。
[vagrant@contiv-node1 ~]$ netctl net create -s 10.1.1.0/24 dev
Creating network default:dev

[vagrant@contiv-node1 ~]$ netctl net ls
Tenant   Network      Nw Type  Encap type  Packet tag  Subnet       Gateway  IPv6Subnet  IPv6Gateway
------   -------      -------  ----------  ----------  -------      ------   ----------  -----------
default  default-net  data     vxlan       0           20.1.1.0/24
default  dev          data     vxlan       0           10.1.1.0/24
[vagrant@contiv-node1 ~]$
3. アプリケーションポリシーを作る
netctl policy create コマンドで作成
[vagrant@contiv-node1 ~]$ netctl policy create dev-policy
Creating policy default:dev-policy

[vagrant@contiv-node1 ~]$ netctl policy ls
Tenant   Policy
------   ------
default  dev-policy
[vagrant@contiv-node1 ~]$
今回は、特にルールを書きませんが、 netctl policy rule-add コマンドで、ルールを追加できます。
netctl policy rule-add dev-policy 1 -direction=in -protocol=tcp -action=deny
また、帯域や、QoSを設定する場合は netctl netprofile create コマンドで、帯域・DSCPを指定できます。
netctl netprofile create -b 1Mbps -dscp 3 dev-net-profile
詳細はこちらをご確認ください http://contiv.github.io/documents/networking/policies.html
4. アプリケーショングループを作る
ポリシーを作成したら、グループにポリシーを適用します。
netctl group create コマンドでグループを作成
[vagrant@contiv-node1 ~]$ netctl group create dev dev-group -policy=dev-policy
Creating EndpointGroup default:dev-group

[vagrant@contiv-node1 ~]$ netctl group ls
Tenant   Group      Network  Policies    Network profile
------   -----      -------  --------    ---------------
default  dev-group  dev      dev-policy
[vagrant@contiv-node1 ~]$
Contiv環境での アプリケーションPodの定義
1. Yamlの書き方
Contiv で作成したネットワークを利用する場合は、下記の指定を yaml ファイルに書きます。
io.contiv.net-group: <グループ>
io.contiv.network: <ネットワーク>
例として、以下のような、Yamlファイルを用意して、busybox-poc-net というインスタンスを作成してみましょう。Label のところで、先程作った dev ネットワークと dev-group グループを指定しています。
apiVersion: v1
kind: Pod
metadata:
name: busybox-poc-net
labels:
  app: demo-labels
  io.contiv.net-group: dev-group
  io.contiv.network: dev

spec:
containers:
- name: bbox
  image: contiv/nc-busybox
  command:
    - sleep
    - "7200"
上記ファイルを busybox-dev.yaml という名前で保存し、これを使って、kubectl create コマンドで、インスタンスを作成します。
[vagrant@contiv-node1 ~]$ kubectl create -f busybox-dev.yaml
pod "busybox-poc-net" created
作成した Pod ができていることを確認します。
[vagrant@contiv-node1 ~]$ kubectl get pod
NAME              READY     STATUS    RESTARTS   AGE
busybox-poc-net   1/1       Running   0          1m
netctl コマンドでも見てみましょう。
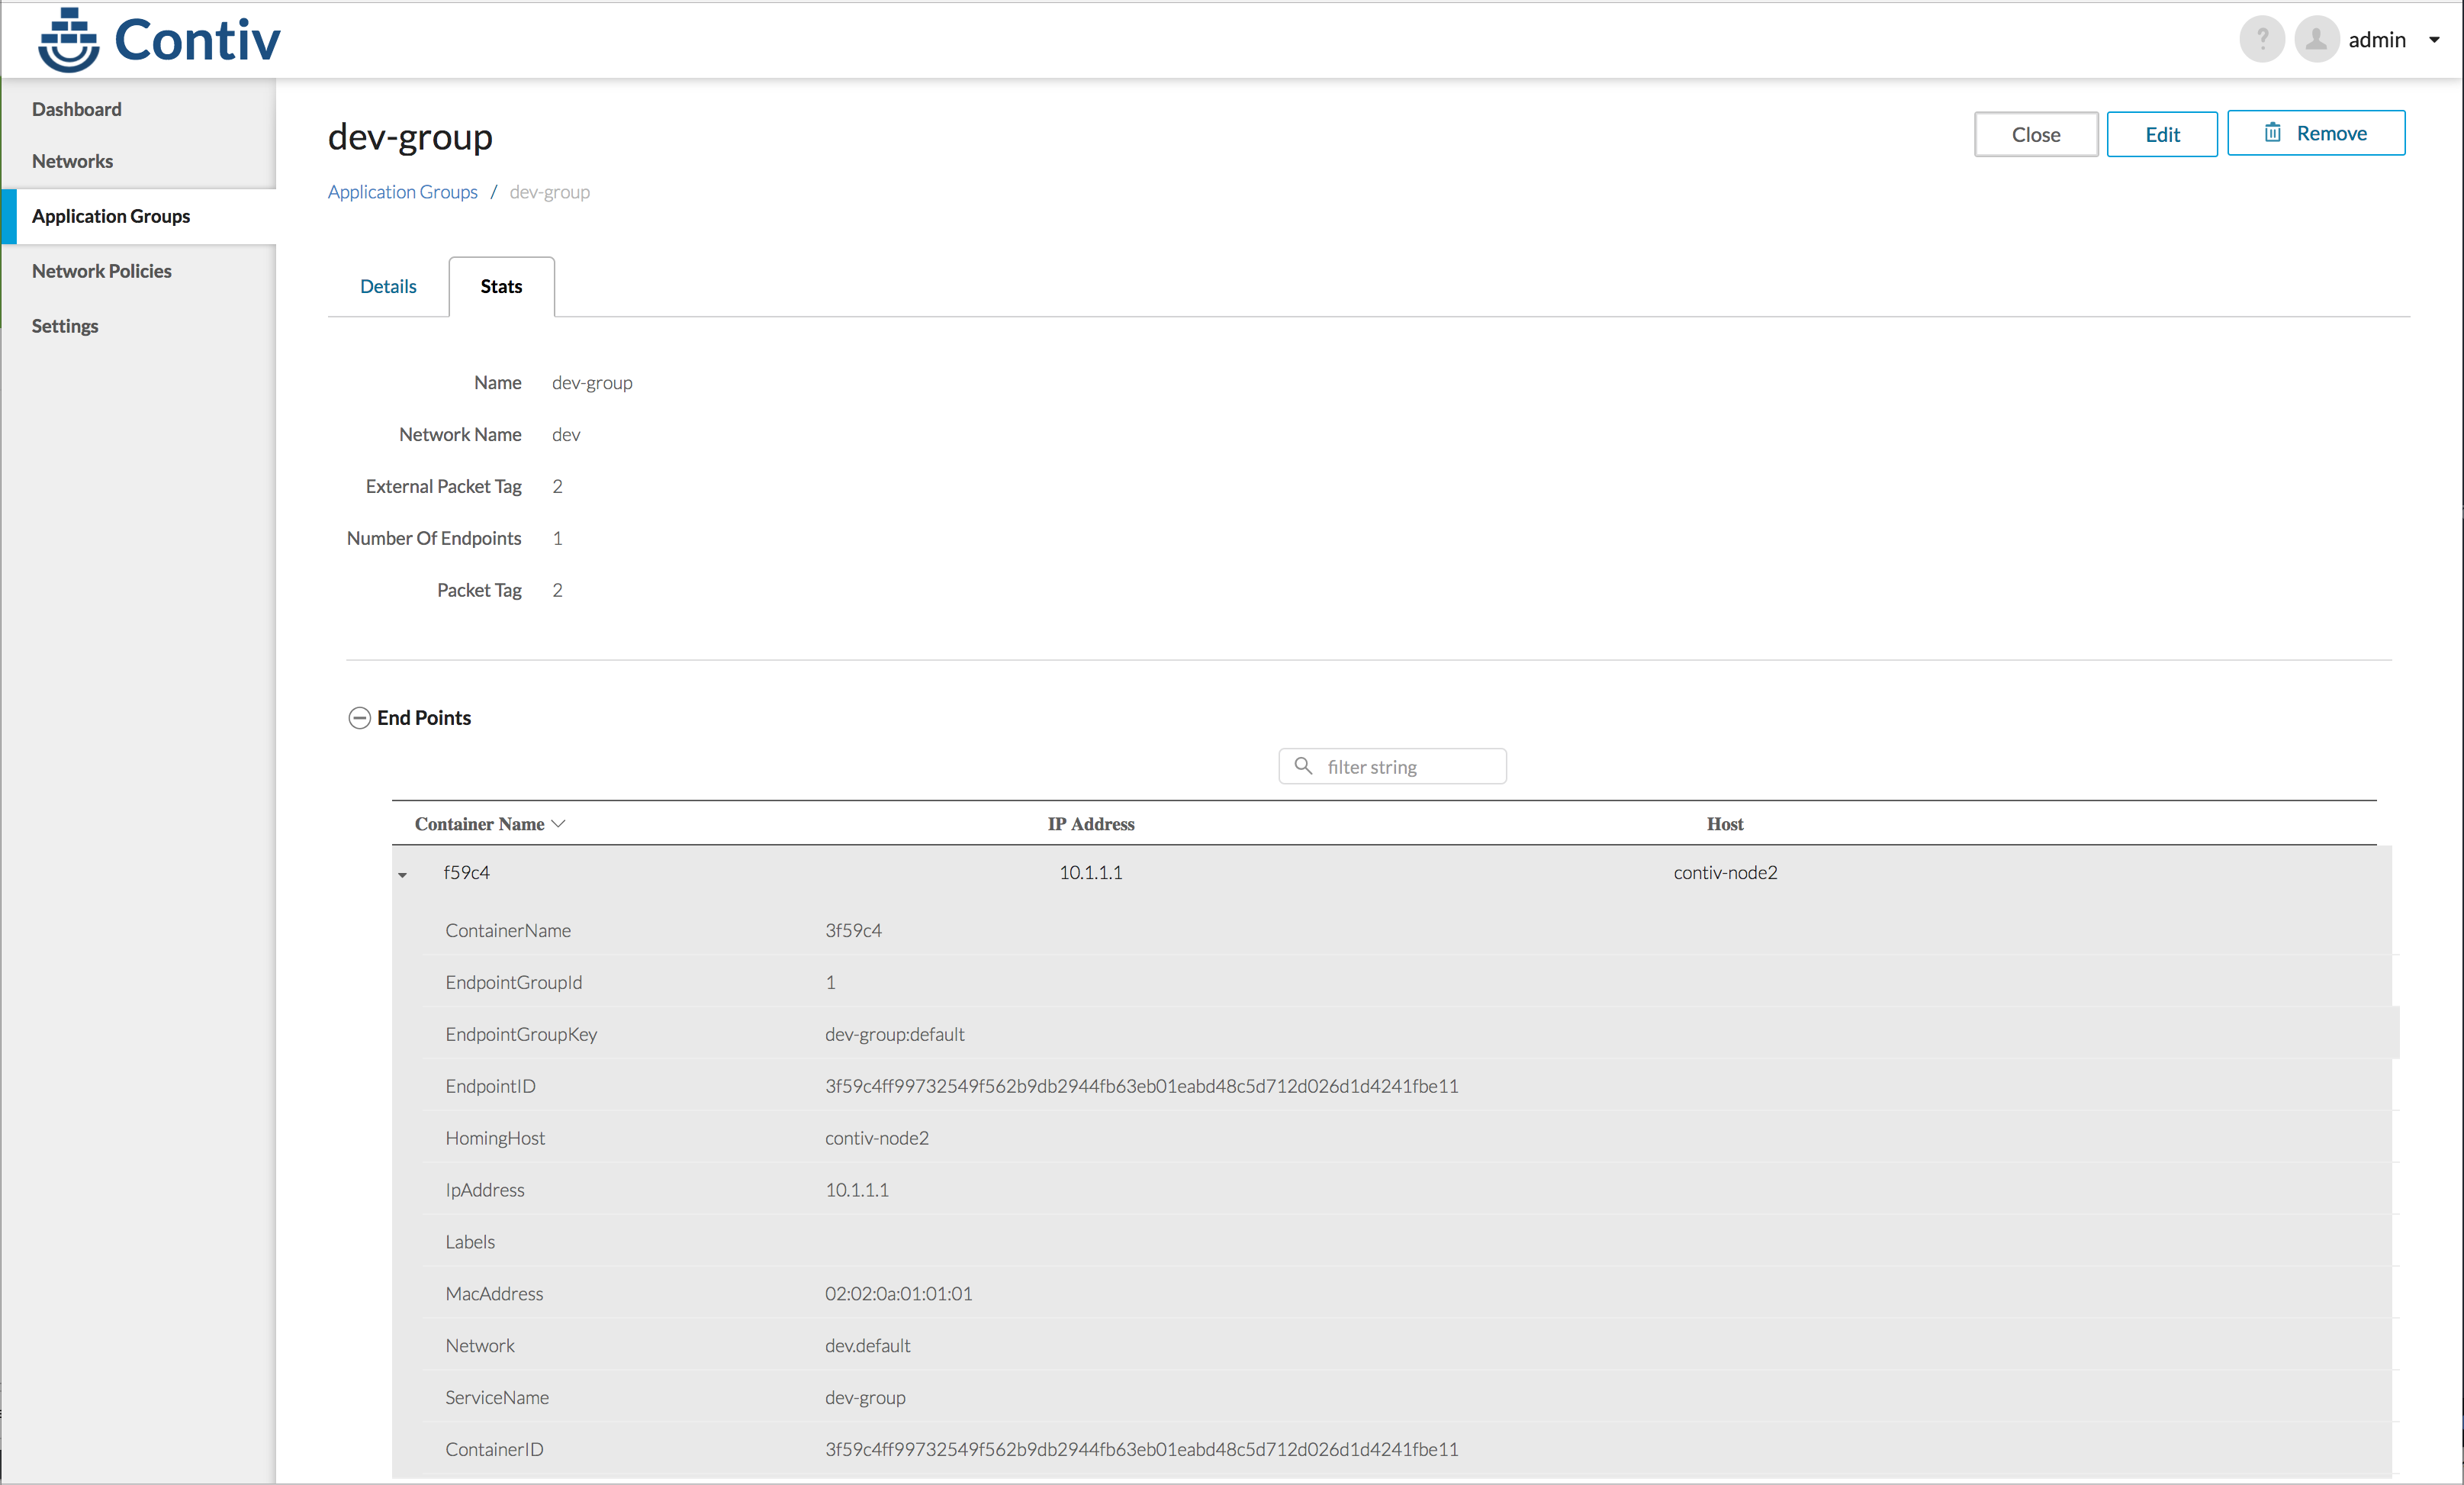
[vagrant@contiv-node1 ~]$ netctl ep inspect busybox-poc-net
Inspecting endpoint: busybox-poc-net
{
  "Oper": {
    "containerName": "busybox-poc-net",
    "endpointGroupId": 1,
    "endpointGroupKey": "dev-group:default",
    "endpointID": "3f59c4ff99732549f562b9db2944fb63eb01eabd48c5d712d026d1d4241fbe11",
    "homingHost": "contiv-node2",
    "ipAddress": [
      "10.1.1.1",
      ""
      ],
      "labels": "map[]",
      "macAddress": "02:02:0a:01:01:01",
      "network": "dev.default",
      "serviceName": "dev-group"
    }
}
[vagrant@contiv-node1 ~]$
作成された、busybox-poc-net というインスタンスが、network=dev の 10.1.1.1 のアドレスを持っていること、dev-group というグループに所属していることがわかります。実際にログインしてみます
[vagrant@contiv-node1 ~]$ kubectl exec -it busybox-poc-net /bin/sh
/ #
/ #
/ # ifconfig
eth0      Link encap:Ethernet  HWaddr 02:02:0A:01:01:01
          inet addr:10.1.1.1  Bcast:0.0.0.0  Mask:255.255.255.0
          inet6 addr: fe80::2:aff:fe01:101/64 Scope:Link
          UP BROADCAST RUNNING MULTICAST  MTU:1450  Metric:1
          RX packets:8 errors:0 dropped:0 overruns:0 frame:0
          TX packets:8 errors:0 dropped:0 overruns:0 carrier:0
          collisions:0 txqueuelen:0
          RX bytes:648 (648.0 B)  TX bytes:648 (648.0 B)

host1     Link encap:Ethernet  HWaddr 02:02:AC:13:00:01
          inet addr:172.19.0.1  Bcast:0.0.0.0  Mask:255.255.0.0
          inet6 addr: fe80::2:acff:fe13:1/64 Scope:Link
          UP BROADCAST RUNNING MULTICAST  MTU:1500  Metric:1
          RX packets:8 errors:0 dropped:0 overruns:0 frame:0
          TX packets:8 errors:0 dropped:0 overruns:0 carrier:0
          collisions:0 txqueuelen:0
          RX bytes:648 (648.0 B)  TX bytes:648 (648.0 B)

 lo        Link encap:Local Loopback
          inet addr:127.0.0.1  Mask:255.0.0.0
          inet6 addr: ::1/128 Scope:Host
          UP LOOPBACK RUNNING  MTU:65536  Metric:1
          RX packets:0 errors:0 dropped:0 overruns:0 frame:0
          TX packets:0 errors:0 dropped:0 overruns:0 carrier:0
          collisions:0 txqueuelen:1
          RX bytes:0 (0.0 B)  TX bytes:0 (0.0 B)

/ #
10.1.1.1 を持っていることがわかります。GUIでも確認できます。
環境の削除
cluster ディレクトリ配下で下記のコマンドを実行することで、環境を削除できます。
$ CONTIV_KUBEADM=1 vagrant destroy -f
まとめ
このような形で、Contiv を使うと、コンテナネットワークに対して簡単に柔軟なポリシーを適用することができます。
運用者は、これまでの仮想マシンやベアメタルサーバーで提供していたポリシーをコンテナにまたがって適用することが可能になります。
参考
- Contiv.io http://contiv.github.io/
- Github https://github.com/contiv
- https://github.com/contiv/install/blob/master/QUICKSTART.md
- Cisco Live Berlin 2017 資料(無料アカウント作成が必要)
- BRKDCT-2023 - Container Networking - Deep dive into Project Contiv (2017 Berlin)
https://www.ciscolive.com/online/connect/sessionDetail.ww?SESSION_ID=94384&backBtn=true#.WMfGCcUlJHI.link