はじめに
本記事はNutanixアドベントカレンダー2020の12/2分記事となります。
概要
Nutanixは2020年9月、Karbon Platform Services(KPS)を発表しました。これはKubernetesをベースとしたマルチクラウドPaaSを実現するものです。プレスリリースと製品紹介は以下をご覧ください。
プレスリリース
Karbon Platform Services製品紹介ページ
本記事では
前編でサービスドメインと呼ばれるKubernetesクラスタの構築、後編でマイクロサービスアプリケーションを構築しました。本記事ではKPSの機能群を駆使し、簡単なAI推論アプリケーションを構築します。こちらのGithubレポジトリのガイドに沿って進めていきます。
アプリケーションデザイン
構築するアプリケーションについて説明します。ある画像のデータソースをKPSに入力し、KPS内で管理されたTensorflowモデルに掛け、推論結果を出力するというものです。
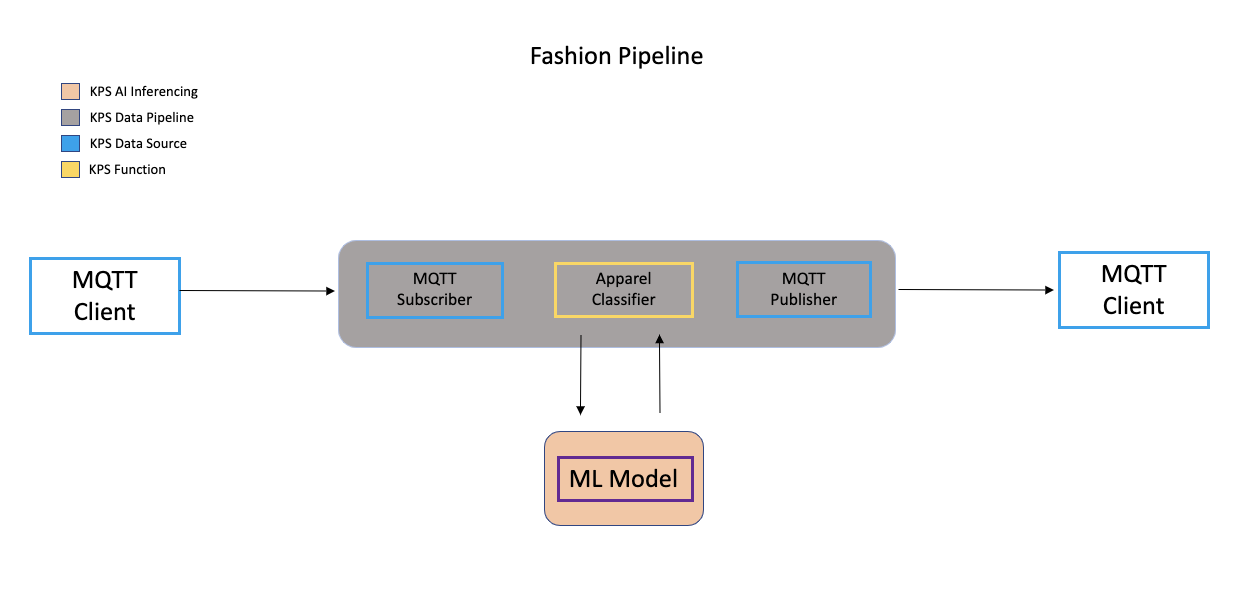
主なコンポーネントと使用する機能は以下です。
MQTT Client: ファッションアイテムの画像データを入力し、推論結果を受け取るMQTTクライアントのアプリケーションです。あなたのローカル環境(著者はMacOS Catalina環境にて実施)上にPythonスクリプトとして構築します。
MQTT Subscriber/Publisher: KPSのサービスドメインがビルトインで備えるMQTTの入力/出力のためのコンポーネントです。KPS上でデータソースとして設定します。
Apparel Classifier: 入力されたファッションアイテムを識別するためのPython関数です。KPSのデータパイプライン上にFunction as a Service(FaaS)機能を用いて実装します。
ML Model: 入力されたファッションアイテムを識別するために推論を行うTensorflowベースの機械学習モデルです。KPS上でAI Inference機能を用いて実装します。
構築手順
1. ローカル環境のセットアップ
1-1. Githubリポジトリのクローン
KPSのGithubリポジトリをクローンし、プロジェクトのディレクトリ(以下作業ディレクトリと記載します)に移動します。
git clone https://github.com/nutanix/karbon-platform-services.git
cd karbon-platform-services/projects/ai-inference
1-2. Pythonモジュールのインストール
本ガイドの実行にはPython3(筆者は3.6.1のpyenv環境にて実施)といくつかのPythonライブラリが必要となります。以下を実行します。
pip3 install -r requirements.txt
2. MQTTデータソースの設定
このセクションではKPSおよびローカル環境においてMQTTデータソース、MQTTクライアントの設定を行います。
2-1. KPSへのアクセス
こちらにアクセスし、My Nutanixアカウントでログインします。
2-2. カテゴリの作成
Administration - Categoriesに進み、"+Create"をクリックした後、以下を入力して"Update"をクリックします。
Name: MQTT
Values: ByteArray
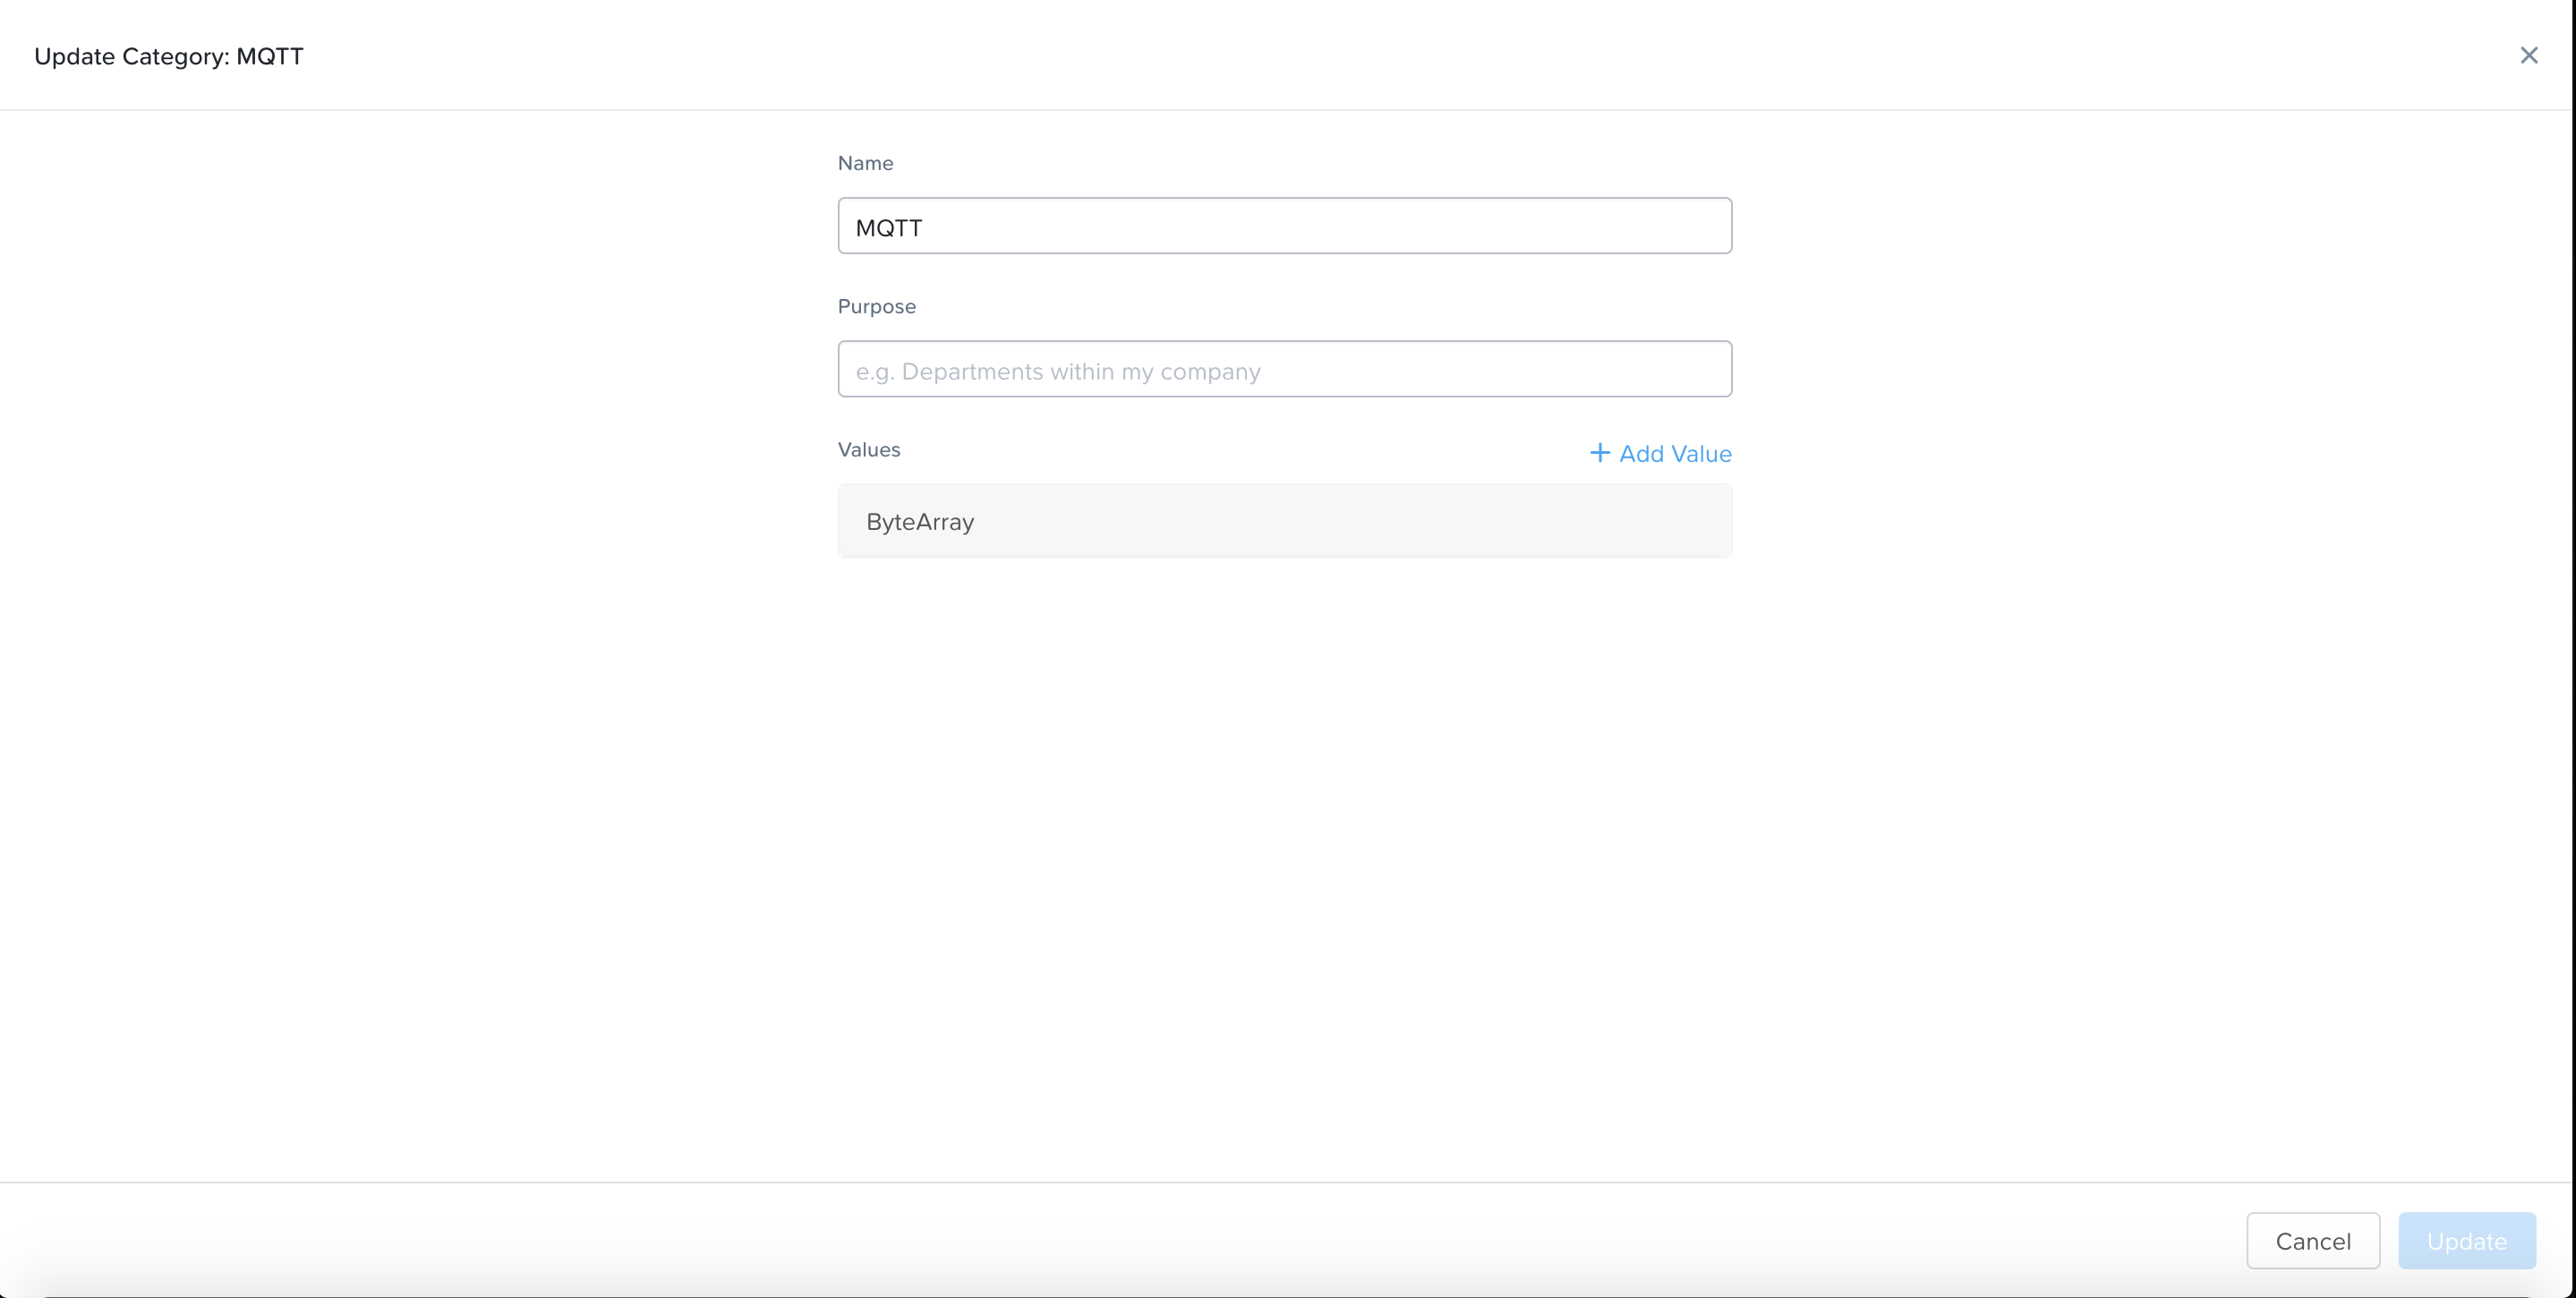
KPSはこのカテゴリを各種リソースに属性情報として付与することでスケーラブルな運用管理を可能としています。
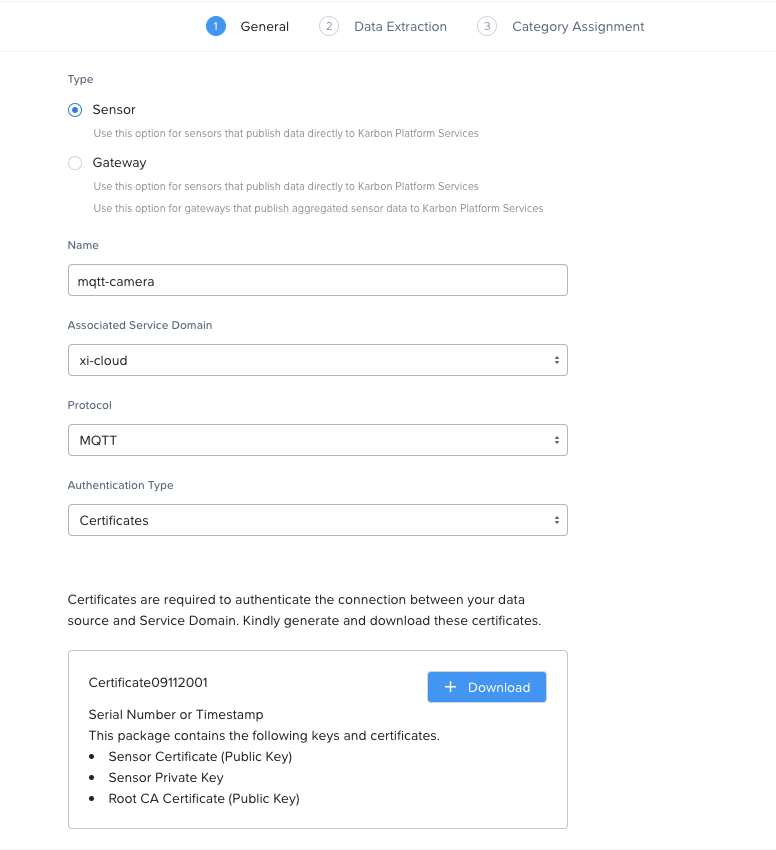
2-3. データソースの作成
Infrastructure - Data Sources and IoT Sensorsに進み、"+Add Data Source"をクリックします。以下入力します。
Type: Sensor
Name: mqtt-camera
Associated Service Domain: あなたのサービスドメイン
Protocol: MQTT
Authentication: Certificates
"+Generate Certificates"をクリックし、"+Download"をクリックして認証情報をダウンロードします。
また、各ファイルを以下のように名前変更し、作業ディレクトリ配下のcertsディレクトリ内に配置します。
xxxxxxxxxxxxx_CACertificate.crt --> ca.crt
xxxxxxxxxxxxx_certificate.crt --> client.crt
xxxxxxxxxxxxx_privateKey.key --> client.key
mkdir certs/
mv ca.crt client.crt client.key certs/
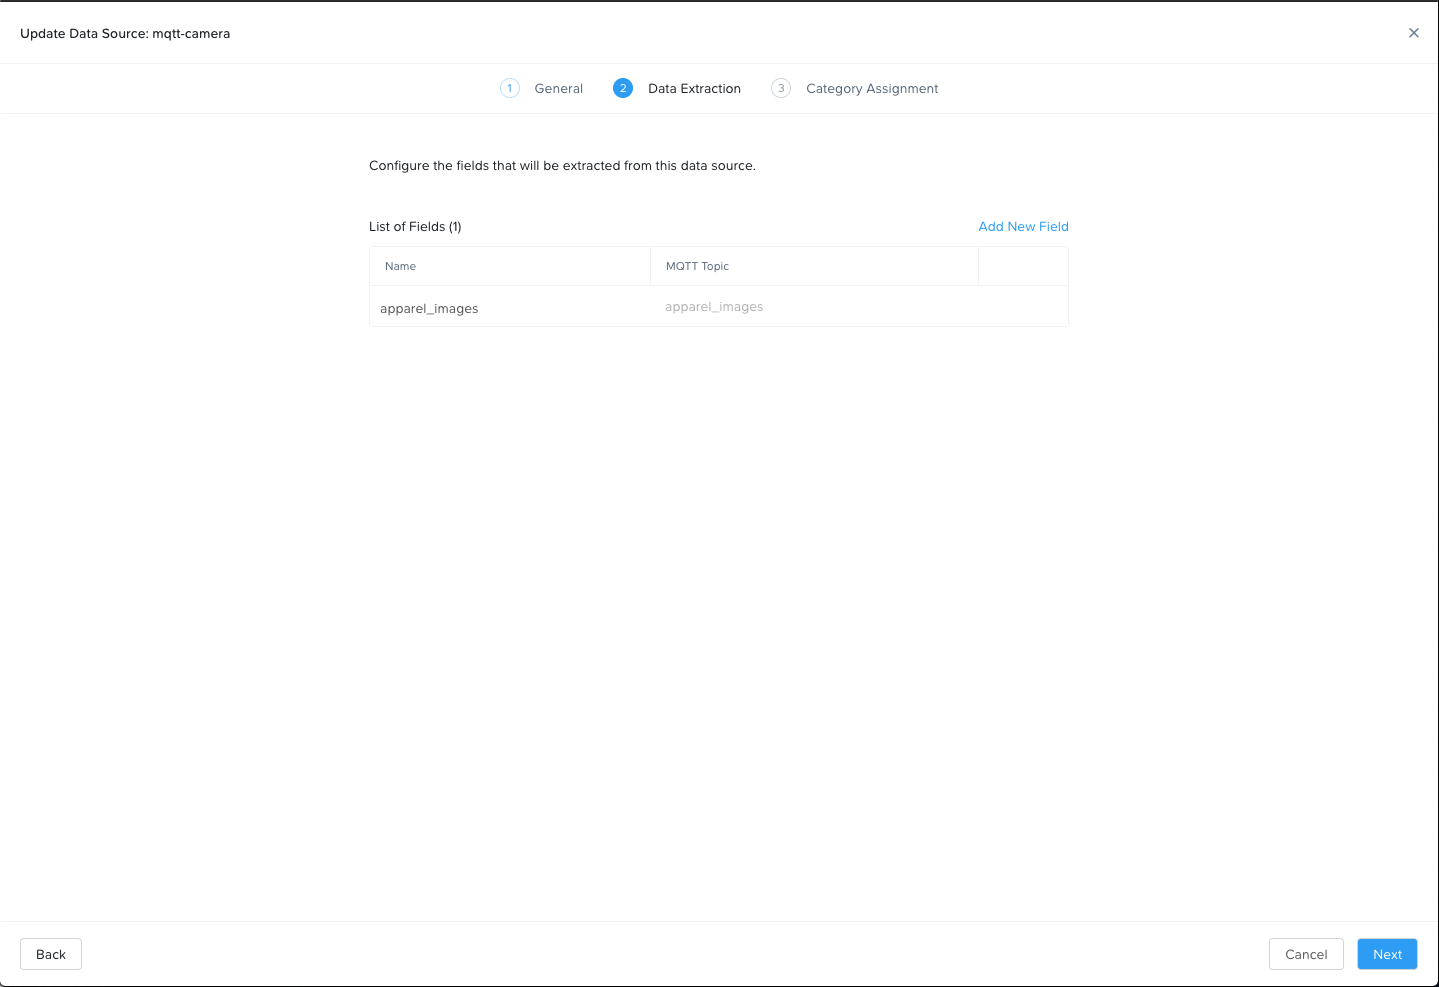
"Next"をクリックし、"Add New Field"をクリックした後、以下入力します。
Name: apparel_images
MQTT Topic: apparel_images
"Next"をクリックし、以下入力し、"Add"をクリックします。
Attribute: MQTT ByteArrayをそれぞれドロップダウンから選択
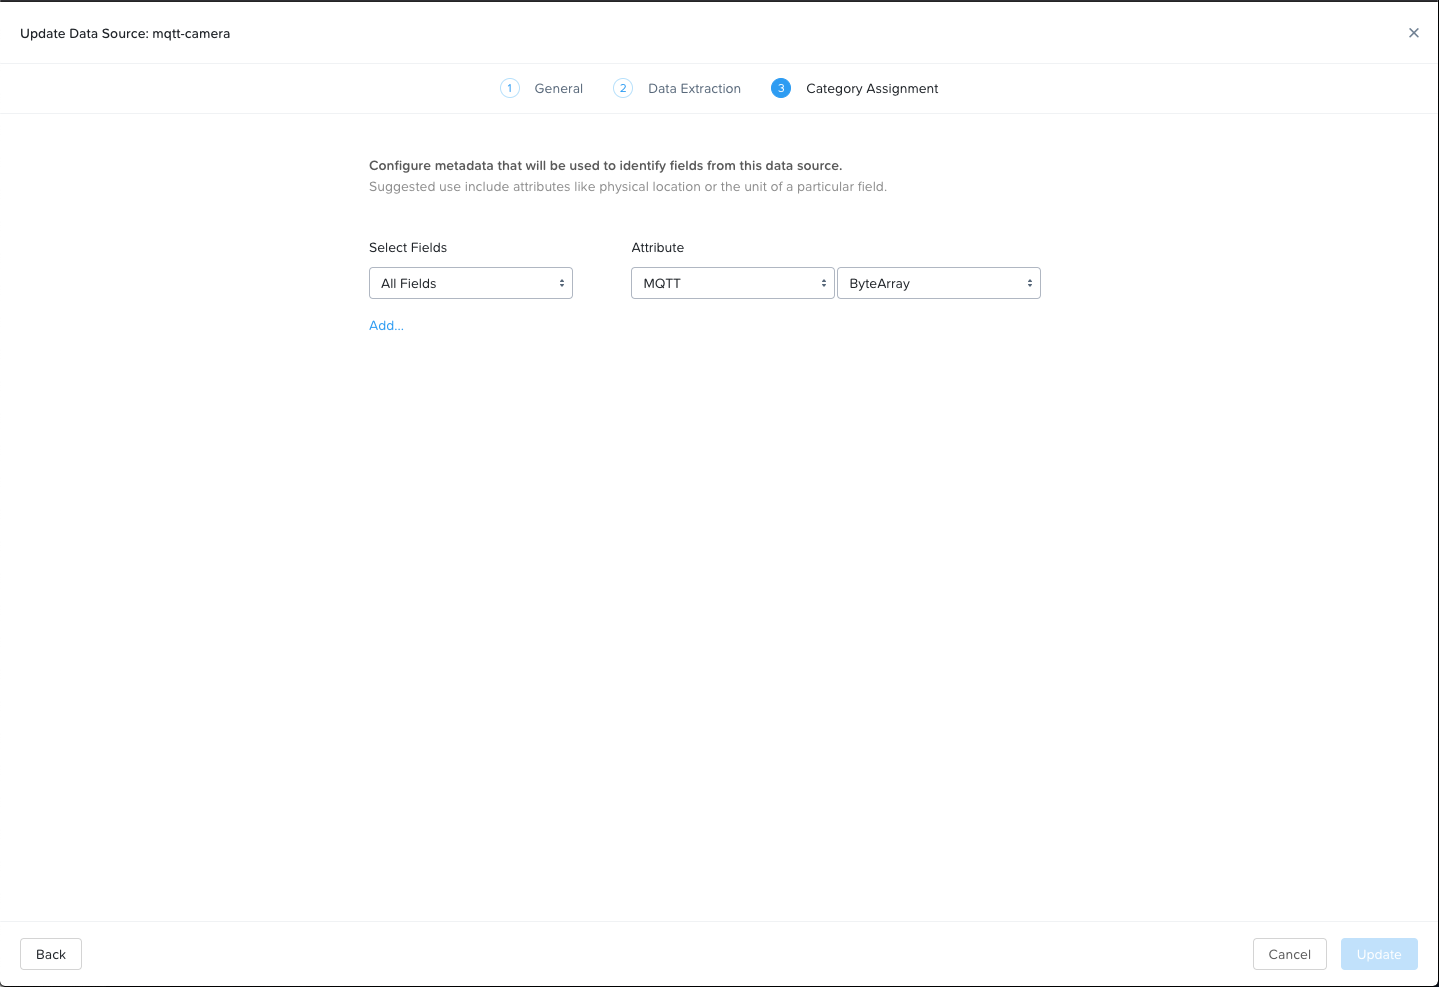
以上によりKPS側でMQTTデータを受け取る準備が出来ました。
2-4. MQTTクライアントの作成
本ガイドでは以下PythonコードによるMQTTクライアントを使用します。あなたのサービスドメインのIPアドレス部分を環境に合わせてチューニングして下さい。
このクライアントはKeras Fashion MNIST datasetを用いてMQTTデータソースの指定したトピックに画像データを送信します。
import ssl
import time
import random
import msgpack
from tensorflow import keras
import paho.mqtt.client as mqttClient


def on_connect(client, userdata, flags, rc):
	if rc == 0:
		print("Connected to broker")
		global Connected                #Use global variable
		Connected = True                #Signal connection
	else:
		print("Connection failed")

def on_publish(client, userdata, result):
	print("Published!")

def on_message(client, userdata, message):
    print("New message received!")
    print("Topic:", message.topic)
    print("Message:", message.payload)


def main():
	global Connected
	Connected = False
	# IP address of the edge. Modify this.
	broker_address= "あなたのサービスドメインのIPアドレス"
	port = 1883
	# NOTE: For data pipelines to receive MQTT messages, topic should
	#       be the same as that specified when creating the MQTT datasource.
	input_topic = "apparel_images"
	output_topic = "apparel-predict"
	client = mqttClient.Client()
	# Set callbacks for connection event, publish event and message receive event
	client.on_connect = on_connect
	client.on_publish = on_publish
	client.on_message = on_message
	client.tls_set(ca_certs="certs/ca.crt", certfile="certs/client.crt", keyfile="certs/client.key", cert_reqs=ssl.CERT_REQUIRED, tls_version=ssl.PROTOCOL_TLSv1_2, ciphers=None)
	# Set this to ignore hostname only. TLS is still valid with this setting.
	client.tls_insecure_set(True)
	client.connect(broker_address, port=port)
	client.subscribe(output_topic)
	client.loop_start()

	# Wait for connection
	while Connected != True:
		print("Connecting...")
		time.sleep(1)

	fashion_mnist = keras.datasets.fashion_mnist
	(images, image_labels), (test, labels) = fashion_mnist.load_data()

	# scale the values to 0.0 to 1.0
	images = images / 255.0
	# reshape for feeding into the model
	images = images.reshape(images.shape[0], 28, 28, 1)

	for i in range(10):
		print(f'\nCounter: {i+1}')
		img = random.choice(images)
		print(img.shape)
		payload ={}
		payload['image'] = img.tolist()
		payload['dtype'] = str(images.dtype)
		payload['height'] = 28
		payload['width'] = 28
		try:
			client.publish(input_topic, msgpack.packb(payload))
			time.sleep(5)
		except KeyboardInterrupt:
			client.disconnect()
			client.loop_stop()

if __name__ == "__main__":
	 main()
これによりローカル環境からMQTTデータを送信し、推論結果を受け取る準備ができました。
3. 機械学習モデル(MLモデル)の構築
このセクションではKPSのAI Inferencing Serviceを用いてMLモデルをKPSにデプロイします。AI Inferencing ServiceではMLモデルのバージョン管理およびAI推論ランタイム(GPU等のハードウェアアクセラレータを抽象化したもの)提供を行います。本ガイドではTensorflowのフレームワークを用いたシンプルなMLモデルを構築し、KPSに登録します。ローカル環境で行いますが、GPUは不要です。
3-1. プロジェクトの作成
今回のアプリケーションをデプロイするアプリケーションを作成します。こちらの"1. プロジェクトの設定"を参考に作成します。ただし、このプロジェクトで有効化するプラットフォーム機能については
AI Inferencing Serviceはデフォルトで有効化されており、かつTraefik/Istio/Kafka/Prometheusの有効化は不要です。
3-2. TensorflowのMLモデルの構築
以下のPythonスクリプトにより機械学習モデルを構築します。このスクリプトでは主に以下2つのタスクを行っています。
- 異なるカテゴリのファッションアイテムの画像を識別するための畳み込みニューラルネットワークを訓練する
- TensorflowのSavedModelフォーマットでモデルを保存する
import tensorflow as tf
from tensorflow import keras

# Helper library
import numpy as np

# dataset used to train model
fashion_mnist = keras.datasets.fashion_mnist
(train_images, train_labels), (test_images, test_labels) = fashion_mnist.load_data()

# scale the values to 0.0 to 1.0
train_images = train_images / 255.0
test_images = test_images / 255.0

# reshape for feeding into the model
train_images = train_images.reshape(train_images.shape[0], 28, 28, 1)
test_images = test_images.reshape(test_images.shape[0], 28, 28, 1)

# class labels
class_names = ['T-shirt/top', 'Trouser', 'Pullover', 'Dress', 'Coat',
               'Sandal', 'Shirt', 'Sneaker', 'Bag', 'Ankle boot']

print('\ntrain_images.shape: {}, of {}'.format(train_images.shape, train_images.dtype))
print('test_images.shape: {}, of {}'.format(test_images.shape, test_images.dtype))

# neural network architecture
model = keras.Sequential([
  keras.layers.Conv2D(input_shape=(28,28,1), filters=8, kernel_size=3,
                      strides=2, activation='relu', name='Conv1'),
  keras.layers.Flatten(),
  keras.layers.Dense(10, activation=tf.nn.softmax, name='Softmax')
])
model.summary()

testing = False
epochs = 5

model.compile(optimizer='adam',
              loss='sparse_categorical_crossentropy',
              metrics=['accuracy'])
model.fit(train_images, train_labels, epochs=epochs)

test_loss, test_acc = model.evaluate(test_images, test_labels)
print('\nTest accuracy: {}'.format(test_acc))

tf.saved_model.save(model, 'fashion_classifier')
print('\nSaved model:')
作業ディレクトリにてこちらのPythonスクリプトを実行します。
python3 model_trainer.py
作業ディレクトリ配下にfashion_classifierディレクトリが作成されます。この中に構築されたMLモデルが格納されています。これをzipで固めます。Githubレポジトリに既にあるfashion_classifier.zipについては不要のため削除しています。
rm fashion_classifier.zip
zip -r fashion_classifier.zip fashion_classifier/saved_model.pb fashion_classifier/variables/
3-3. MLモデルの登録
左上のドロップダウンメニューから3-1で作成したプロジェクトに移動します。左側のナビゲーションペインからAI Inferenceをクリックします。
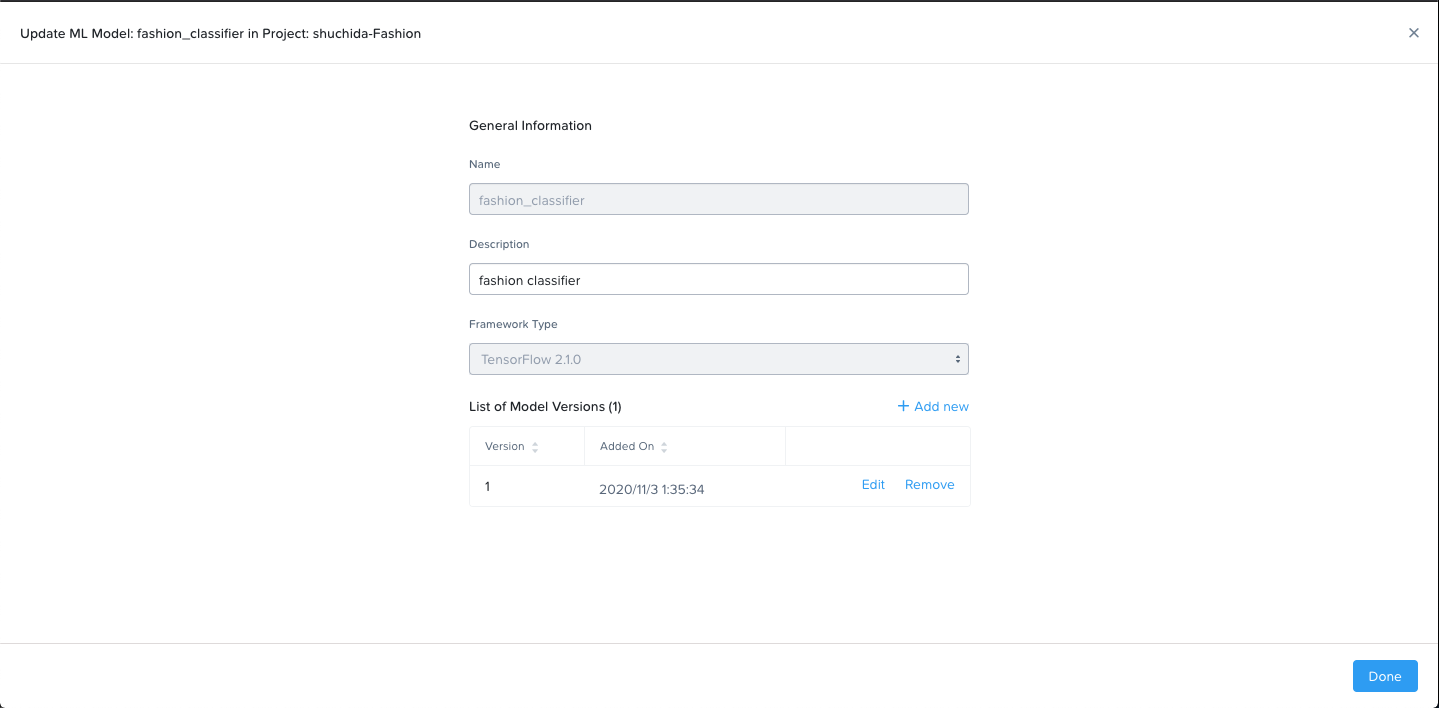
以下を入力し、"+Add Version"をクリックします。
Name: fashion_classifier
Description: 任意の情報を入力
Framework Type: Tensorflow 2.1.0
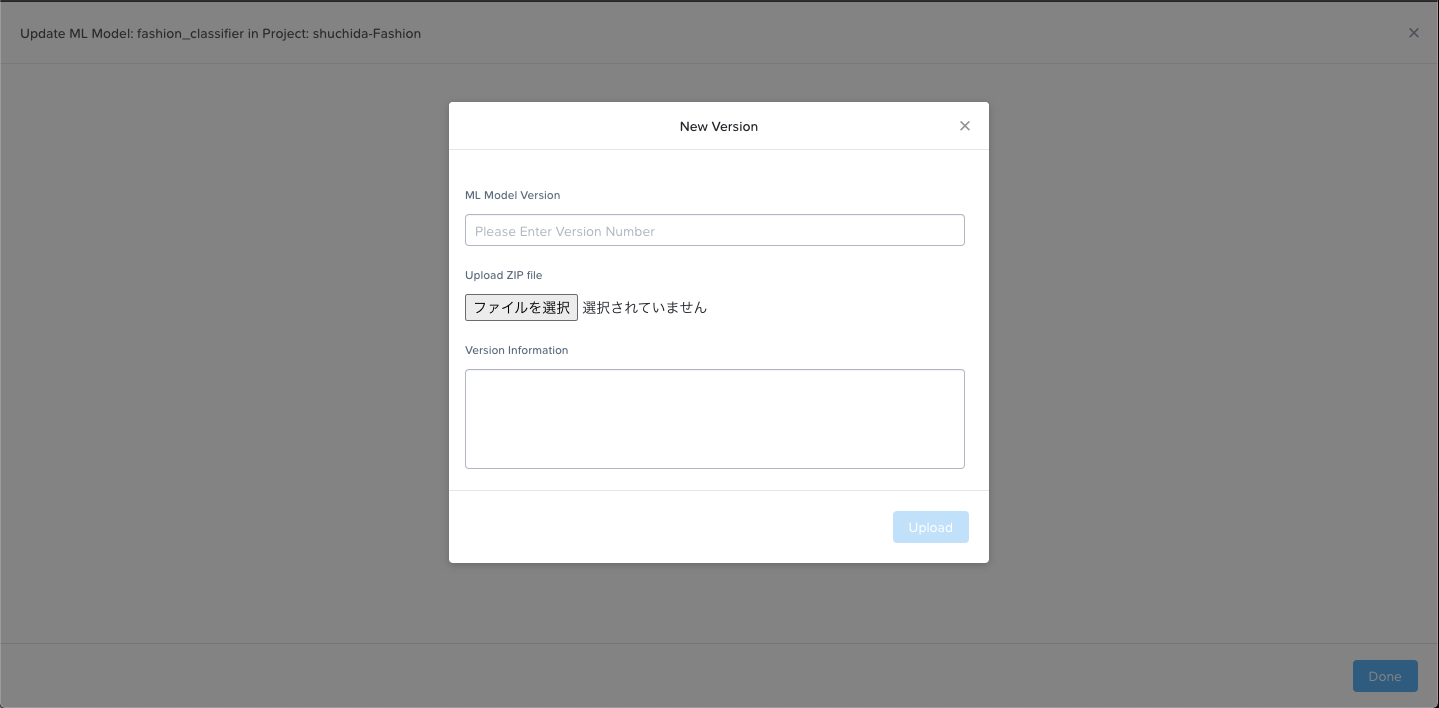
以下入力します。
ML Model Version: 1
"ファイルを選択"した上で、3-2で作成したfashion_classifier.zipを選択します。
"Upload"をクリックし、モデルのアップロードが終わったら"Done"をクリックします。
以上で、MLモデルのローカル環境での構築、KPSへの登録が完了しました。
4. データパイプラインの作成
最後のステップです。KPSにおいてETL処理を行うFunction as a Serviceとデータパイプラインの作成を行います。
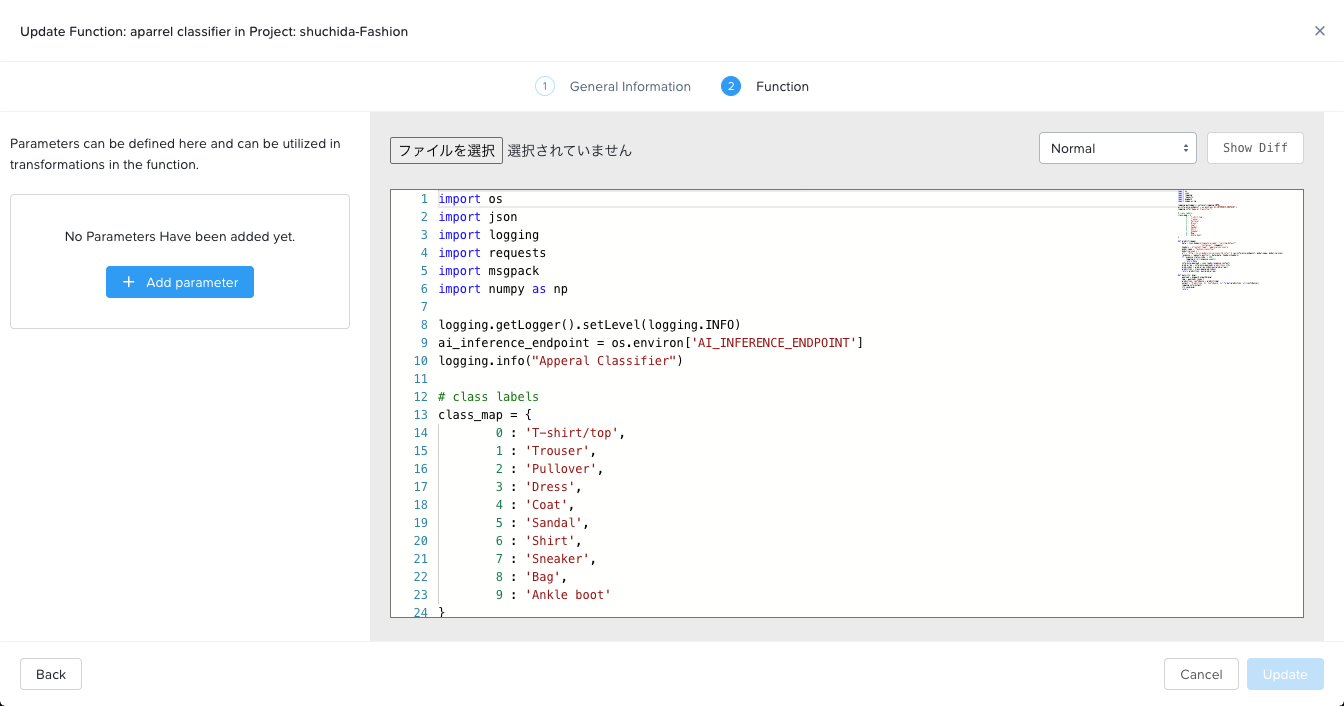
4-1. ファンクションの登録
Function as a Service機能ではPython, Go, Node.jsのようなデータ処理言語が使用できます。本ガイドでは以下のPythonスクリプトを登録します。このスクリプトは以下のタスクを行っています。
- MQTTデータソースからの入力を取得
- インプット画像に対する推論を行う
- 識別されたクラスと自信度をログする
- MQTTトピックにメッセージをPublishする
import os
import json
import logging
import requests
import msgpack
import numpy as np

logging.getLogger().setLevel(logging.INFO)
ai_inference_endpoint = os.environ['AI_INFERENCE_ENDPOINT']
logging.info("Apperal Classifier")

# class labels
class_map = {
        0 : 'T-shirt/top',
        1 : 'Trouser',
        2 : 'Pullover',
        3 : 'Dress',
        4 : 'Coat',
        5 : 'Sandal',
        6 : 'Shirt',
        7 : 'Sneaker',
        8 : 'Bag',
        9 : 'Ankle boot'
}

def predict(image):
    data = json.dumps({"signature_name": "serving_default",
                       "instances": [image]})
    headers = {"content-type": "application/json"}
    model_name = "fashion_classifier"
    model_version = 1
    url = "http://%s/v1/models/%s/versions/%d:infer" % (ai_inference_endpoint, model_name, model_version)
    response = requests.post(url, data=data, headers=headers)
    if response.status_code != 200:
        logging.error(response.json())
        return None
    inference_payload = json.loads(response.content)
    pred_array = inference_payload['predictions'][0]
    pred_index = pred_array.index(max(pred_array))
    prediction = class_map[pred_index]
    return prediction, max(pred_array)

def main(ctx, msg):
	payload = msgpack.unpackb(msg)
	img = payload['image']
	prediction, confidence = predict(img)
	output = "Prediction: {}, Confidence: {}".format(prediction, str(confidence))
	logging.info(output)
	ctx.send(msg)
	return
Pythonスクリプトの以下部分に注目で、本部分により3で登録したAI Inferencing機能のfashion_classifierというMLモデルのバージョン1を参照することになります。
ai_inference_endpoint = os.environ['AI_INFERENCE_ENDPOINT']
model_name = "fashion_classifier"
model_version = 1
url = "http://%s/v1/models/%s/versions/%d:infer" % (ai_inference_endpoint, model_name, model_version)
左側のナビゲーションペインからFunctions and Data Pipelinesをクリックし、画面上部のタブからFunctionsをクリックします。
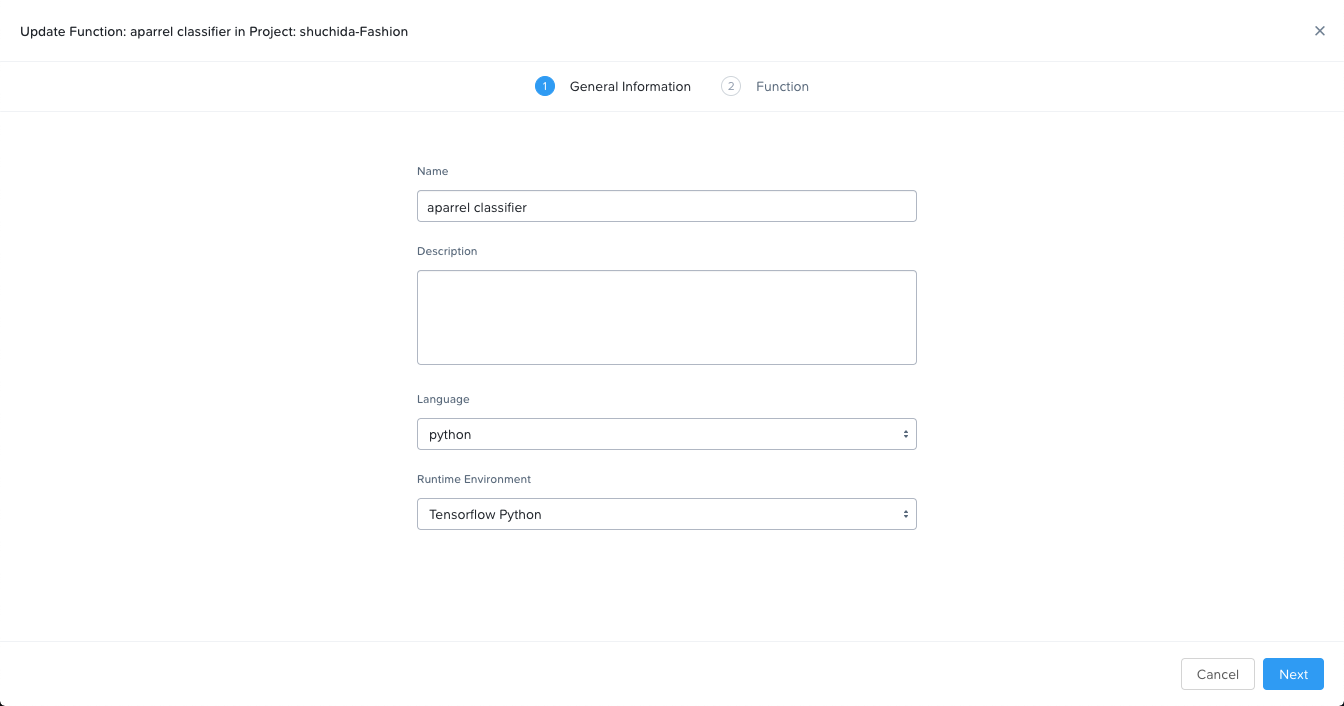
"+Create"をクリックし、以下入力し、"Next"をクリックします。
Name: apparel classifier
Language: python
Runtime Environment: Tensorflow Python
"ファイルを選択"し、作業ディレクトリにあるapparel_classifier.pyを選択し、"Create"をクリックします。
4-2. データパイプラインの登録
画面上部のタブからData Pipelinesをクリックし、"+Create"をクリックします。
以下入力し、"+Create"をクリックします。
Data Pipeline Name: fashion-pipeline
Input:
- Data Sourceを選択
-
Select by Categories: MQTT:ByteArray
Transformation: apparel classifier
Output: - Destination: Service Domain
- Endpoint Type: MQTT
- Endpoint Name: apparel-predict
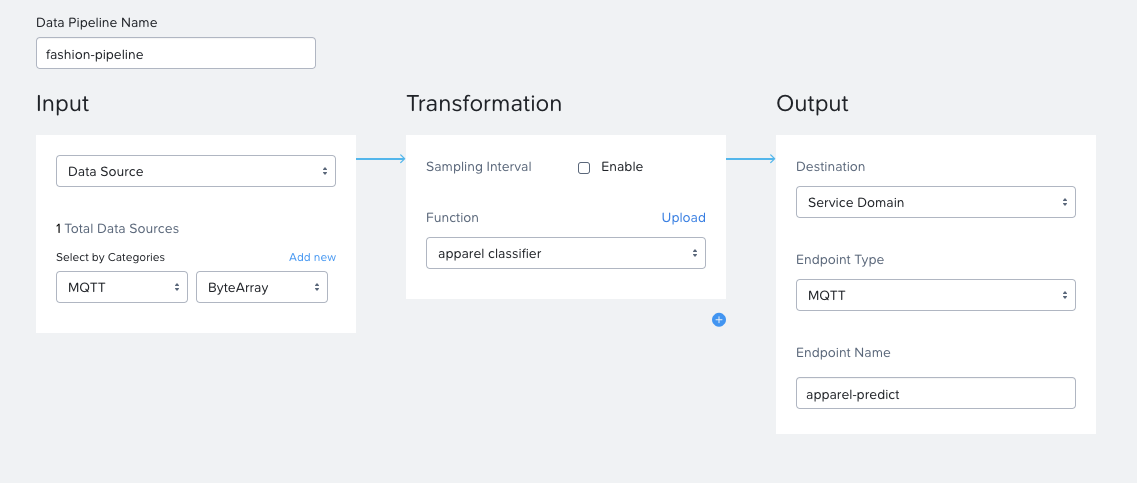
これでデータソース、MLモデル、Function、データパイプラインが作成され、すべてがKPSのサービスドメインにコンテナとしてデプロイされています。
5. 試してみる
ローカル環境からmqtt_client.pyを実行し、KPSへのMQTTデータの送信と、推論結果の受信を行います。
python mqtt_client.py
以下のような出力が得られれば期待通りの結果となります。Messageとして推論結果と自信度が得られていることが分かります。
Connecting...
Connected to broker

Counter: 1
(28, 28, 1)
Published!
New message received!
Topic: apparel-predict
Message: b'Prediction: Sandal, Confidence: 0.96976918'

Counter: 2
(28, 28, 1)
Published!
New message received!
Topic: apparel-predict
Message: b'Prediction: Shirt, Confidence: 0.539910078'

Counter: 3
(28, 28, 1)
Published!
New message received!
Topic: apparel-predict
Message: b'Prediction: Dress, Confidence: 0.873085737'
まとめ
Karbon Platform Services(KPS)の得意分野であるデータパイプラインやFaaS、AI機能についてご紹介しました。各種ユーティリティを各自で構築することなく、サービスとして利用することでアプリケーション開発における生産性の向上、サービス開発の迅速化を実現します。