JavaScriptを用いて要素のサイズ、座標を取得してツールチップを実装してみます。
この記事は、下記の記事の続編にあたります。
【JavaScript】サイズ・座標 取得チートシート(Chrome)
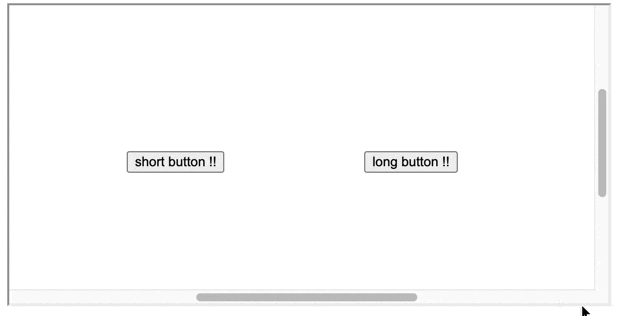
ツールチップの仕様
2種類のボタンがあり、それぞれのボタンの上にマウスカーソルが乗った場合に、上部中央(以下「基本位置」)に、あらかじめ設定しておいたメッセージを出現させます。
ただし、上部にツールチップが収まるスペースがない場合は下部に表示させます。

また、ボタン中央に合わせて配置するスペースが左右にない場合は、それぞれのフチに合わせます。

まずはページの大枠を作ります。
<!DOCTYPE HTML>
<html>

<body>
  <iframe id="flame" src="./ifame.htm"></iframe>
  <!-- 表示箇所はiflameで表示。 -->
</body>

<style>
  body {
    margin: 10px;
  }

  #flame {
    width: 600px;
    height: 300px;
  }
</style>

</html>
<!DOCTYPE html>
<html lang="en">

<head>
  <meta charset="UTF-8">
  <meta http-equiv="X-UA-Compatible" content="IE=edge">
  <meta name="viewport" content="width=device-width, initial-scale=1.0">
  <title>Document</title>
</head>

<body>
  <div id="inner">
    <button class="btn" data-tooltip="sbtn">short button !!</button>
    <button class="btn" data-tooltip="long message tooltip long message tooltip">long button !!</button>
  </div>
  <script>
    let tooltipElem; //作成されたツールチップ要素

    function createTooltip() {}; //ツールチップを作成する関数

    function setTop() {}; //ツールチップのtopを決定する関数

    function setLeft() {}; //ツールチップのleftを決定する関数

    document.addEventListener("mouseover", () => {}); //mouseoverイベントで発火

    document.addEventListener('mouseout',() => {}); //mouseoutイベントで発火

  </script>
</body>

<style>
  body {
    width: 585px;
    height: 300px;
  }

  .tooltip {
    position: fixed;
    padding: 3px;
    border: 1px solid #b3c9ce;
    border-radius: 4px;
    text-align: center;
    color: #333;
    background: #fff;
    box-shadow: 3px 3px 3px rgba(0, 0, 0, .3);
  }

  #inner {
    width: 1500px;
    height: 700px;
    display: flex;
    justify-content: center;
    align-items: center;
  }

  .btn {
    margin: 70px;
  }
</style>

</html>
基本位置(垂直方向)にツールチップを出現させる実装。
マウスカーソルがボタン上に来た場合にツールチップを基本位置(垂直方向)に表示させる実装を行います。
ツールチップの位置を決定するにはツールチップに指定するべきtopを計算する必要があります。
topは以下図で計算すると取得することがでます。
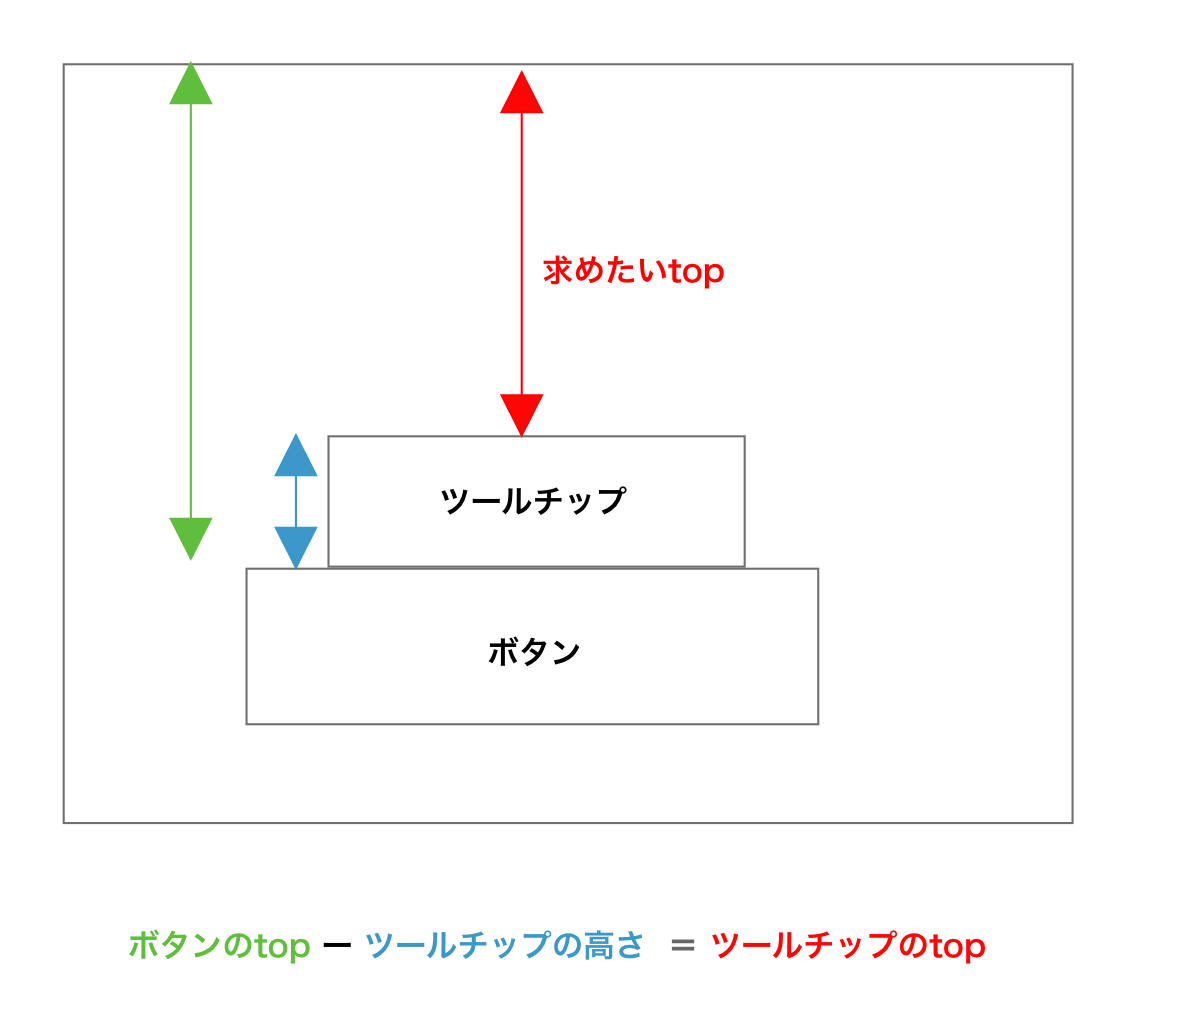
注 : DOMRectは実際の可視範囲ではなくiflame枠組みからの距離を取ります。
  <script>
    let tooltipElem;

-   function createTooltip(message) {};
    function createTooltip(message) {
      tooltipElem = document.createElement('div');
      tooltipElem.innerText = message;
      // ボタン要素のdata-tooltipをテキストにする。
      tooltipElem.className = "tooltip"
      document.body.append(tooltipElem);
    }

-   function setTop() {};
    function setTop(buttonRect, tooltipRect) {
      tooltipElem.style.top = `${buttonRect.top - tooltipRect.height}px`
    }

-   function setLeft() {};
    function setLeft() {
      tooltipElem.style.left = "10px"
      //左右は仮置き
    };

-   document.addEventListener("mouseover", () => {});
    //ここから処理開始
    document.addEventListener("mouseover", (ev) => { //
    // どこかの要素上にカーソルがホバーしたら発火。
      if (ev.target.tagName !== "BUTTON") return;
      //mouseoverイベントがbuttonタグ上以外で発生した場合は処理終了。

      const overButton = ev.target;
      createTooltip(overButton.dataset.tooltip);
      // ツールチップを作成し、body要素に追加

      const buttonRect = overButton.getBoundingClientRect();
      //ホバーしたボタン要素のDOMRectを取得
      const tooltipRect = tooltipElem.getBoundingClientRect();
      //作成したツールチップの要素のDOMRectを取得

      setTop(buttonRect, tooltipRect);
      // ツールチップの垂直位置を指定する関数

      setLeft();
    })

-   document.addEventListener('mouseout',() => {});
    document.addEventListener('mouseout',() => {
    //ボタンからカーソルが離れたらツールチップ消す。
      if (tooltipElem) {
        tooltipElem.remove();
        tooltipElem = null;
      }
    };
  </script>
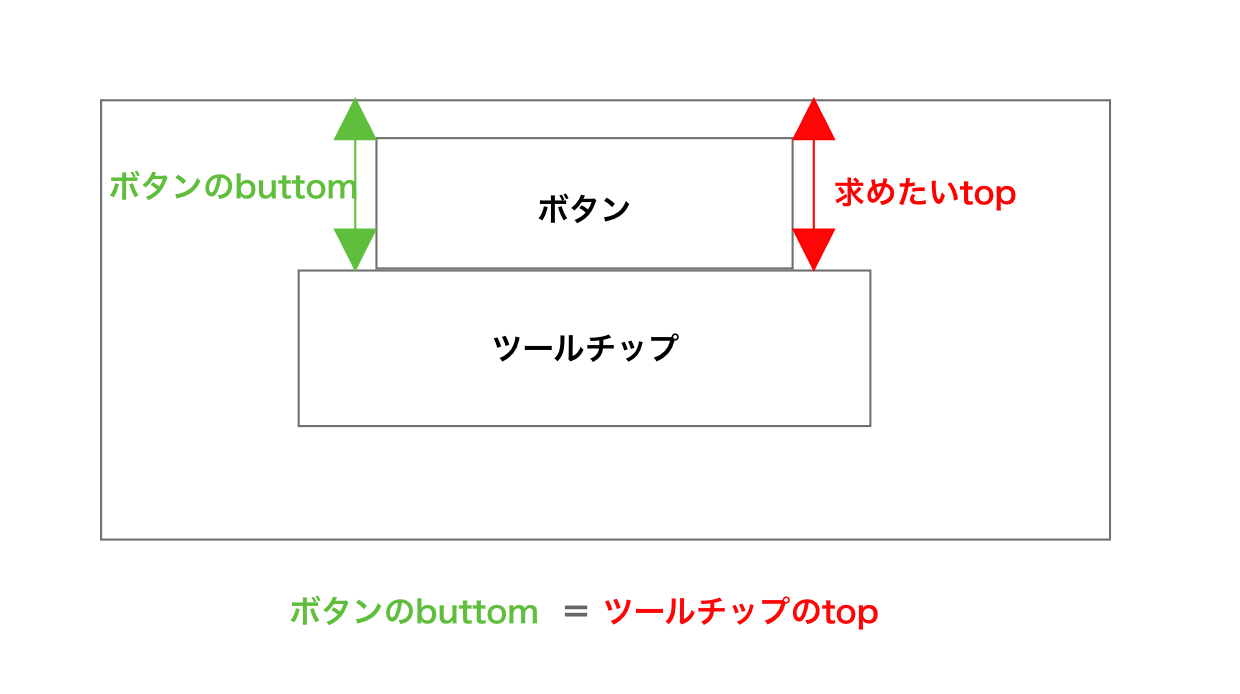
ボタン下部に表示させる実装
ボタン上部にツールチップを表示させるスペースがない場合はボタン下部に表示させるためsetTop関数を書き換えます。
スペースがあるか無いかの判定は、ボタンの上部スペース(top)が、ツールチップの高さより狭い場合です。
スペースがない場合のツールチップのtopは以下図で計算すると取得することがでます。
    function setTop(buttonRect, tooltipRect) {
+     if (tooltipRect.height >= buttonRect.top) {
+       // スペースがない場合
+        tooltipElem.style.top = `${buttonRect.bottom}px`
+      } else {
+        // スペースがある場合
        tooltipElem.style.top = `${buttonRect.top - tooltipRect.height}px`
+     }
    }
基本位置(水平方向)の計算
水平方向の位置を決定するためには、ボタンとツールチップの左側の幅の差分を計算する必要があります。
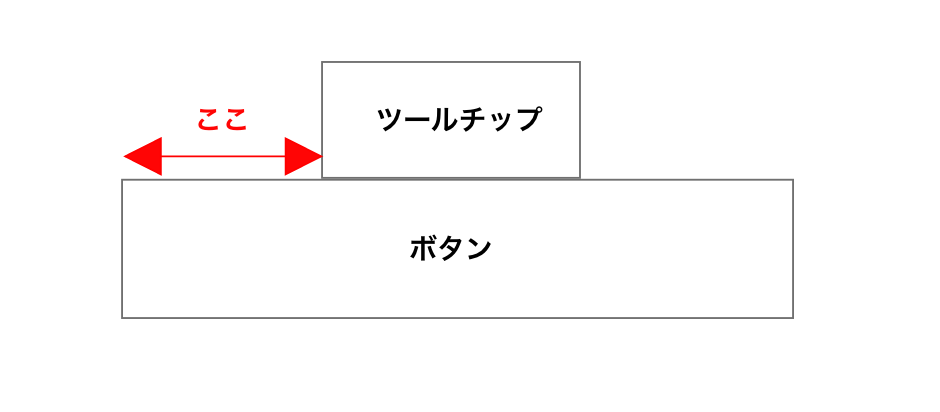
ボタンとツールチップの左側の幅の差分の計算は以下図で計算すると取得することがでます。
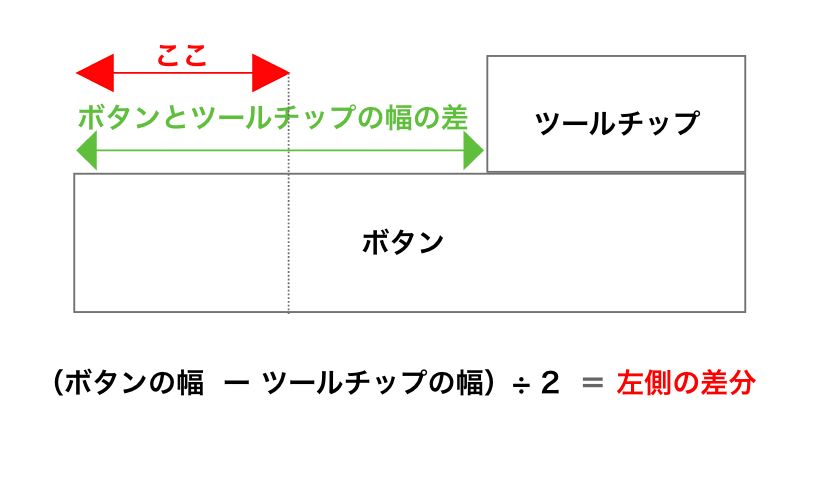
const buttonBaseDiff = (buttonRect.width - tooltipRect.width) / 2;
なお、ツールチップの方がボタンより幅広の場合は値は 「負の値」 となります。
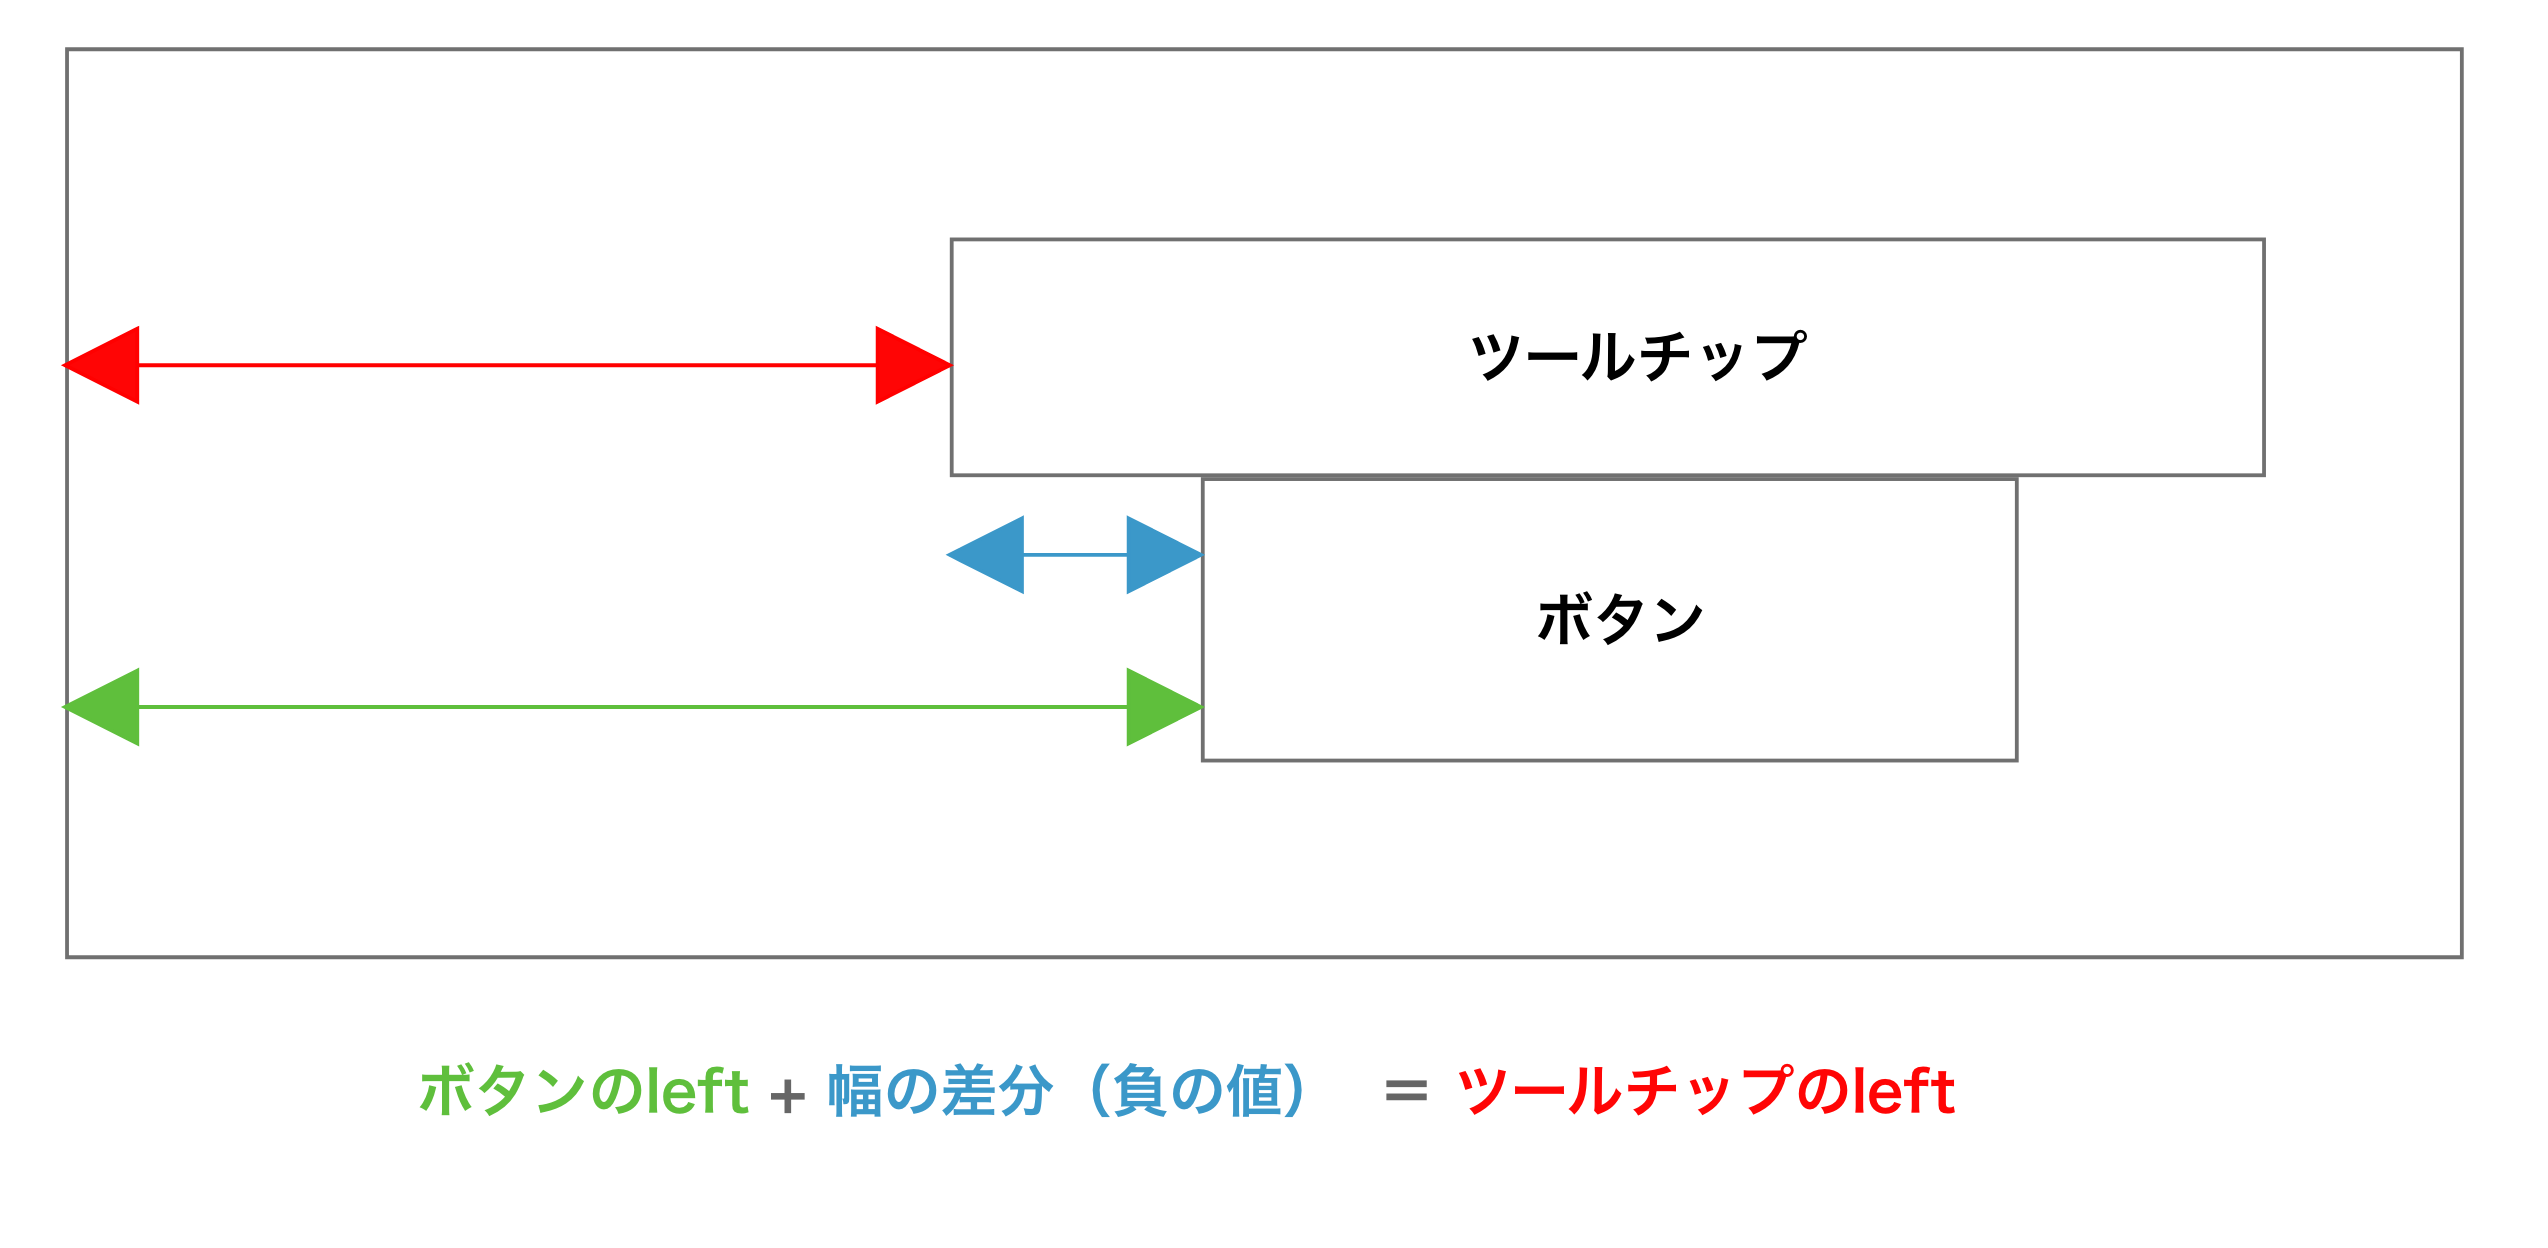
ツールチップのleftの計算は以下図で計算すると取得することがでます。
- ツールチップが短い場合

- ツールチップが長い場合
↑どちらの場合も計算方法は同じ
- function setLeft() {
-   tooltipElem.style.left = "10px"
- };
+ function setLeft(buttonRect, buttonBaseDiff) {
+  tooltipElem.style.left = `${buttonRect.left + buttonBaseDiff}px`;
+ }
+ const buttonBaseDiff = (buttonRect.width - tooltipRect.width) / 2;
  // 左側の幅の差分を取得

  setTop(buttonRect, tooltipRect);

- setLeft()
+ setLeft(buttonRect, buttonBaseDiff);
  //左端からのツールチップの距離を設定
基本位置(水平方向)に配置するスペースが左側にない場合
左側にスペースがない場合の判定方法
ツールチップの方が長い場合で考えてみます。
ツールチップを基本位置(水平方向)配置できる限界点は下記の図の状態です。
※ ボタンのleftを4、差分を-5と仮定
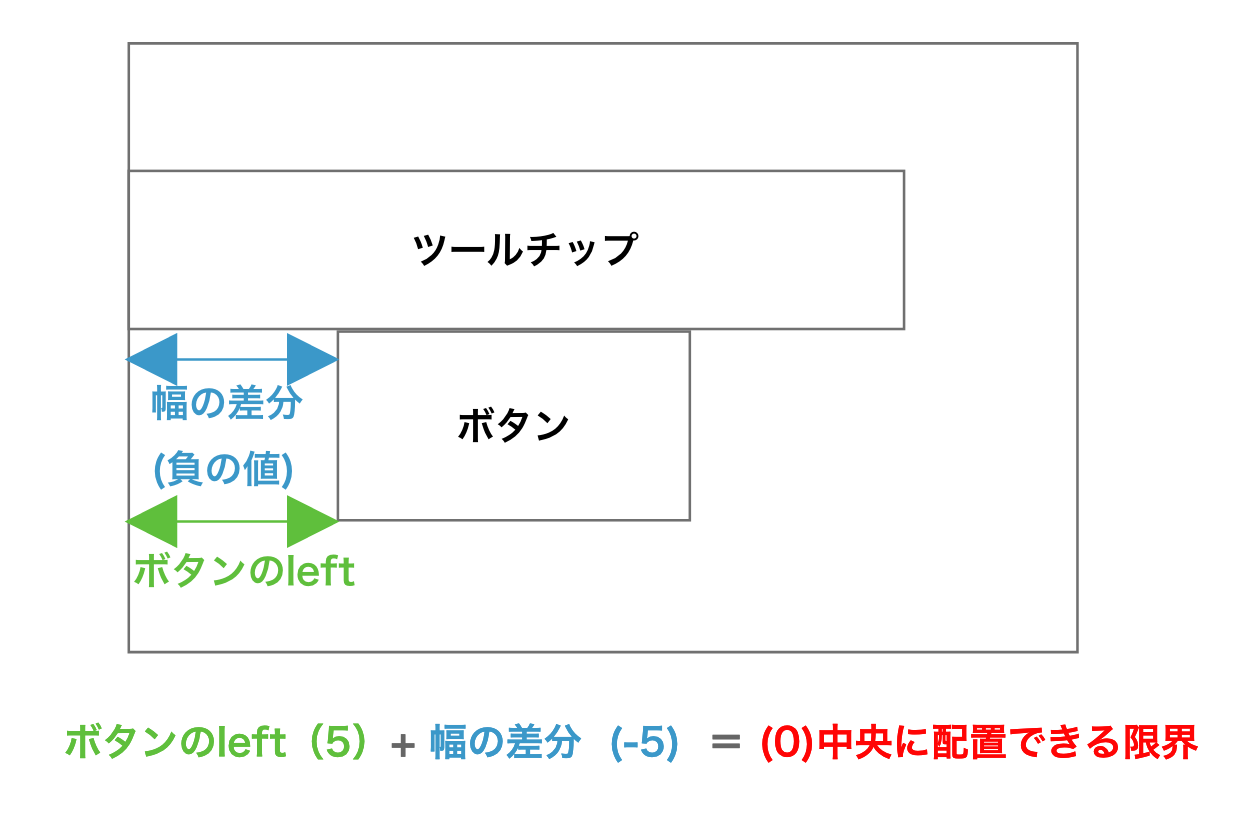
一方、基本位置(水平方向に配置できない状態とは下記の図のような状態です。
※ ボタンのleftを5、差分を-5と仮定

つまり、下記のことが言えます。

次にツールチップの方が短い場合で考えてみます。
ツールチップを基本位置(水平方向)に配置できる限界点は下記の図の状態です。
※ ボタンのleftを-5(5左にはみ出している。)、差分を5と仮定
注:DOMRectは、画面からはみ出している場合は負の値となる。
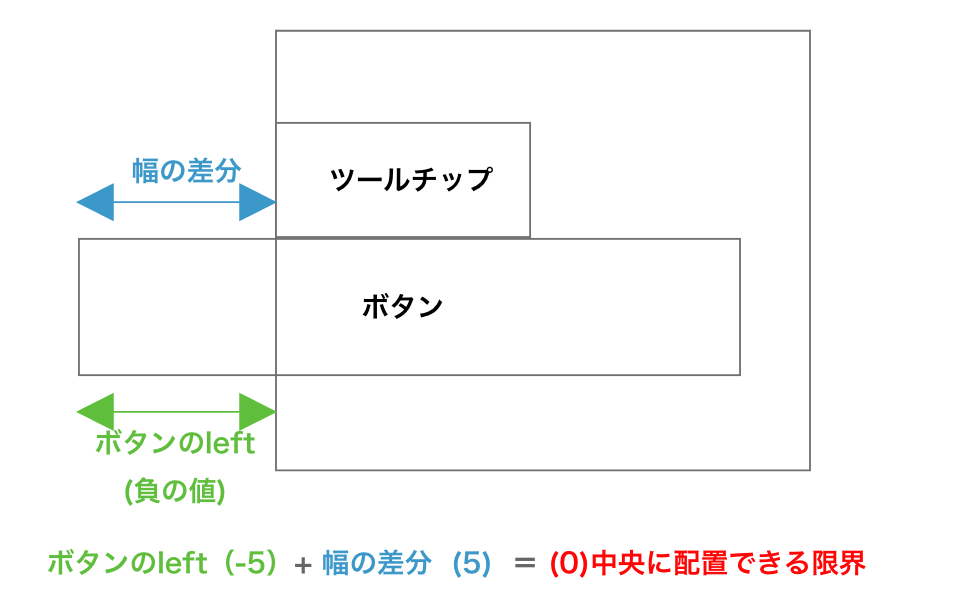
一方、基本位置(水平方向)に配置できない状態とは下記の図のような状態です。
※ ボタンのleftを-6、差分を5と仮定
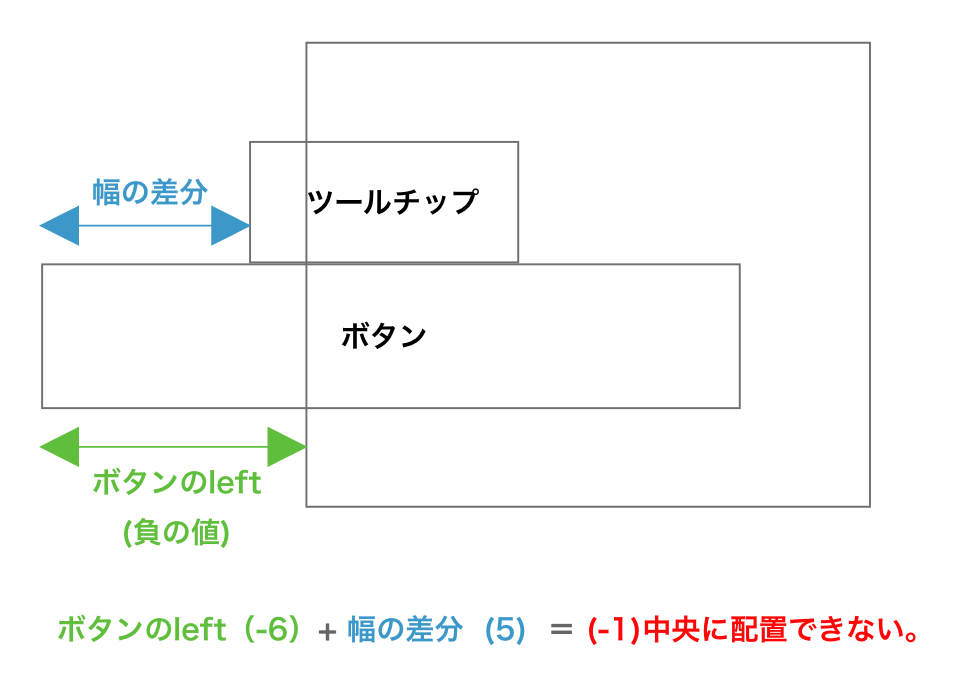
つまり、ツールチップとボタンの差分の長短で場合わけせずとも下記のことが言えます。
function setLeft(buttonRect, buttonBaseDiff) {
+ if (buttonRect.left + buttonBaseDiff < 0) {
+ // 中央に配置できない場合
+  tooltipElem.style.left = "0px";
+ // 画面左端にツールチップの左端を配置
+  return;
+  }
  tooltipElem.style.left = `${buttonRect.left + buttonBaseDiff}px`;
}
右側にスペースがない場合の判定方法
ツールチップの方が長い場合で考えてみます。
ツールチップを基本位置(水平方向)に配置できる限界点は下記の図の状態です。
※ ボタンのrightを10、差分を-5、bodyの横幅を15と仮定
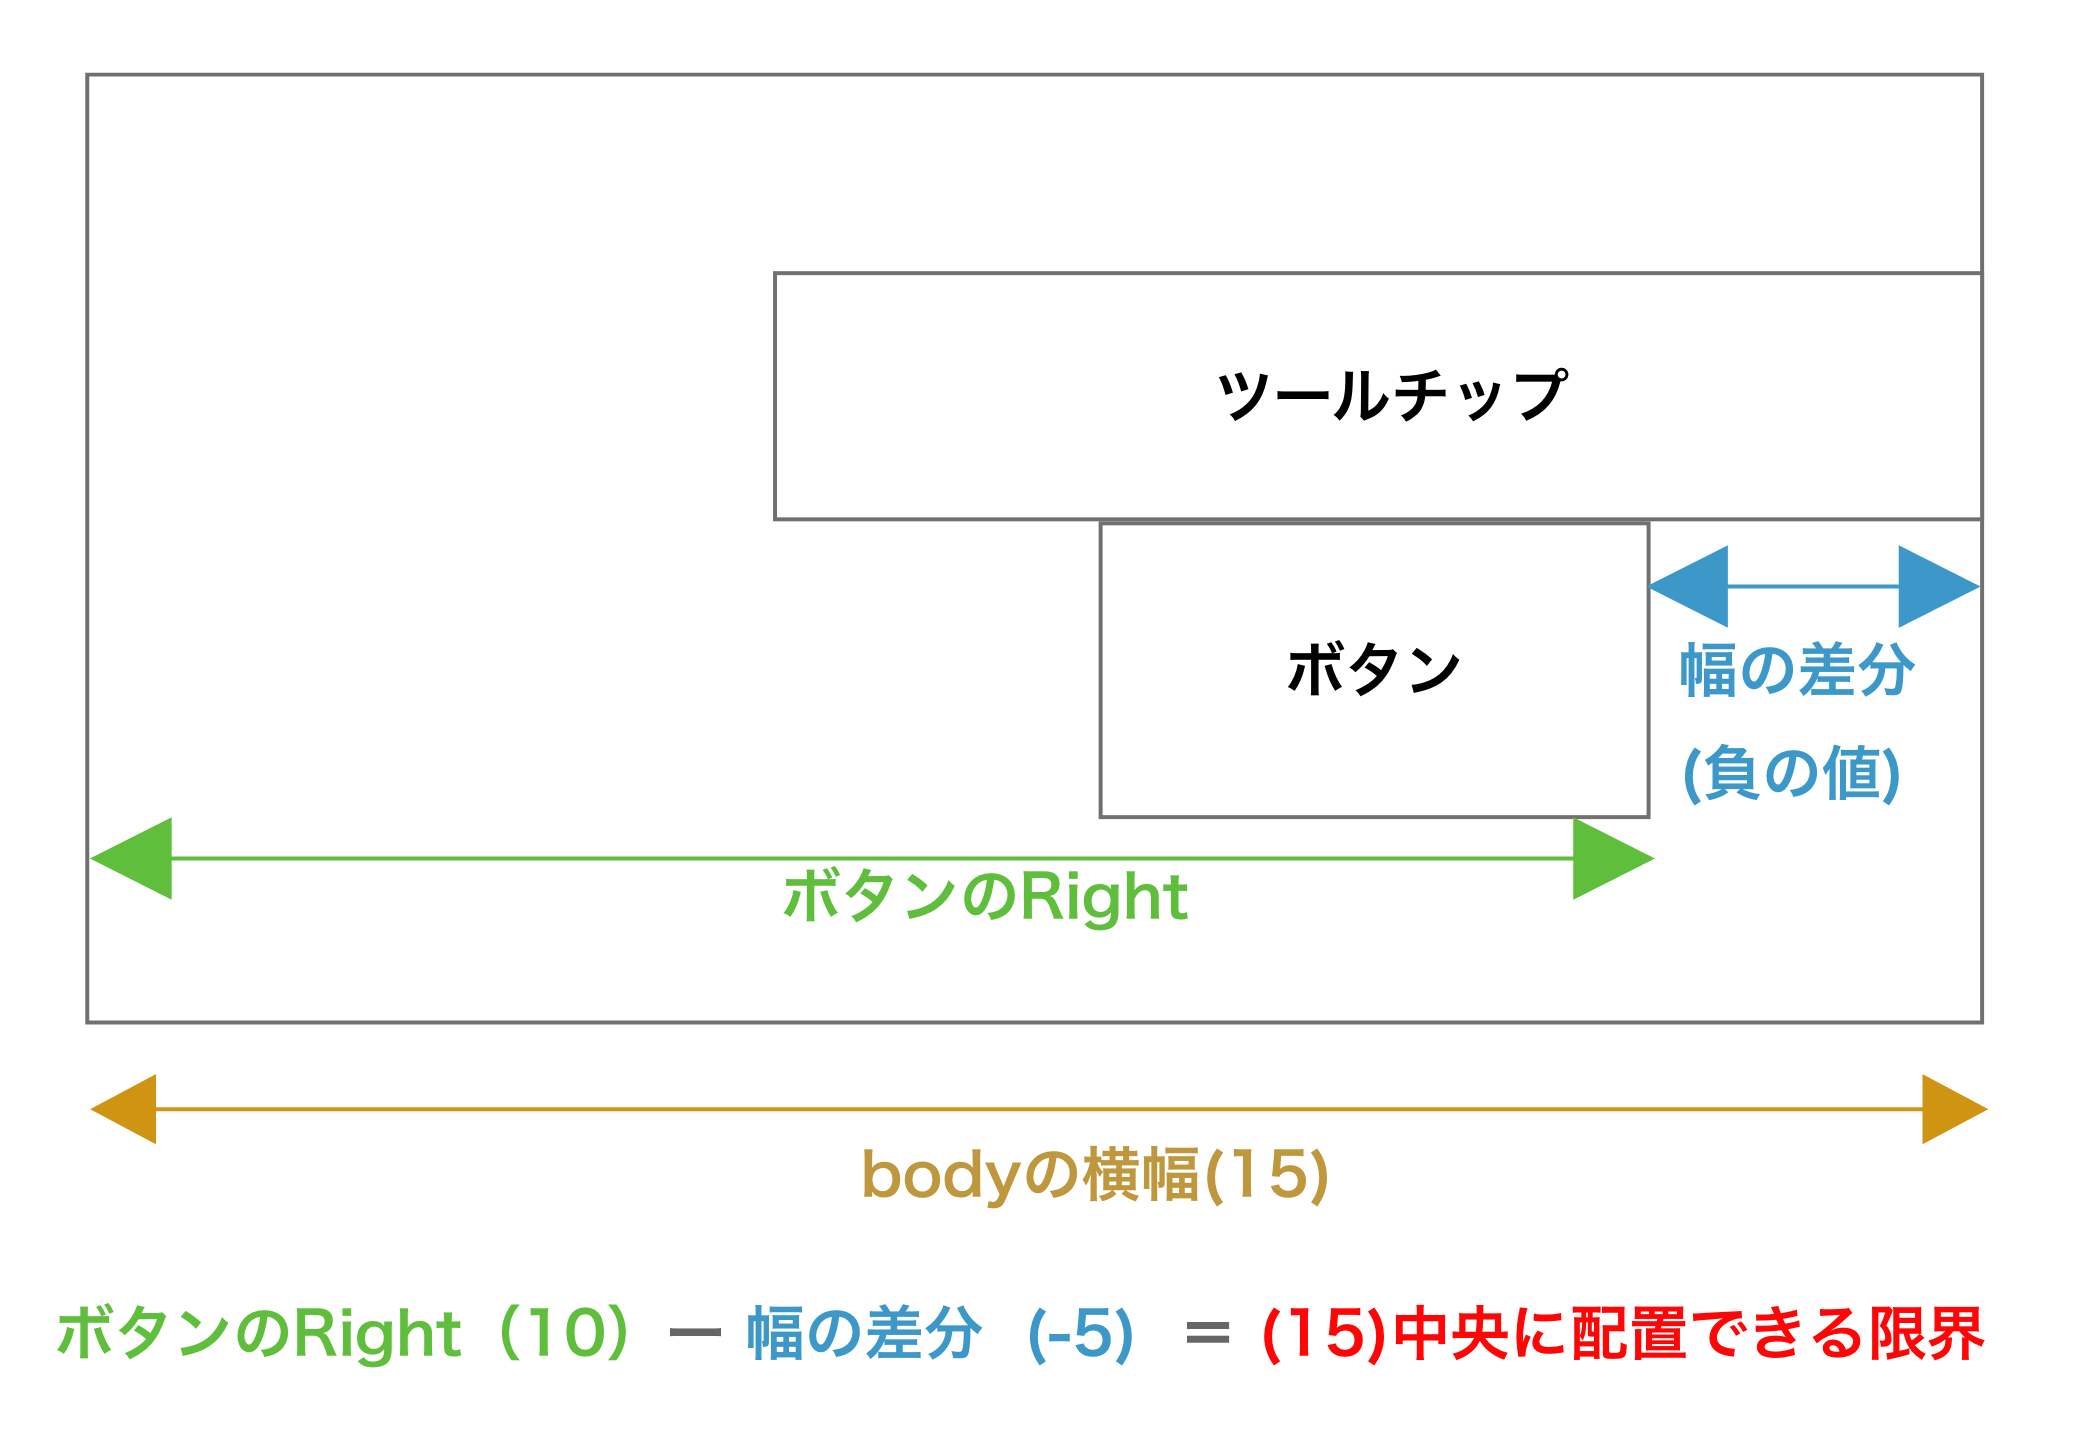
一方、基本位置(水平方向)に配置できない状態とは下記の図のような状態です。
※ ボタンのrightを11、差分を-5、bodyの横幅を15と仮定
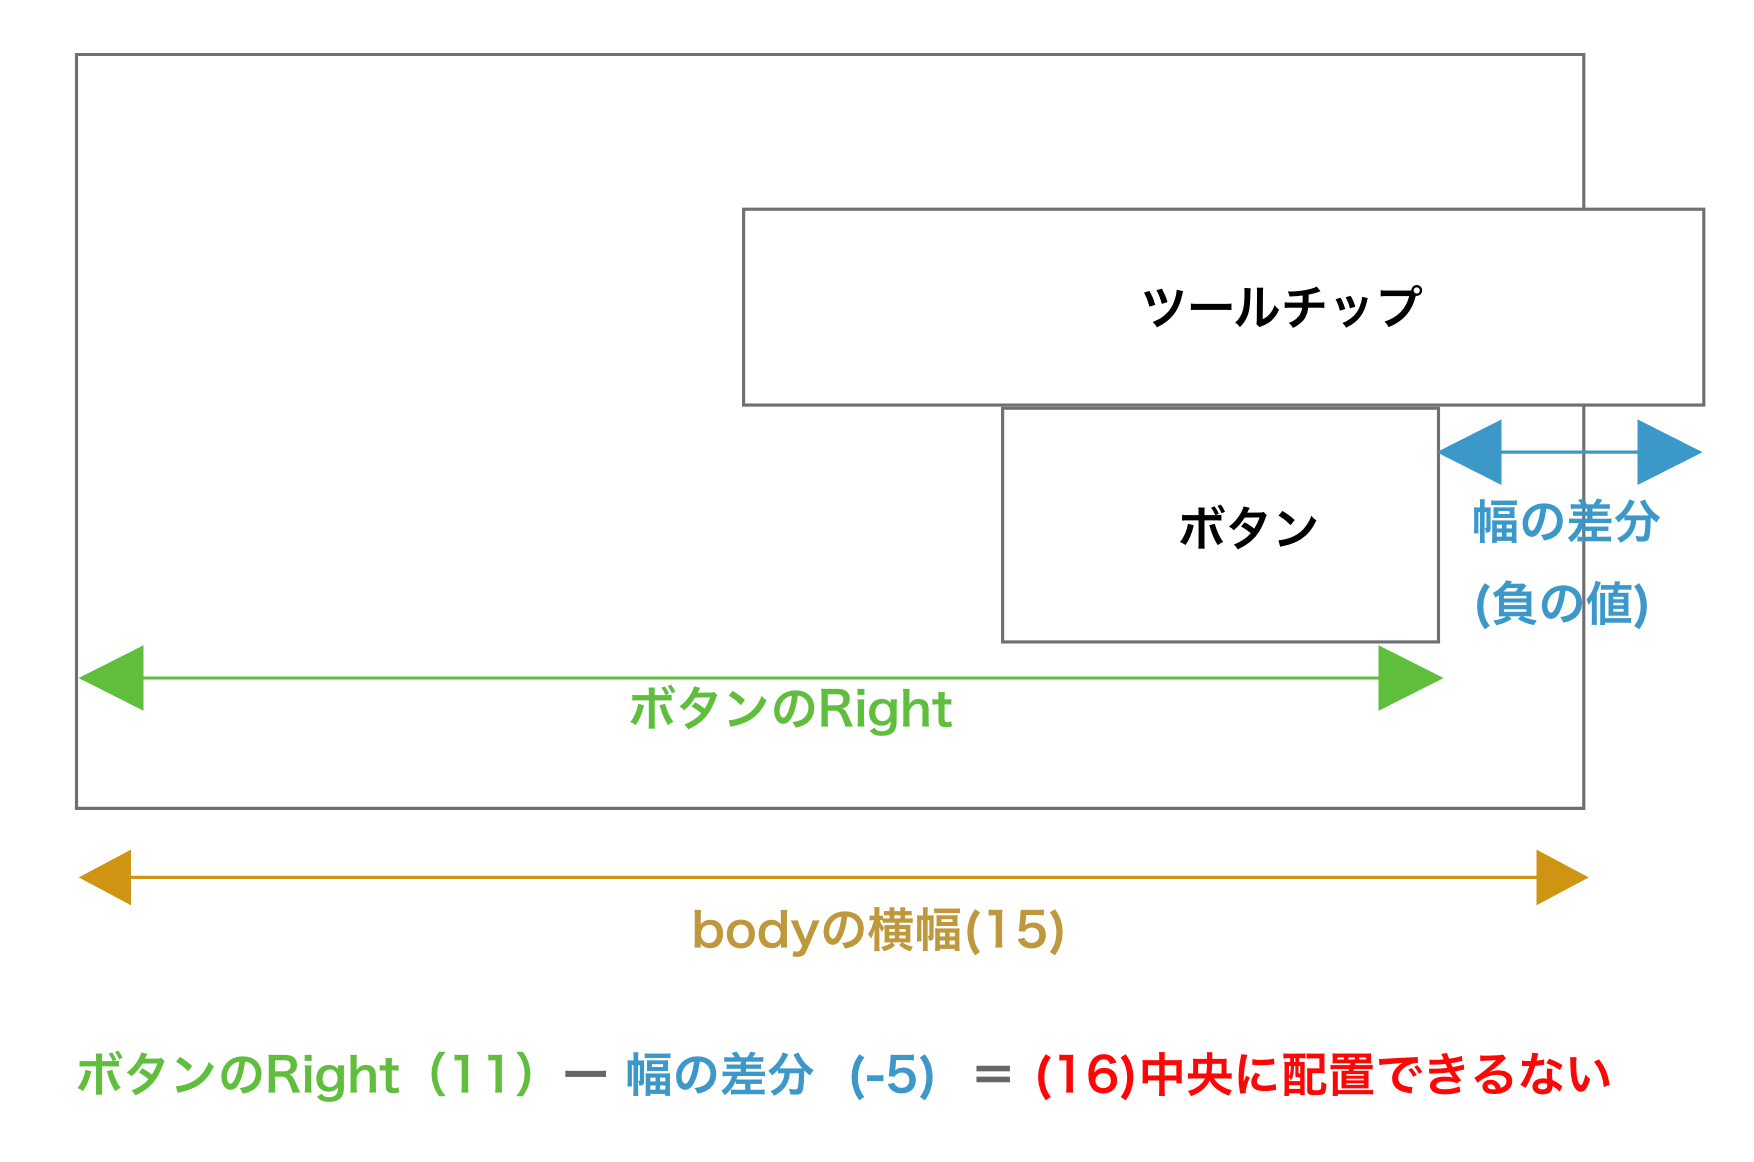
つまり、下記のことが言えます。

次にツールチップの方が短い場合で考えてみます。
ツールチップを中央に配置できる限界点は下記の図の状態です。
※ ボタンのrightを20、差分を5、bodyの横幅を15と仮定

一方、中央に配置できない状態とは下記の図のような状態です。
※ ボタンのrightを21、差分を5、bodyの横幅を15と仮定
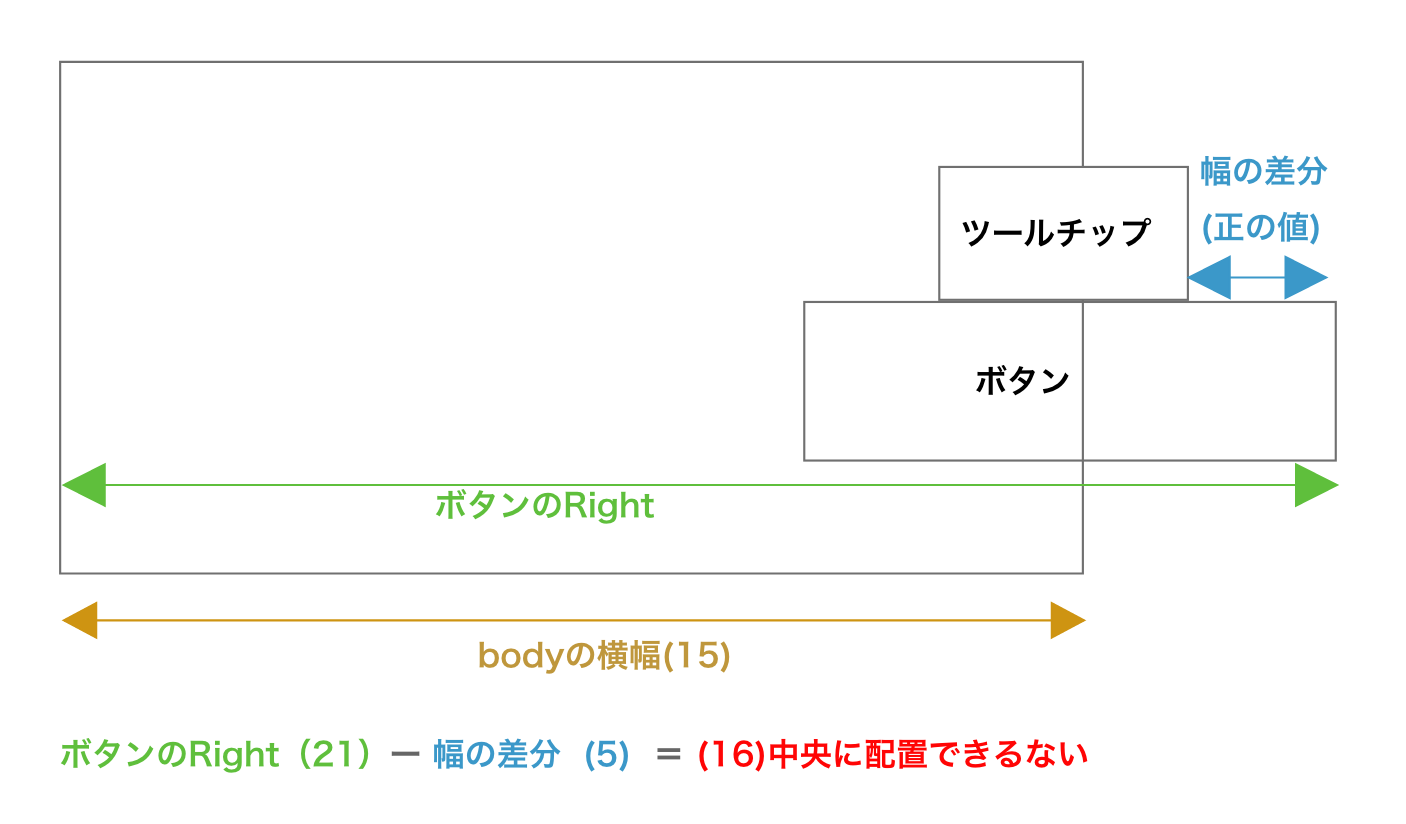
つまり、ツールチップとボタンの差分の長短で場合わけせずとも下記のことが言えます。
function setLeft(buttonRect, buttonBaseDiff) {
 if (buttonRect.left + buttonBaseDiff < 0) {
   tooltipElem.style.left = "0px";
   return;
 }

+ if (buttonRect.right - buttonBaseDiff > document.body.clientWidth) {
+ // 中央に配置できない場合
+   tooltipElem.style.right = "0px";
+ // 画面右端にツールチップの右端を配置
+   return;
+ }

 tooltipElem.style.left = `${buttonRect.left + buttonBaseDiff}px`;
}
これでツールチップを正しい位置に配置することができました。
最後に、画面スクロールした場合にツールチップが残り続けると気持ち悪いので非表示にするように修正します。
+ function removeToolTip() {
+   if (tooltipElem) {
+   tooltipElem.remove();
+   tooltipElem = null;
+   }
+ }

+ document.addEventListener('mouseout', removeToolTip);
+ document.addEventListener('scroll', removeToolTip);
全文
<!DOCTYPE HTML>
<html>

<body>
  <iframe id="flame" src="./ifame.htm"></iframe>
</body>

<style>
  body {
    margin: 10px;
  }

  #flame {
    width: 600px;
    height: 300px;
  }
</style>

</html>
<!DOCTYPE html>
<html lang="en">

<head>
  <meta charset="UTF-8">
  <meta http-equiv="X-UA-Compatible" content="IE=edge">
  <meta name="viewport" content="width=device-width, initial-scale=1.0">
  <title>Document</title>
</head>

<body>
  <div id="inner">
    <button class="btn" data-tooltip="sbtn">short button !!</button>
    <button class="btn" data-tooltip="long message tooltip long message tooltip">long button !!</button>
  </div>
  <script>
    let tooltipElem;

    function createTooltip(message) {
      tooltipElem = document.createElement('div');
      tooltipElem.innerText = message;
      tooltipElem.className = "tooltip"
      document.body.append(tooltipElem);
    }

    function setTop(buttonRect, tooltipRect) {
      if (tooltipRect.height >= buttonRect.top) {
        tooltipElem.style.top = `${buttonRect.bottom}px`
      } else {
        tooltipElem.style.top = `${buttonRect.top - tooltipRect.height}px`
      }
    }

    function setLeft(buttonRect, buttonBaseDiff) {
      if (buttonRect.left + buttonBaseDiff < 0) {
        tooltipElem.style.left = "0px";
        return;
      }

      if (buttonRect.right - buttonBaseDiff > document.body.clientWidth) {
        tooltipElem.style.right = "0px";
        return;
      }
      tooltipElem.style.left = `${buttonRect.left + buttonBaseDiff}px`;
    }

    document.addEventListener("mouseover", (ev) => {
      if (ev.target.tagName !== "BUTTON") return;

      const overButton = ev.target;

      createTooltip(overButton.dataset.tooltip)

      const buttonRect = overButton.getBoundingClientRect();
      const tooltipRect = tooltipElem.getBoundingClientRect();

      const buttonBaseDiff = (buttonRect.width - tooltipRect.width) / 2;

      setTop(buttonRect, tooltipRect);
      setLeft(buttonRect, buttonBaseDiff);
    })

    function removeToolTip() {
      if (tooltipElem) {
        tooltipElem.remove();
        tooltipElem = null;
      }
    }

    document.addEventListener('mouseout', removeToolTip);
    document.addEventListener('scroll', removeToolTip);
  </script>
</body>

<style>
  body {
    width: 585px;
    height: 300px;
  }

  .tooltip {
    position: fixed;
    padding: 3px;
    border: 1px solid #b3c9ce;
    border-radius: 4px;
    text-align: center;
    color: #333;
    background: #fff;
    box-shadow: 3px 3px 3px rgba(0, 0, 0, .3);
  }

  #inner {
    width: 1500px;
    height: 700px;
    display: flex;
    justify-content: center;
    align-items: center;
  }

  .btn {
    margin: 70px;
  }
</style>

</html>