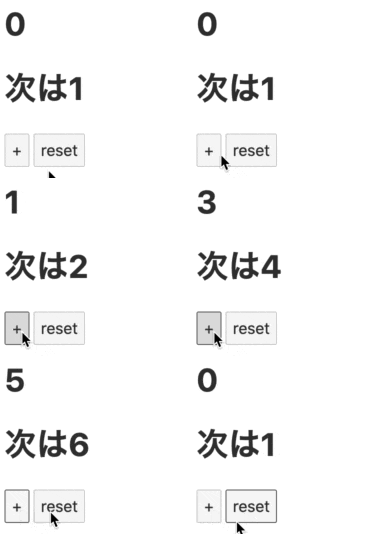
SvelteのStoreについて、よく分からなかったので、図を交えて理解してみました。
Svelteではストアを用いて、関連のない複数のコンポーネントや、通常の JavaScript モジュールからアクセスする必要のある値を定義します。
VueでいうところのVuexやReactでいうところのReduxが標準で組み込まれています。
実装イメージ
➕を押すと数が増加します。
resetを押すと0に初期化されます。
構造イメージ
Appコンポーネント内で「Nextコンポーネント」「Incrementerコンポーネント」「Resetterコンポーネント」を呼び出します。
Appコンポーネントでは現在のcountの値をリアルタイムで表示します。
Nextコンポーネントでは、countをプラス1した値を表示します。
Incrementerでは現在のcountの値を1増加させます。
Resetterコンポーネントではcountの値を初期化(0)します。
更新可能なストアを定義する。
writable関数は、書き込み可能なストアを返します。引数には初期値を与えます。
import { writable } from 'svelte/store';

export const count = writable(0);
Appコンポーネントでストアからcountを呼び出す。
writable関数で作成されたストアのsubuscribe関数を呼び出すことによって、countの値が変更された場合に検知して、引数で渡した関数が実行されます。
渡された関数の引数には、最新のcountの値が渡ります。
下記の場合、countの値が変更されたら、countValueに最新のcountの値が格納されます。
//App.svelte

<script>
	import { count } from './stores.js';

	let countValue;

	count.subscribe(value => {
		countValue = value;
	});
// valueには、変更後のcountの値が入る。

</script>

<h1>{countValue}</h1>
Nextコンポーネントでストアからcountを呼び出す。
同様にNextコンポーネントでもcountを呼び出します。
nextValueにはcountにプラス1した値が格納されます。
//Next.svelte
<script>
	import { count } from './stores.js';
	import Next from"./Next.svelte";

	let nextValue;

	count.subscribe(value => {
		nextValue = value +1;
	});
</script>

<h1>次は{nextValue}</h1>
Incrementerコンポーネントでストアのcountの値を更新する。
writable関数で作成されたストアのupdate関数を呼び出すことによって、ストアの値を変更できます。
update関数の引数で渡された関数の返り値が新たにcountの値に更新されます。
update関数の引数で渡された関数の第一引数は、更新前のcountの値が渡されます。
下記の場合、update関数の引数として渡された関数((n => n + 1))は、countの値にプラス1して返すので、countには新たにプラス1した値で更新されます。
//Incrementer.svelte

<script>
	import { count } from './stores.js';

	function increment() {
		count.update(n => n + 1);
	}
// nには、変更前のcountの値が入る。

</script>

<button on:click={increment}>+</button>
Resetterコンポーネントでストアのcountの値を初期化(0で更新)する。
writable関数で作成されたストアのset関数を呼び出すことによって、ストアの値を変更できます。
set関数の引数で渡された値が新たにcountの値に更新されます。
下記の場合、set関数の引数として渡された0でcountは更新されます。
//Resetter.svelte

<script>
	import { count } from './stores.js';

	function reset() {
		count.set(0);
	}
</script>

<button on:click={reset}>reset</button>
Appコンポーネントでそれぞれを呼び出します。
//App.svelte

<script>
	import { count } from './stores.js';
	import Next from"./Next.svelte";
	import Incrementer from './Incrementer.svelte';
	import Resetter from './Resetter.svelte';

	let countValue;

	count.subscribe(value => {
		countValue = value;
	});
</script>

<h1>{countValue}</h1>

<Next/>
<Incrementer/>
<Resetter/>
$でsubscribeする。
ストアを格納している変数名の頭に$をつけることによって、subscribe関数と同様に、リアルタイムにストアの値の変更を検知することができます。
//App.svelte

<script>
	import { count } from './stores.js';
	import Next from"./Next.svelte";
	import Incrementer from './Incrementer.svelte';
	import Resetter from './Resetter.svelte';

// 	let countValue;

// 	count.subscribe(value => {
// 		countValue = value;
// 	});
</script>

<h1>{$count}</h1>

<Next/>
<Incrementer/>
<Resetter/>
この方法は、下記のようにマークアップ内のみにかかわらず、scriptタグ内でも有効です。
($:は関数内の値に変化があった場合に、実行される記法です。この場合はcountが変更された場合、関数が実行されnextValueの値がcount+1で更新されます。)
//Next.svelte

<script>
	import { count } from './stores.js';
	import Next from"./Next.svelte";

 $: nextValue = $count + 1;

//	count.subscribe(value => {
//		nextValue = value +1;
//	});
</script>

<h1>次は{nextValue}</h1>
カスタムストアを作成する。
現状、countからupdate関数やset関数を呼び出すことにより、countの値を自由に変更できてしまいます。
今後の実装で不用意にupdate関数やset関数を呼び出して、意図せぬcountの値変更を防ぐために、値を変更する関数をカスタム関数化します。
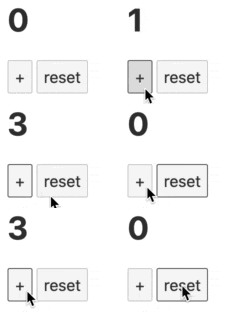
実装イメージ
・+を押すと1加算
・resetを押すと0にする。
まずは先ほどと同様に下記のように実装します。
//App.svelte

<script>
	import { count } from './stores.js';

	function increment(){
	  count.update( c => c+1 )
	}

	function reset(){
		count.set(0);
	}

	let number;
	count.subscribe((c)=>{
		number = c;
	})
</script>

<h1>{number}</h1>

<button on:click={increment}>+</button>
<button on:click={reset}>reset</button>
import { writable } from 'svelte/store';
export const count = writable(0);
stores.jsのexportをストアそのものではなく、関数を限定したオブジェクトで返す。
import { writable } from 'svelte/store';

function createCount() {
	const { subscribe, set, update } = writable(0);

	return {
		subscribe: subscribe,
		increment: () => update(n => n + 1),
		reset: () => set(0)
	};

    //返す値をwritable関数で作成されたストアそのものではなく、オブジェクトで限定する。
}

export const count = createCount();
//exportされるのはストアそのものではなく、限定的な関数を保持するオブジェクト。
//.svelte

<script>
	import { count } from './stores.js';
//  countは、subscribe,increment,resetのみで形成されたオブジェクト。

// 	function increment(){
// 	  count.update( c => c+1 )
// 	}

// 	function reset(){
// 		count.set(0);
// 	}

	let number;
	count.subscribe((c)=>{
		number = c;
	})
</script>

<h1>{number}</h1>

<button on:click={count.increment}>+</button>
<!-- countのincrementメソッド-->
<button on:click={count.reset}>reset</button>
<!-- countのresetメソッド-->
countオブジェクトはupdate関数や、set関数を保持していない(subscribe,increment,reset関数のみを保持)ので、不用意にupdate関数や、set関数でcountを更新されることがなくなる。
この場合でもsubscript関数は、$変数名で検知可能。
//.svelte

<script>
	import { count } from './stores.js';

//	let number;
//	count.subscribe((c)=>{
//		number = c;
//	})
</script>

<h1>{$count}</h1>

<button on:click={count.increment}>+</button>
<button on:click={count.reset}>reset</button>
他のストアの値に基づくストアを作成する。
derived を使用して、1つまたはそれ以上の他のストアに基づいた値のストアを作成することができます。
import { writable, derived } from 'svelte/store';

export const firstName = writable('');

export const greeting = derived(
	  firstName,
 	  $firstName => `Hello ${$firstName}!`
);

//  greetingはfirstNameに基づいている。
//  derived関数の第一引数に依存するストアを、第二引数に依存するストアが変更した時に実行し値を返す関数を渡します。
//App.svelte

<script>
	import { firstName, greeting } from './stores.js';

	let firstN="";

	function setFirstName(){
		firstName.set(firstN);
}
</script>

<h1>{$greeting}</h1>
<input bind:value={firstN}>
<button on:click={setFirstName}>
	名前セット
</button>
複数のストアに基づくストアの場合は、引数に配列を渡します。
import { writable, derived } from 'svelte/store';

export const firstName = writable('');
export const familyName = writable('');

export const greeting = derived(
	[firstName,familyName],
	([$firstName,$familyName]) => `Hello ${$firstName}${$familyName}!`
);
//App.svelte

<script>
	import { firstName,familyName, greeting } from './stores.js';

	let firstN="";

	function setFirstName(){
		firstName.set(firstN);
}

	let familyN="";

	function setFamilyName(){
		familyName.set(familyN);
}
</script>

<h1>{$greeting}</h1>
<input bind:value={firstN}>
<button on:click={setFirstName}>
	名前セット
</button>
<input bind:value={familyN}>
<button on:click={setFamilyName}>
  名字セット
</button>
ストアをバインドする。
ストアを直接バインドしてインプットフォームからストアの値を書き換えることも可能です。
import { writable, derived } from 'svelte/store';

export const name = writable('world');

export const greeting = derived(
	name,
	$name => `Hello ${$name}!`
);
//App.svelte

<script>
	import { name, greeting } from './stores.js';
</script>

<h1>{$greeting}</h1>
<input bind:value={$name}>
<!-- インプットフォームの内容が変化するとストアのnameの値が書き変わる。 -->


