React/JSXのコンパイル環境を構築するために「create-react-app」というアプリを使います。
以下のコマンドでインストールすることができます。
npm install -g create-react-app
create-react-appを使ってサンプルプロジェクトを作ってみます。
以下のコマンドを実行します。
create-react-app example
すると、必要なモジュールが一気にインストールされます。
インストールすると、ちょっと前まではnpm startのコマンドが表示されてた気がするのですが、yarn startに変わっていました。
  yarn start
    Starts the development server.

  yarn build
    Bundles the app into static files for production.

  yarn test
    Starts the test runner.

  yarn eject
    Removes this tool and copies build dependencies, configuration files
    and scripts into the app directory. If you do this, you can’t go back!

We suggest that you begin by typing:

  cd example
  yarn start

Happy hacking!
Weblioで読み方を調べてみたのですが、カタカナにすると「ョアーン」って感じで発音してて、ちょっとわかりづらいですね。「ヤーン」でいい気がします。
Yarnとnpmの違いについてはこちらの記事がわかりやすいです。
https://www.webprofessional.jp/yarn-vs-npm/
cd example
yarn start
とコマンドを打つと、ブラウザが立ち上がります。

ファイルを編集すると自動的に検知して、ブラウザに反映してくれるため非常に便利です。
たとえば、デフォルトのApp.jsを修正すると、、、
import React, { Component } from 'react';
import logo from './logo.svg';
import './App.css';

class App extends Component {
  render() {
    return (
      <div className='App'>
        <h2>Hello React first App!</h2>
      </div>
    );
  }
}

export default App;
以下のように、ブラウザに反映されます。

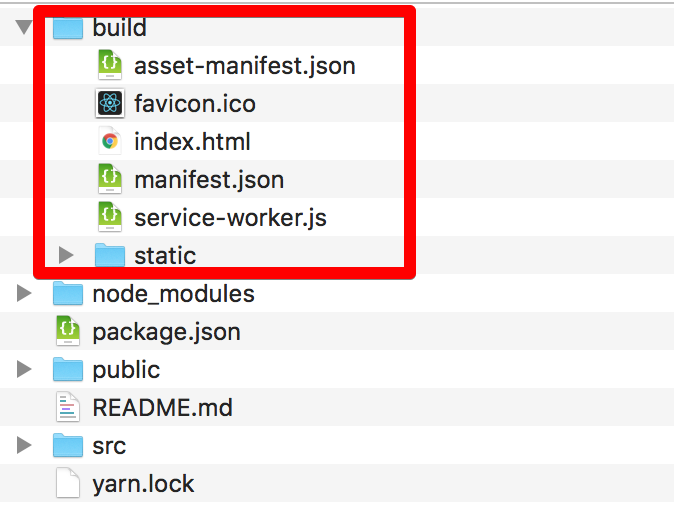
次に、yarn buildを実行してみます。
コマンドを実行すると以下のようなbuildディレクトリが作られます。
The project was built assuming it is hosted at the server root.
To override this, specify the homepage in your package.json.
For example, add this to build it for GitHub Pages:

  "homepage" : "http://myname.github.io/myapp",

The build folder is ready to be deployed.
You may serve it with a static server:

  yarn global add serve
  serve -s build

Done in 8.87s.
メッセージにしたがって
serve -s build
を実行すると、URLが表示されます。
 serve -s build

   ┌──────────────────────────────────────────────────┐
   │                                                  │
   │   Serving!                                       │
   │                                                  │
   │   - Local:            http://localhost:5000      │
   │   - On Your Network:  http://192.168.1.10:5000   │
   │                                                  │
   │   Copied local address to clipboard!             │
   │                                                  │
   └──────────────────────────────────────────────────┘
表示されたURLを開くと、Reactアプリケーションがブラウザに表示されました。
次にWebpackを導入していきます。
Webpackとは、複数のモジュールを一つにまとめたファイルを出力するモジュールバンドラです。
GitHubのcreate-react-appにも書かれているように、create-react-appで作られた環境にはWebpackがプリインストールされています。
Get Started Immediately
You don’t need to install or configure tools like Webpack or > Babel.
They are preconfigured and hidden so that you can focus on the code.
https://github.com/facebookincubator/create-react-app
Just create a project, and you’re good to go.
自分でインストールしたい人は
npm install -g webpack
でインストールできます。
create-react-appで作られるdefaultの環境を変更したい人は、
npm run eject
を実行します。
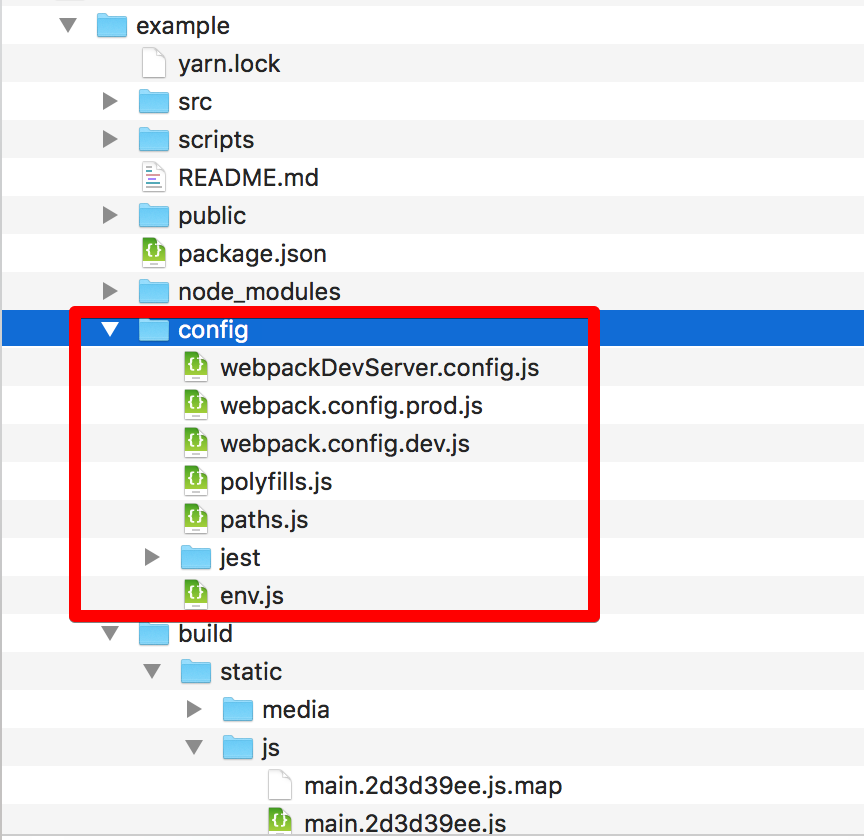
すると、以下のようにログが出力され、configファイルが作成されます。
Copying files into /Users/XXX/Documents/git_repo/examples/react/modern/example
  Adding /config/env.js to the project
  Adding /config/paths.js to the project
  Adding /config/polyfills.js to the project
  Adding /config/webpack.config.dev.js to the project
  Adding /config/webpack.config.prod.js to the project
  Adding /config/webpackDevServer.config.js to the project
  Adding /config/jest/cssTransform.js to the project
  Adding /config/jest/fileTransform.js to the project
  Adding /scripts/build.js to the project
  Adding /scripts/start.js to the project
  Adding /scripts/test.js to the project

(略)

Updating the scripts
  Replacing "react-scripts start" with "node scripts/start.js"
  Replacing "react-scripts build" with "node scripts/build.js"
  Replacing "react-scripts test" with "node scripts/test.js"

Configuring package.json
  Adding Jest configuration
  Adding Babel preset
  Adding ESLint configuration

Ejected successfully!

Please consider sharing why you ejected in this survey:
  http://goo.gl/forms/Bi6CZjk1EqsdelXk1
ここでできたファイルを編集することで、自分なりの開発環境を設定することができます。
試しにconfig/webpack.config.dev.jsを指定してwebpackを実行してみます。
$ webpack --config config/webpack.config.dev.js
/Users/xxx/Documents/git_repo/examples/react/modern/example/config/env.js:12
  throw new Error(
  ^

Error: The NODE_ENV environment variable is required but was not specified.
    at Object.<anonymous> (/Users/xxx/Documents/git_repo/examples/react/modern/example/config/env.js:12:9)
    at Module._compile (module.js:571:32)
    at Object.Module._extensions..js (module.js:580:10)
    at Module.load (module.js:488:32)
    at tryModuleLoad (module.js:447:12)
    at Function.Module._load (module.js:439:3)
    at Module.require (module.js:498:17)
    at require (internal/module.js:20:19)
    at Object.<anonymous> (/Users/xxx/Documents/git_repo/examples/react/modern/example/config/webpack.config.dev.js:12:30)
    at Module._compile (module.js:571:32)
    at Object.Module._extensions..js (module.js:580:10)
    at Module.load (module.js:488:32)
    at tryModuleLoad (module.js:447:12)
    at Function.Module._load (module.js:439:3)
    at Module.require (module.js:498:17)
    at require (internal/module.js:20:19)
「Error: The NODE_ENV environment variable is required but was not specified.」
のように、NODE_ENVが設定されていないことを指摘されたので、確認してみます。
$ node
> process.env.NODE_ENV
undefined
どこにNODE_ENVを定義するのがベストプラクティスなのかわからないので、とりあえずコンソール上で
export NODE_ENV=development
を実行しました。
以下のStackoverflowによると、package.jsonに書くのが正しそうなのですが...。
"scripts": {
  "start": "set NODE_ENV=development && node app.js"
 }
「process.env.NODE_ENV is undefined」
https://stackoverflow.com/questions/11104028/process-env-node-env-is-undefined
NODE_ENVを指定してから再び
webpack --config config/webpack.config.dev.js
を実行すると、プロジェクトのルートディレクトリ/static/js配下にbundle.jsができました。
yarn startを実行すると、修正した内容が反映されたアプリケーションが立ち上がります。