主な変更履歴
- 2019/6/14 Combine in URLSessionについて追記しました。
- 2019/6/18 Xcode11 Beta2より
@PublishedとDataTaskPublisherが補完されるようになりました。ドキュメントもできていましたのでリンクも追記しています。 - 2019/6/24 Subscriberのreceive(_ input: Self.Input) -> Subscribers.Demandについて追記しました。
- 2019/6/29 下記について追加、修正しました。
- catchがなぜ元のPublisherの出力を止めてしまうのかの理由について
- 処理を繋げた際の型とtype eraserについて
- Combineで事前に定義されているPublisherとSubscriberについて
- FRPについて
- assignメソッドとsinkメソッドをPublisherのextensionへ修正
- 2019/7/3
- XCode11 Beta3よりFoundationと統合され、Combineをimportしなくても
URLSessionやNotificationCenterなどでCombineを使用することができるようになりました。(@Publishedはまだ使えなかったです。)
- XCode11 Beta3よりFoundationと統合され、Combineをimportしなくても
- 2019/7/15 デバッグについて追記
- 2019/7/17 FutureとJustがPublishersから移動していたのでリンク先の修正など行いました。
- 2019/7/18 tryCatchのドキュメントへのリンクを追加しました。またXcode11 Beta4より
PublisherのsinkのFailureがNeverになりました(詳細は下記) - 2019/7/19 Xcode11 Beta4でBindableObjectがdidChange->willChange, didSet->willSetに変わったので一部修正しました。
- 2019/7/30 Xcode11 Beta5でBindableObjectはdeprecatedになり
ObservableObjectを使うようになったので追記しました。@ObjectBindingも@ObservedObjectに名前が変わりました。 - 2019/7/31
ObservableObjectがCombineに含まれること、IdentifiableはStandard Libraryに移動したことについて記載しました。また@PublishedをつけるとwillChangeなどの記載が不要になりました。 - 2019/8/1 Beta5だとプロパティのwillSetで値の変更通知していたロジックが
@Publishedを使用しないと動かなくなっています。またCancellableのメモリ管理の挙動が変わりました。(詳細は下記に記載しています。) - 2019/8/6
AnyCancellableのstoreメソッドとobjectWillChangeについて追記しました。 - 2019/8/21 Beta6で
@PublishedのprojectedValueの型がPublished.Publisherになったこと、BindingのCollectionへのConditional Comformanceが廃止されたことについて追記しました。 - 2019/9/21 Schedulerについて書いた記事のリンクを追加しました。
- 2019/10/17 Demandについて間違いがございましたので修正しました。
Subscribers.Demandをenumからstructに変更。receive(_ input: Self.Input) -> Subscribers.Demandは現在のDemandに対する調整値を設定するように説明を変更。 - 2020/7/3 iOS14の
FailureTypeがNeverの時のflatMapとPublished.Publisherを引数に取るassign(to:)について追記しました。 - 2020/7/23 Xcode12 Beta3で
Published.Publisherを引数に取るassign(to:)の引数にinoutが追加されたので更新しました。 - 2021/11/25
PublisherをAsyncSequenceへ変換する方法、Futureをasync/awaitへ変換する方法について追記しました。
2019/7/18追記 Xcode11 Beta4で起きている事象
これまでできていたsinkの使い方でコンパイルエラーになるものがありました。
他にもあるかもしれません。
enum SomeError: Swift.Error {
case somethingWentWrong
}
let subject = PassthroughSubject<String, SomeError>()
// error: referencing instance method 'sink(receiveValue:)' on 'Publisher' requires the types 'SomeError' and 'Never' be equivalent
let subscription = subject.sink { _ in }
// これも🙅🏻♂️
let subscription = subject.sink(receiveValue: { _ in })
下記のようにするとコンパイルが通ります。
// これは🙆🏻♂️
let subscription = subject.sink(receiveCompletion: { _ in }, receiveValue: { _ in })
sink(receiveValue:)のFailureがNeverになったようです。
extension Publisher where Self.Failure == Never {
    public func sink(receiveValue: @escaping ((Self.Output) -> Void)) -> Subscribers.Sink<Self.Output, Self.Failure>
}
// これは🙆🏻♂️
let subject = PassthroughSubject<String, Never>()
let subscription = subject.sink(receiveValue: { _ in })
2019/8/7追記 Beta5でドキュメントへも記載がされていました。
https://developer.apple.com/documentation/combine/anypublisher/3362546-sink
receiveValueのみを引数に取るsinkメソッドは
FailureがNeverのときのみ利用可能という記載に統一されています。
2019/8/1追記 Xcode Beta5の変更の影響
willSetから値の変更の通知が動かなくなった?
willSetでwillChangeのsendでデータの変更を通知していたものは
動かなくなっていました。
下記のようなコードでボタンのdisabledを制御していましたが
Beta5では動かなくなっています。
※ コードは一部省略しています。
final class LoginBindableObject: ObservableObject  {
    var willChange = PassthroughSubject<Void, Never>()

    var id: String = "" {
        willSet {
            willChange.send(())
        }
    }
    var password: String = "" {
        willSet {
            willChange.send(())
        }
    }
    var isEnabled: Bool {
        return !id.isEmpty && !password.isEmpty
    }
}

struct LoginView: View {
    @ObservedObject var viewModel: LoginBindableObject

    var body: some View {
        VStack(alignment: .center, spacing: 24) {
            HStack(spacing: 12) {
                Text("ID:")
                TextField("IDを入力してください", text: $viewModel.id)
                    .textFieldStyle(RoundedBorderTextFieldStyle())
            }
            HStack(spacing: 12) {
                Text("パスワード:")
                SecureField("パスワードを入力してください", text: $viewModel.password)
                    .textFieldStyle(RoundedBorderTextFieldStyle())
            }
            Button("ログイン"){
            }
            .disabled(!viewModel.isEnabled)
        }.padding()
    }
}
こうすればうまく行きました。
※ コードは一部省略しています。
final class LoginBindableObject: ObservableObject  {
    @Published var id: String = ""
    @Published var password: String = ""
    var isEnabled: Bool {
        return !id.isEmpty && !password.isEmpty
    }
}
2019 8/7 追記 ドキュメントの例も更新されていました。
struct MyFoo {
    @Published var bar: String
}
let foo = MyFoo(bar: "bar")
let barSink = foo.$bar
    .sink() {
        print("bar value: \($0)")
}
objectWillChange
上記のwillChangeですがobjectWillChangeというプロパティに変更になっているようでした。
https://developer.apple.com/documentation/combine/observableobject/3362557-objectwillchange
ただ@Publishedを使えば不要なので
単に値の変更通知を行う場合にはあえて使う必要はないのかと思っています。
Cancellableのメモリ管理が変わった(直った?)
↓にも記載があるのですが参照を保持していなくても
参照が残っているような挙動をしていました。
https://medium.com/better-programming/swift-5-1-and-combine-memory-management-a-problem-14a3eb49f7ae
例えば下記の様なテストが以前は通っていました。
※ コードは一部省略しています。
func testApplyLogin() {
    let expectation = self.expectation(description: "testApplyLogin")
    let publisher = AuthPublisher()

   // 参照を保持しない
    _ = publisher.userStream.sink { user in
        XCTAssert(user == .mock)

        expectation.fulfill()
    }
    publisher.apply(.didLogin(.mock))
    waitForExpectations(timeout: 0.5)
}
参照が解放されるはずなので
これは失敗するような気がしますが通っていました。
Beta5では失敗するようになり下記の様に参照を保持する必要が出てきました。
※ コードは一部省略しています。
// クラス変数
var cancellables: [Cancellable] = []

func testApplyLogin() {
    let expectation = self.expectation(description: "testApplyLogin")
    let publisher = AuthPublisher()

    // 参照を保持
    let userStream = publisher.userStream.sink { user in
        XCTAssert(user == .mock)

        expectation.fulfill()
    }
    publisher.apply(.didLogin(.mock))
    cancellables += [
        userStream
    ]

    waitForExpectations(timeout: 0.5)
}
これはバグが修正されたのではないかと考えています。
2019/8/6追記 AnyCancellableのstoreメソッド
AnyCancellableにするとstoreメソッドが利用できます。
store(in:)
https://developer.apple.com/documentation/combine/anycancellable/3333294-store
https://developer.apple.com/documentation/combine/anycancellable/3333295-store
これを利用すると下記のように記載ができます。
@Published var items: [QiitaItemViewModel] = []
@Published var searchText: String = ""
private var cancellables: Set<AnyCancellable> = []

$searchText
    .removeDuplicates()
    .debounce(for: 0.8, scheduler: DispatchQueue.main)
    .flatMap { keyword in
        // ネットワーク通信で情報を取得するなど
    }
    .receive(on: DispatchQueue.main)
    .assign(to: \.items, on: self)
    .store(in: &cancellables)
※
後にわかったことですが
このassignのonにselfを使用した場合に
メモリーリークを起こすようです。
https://forums.swift.org/t/does-assign-to-produce-memory-leaks/29546
2019/8/21追記 Beta6でのアップデート
あまり大きな変更をなさそうですが@PublishedのprojectValueの型がPublished.Publisherになりました。
https://developer.apple.com/documentation/combine/published/publisher
BindingのCollectionへのConditional Comformancegが廃止されました。
https://developer.apple.com/documentation/swiftui/binding
追記や更新について
過去の経緯を追っていくためにも変更履歴は残しておきたいと思います。
今後も更新があったものに関しては随時追っていきたいと思います。
Apple公式の非同期処理を扱うフレームワークの登場
iOS13で新しく追加されたフレームワークの一つに
Combineフレームワークがあります。
これは非同期の処理などを扱うためのフレームワークで
今まではサードライブラリで実装しているものが多くありましたが
今回Appleの正式なものとして登場し注目を浴びています。
私もRxSwiftを業務で使用しているので
何となくそれっぽく使えそうだなと思っていましたが
ちょっと見てみると似ているようで違う部分もあり
今回は今後学んでいくための最初のきっかけとして
WWDC2019の動画を中心にCombineフレームワークについてどういうものか調べてみました。
WWDC2019動画 Introducing Combine
https://developer.apple.com/videos/play/wwdc2019/722
WWDC2019動画 Combine in Practice
https://developer.apple.com/videos/play/wwdc2019/721
まずはIntroducing Combineから見ていきます。
※Combineフレームワークとは?
※ 以下、Combineと呼びます。
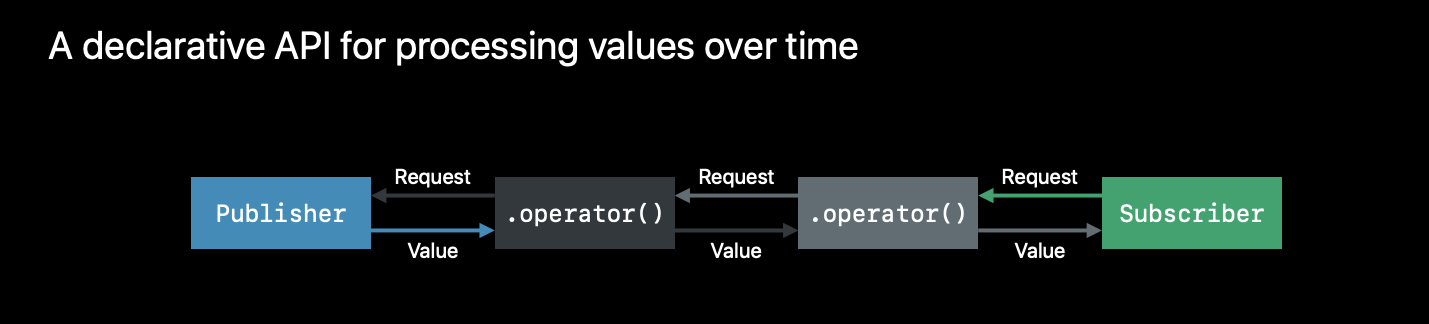
発表の中では
時間とともに値を処理するための統一的で宣言的なAPI
と言っています。
ドキュメントでは
イベントを処理する※Operator(オペレーター)を組み合わせて
非同期のイベント処理を扱いやすくしたもの
とあります。
※ ここからOperatorと呼びます。
※ 2019/6/29 追記
また
※**関数型リアクティブプログラミング(Functional reactive programming)**ライブラリ
の一つであるとも言われています。
※ ここからFRPと呼びます。
強力な型を持ったSwiftの性質を活かして
他の言語やライブラリに見られるのと
同様の関数型リアクティブの概念を使用しています。
FRPとは?
関数型プログラミングを基にして
データの流れ※を扱うプログラミングです。
※ ここからストリームと呼びます。
関数型プログラミングで配列を操作するのと同様に
FRPではデータの流れを操作します。
map、filter、reduceといったメソッドは関数型プログラミングと
同様の機能を持っています。
さらに
FRPではストリームの分割や統合、変換などの機能も有しています。
イベントやデータの連続した断片などを非同期の情報の流れとして扱うことがあるかと思いますが
これはオブジェクトを監視し変更があった際に通知がきて更新を行うという
いわゆるオブザーバー(Observer)パターンで実装します。
時間とともにこれが繰り返されることで
ストリームとしてこの更新を見ることができます。
FRPでは
変化する一つ以上の要素の変化を一緒に見たい
ストリームの途中データに操作を行いたい
エラー場合にある処理を加えたい
あるタイミングで特別な処理を実行したい
など
あらゆるイベントにシステムがどういうレスポンスをするのかをまとめます。
FRPはユーザインターフェイスやAPIなど
外部リソースのデータの変換や処理をするのに効果的です。
CombineとFRP
Combineは
FRPの特徴と強力な型付け言語であるSwiftの特徴を組み合わせて作成されています。
Combineは組み合わせて使えるように構成されており
いくつかのAppleの他のフレームワークに明示的にサポートされています。
SwiftUIではSubscriberも※データの送り手(Publisher)も使用しており
もっとも注目されている例です。
※ 以下、Publisherと呼びます。
FoundationのNotificationCenterやURLSessionも
Publisherを返すメソッドが追加になりました。
4つの特徴
Combineには4つの特徴があります。
ジェネリック
ボイラープレートを減らすことができると同時に
一度処理を書いてしまえばあらゆる型に適応することができます。
型安全
コンパイラがエラーのチェックをしてくれるため
ランタイムエラーのリスクを軽減できます。
Compositionファースト
コア概念が小さくて非常にシンプルで理解しやすく
それを組み合わせてより大きな処理を扱っていきます。
リクエスト駆動
Combineではデータを受け取る側(リクエストをする側)から
あらゆる処理の実行が開始されます。
また
データの流量制御(back pressure)の概念を含んでおり
データを受け取る側が
一度にどのくらいのデータが必要で、どのくらい処理する必要があるのか
などのコントロールをすることができます。
不要になった場合はキャンセルをすることも可能です。
主要な3つコンセプト
Combineには3つの主要なコンセプトがあります。
- Publishers
- Subscribers
- Operators
Publishers
データを提供します。
OutputとFailureの2つのassociatedtypeを持ちます。
https://developer.apple.com/documentation/combine/publisher
値型でSubscriberはPublisherに登録することができます。
発表のスライドでは
Publisherプロトコルは下記のように定義されています。

receive(subscriber:)とsubscribe(_:)
ここがちょっとわかっていないのですが
2019/6/8の時点ですと
ドキュメント上やコードの定義では下記のメソッドが
requiredになっています。
receive(subscriber:)
https://developer.apple.com/documentation/combine/publisher/3229093-receive
しかし
ドキュメントなどを見てみると
This function is called
to attach the specified Subscriber
to this Publisher by subscribe(_:)
と記載があり
実際にAPIとして使用するものとしては
subscribe(_:)
になります。
Outputが出力される値で
Failureがエラー時に出力される型で
OutputはSubscriberのInputの型と
FailureはSubscriberのFailureと一致する必要があります。
Publisher     Subscriber
<Output>  --> <Input>
<Failure> --> <Failure>
例として
NotificationCenterのextensionが紹介されており
エラーが発生しないためFailureにはNeverが指定されています。
extension NotificationCenter {
    struct Publisher: Combine.Publisher {
        typealias Output = Notification
        typealias Failure = Never
        init(center: NotificationCenter, name: Notification.Name, object: Any? = nil)
    }
}
※ 上記の例はコンパイルが通らないのですが、
このメソッド(struct)が結構他のセッションでも使われているのにも関わらず
実装が見つからないので
勝手に脳内補完してみると下記のようになりました。
間違っていたらご指摘ください🙏🏻
extension NotificationCenter {
    struct Publisher: Combine.Publisher {
        typealias Output = Notification
        typealias Failure = Never

        let center: NotificationCenter
        let name: Notification.Name
        let object: Any?

        init(center: NotificationCenter, name: Notification.Name, object: Any? = nil) {
            self.center = center
            self.name = name
            self.object = object
        }

        func receive<S>(subscriber: S) where S : Subscriber, Failure == S.Failure, Output == S.Input {
            subscribe(subscriber)
        }
    }

    func publisher(for name: Notification.Name, object: Any? = nil) -> Publisher {
        return Publisher(center: self, name: name, object: object)
    }
}
https://developer.apple.com/documentation/foundation/notificationcenter/publisher
https://developer.apple.com/documentation/foundation/notificationcenter/3329353-publisher
※ 2019/6/29追記
Combineは便利なPublisherを事前に提供しています。
-
Publishers.Empty
https://developer.apple.com/documentation/combine/publishers/empty -
Publishers.Fail
https://developer.apple.com/documentation/combine/publishers/fail -
Publishers.Just
https://developer.apple.com/documentation/combine/publishers/just -
Publishers.Once
https://developer.apple.com/documentation/combine/publishers/once -
Publishers.Optional
https://developer.apple.com/documentation/combine/publishers/optional -
Publishers.Sequence
https://developer.apple.com/documentation/combine/publishers/sequence -
Publishers.Deferred
https://developer.apple.com/documentation/combine/publishers/deferred -
Publishers.Future
https://developer.apple.com/documentation/combine/publishers/future
※ 2019/7/31 追記 下記はPublishersから移動していました。
https://developer.apple.com/documentation/combine/just
https://developer.apple.com/documentation/combine/empty
https://developer.apple.com/documentation/combine/deferred
https://developer.apple.com/documentation/combine/future
中身はテキトーですが
下記のようにしてAnyPublisherに変換したりできます。
extension Int {
    enum NumberConvertError: Error {
        case convert
    }

    func toAnyPublisher(string: String) -> AnyPublisher<Int, Error> {
        guard let number = Int(string) else {
            return Fail(error: NumberConvertError.convert)
            .eraseToAnyPublisher()
        }
        return Just(number)
            .setFailureType(to: Error.self)
            .eraseToAnyPublisher()
    }
}
setFailureTypeは
PublisherのFailureがNeverの場合のみに使用でき
指定したError Protocolに適合した型を出力するPublisherに変換します。
上記の例ですとJust<Int, Never>からJust<Int, Error>に変換しています。
setFailureType
https://developer.apple.com/documentation/combine/just/3343941-setfailuretype
新しくRecordというstructが追加されいましたが
詳細がわかり次第追記します。
https://developer.apple.com/documentation/combine/record
他のAppleのAPIもPublisherを提供しているものはあります。
-
Timer.publish、Timer.TimerPublisher
https://developer.apple.com/documentation/foundation/timer/timerpublisher -
URLSession dataTaskPublisher
https://developer.apple.com/documentation/foundation/urlsession/3329707-datataskpublisher
さらに
Pulishers.FutureFutureを戻り値にすることで独自のPublisherを生成することもできます。
これはPromiseを返すクロージャを引数に渡すことで初期化されます。
つまり、既存のAPIからもPublisherの生成が可能です。
https://developer.apple.com/documentation/combine/publishers/future/promise
Futureは
1つ値を出力して終了するか
エラーで失敗するか
のいずれかのみを結果として出力します。
また
Subscribeされていなくても
Futureインスタンスが生成されると同時に
出力する値の計算を実行します。
そして全てのsubscriberは同じ値を受け取ります。
2019/7/17 追記 Futureの移動に伴いPromiseもPublishersから移動していたようです。
https://developer.apple.com/documentation/combine/future/promise
Subscribers
データの受け取り側です。
Publisherから出力された値や
出力の最後の完了イベントを受け取ります。
Subscriberは参照型です。
Subscriberプロトコルは下記のように定義されています。

3つのメソッドは下記のようになっています。
receive(subscription:)
Subscriberが
Publisherへの登録が成功して
値をリクエストすることができることを伝えます。
receive(subscription:)
https://developer.apple.com/documentation/combine/subscriber/3213655-receive
またこの中でsubscriptionのrequest(_:)を呼ぶことで
Publisherへ何回の出力した値を受け取るかを伝えます。
request(_:)
https://developer.apple.com/documentation/combine/subscription/3213720-request
引数にはSubscribers.Demandというstructを渡します。
Subscribers.Demand
https://developer.apple.com/documentation/combine/subscribers/demand
staticな変数unlimitedとnone
staticなメソッドmax(Int)
があります。
unlimitedで無制限値を受け取り
noneは値を受け取らないことを意味します。
max(Int)では具体的な数字を指定することができ
max(0)とnoneは同じ意味になります。
receive(_ input: Self.Input) -> Subscribers.Demand
実際にPublisherから出力された値を受け取ります。
receive(_:)
https://developer.apple.com/documentation/combine/subscriber/3213653-receive
この際にSubscribers.Demandを戻り値に指定しますが
これは現在のDemandに対しての調整値を指定します。
例えば
func receive(_ input: Int) -> Subscribers.Demand {
    return .none
}
とするとこれは
今後値を受け取らないという意味ではなく
現在のDemandの状態を維持する
ということを意味します。
他の例を見てみると
func receive(subscription: Subscription) {
    subscription.request(.max(2))
}

func receive(_ input: String) -> Subscribers.Demand {
    return input == "Add" ? .max(1) : .none
}
この場合
最初はmax(2)が指定されていましたが
Addという文字列を受け取った場合は
max(1)は追加されているため
結果としてmax(3)になります。
ちょっと紛らわしいので注意が必要です。
さらにmax(Int)を使用する場合は
0以上の値を指定しなければならず
マイナス値を設定するとfatalErrorが発生します。
receive(completion:)
Publisherの値の出力が完了(これ以上値を出力しない)ということを
Subscriberに伝えます。
これは正常な場合もエラーが起きた場合もこのメソッドが呼ばれます。
receive(completion:)
https://developer.apple.com/documentation/combine/subscriber/3213654-receive
例として
SubscribersのextensionのAssignクラスが紹介されていました。
これはRootの中のInputにPublisherから受け取った値を適用します。
keypathはパイプラインが生成された時に設定されます。
extension Subscribers {
    class Assign<Root, Input>: Subscriber, Cancellable {
        typealias Failure = Never
        init(object: Root, keyPath: ReferenceWritableKeyPath<Root, Input>)
    }
}
※ 途中でassignというメソッドが出てきてますが
こちらもNotificationCenterの時と同様にこちらも一部脳内補完をしました。
※ 2019/6/29 修正
ドキュメントを見つけたので一部修正しました。
(SubscriberではなくPublisherのextensionでした)
extension Publisher where Self.Failure == Never {
    func assign<Input>(to keyPath: ReferenceWritableKeyPath<Self, Self.Output>, on object: Root) -> AnyCancellable {
        return Subscribers.Assign<Self, Input>(object: object, keyPath: keyPath)
    }
}
例えば下記のように使用します。
assign(to: \.isEnabled, on: signupButton)
assignはUIKitやAppKitでも使用することが可能です。
※ 2019/6/29追記
Combineは2つのSubscriberを事前に定義しています。
どちらもCancellableプロトコルに適合しています。
https://developer.apple.com/documentation/combine/cancellable
Assign
上記で紹介させていただきました。
Sink
Publisherから受け取った値を引数にしたクロージャを受け取ります。
Sinkを使うと独自の実装でパイプラインを完了させることができます。
またsinkというメソッドが存在します。
Publisherから受け取った値を引数にしたクロージャを受け取ります。
sinkを使うと独自の実装をすることができます。
sink
https://developer.apple.com/documentation/combine/publisher/3343978-sink
https://developer.apple.com/documentation/combine/publisher/3235806-sink
※ こちらも一部脳内補完しました。
extension Publisher {

    public func sink(receiveCompletion: ((Subscribers.Completion<Self.Failure>) -> Void)? = nil, receiveValue: @escaping ((Self.Output) -> Void)) -> Subscribers.Sink<Self> {
        return Subscribers.Sink(receiveCompletion: receiveCompletion, receiveValue: receiveValue)
    }
}
もしCompletionを取得するクロージャを含まない場合は
エラーを受け取ることができません。
一つ注意点として
SubscriberはCombineの処理の実行させます。
そのためsinkで処理が終わっている場合は
その時点でSubscriberが生成され、Publisherと接続している状態になります。
つまり繋げた時点で暗黙的にsubscribeされ
無限のデータのリクエストを要求したことになります。
let _ = remoteDataPublisher.sink { value in
  print(".sink() received \(String(describing: value))")
}
PublisherがCompletionを送信するまで
値が更新されるたびにクロージャ内の処理が実行されます。
エラーやFailureが起きたあとはクロージャは実行されません。
sinkでSubscriberを生成した場合は繰り返し値を受け取ります。
失敗を処理した場合はCompletionを受け取るクロージャを渡す必要があります。
この時は2つのクロージャを渡します。
let _ = remoteDataPublisher.sink(receiveCompletion: { completion in
    switch completion {
    case .finished:
        // ここでは値を受け取れないが完了したことを伝えることはできる
        break
    case .failure(let anError):
        // エラーを受け取ることができる
        print("エラー: ", anError)
        break
    }
}, receiveValue: { someValue in
    // 値を受け取って処理することができる
    print(".sink() received \(someValue)")
})
receiveCompletionでは
enumのSubscribers.Completionの受け取ります。
https://developer.apple.com/documentation/combine/subscribers/completion
failureケースではErrorをassociatedValueに持ち
エラーの原因へアクセスすることができます。
SwiftUIではほぼ全てのコントロールがSubscriberです。
onReceive(publisher)はsinkに似ており
クロージャを受け入れてSwiftUIの@Stateや@Bindingsに値を設定します。
PublisherとSubscriberのライフサイクル
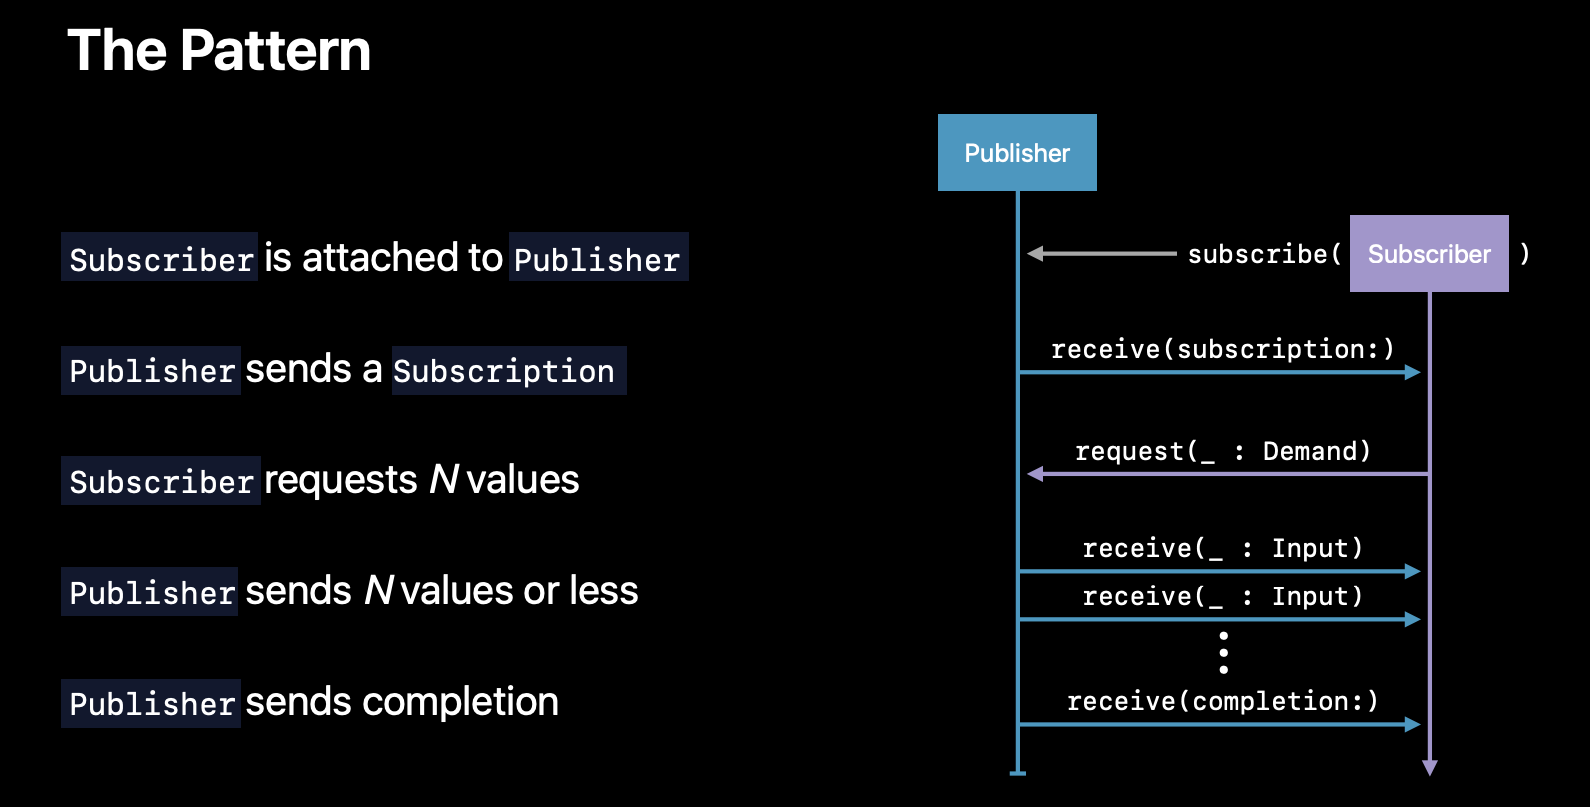
図にある通りですが
-
SubscriberがPublisherに紐づく -
SubscriberがPublisherから登録完了のイベントを受け取る -
SubscriberがPublisherへリクエストを送りイベントを受け取りが開始される -
SubscriberがPublisherから値を受け取る(繰り返し) -
SubscriberがPublisherから出力終了のイベントを受け取る
Operators
上記で示した2つの例を使ってOperatorsの説明をしています。
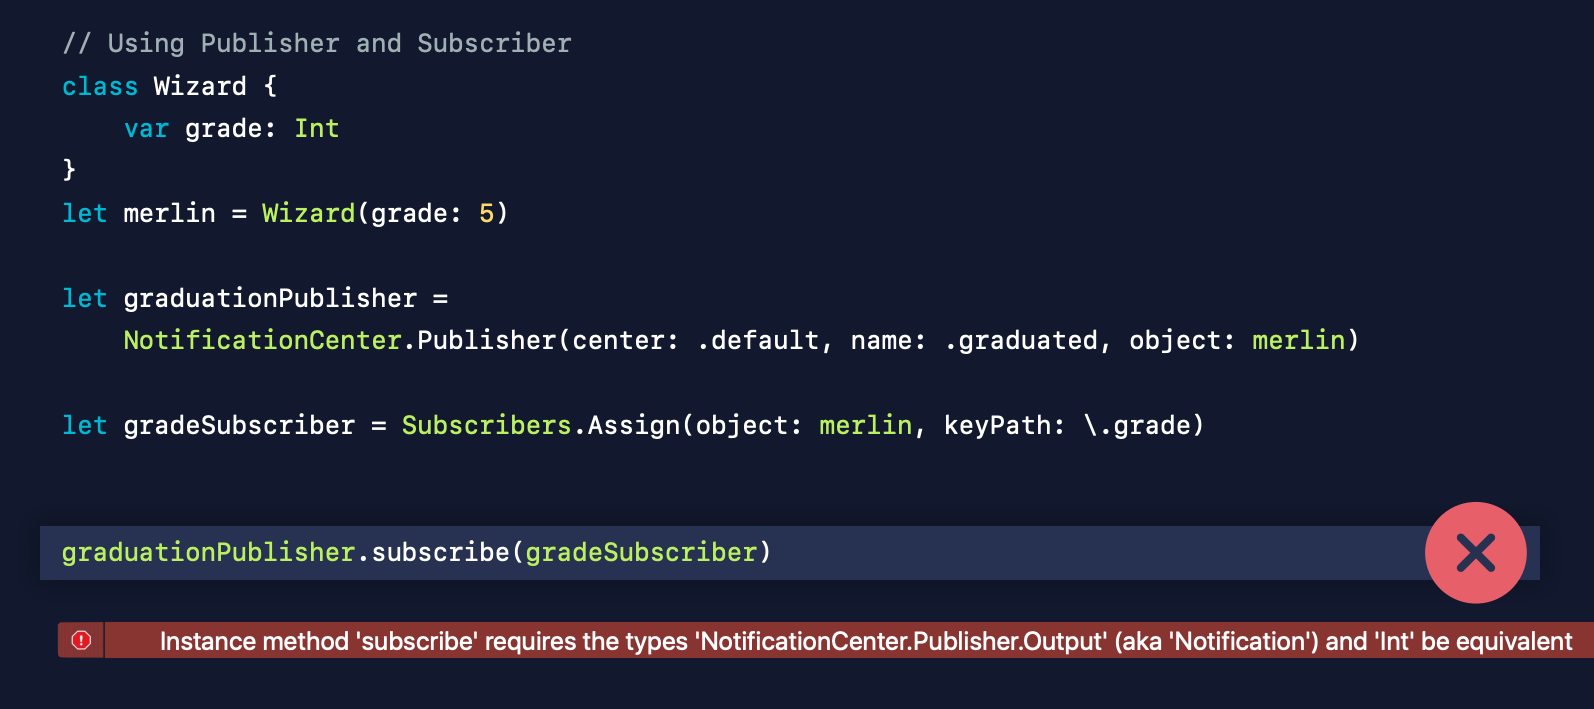
Publisher側ではNotificationを出力しているにも関わらず
Subscriber側ではIntが来ることを想定しているため
型が合わずにコンパイルエラーになります。
※そもそもコンパイルエラーというのは気にせずにいきましょう。

ここの隙間を埋めるのがOperatorsです。
※ Operatorsは特別な名前ではなく
複数のOperatorを表す単語として使用されています。
OperatorsはPublisherプロトコル適合にし
上流のPublisherに登録して
出力された値を受け取って変換した結果を
下流のSubscriberに送ります。
Operatorsは値型です。
OperatorsはPublishersというenumの中でstructで定義されています。
https://developer.apple.com/documentation/combine/publishers
Combineの特徴でもある
Compositionファーストを実現するためにも
Operatorsを活用した組み合わせを行っていきます。

さらにOperatorsは
Swiftのよく利用されるメソッドにシンタックスに合わせた
インスタンスメソッドも定義されております。
https://developer.apple.com/documentation/combine/publisher
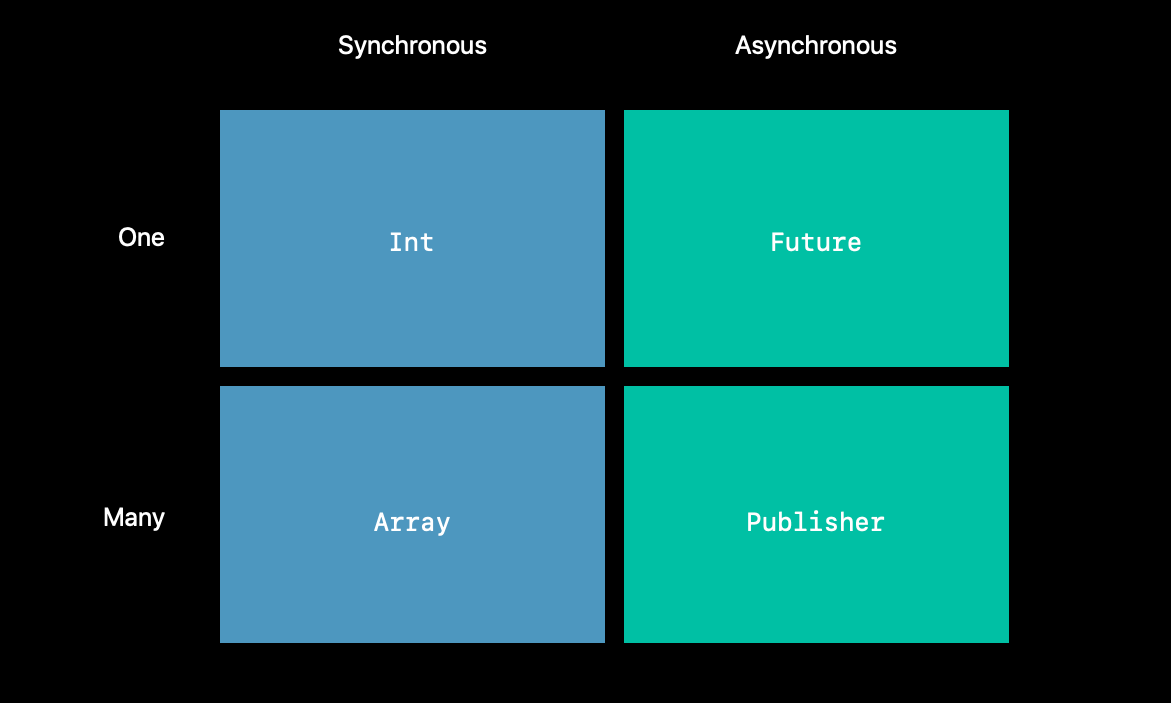
図にすると下記の様な関係で
Intのような一つの値を扱う型のメソッドは
CombineのFutureという型(あとで出てきます)に同じようなメソッドがあり
Arrayのような複数の値を扱う型のメソッドが
CombineのPublisher型にも存在するということだそうです。
※ 2019/6/29追記
tryというprefixがついた関数はErrorを返す可能性があることを示します。
例えば、mapにはtryMapがあります。
mapはどんなOutputとFailureの組み合わせも可能ですが
tryMapの場合どんなInputやOutputとFailureの組み合わせも許可されていますが
エラーがthrowされた場合に出力されるFailureの型は必ずErrorになります。
非同期処理のOperators
次に非同期処理時にPublisherを組み合わせる
OperatorsとしてZipとCombineLatestが紹介されていました。
Zip
複数のPublisherの結果を待ってタプルとして一つにまとめます。
まず最初に、結合しているすべてのPublisherから新しい値が一つ出力されないと値は出力され始めません。
また、それ以降も結合しているすべてのPublisherから新しい値が出力されないと値は出力されません。

Zip
https://developer.apple.com/documentation/combine/publishers/zip
CombineLatest
複数のPublisherの出力を一つの値にします。
どれかの新しい値を受け取ったら新しい結果を出力します。
まず最初に、結合しているすべてのPublisherから新しい値が一つ出力されないと値は出力され始めません。
それ以降は、結合しているいずれかのPublisherから新しい値が出力されると値が出力されます。
CombineLatest
https://developer.apple.com/documentation/combine/publishers/combinelatest
Operatorについては↓により詳細を記載しています。
https://qiita.com/shiz/items/cff44fe801243b8a5496
次にCombine in Practiceのセッションを見ていきます。
より詳細を見る
こちらのセッションでは
具体例を交えてCombineの使い方をより詳細に見ています。
例は通知で受け取ったMagicTrickというクラスの値から
nameというStringのプロパティを取り出すというような話です。
受け取る値はJSON形式で
JSONDecoderでdecodeできるものとします。
内容は特に関係なく
出力される型に注目していきます。
※ コンパイルは通りません
Publisher
最初の通知で受け取るOutputはNotificationです。
失敗はないのでFailureはNeverです。
let trickNamePublisher = NotificationCenter.default.publisher(for: .newTrickDownloaded)

// Notification Output
// Never Failure
次にmapでOutputをDataに変換します。
FailureはNeverのままです。
let trickNamePublisher = NotificationCenter.default.publisher(for: .newTrickDownloaded)
    .map { notification in
        return notification.userInfo?["data"] as! Data
    }
// Data Output
// Never Failure
次にOutputをMagicTrickクラスに変換します。
この際にdecodeでエラーが発生する可能性があるため
FailureはErrorになります。
let trickNamePublisher = NotificationCenter.default.publisher(for: .newTrickDownloaded)
    .map { notification in
        return notification.userInfo?["data"] as! Data
    }
    .tryMap { data in
        let decoder = JSONDecoder()
        try decoder.decode(MagicTrick.self, from: data)
    }
    // MagicTrick
    // Error
ちなみにdecodeはPublisherのextensionとして定義されているため
下記のようにも書けます。
let trickNamePublisher = NotificationCenter.default.publisher(for: .newTrickDownloaded)
    .map { notification in
        return notification.userInfo?["data"] as! Data
    }
    .decode(MagicTrick.self, JSONDecoder())
    // MagicTrick
    // Never
ここでエラーが発生する可能性があり
エラー処理を扱うOperatorsが紹介されています。
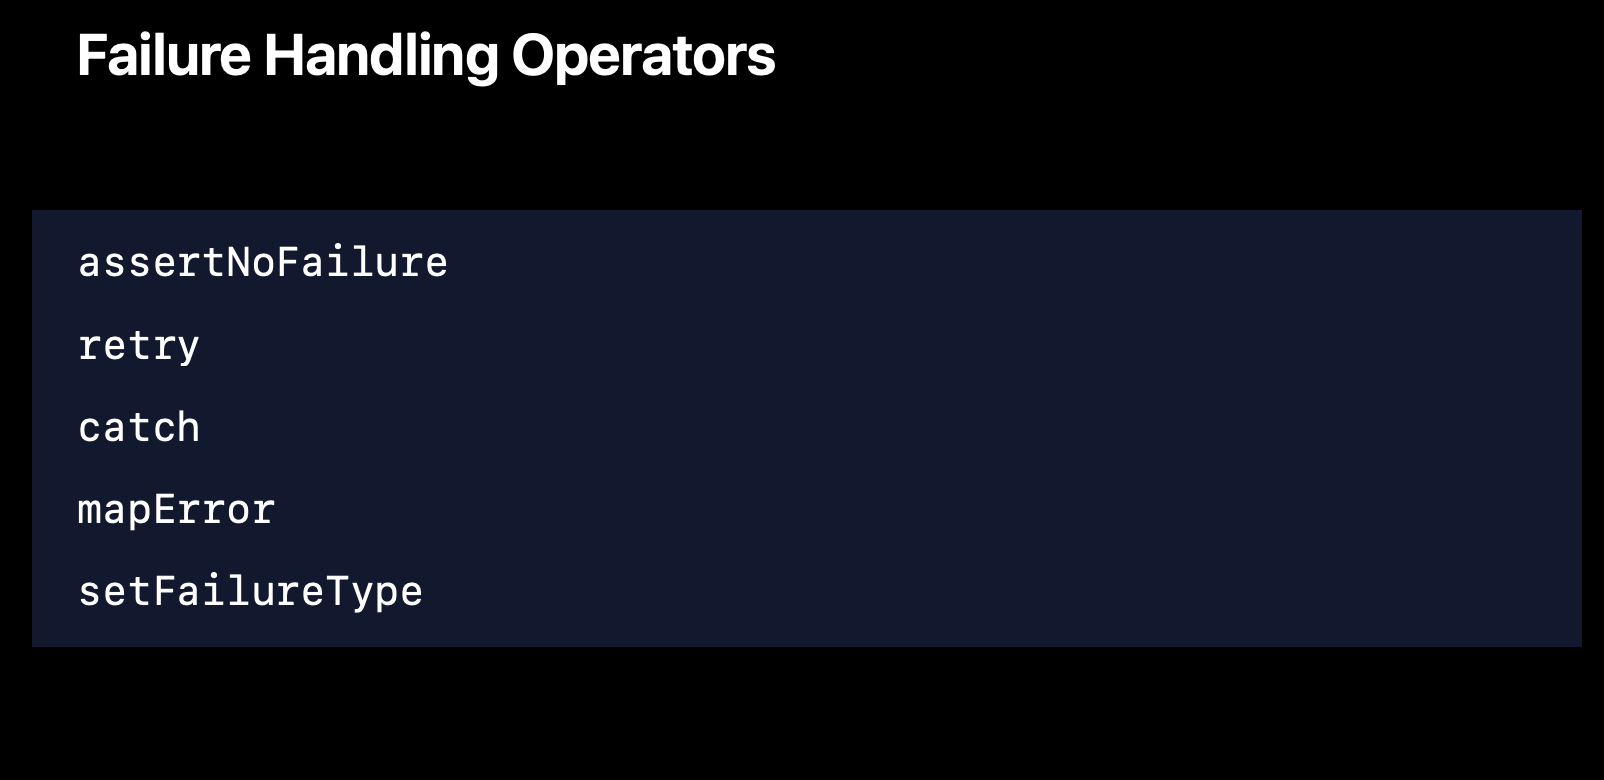
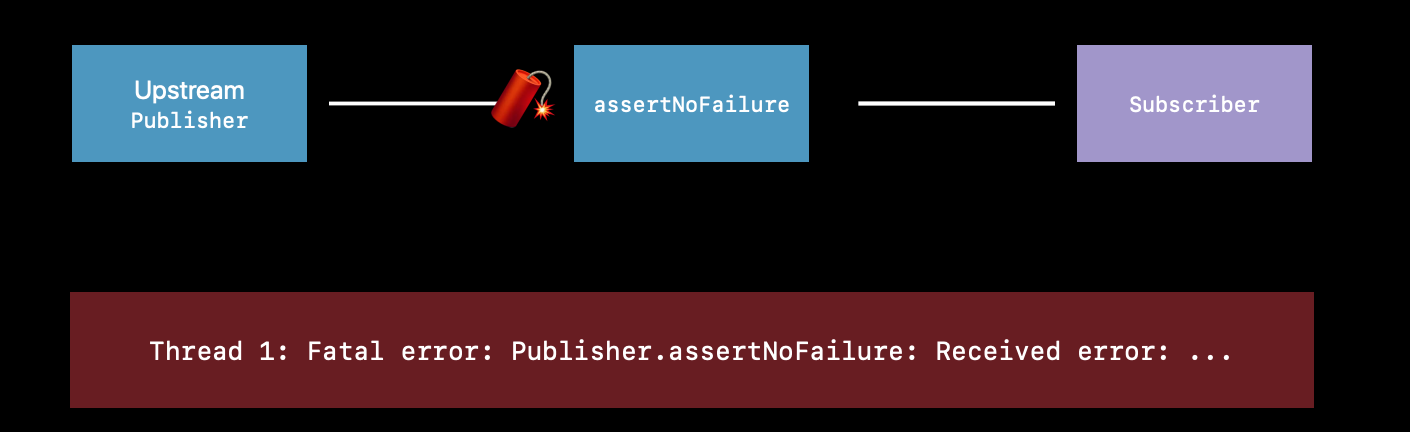
assertNoFailure()の場合はエラーの際にFatal errorが発生します。
https://developer.apple.com/documentation/combine/publisher/3204686-assertnofailure
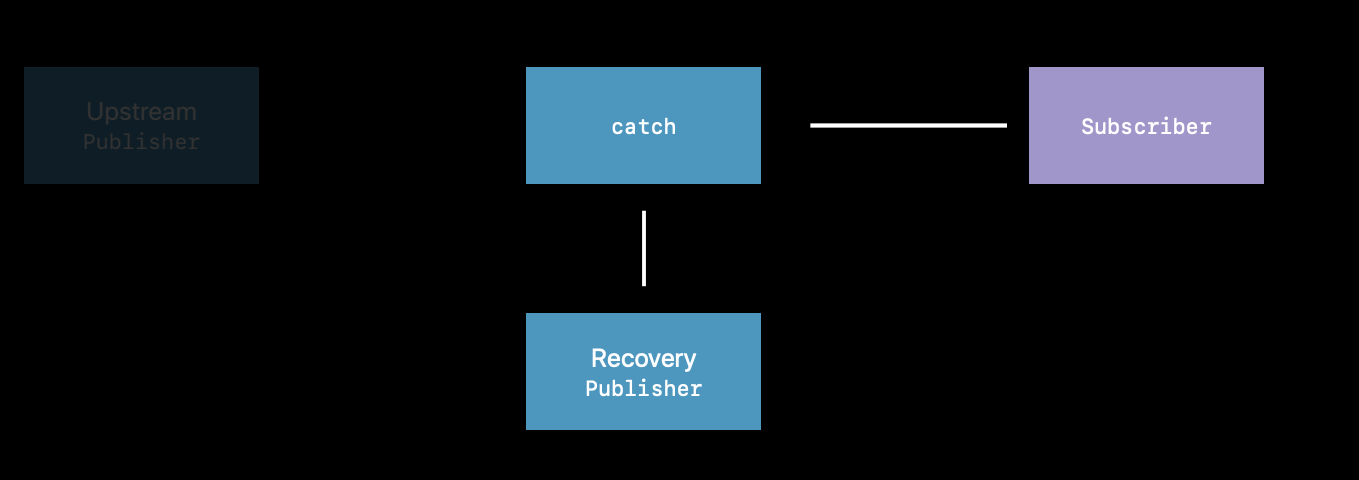
catchの場合は自分でエラーの処理方法を決められます。
今回のケースですとJustで新たにPublisherを返すようにしています。
catch
https://developer.apple.com/documentation/combine/publisher/3204690-catch
Just
https://developer.apple.com/documentation/combine/publishers/just
2019/7/17 追記 JustはPublishersから移動していました。
https://developer.apple.com/documentation/combine/just
let trickNamePublisher = NotificationCenter.default.publisher(for: .newTrickDownloaded)
    .map { notification in
        return notification.userInfo?["data"] as! Data
    }
    .decode(MagicTrick.self, JSONDecoder()
    .catch {
        return Just(MagicTrick.placeholder)
    }

// MagicTrick
// Never
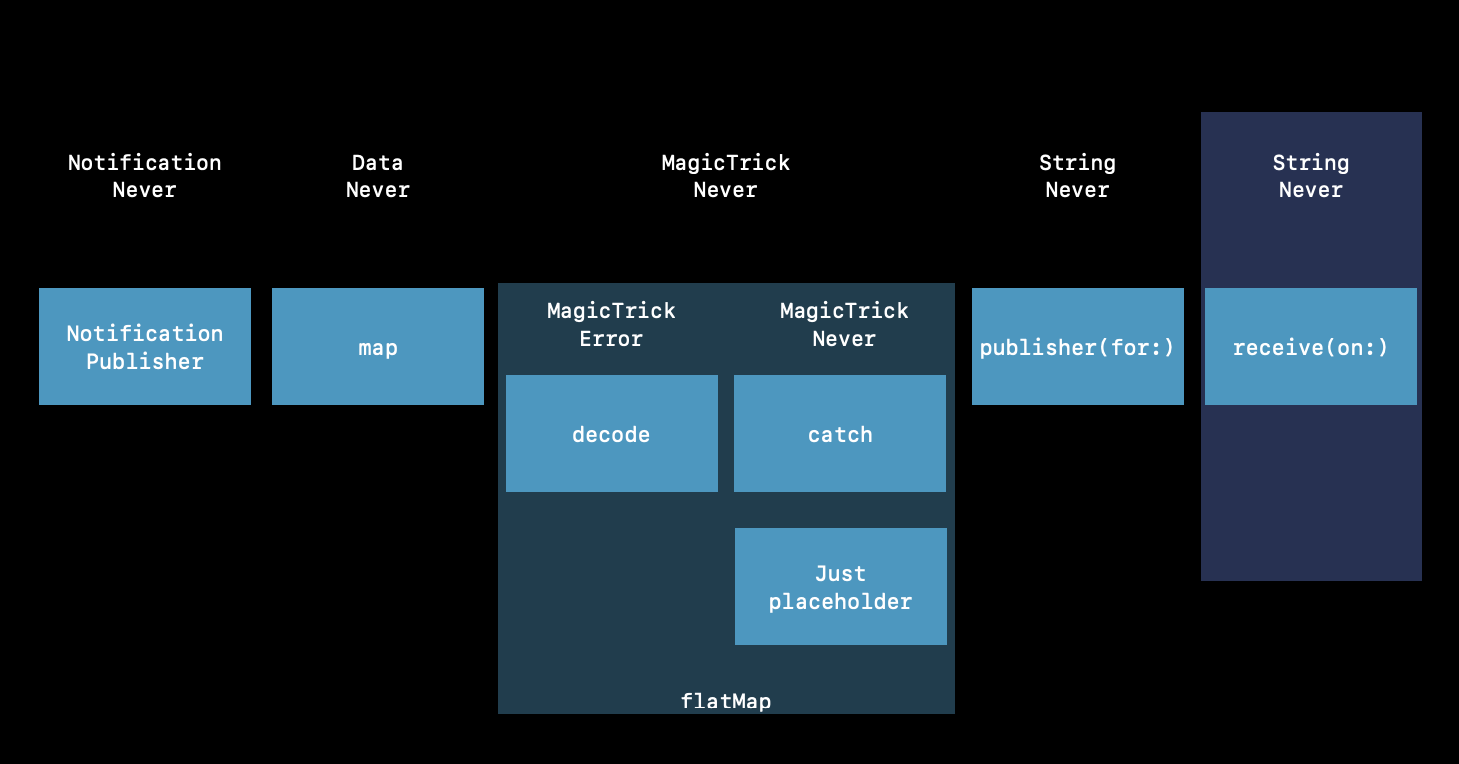
これまでの流れが下記のようになっています。
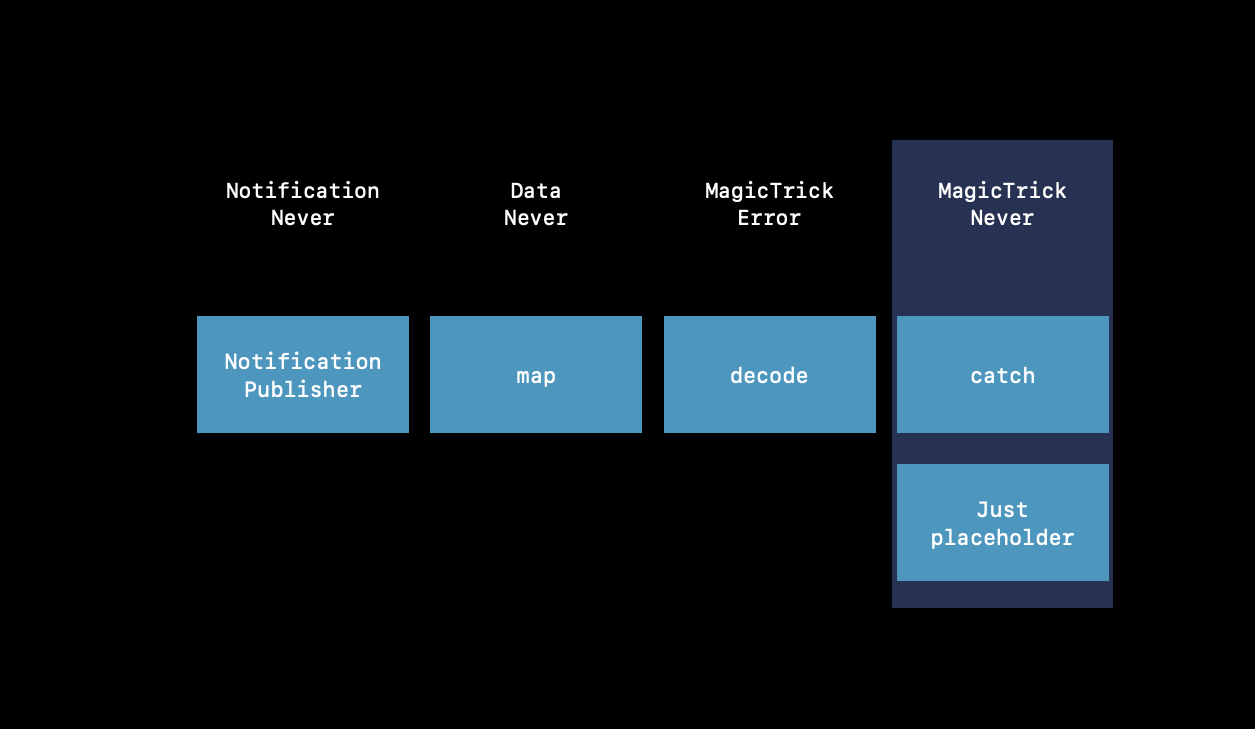
ここで一つ問題が出てきました。
エラーが発生した場合にPublisherは出力を止めてしまいます。
※ 2019/6/29追記
なぜかというと
catchはPublisherを別のPublisherへと置き換えて返却します。
これによってcatchよりも上位で実行されていた処理を効率的に実行させなくすることができます。
一方でcatchが発生した以降は元々のPublisherからの出力は受け取れなくなります。
今回のケースでは
エラーが発生しても出力を続けて欲しいとします。
その場合はflatMapを用います。
flatMap
https://developer.apple.com/documentation/combine/publisher/3204712-flatmap
FlatMap
https://developer.apple.com/documentation/combine/publishers/flatmap
flatMapは受け取った全ての値を
既存のもしくは新しい一つのPublisherに変換します。
flatMapを使うことでエラーが発生してとしても
新しいPublisherを生成して出力を継続することが可能になります。
dataをJustで包み
新しいPublisherを生成しています。
let trickNamePublisher = NotificationCenter.default.publisher(for: .newTrickDownloaded)
    .map { notification in
        return notification.userInfo?["data"] as! Data
    }
    .flatMap { data in
        return Just(data)
            .decode(MagicTrick.self, JSONDecoder()
            .catch {
                return Just(MagicTrick.placeholder)
            }
    }

// MagicTrick
// Never
こうすることでエラーが発生しないままになります。
ではここからnameを取り出します。
let trickNamePublisher = NotificationCenter.default.publisher(for: .newTrickDownloaded)
    .map { notification in
        return notification.userInfo?["data"] as! Data
    }
    .flatMap { data in
        return Just(data)
            .decode(MagicTrick.self, JSONDecoder()
            .catch {
                return Just(MagicTrick.placeholder)
            }
    }
    .publisher(for: \.name)

// String
// Never
次にSubscriberが値を受け取るタイミングを指定します。
今回の場合はメインスレッドで受け取るようにしていますが
UIの更新などはメインスレッドで行う必要があります。
let trickNamePublisher = NotificationCenter.default.publisher(for: .newTrickDownloaded)
    .map { notification in
        return notification.userInfo?["data"] as! Data
    }
    .flatMap { data in
        return Just(data)
            .decode(MagicTrick.self, JSONDecoder()
            .catch {
                return Just(MagicTrick.placeholder)
            }
    }
    .publisher(for: \.name)
    .receive(on: RunLoop.main)
// String
// Never
receive(on:options:)
https://developer.apple.com/documentation/combine/publisher/3204743-receive
これはドキュメントの例の方がイメージしやすいかもしれません。
PublisherはバックグラウンドでJSONを処理し
SubscriberはメインスレッドでUIの更新を行います。
let jsonPublisher = MyJSONLoaderPublisher() // Some publisher.
let labelUpdater = MyLabelUpdateSubscriber() // Some subscriber that updates the UI.

jsonPublisher
    .subscribe(on: backgroundQueue)
    .receiveOn(on: RunLoop.main)
    .subscribe(labelUpdater)
最終的なPublisherの処理の流れです。
補足: RunLoop.mainとDispatchQueue.main
以下のコードではサンプルコードに合わせてRunLoop.mainを使っていますが、DispatchQueue.mainも利用可能です。ただし、両者には微妙に動作が異なるため置き換える際にはご注意ください。
主な違いはRunLoopがbusyになっている場合、DispatchQueue.mainを指定するとRunLoopの処理を待ちません。例えば、ダウンロードした画像をスクロール中に表示するのは、DispatchQueue.mainをスケジューラとして使用した場合のみ、すぐに表示されます。
詳しくはこちらの記事をご参考ください。
https://www.avanderlee.com/combine/runloop-main-vs-dispatchqueue-main/
Subscriber
次に受け取り側を見ていきます。
前述しましたが
Subscriberは主に3つのものを受け取ります。
- 正確に一度きりの登録完了の通知
- 出力された値(0回以上)
- 出力の終了またはエラーの通知
Subscriberの種類
下記のようなものが挙げられていました。
- keyPath
- Sinks
- Subjects
- SwiftUI
Publisherの例の続きを見ていきます。
let trickNamePublisher = ... // Publisher of <String, Never>

let canceller = trickNamePublisher.assign(to: \.someProperty, on: someObject)

canceller.cancel()
assignはPublisherから受け取った値をkeypathで定義されたオブジェクトへ渡し
Subscriberを生成します。
assign(to:on:)
https://developer.apple.com/documentation/combine/publisher/3235801-assign
注目点としては
戻り値のcancellerでCancellableプロトコルに適合したインスタンスを返却します。
※ Subscriberだと思ってもらえば大丈夫です。
Cancellable
https://developer.apple.com/documentation/combine/cancellable
cancelメソッドを呼ぶことで
メモリから解放することができます。
このように手動でcancelメソッドを呼ぶこともできますが
忘れてしまってメモリが解放されないままでいるリスクもあります。
そこでAnyCancellableというクラスが用意されており
deinitが呼ばれた際に自動でcancelメソッドを呼びます。
AnyCancellable
https://developer.apple.com/documentation/combine/anycancellable
上記で記述しましたsinkも紹介されていました。
let canceller = trickNamePublisher.sink { trickName in
 // Do Something with trickName
}
Subjects
次にSubjectsについて紹介されています。
SubjectsはPublisherとSubscriberの間のような存在で
複数のSubscriberに値を出力できます。
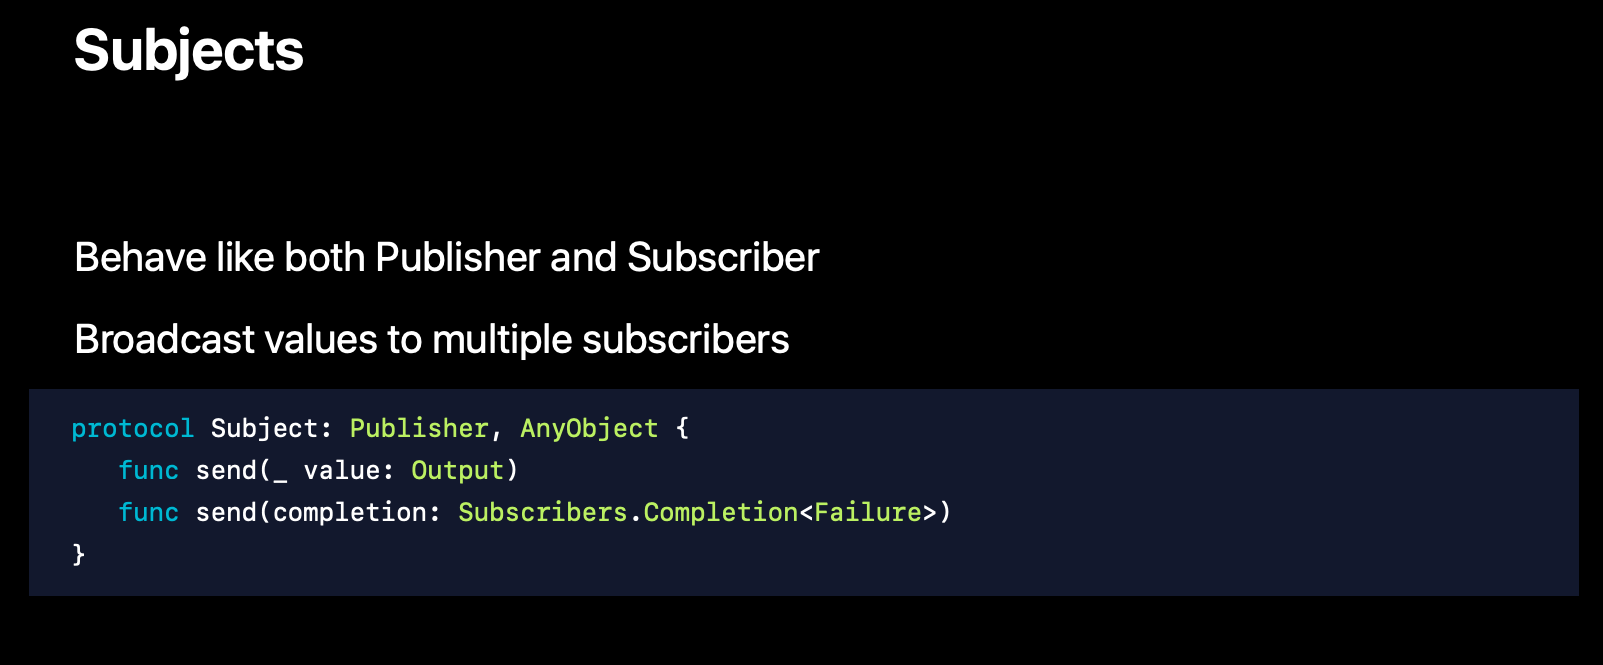
send(_:)
Subscriberに値を出力します。
send(_:)
https://developer.apple.com/documentation/combine/subject/3213648-send
send(completion:)
Subscriberに出力終了の通知を送ります。
send(completion:)
https://developer.apple.com/documentation/combine/subject/3213649-send
2種類のSubjectがあります。
PassthroughSubject
値を保持せずに来たものをそのまま出力します。
PassthroughSubject
https://developer.apple.com/documentation/combine/passthroughsubject
CurrentValueSubject
最後に出力した値を一つ保持しつつ値を出力します。
後からsubscribeした場合の初期値に利用するためです。
CurrentValueSubject
https://developer.apple.com/documentation/combine/currentvaluesubject
Subjectの例
下記のようにsubscribeしたり
sendで値の出力もできます。
let canceller = trickNamePublisher.assign(to: \.someProperty, on: someObject)

let magicWordsSubject = PassthroughSubject<String, Never>()

trickNamePublisher.subscribe(magicWordsSubject)

let canceller = magicWordsSubject.sink { value in
    // do something with the value
}

magicWordsSubject.send("Please")
同じPublisherにsubscribeするSubscriberが多い場合は
share使うことで参照型に変換でき
値の共有をすることもできます。
let sharedTrickNamePublisher = trickNamePublisher.share()
share
https://developer.apple.com/documentation/combine/publisher/3204754-share
SwiftUI
SwiftUIはSubscriberを持っているため
利用側はPublisherを設定するだけで
値の更新などを行うことができるようになっています。
BindableObjectプロトコル(deprecated)
BindableObjectはPublisherプロトコルに適合した型の
didChangeというプロパティを持っています。

BindableObject
https://developer.apple.com/documentation/swiftui/bindableobject
下記はスライドの例です。
※コンパイルはできません。
class WizardModel : BindableObject {
    var trick: WizardTrick { didSet { didChange.send() }
    var wand: Wand? { didSet { didChange.send() }

    let didChange = PassthroughSubject<Void, Never>()
}

struct TrickView: View {
    @ObjectBinding var model: WizardModel
    var body: some View {
        Text(model.trick.name)
    }
}
trickやwandの変更されると
didChangeがsendを送ると
それに応じてSwiftUIが@ObjectBinding var model: WizardModelを更新し
Text(model.trick.name)に更新結果が反映されます。
※SwiftUIの詳細に関しては割愛させていただきます。
2019/7/19 追記
Xcode11 Beta4でBindableObjectがdidからwillに変わったようです。
class WizardModel : BindableObject {
    var trick: WizardTrick { willSet { willChange.send() }
    var wand: Wand? { willSet { willChange.send() }

    let willChange = PassthroughSubject<Void, Never>()
}

struct TrickView: View {
    @ObjectBinding var model: WizardModel
    var body: some View {
        Text(model.trick.name)
    }
}
2019/7/30 追記 ObservableObjectプロトコル
Xcode11 Beta5でBindableObjectは非推奨になり
ObservableObjectを使うようになったようです。
BindableObjectはObservableObjectとIdentifiableに適合するようになっています。
これはSwiftUIではなくCombineフレームワークに含まれます。
ちなみにIdentifiableはStandard Libraryに移動しました。
ObservableObject
https://developer.apple.com/documentation/combine/observableobject
Identifiable
https://developer.apple.com/documentation/swift/identifiable
また、@ObjectBindingも@ObservedObjectに名前が変わりました。
@ObjectBindingは@ObservedObjectのtypealiasになっています。
public typealias ObjectBinding = ObservedObject
import Combine

class WizardModel : ObservableObject {
    var trick: WizardTrick { willSet { willChange.send() }
    var wand: Wand? { willSet { willChange.send() }

    let willChange = PassthroughSubject<Void, Never>()
}

struct TrickView: View {
    @ObservedObject var model: WizardModel
    var body: some View {
        Text(model.trick.name)
    }
}
#既存のアプリに適応する
以上のように
Combineの特徴を例を挙げて
見てきました。
最後により詳細な例を通して
もう少し深く見ていきます。
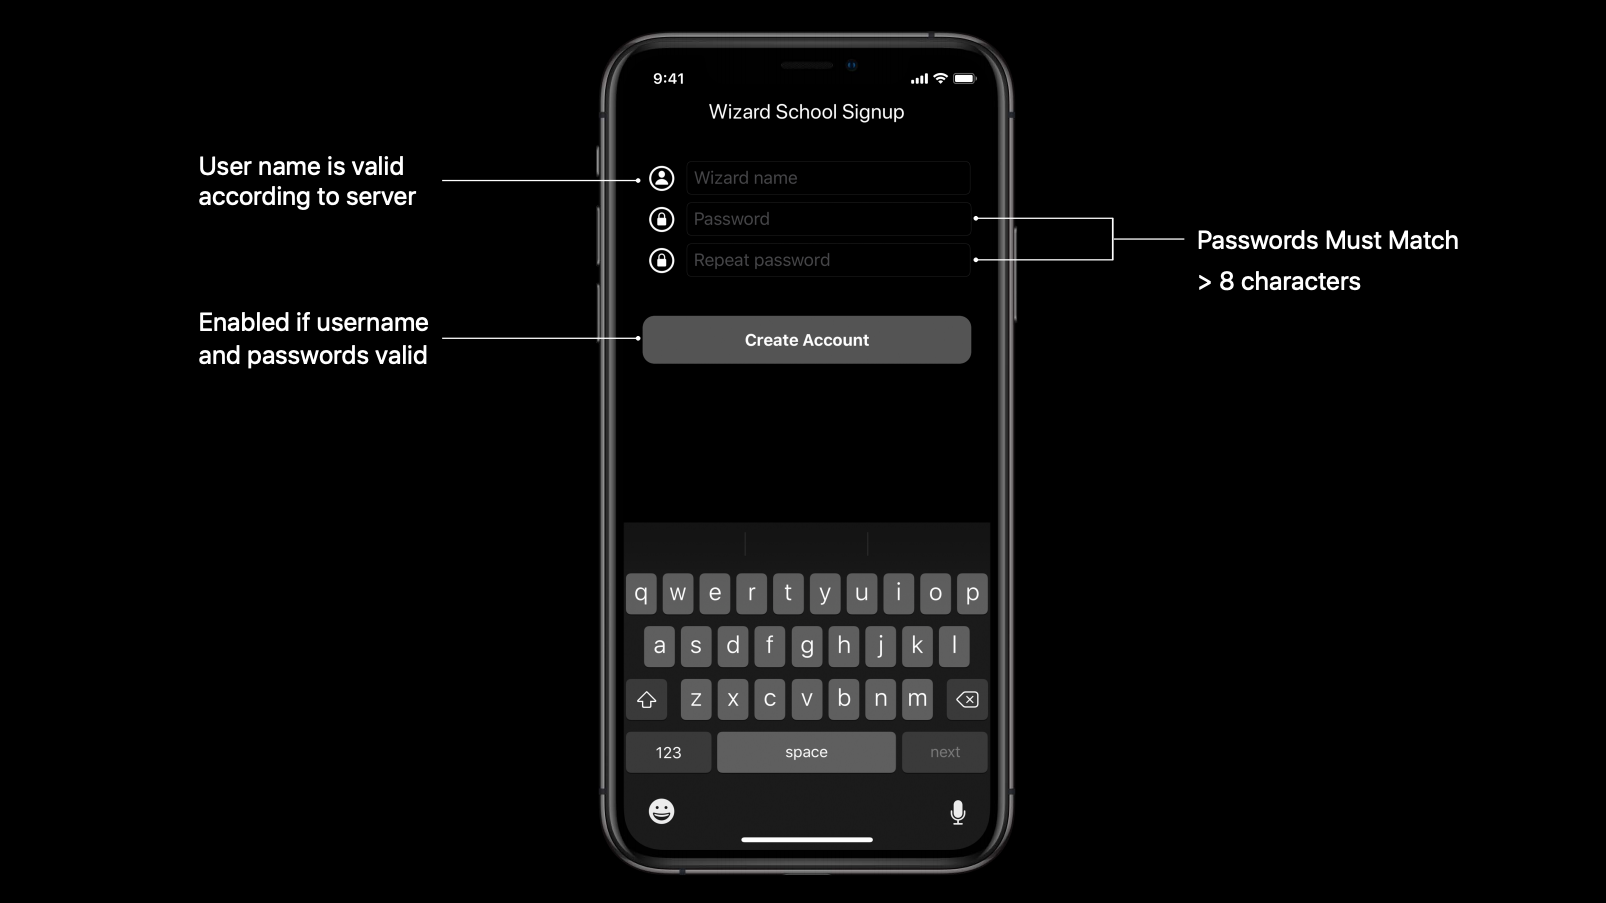
内容
ユーザ名とパスワードとパスワード確認用のテキストフィールドがあり
全ての項目が妥当な値になるとユーザ登録ボタンが有効になるようにします。
var password: String = ""
@IBAction func passwordChanged(_ sender: UITextField) {
    password = sender.text ?? ""
}

var passwordAgain: String = ""
@IBAction func passwordAgainChanged(_ sender: UITextField) {
    passwordAgain = sender.text ?? ""
}
これまでのUIKitですと
上記のような形で変更を監視して
値に変更を反映するためには
さらにUIViewの更新処理を自分で書く必要がありました。
これをPublisherを使用する形へ変更します。
@Published var password: String = ""
@IBAction func passwordChanged(_ sender: UITextField) {
    password = sender.text ?? ""
}

@Published var passwordAgain: String = ""
@IBAction func passwordAgainChanged(_ sender: UITextField) {
    passwordAgain = sender.text ?? ""
}
@Published
これはSwift5.1のProperty Wrappersという機能を使って
@Publishedというアノテーションを適用することで
プロパティをPublisherにすることができます。
Property Wrappersについては下記をご参照ください。
https://github.com/DougGregor/swift-evolution/blob/property-wrappers/proposals/0258-property-wrappers.md
※現在下記のようなissueがあり
Xcode上で色々調べることができない状態にあります。
The Foundation integration for the Combine framework is unavailable.
The following Foundation and Grand Central Dispatch integrations
with Combine are
unavailable: KeyValueObserving, NotificationCenter, RunLoop, OperationQueue, Timer, URLSession, DispatchQueue, JSONEncoder, JSONDecoder,
PropertyListEncoder, PropertyListDecoder,
and the @Published property wrapper. (51241500)
2019/6/18追記
Xcode11 Beta2より補完が効くようになりました。
The Foundation integration for the Combine framework is now available.
The following Foundation and Grand Central Dispatch integrations
with Combine are available:
KeyValueObserving, NotificationCenter, RunLoop, OperationQueue, Timer,
URLSession, DispatchQueue, JSONEncoder, JSONDecoder,
PropertyListEncoder, PropertyListDecoder,
and the @Published property wrapper. (51241500)
ドキュメントもあります。
Published
https://developer.apple.com/documentation/combine/published
FailureがNeverのPublisherです。
https://developer.apple.com/documentation/combine/published/failure
下記のようにPublisherとしての機能が活用できます。
@Published var password: String = ""
self.password = "1234" // The published value is `1234`

let currentPassword: String = self.password
let printerSubscription = $password.sink {
    print("The published value is '\($0)'") // The published value is 'password'
}
self.password = "password"
アプリの例では
パスワードとパスワード確認用のテキストフィールドを
組み合わせたバリデーションが必要になります。
この時にCombineLatestを活用します。
https://developer.apple.com/documentation/combine/publishers/combinelatest
https://developer.apple.com/documentation/combine/publisher/3204695-combinelatest
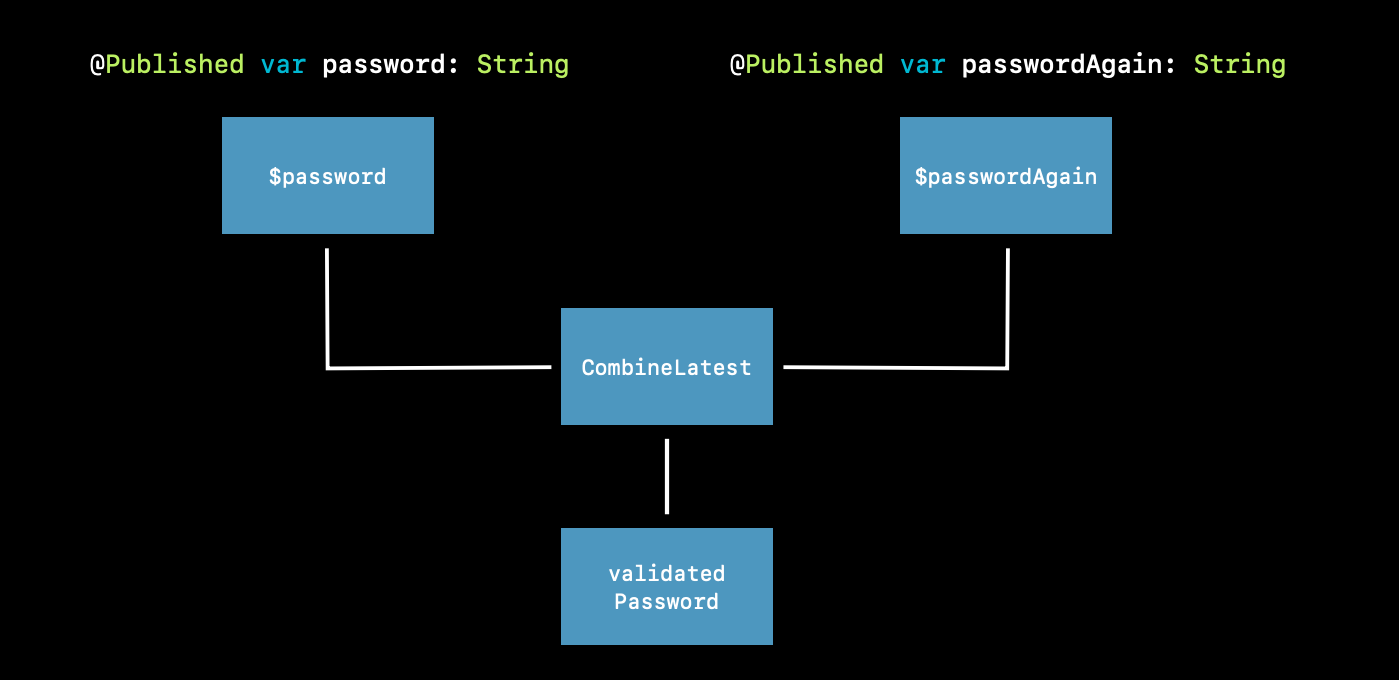
@Published var password: String = ""
@Published var passwordAgain: String = ""
var validatedPassword: CombineLatest<Published<String>, Published<String>, String?> {
    return CombineLatest($password, $passwordAgain) { password, passwordAgain in
        guard password == passwordAgain, password.count > 8 else { return nil }
        return password
    }
}
CombineLatestは上記で記載の通り
passwordかpasswordAgainが更新されると
クロージャの処理が実行されます。
また処理には続きがあり
正しいパスワードかどうかのチェックを行います。
@Published var password: String = ""
@Published var passwordAgain: String = ""
var validatedPassword:  Map<CombineLatest<Published<String>, Published<String>, String?>> {
    return CombineLatest($password, $passwordAgain) { password, passwordAgain in
        guard password == passwordAgain, password.count > 8 else { return nil }
        return password
    }
    .map { $0 == "password1" ? nil : $0 }
}
mapを使用していることでさらに型が変化しました。
map
https://developer.apple.com/documentation/combine/publisher/3204718-map
Map
https://developer.apple.com/documentation/combine/publishers/map
ここで問題が発生します。
このままですと他のPublisherと型が合わず
処理を組み合わせることが難しいです。
そこでeraseToAnyPublisher()を使います。
@Published var password: String = ""
@Published var passwordAgain: String = ""
var validatedPassword: AnyPublisher<String?, Never> {
    return CombineLatest($password, $passwordAgain) { password, passwordAgain in
        guard password == passwordAgain, password.count > 8 else { return nil }
        return password
    }
    .map { $0 == "password1" ? nil : $0 }
    .eraseToAnyPublisher()
}
eraseToAnyPublisher()
https://developer.apple.com/documentation/combine/publisher/3241548-erasetoanypublisher
AnyPublisher
https://developer.apple.com/documentation/combine/anypublisher
こうすることで
他の処理とのさらなるCompositionが可能になります。
下記のような処理の流れになります。

2019/6/29追記 処理を繋げた際の型とtype eraserについて
処理を繋げると
コンパイラは型がネストされていくように解釈します。
そのためかなり複雑な型になります。
例えば下記のようになります。
let x = PassthroughSubject<String, Never>()
  .flatMap { name in
      return Future<String, Error> { promise in
          promise(.success(""))
          }.catch { _ in
              Just("No user found")
          }.map { result in
              return "\(result) foo"
          }
}
これの型を示すと
Publishers.FlatMap<Publishers.Map<Publishers.Catch<Future<String, Error>,
Just<String>>, String>, PassthroughSubject<String, Never>>
これをそのまま使おうとするのは大変難しいです。
そのためCombineではこの型の複雑を解決するために
Publisher、Subscriber、Subjectは
型消去(type eraser)用のメソッドを提供しています。
-
eraseToAnyPublisher()
https://developer.apple.com/documentation/combine/publisher/3241548-erasetoanypublisher -
eraseToAnySubscriber()
https://developer.apple.com/documentation/combine/subscriber/3241649-erasetoanysubscriber -
eraseToAnySubject()
https://developer.apple.com/documentation/combine/subject/3241648-erasetoanysubject
let x = PassthroughSubject<String, Never>()
  .flatMap { name in
      return Future<String, Error> { promise in
          promise(.success(""))
          }.catch { _ in
              Just("No user found")
          }.map { result in
              return "\(result) foo"
          }
}.eraseToAnyPublisher()
こうすることで
AnyPublisher<String, Never>
というシンプルな型になります。
2019/07/31追記 @PublishedをつけるとwillChangeなどの記載が不要に
@Publishedをつけたプロパティは自動で値が変更した時の通知をしてくれるようになり
willChangeなどの繰り返し書かなければいけなかったコードを省略できるようになりました。
import Combine

class WizardModel : ObservableObject {
    @Published var trick: WizardTrick = WizardTrick()
    @Published var wand: Wand? = nil
}

struct TrickView: View {
    @ObservedObject var model: WizardModel
    var body: some View {
        Text(model.trick.name)
    }
}
非同期処理
次にユーザ名について見ていきます。
@Published var username: String
ユーザ名は利用可能かをサーバに確認する必要があります。
そのため一文字一文字に変化するたびに
サーバに問い合わせるのはちょっと処理が重くなってしまいます。
そこでサーバに問い合わせる間隔を少し長くするために
Debounceを活用します。
Debounce
Debounceは一定の間隔後にイベントが発行するように
処理を遅らせることができます。
debounce
https://developer.apple.com/documentation/combine/publisher/3204702-debounce
Debounce
https://developer.apple.com/documentation/combine/publishers/debounce
下記のように使います。
@Published var username: String
var validatedUsername: Debounce<Published<String>, Never> {
    return $username
        .debounce(for: 0.5, scheduler: RunLoop.main)
}
上記の例は0.5秒の間はイベントが発行されません。
さらにイベントの発行をメインスレッドで実行されるように
RunLoop.mainを指定しています。
さらに値が変わっていないのにサーバに処理を送るのも
効率がよくありません。
そこでRemoveDuplicatesを活用します。
removeDuplicates
https://developer.apple.com/documentation/combine/publisher/3204745-removeduplicates
RemoveDuplicates
https://developer.apple.com/documentation/combine/publishers/removeduplicates
RemoveDuplicates
これを使用するとイベントを発行しようとする際に
前回と同じ値であった場合はイベントを発行しなくなります。
@Published var username: String
var validatedUsername: RemoveDuplicates<Published<String>, Never> {
    return $username
        .debounce(for: 0.5, scheduler: RunLoop.main)
        .removeDuplicates()
}
先ほどと同様に型を合わせるために
eraseToAnyPublisher()を使います。
@Published var username: String
var validatedUsername: AnyPublisher<String?, Never> {
    return $username
        .debounce(for: 0.5, scheduler: RunLoop.main)
        .removeDuplicates()
        .eraseToAnyPublisher()
}
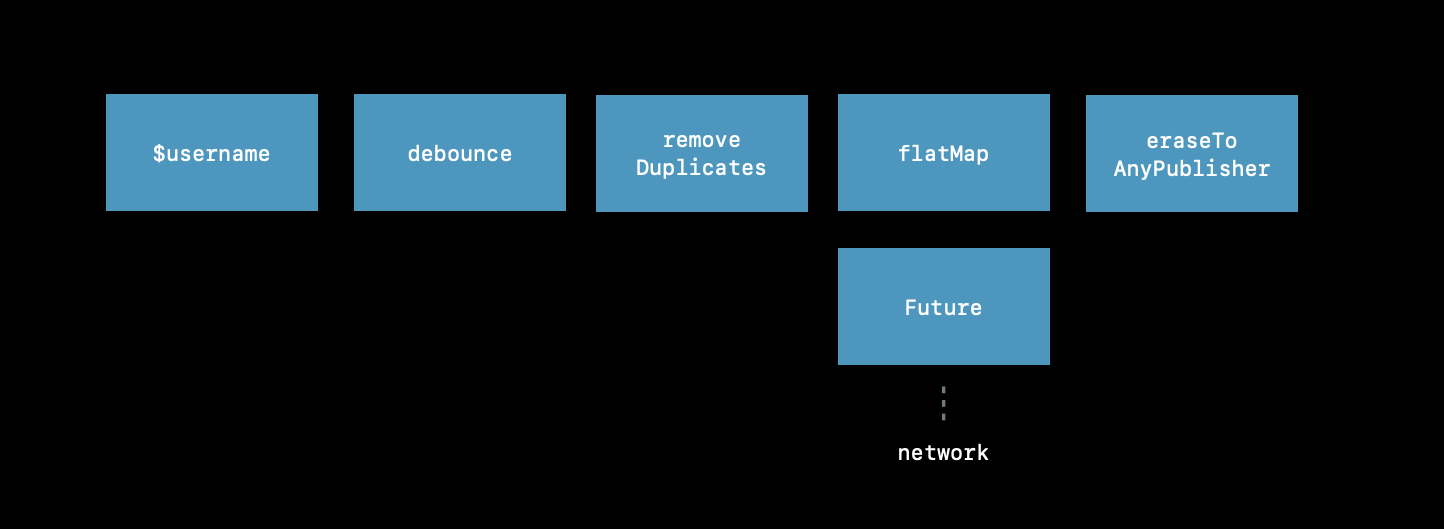
次にサーバへの通信を考えます。
非同期処理から新しいPublisherを返すため
flatMapを使います。
@Published var username: String
var validatedUsername: <String, Never> {
    return $username
        .debounce(for: 0.5, scheduler: RunLoop.main)
        .removeDuplicates()
        .flatMap { username in
            // 下記のような非同期処理でコールバックが返ってくることを想定
            // func usernameAvailable(_ username: String, completion: (Bool) -> Void)
        }
}
ここで非同期処理からPublisherを返すために
Futureを使います。
Future
https://developer.apple.com/documentation/combine/publishers/future
https://developer.apple.com/documentation/combine/future
@Published var username: String
var validatedUsername: AnyPublisher<String?, Never> {
    return $username
        .debounce(for: 0.5, scheduler: RunLoop.main)
        .removeDuplicates()
        .flatMap { username in
            return Future { promise in
                self.usernameAvailable(username) { available in
                    promise(.success(available ? username : nil))
                }
            }
        }
}
nilを返すために最終的な型は
AnyPublisher<String?, Never>になっています。
promiseは下記のような形になっており
処理結果をResultに包んだコールバックです。
(Result<Output, Failure>) -> Void
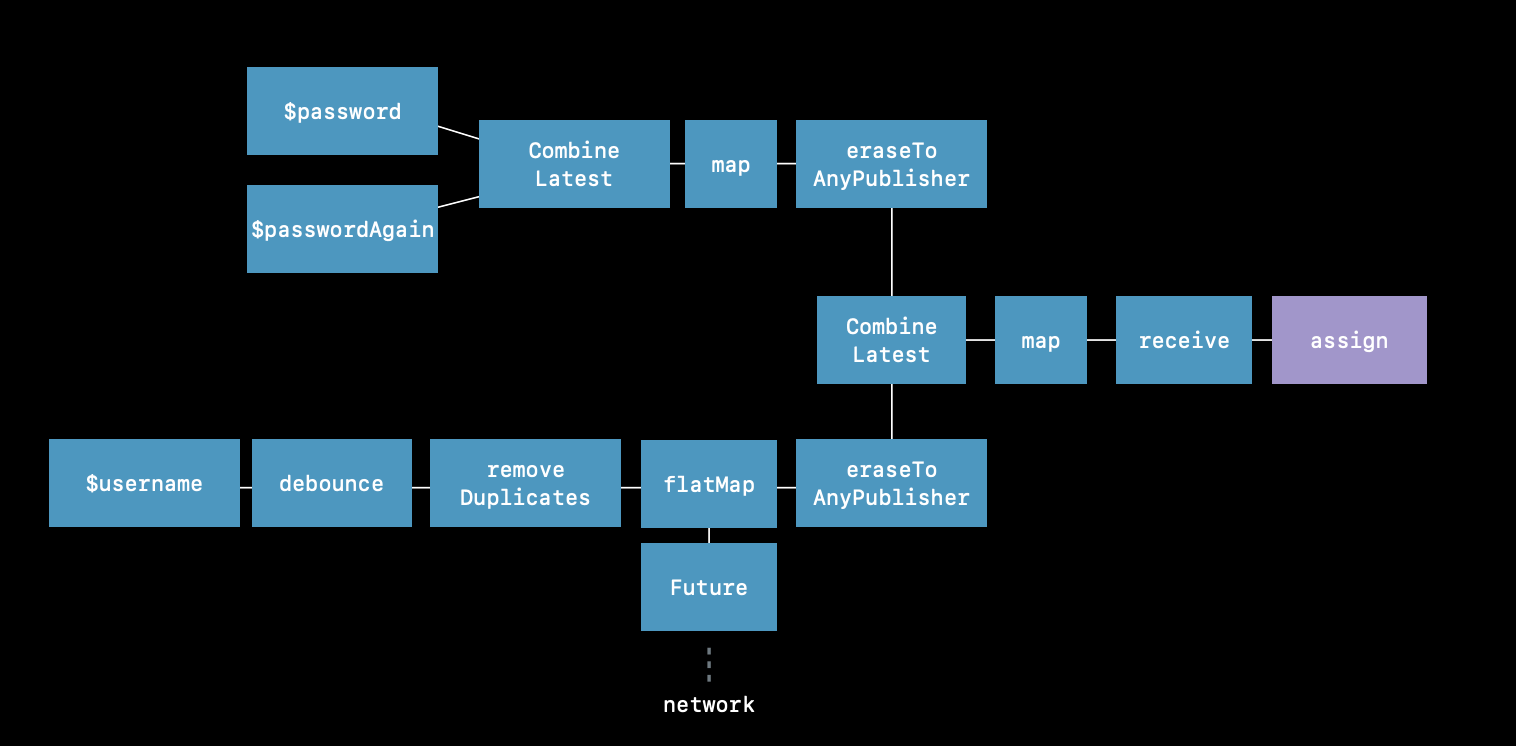
これまでの流れは下記のようになります。
最後に
validatedPasswordとvalidatedUsername
をCombineLatestを使って
Create Accountボタンの有効無効を切り替えられるようにします。
var validatedCredentials: AnyPublisher<(String, String)?, Never> {
    return CombineLatest(validatedUsername, validatedPassword) { username, password in
        guard let uname = username, let pwd = password else { return nil }
        return (uname, pwd)
            // ここでチェックを行う
        }
        .eraseToAnyPublisher()
}
最終的には下記のように使います。
@IBOutlet var signupButton: UIButton!
var signupButtonStream: AnyCancellable?
override func viewDidLoad() {
    super.viewDidLoad()
    self.signupButtonStream = self.validatedCredentials
        .map { $0 != nil }
        .receive(on: RunLoop.main)
        .assign(to: \.isEnabled, on: signupButton)
}
validatedCredentialsでチェックを行ったあとに
メインスレッドで値を受け取り
signupButtonのisEnabledプロパティにその値を適用しています。
最終的な全体の処理の流れです。
今回の例を通して
- 小さな要素をカスタムの
Publisherに構成する -
Publisherを少しづつ適応する -
@Publishedをプロパティに適用してPublisherにする -
Futureを使ってコールバックとPublisherを組み合わせる
ことを見てきました。
Combine in URLSession
他の例として
Advances in Networking, Part 1のセッション内ではURLSessionを使った例が紹介されていました。
こちらもCombineの機能をたくさん使用しています。
Advances in Networking, Part 1
https://developer.apple.com/videos/play/wwdc2019/712/
※ セッションでも言及していましたが
現時点ではないメソッドなども使用しており
Combineの正式版には
導入予定のものとして紹介されています。
Combineを用いた通信の流れ
Subscriberがリクエストを送ると
実際にPublisherに伝わるまでに
後ろから順番にOperatorsが適用されます。
そして通信が完了したPublisherが値を送り出し
リクエストとは逆の順番にOperatorsが適用されて
Subscriberにまで値が届けられます。
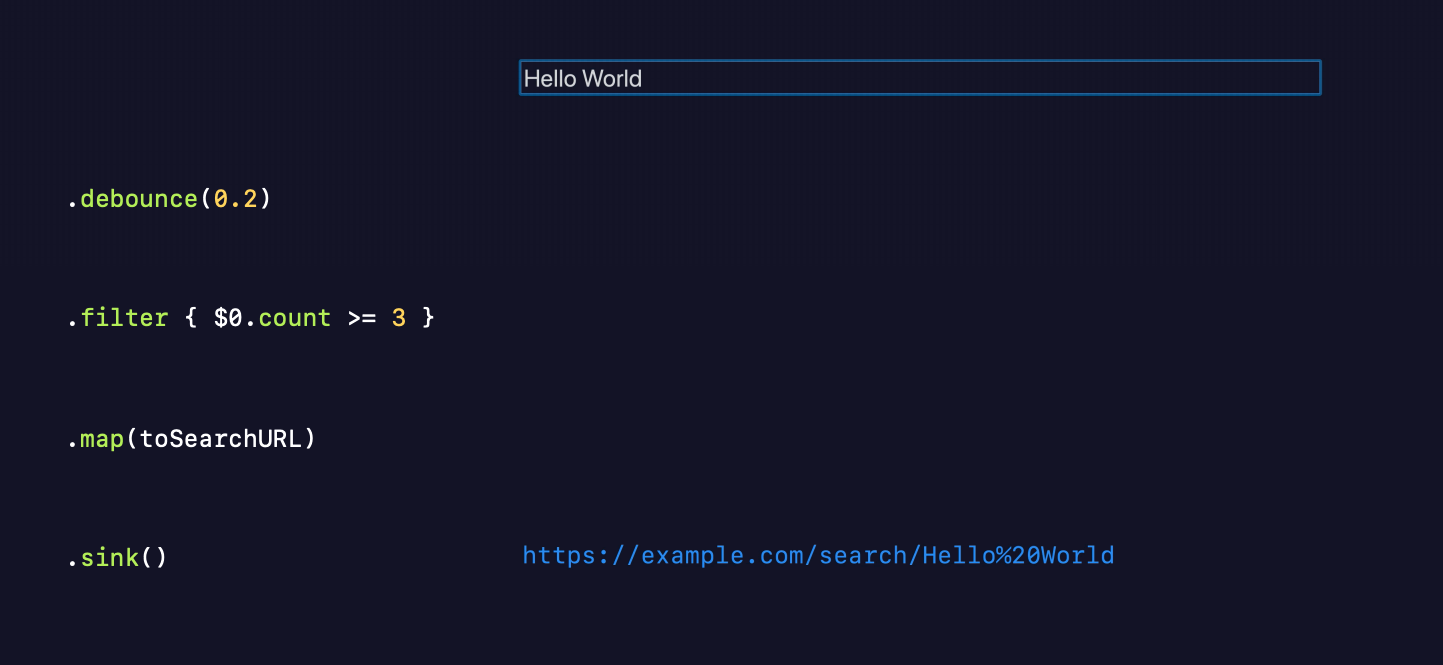
セッションでは検索窓にキーワードを入力して
検索APIを呼び出す例が紹介されています。
Sink
Subscriberの一つで
リクエストを何回も行うことができます。
sink(下記はFutureのものです)
https://developer.apple.com/documentation/combine/publishres/future/3236194-sink
https://developer.apple.com/documentation/combine/future/3333406-sink
Sink
https://developer.apple.com/documentation/combine/subscribers/sink
DataTaskPublisher
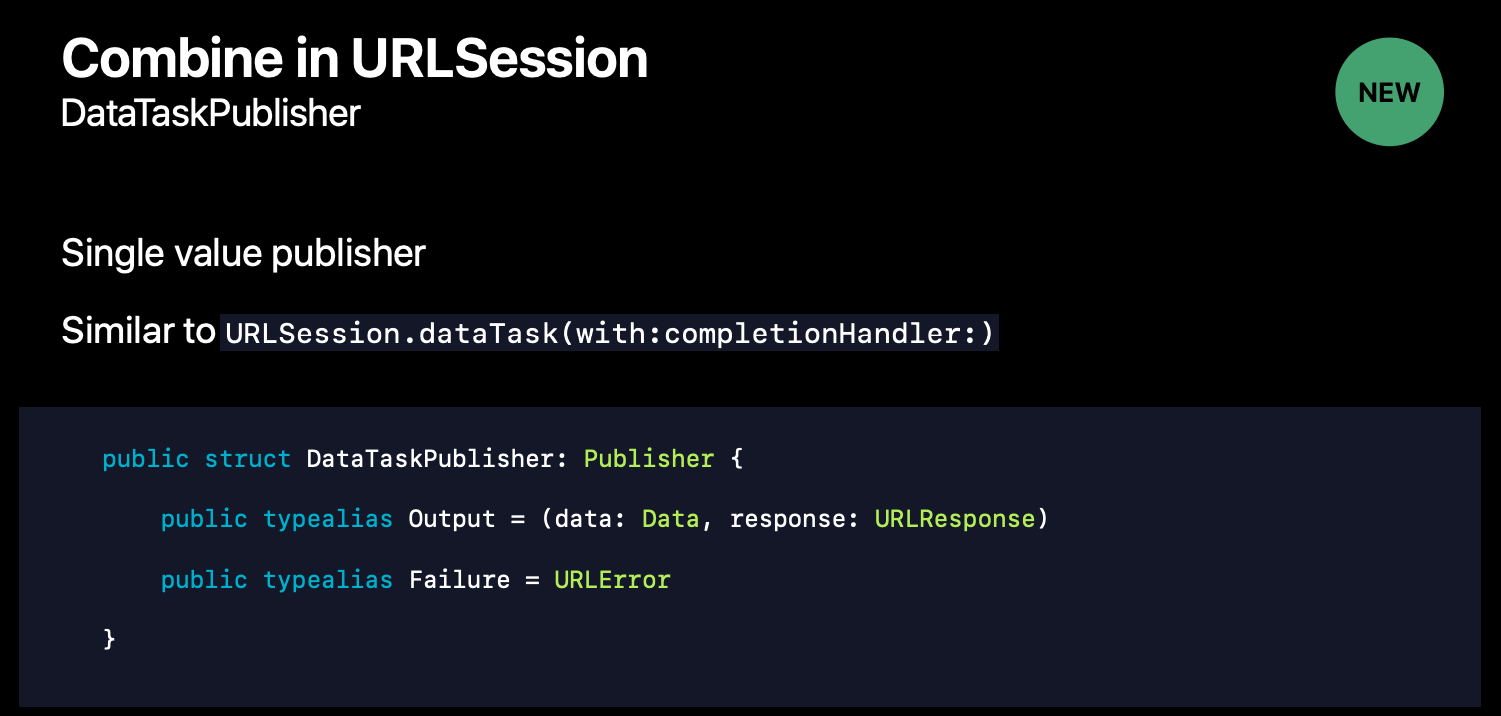
セッションで紹介されていましたが
現時点ではまだありません。
おそらくこういう形だろうということで
サンプルを紹介されているものもあります。
https://gist.github.com/yamoridon/16c1cc70ac46e50def4ca6695ceff772
https://dev.classmethod.jp/smartphone/iphone/use-combine-for-http-networking/
※ 2019/6/18追記
ドキュメントができていました。
dataTaskPublisher(for:)
https://developer.apple.com/documentation/foundation/urlsession/3329708-datataskpublisher
URLSession.DataTaskPublisher
https://developer.apple.com/documentation/foundation/urlsession/datataskpublisher
FailureにはURLErrorというstructが使われています。
https://developer.apple.com/documentation/foundation/urlerror
セッションでは
セルの中のイメージを非同期で取得する例が使われています。
※ 一部省略しています。かつ一部補完もしています。
class MenuItemTableView: UITableViewCell {

    var subscriber: AnyCancellable?

    override func prepareForReuse() {
        subscriber?.cancel()
    }
}

enum PubsocketError: Error {
    case invalidServerResponse
}

// ↓ UITableViewControllerの中

override func tableView(_ tableView: UITableView, cellForRowAt indexPath: IndexPath) -> UITableViewCell {

    var request = URLRequest(url: menuItem.heighResImageURL)
    cell.subscriber = pubSession.dataTaskPublisher(for: request)
        .tryCatch { error -> URLSession.DataTaskPublisher in
            guard error.networkUnavailableReason == .constrained else {
                throw error
            }
            return pubSession.dataTaskPublisher(for: menuItem.lowResImageURL)
        }
        .tryMap { data, response -> UIImage in
            guard let httpResponse = response as? HTTPURLResponse,
                httpResponse.statusCode == 200,
                let image = UIImage(data: data) else {
                    throw PubsocketError.invalidServerResponse
            }
            return image
        }
        .retry(1)
        .replaceError(with: UIImage(named: "sample"))
        .receive(on: DispatchQueue.main)
        .assign(to: \.itemImageView.image, on: cell)
}
TryMap
tryMapはエラーを投げる可能性のあるmapです。
tryMap
https://developer.apple.com/documentation/combine/publishers/output/3210207-trymap
TryMap
https://developer.apple.com/documentation/combine/publishers/trymap
Retry
エラーが起きた時に再通信する回数を制限します。
retry
https://developer.apple.com/documentation/combine/publishers/future/3208063-retry
https://developer.apple.com/documentation/combine/future/3333402-retry
Retry
https://developer.apple.com/documentation/combine/publishers/retry
ReplaceError
replaceErrorはエラーを指定の要素に変換します。
replaceError(with:)
https://developer.apple.com/documentation/combine/publishers/output/3210183-replaceerror
ReplaceError
https://developer.apple.com/documentation/combine/publishers/replaceerror
tryCatch
AnyCancellableの活用
Combineによって
一連の流れで処理を書くことができることも
十分なメリットですが
AnyCancellableを活用することで
画面から見えなくなった非同期処理を中断することができ
よくある異なったセルに異なった画像が表示される
といった不具合が起きなくなっています。
これまでですとOperationQueueを作成して
cancelメソッドを呼ぶなどが必要でしたが
それが不要になりました。
デバッグについて
他のReactiveプログラミングと同様に
エラーが発生した時に大量にスタックトレースにログが出てしまうため
エラーの原因を見つけるのが困難な状況が多々現れます。
そういう事態にも対応できるように
Combineフレームワークでは下記のデバッグメソッドが用意されています。
下記のイベントを受け取った時にログを出力します。
-
Subscriberに登録されたとき(subscription) - 値を受け取った時(value)
- 正常に出力を完了した時(completion)
- エラーを受け取った時(failure)
- キャンセルされた時(cancel)
enum SomeError: Swift.Error {
    case somethingWentWrong
}

let subject = PassthroughSubject<String, SomeError>()

let printSubscription = subject.print("Print").sink { _ in }
subject.send("ヤッホー!")
printSubscription.cancel()

Print: receive subscription: (PassthroughSubject)
Print: request unlimited
Print: receive value: (ヤッホー!)
Print: receive cancel
breakpoint
クロージャ内がtrueを返す場合に処理が止まります。
breakpoint(receiveOutput: { (items) -> Bool in
    // アイテムが空だったら処理が止まる
    return items.isEmpty
})
引数には何も設定しないこともできますが
この場合は何もせずに処理は継続されます。
https://developer.apple.com/documentation/combine/publishers/print/3210433-breakpoint?changes=latest_minor
https://developer.apple.com/documentation/combine/publishers/breakpoint
breakpointOnError
エラーが発生した時(PublisherのFailureを受け取った時)にメソッドの位置で処理が止まります。
Scheduler
長くなってしまったので
に記載しましたのでそちらをご参照ください。
(こっちに転記した方が良いなどのご要望がありましたら教えてください😃)
2020/7/3追記 iOS14更新
WWDC2020ではセッションはありませんでしたが
いくつか更新がありました。
flatMapでFailureTypeがNeverの場合にsetFailureTypeの変換が不要に
例えば下記のようにパスを元に
URLSessionを用いてネットワーク通信をしたいと思います。
※
Playground上での結果です。
iOS13では下記のように
URLSessionのDataTaskPublisherへ
flatMapをする際にFailureTypeの変換が必要でした。
import Combine
import Foundation
import PlaygroundSupport
PlaygroundPage.current.needsIndefiniteExecution = true

let breedsPublisher = ["beagle", "akita", "bulldog"].publisher

var cancellable: AnyCancellable
cancellable = breedsPublisher
    ↓↓↓↓↓↓↓↓↓↓↓↓↓↓↓↓↓↓↓↓↓↓↓↓↓↓↓↓↓↓↓↓↓↓↓↓↓↓↓↓
    .setFailureType(to: URLError.self)
    .flatMap { id -> URLSession.DataTaskPublisher in
        let url = URL(string:"https://dog.ceo/api/breed/\(id)/images")!
        return URLSession.shared.dataTaskPublisher(for: url)
}
.sink(
    receiveCompletion: { completion in
        print(completion)
    },
    receiveValue: { data, response in
        print(data)
    }
)
しかし
今回FailureTypeがNeverの場合
この変換が不要になりました。
import Combine
import Foundation
import PlaygroundSupport
PlaygroundPage.current.needsIndefiniteExecution = true

let breedsPublisher = ["beagle", "akita", "bulldog"].publisher

var cancellable: AnyCancellable
cancellable = breedsPublisher
    ↓↓↓↓↓↓↓↓↓↓↓↓↓↓↓なくてもOK↓↓↓↓↓↓↓↓↓↓↓↓↓↓↓↓↓
    //.setFailureType(to: URLError.self)
    .flatMap { id -> URLSession.DataTaskPublisher in
        let url = URL(string:"https://dog.ceo/api/breed/\(id)/images")!
        return URLSession.shared.dataTaskPublisher(for: url)
}
.sink(
    receiveCompletion: { completion in
        print(completion)
    },
    receiveValue: { data, response in
        print(data)
    }
)
内部でSetFailureTypeへ変換しています。
func flatMap<P>(
   maxPublishers: Subscribers.Demand = .unlimited,
   _ transform: @escaping (String) -> P)
-> Publishers.FlatMap<P, Publishers.SetFailureType<Publishers.Sequence<[String], Never>,
                      P.Failure>> where P : Publisher
assign(to:)で@Publishedが直接利用可能に
※ Xcode12 Beta3で引数がinoutが追加されました。
assign(to:on:)でonにselfを指定した場合に
メモリーリークを起こす可能性がありました。
そのため
assign(to:on:)を使えずに
sinkで代用するような場面もありました。
例えば
下記のように
ページネーションを行うAPIリクエストを想定してみます。
import Combine
import Foundation

struct Pokemon: Codable {
    let name: String
    let url: URL
}

struct Root: Codable {
    let count: Int
    let previous: URL?
    let next: URL
    let results: [Pokemon]
}


class PokemonProvider {
    @Published var pokemonsPublished = [Pokemon]()
    var offset = 1
    var cancellables: Set<AnyCancellable> = []

    func fetchNext() {
        let url = URL(string:"https:/pokeapi.co/api/v2/pokemon?offset=\(offset)&limit=20")!
        URLSession.shared.dataTaskPublisher(for: url)
            .map(\.data)
            .decode(type: Root.self, decoder: JSONDecoder())
            .sink(
                receiveCompletion: { completion in
                    print(completion)
                },
                receiveValue: { [weak self] value in
                    guard let self = self else {
                        return
                    }
                    print(value.results)
                    self.offset += value.results.count
                    self.pokemonsPublished += value.results
                }
            ).store(in: &cancellables)
    }
}
この場合
取得した値を保持しておく必要がありますが
メモリーリークの問題もあり
assign(to:on:)が使用できず
sinkを利用していました。
しかし
今回新しく追加されたassign(to:)によって
これが実現可能になりました。
class PokemonProvider {
    @Published var pokemonsPublished = [Pokemon]()
    var offset = 1

    func fetchNext() {
        let url = URL(string:"https:/pokeapi.co/api/v2/pokemon?offset=\(offset)&limit=20")!
        URLSession.shared.dataTaskPublisher(for: url)
            .map(\.data)
            .decode(type: Root.self, decoder: JSONDecoder())
            .map(\.results)
            .replaceError(with: pokemonsPublished)
            .handleEvents(receiveOutput: { [weak self] pokemons in
                self?.offset += pokemons.count
            })
            .assign(to: &$pokemonsPublished)
    }
}
replaceErrorをしているのは
@PublishedのFailureTypeは
Neverだからです。
assign(to:)は
@Publishedのライフサイクに合わせて
内部でAnyCancellableを管理しているようで
戻り値はありません。
storeメソッドを呼ぶ必要もありません。
そのため
今回の例では
AnyCancellableを
自身で保持する必要もなくなりました。
extension Publisher where Self.Failure == Never {

    /// Republishes elements received from a publisher, by assigning them to a property marked as a publisher.
    ///
    /// Use this operator when you want to receive elements from a publisher and republish them through a property marked with the `@Published` attribute. The `assign(to:)` operator manages the life cycle of the subscription, canceling the subscription automatically when the ``Published`` instance deinitializes. Because of this, the `assign(to:)` operator doesn't return an ``AnyCancellable`` that you're responsible for like ``assign(to:on:)`` does.
    ///
    /// The example below shows a model class that receives elements from an internal <doc://com.apple.documentation/documentation/Foundation/Timer/TimerPublisher>, and assigns them to a `@Published` property called `lastUpdated`:
    ///
    ///     class MyModel: ObservableObject {
    ///             @Published var lastUpdated: Date = Date()
    ///             init() {
    ///                  Timer.publish(every: 1.0, on: .main, in: .common)
    ///                      .autoconnect()
    ///                      .assign(to: $lastUpdated)
    ///             }
    ///         }
    ///
    /// If you instead implemented `MyModel` with `assign(to: lastUpdated, on: self)`, storing the returned ``AnyCancellable`` instance could cause a reference cycle, because the ``Subscribers/Assign`` subscriber would hold a strong reference to `self`. Using `assign(to:)` solves this problem.
    ///
    /// - Parameter published: A property marked with the `@Published` attribute, which receives and republishes all elements received from the upstream publisher.
    @available(iOS 14.0, OSX 11.0, tvOS 14.0, watchOS 7.0, *)
    public func assign(to published: inout Published<Self.Output>.Publisher)
}
2021/11/25 追記 (iOS15) PublisherからAsyncSequenceへの変換
iOS15からvaluesというプロパティが追加され、Swift5.5で導入されたSwift ConcurrencyのAsyncSequenceへの変換が簡単にできるようになりました。
こうすることで、Publisherが継続的に値を出力する際に
sinkなどで値をbindせずにforループで値を受け取り処理することができます。
func valuesPublisher(
    values: [Int]
) -> AnyPublisher<String, Never> {
    values.publisher
        .map(String.init)
        .eraseToAnyPublisher()
}

Task {
    let publisher = valuesPublisher(values: [1, 2, 3, 4])

    for try await value in publisher.values {
        print(value)
    }
}
https://developer.apple.com/documentation/combine/publisher/values-1dm9r
https://developer.apple.com/documentation/combine/publisher/values-v7nz
2021/11/25 追記 (iOS15) Futureからasync/awaitへの変換
Futureにvalueというプロパティが追加され、結果をawaitして取得することができるようになりました。
final var value: Output { get async } // FailureがNeverの場合
final var value: Output { get async throws }
let x = Future<String, Never> { promise in
    promise(.success("hello"))
}

Task {
    let value = await x.value
    print(value)
}
https://developer.apple.com/documentation/combine/future/value-5iprp
https://developer.apple.com/documentation/combine/future/value-9iwjz
まとめ
CombineフレームワークについてWWDC2019の動画を中心に見ていきました。
スライドにも出てきていましたが
Combineの全体の構成としては
- enum Publishers名前空間にある多数のstruct
- enum Subscribers名前空間にある多数のstruct
- Subjects
- 90以上の共通のOperators(インスタンスメソッド)
となっており
全ての処理がstructで構成されている点が
小さい部品を組み合わせていくCompositionファーストを
強く意識しているところなのかなと感じました。
また
Swiftの標準ライブラリや広く使われてきたライブラリと
クラスやメソッド名などが似ているものがたくさんあることで
導入への抵抗が少なくなっていることも良いなと感じています。
(プログラミングの世界で共通的に使用されている単語だからということもあるとは思いますが)
これから使う機会は多くあるのかなと思っていますが
どういう所にどのように活用していくか
考えていく必要はあると思っています。
今回出てこなかったものはまだまだたくさんありますし
ドキュメントに記載のないものなど
今後変わってくるものもあります。
まだまだ未知な可能性をたくさん含んでいる
新しいフレームワークに今後も注目していきたいですね!
間違いなどございましたらご指摘頂けますと幸いです![]()