経緯
try!Swift2018に参加するにあたり、
知識、経験共に乏しい自分が講演内容についていくためにも
事前準備として関連することを色々調べてみようと思い、
調べたことを忘れないために記録します。
今回は
Getting to Know the Responder Chain
というタイトルを見て
「そういえば、Responder Chainって実際何してるんだろう」とふと思ったので
調べてみました。
Responder Chainとは?
UIResponderオブジェクトの繋がりのことで、この繋がりの順番にしたがって
touchイベントなどの処理ができるUIResponderオブジェクト(=first responder)を見つけて処理を行う仕組みです。
以下、調べたことを列挙します。
○UIResponderはUIView、UIViewController、UIApplicationの親クラス
○Responder Chainは1つではなく複数の場合もある
○デフォルトの処理の順番が決まっている
- UIViewの次はUIViewのsuperview
- UIViewがViewControllerのrootviewの場合、次は UIViewController
- UIViewControllerのrootviewがこのアプリのUIWindowのrootViewControllerの場合、次はUIWindow
- UIWindowの次はUIApplication
- UIApplicationの次はAppDelegate(ただし、AppDelegateはUIResponderクラスを継承し、UIView, UIViewController, UIApplicationではない場合)
5の最後の部分はいまいちわかりませんでした。。。
○First Responderの決め方がイベントによって異なる
・touchイベント
イベントが起きたUIView(下に詳細書きました。)
・pressイベント
フォーカスが当たっているUIReponder
・shakeイベント, remoteイベント, editing menu messageイベント
canBecomeFirstResponderがtrueになっているUIResponder
※accelerometers、gyroscopes、magnetometerに関連したMotionイベント
Reponder Chainには含まれず、Core Motionフレームワークが
直接指定のオブジェクトにイベントを伝えるそうです。
○UIControlsの場合
targetオブジェクトにアクションメッセージを送ることで
eventと同じような動きをします。
targetオブジェクトがnilの場合、Responder Chainを辿って
アクションメッセージに適切な処理するメソッドを見つけて処理を行います。
例えば、editing menuの場合(↓です)

copyやpasteなどのメソッドを実装しているUIResponderで処理されます。
○Gesture Recognizerが設定されている場合
Viewよりも先にtouchイベントやpressイベントを処理し、
処理に失敗した場合Viewが次に処理をします。
○touchイベントの場合、ViewにHitTestを行なう
touchイベントに対してのResponderを判断する際、
touchされたlocationからどのViewがtouch locationの範囲内にあり
Responderとなり得るかを判定します。
一番Viewの階層の中で一番深くにあるUIViewをFirst Responderとします。
※ 上の階層のUIViewがHitTestで当てはまらなかった場合、
ClipToBoundsがfalseなsubviewも一緒に無視されます。
Responder Chainを活用するには?
どういうことだろうと思っていたところ、
同じくtry!Swift2018で登壇されるBen Scheirmanさんが
dotswift2018で発表されていた内容の中に、
Responder Chainを活用しようというようなことを話されていたので、
話を参考に自分なりにこういうことだろうかというサンプルを考えてみました。
実装
かなりざっくりと内容を説明すると、
ViewController、Viewの階層があり、
複数箇所からのアクションで同じAPIを呼び出す
または深い階層にあるViewからのアクションでAPIを呼び出すなどの場合に
上の階層でAPIを一括で管理(処理)したいが、
そのイベントを伝達するためには順次上の階層に順々に伝達しなければならない。
(DelegateやCallbackなど)
これをResponder Chainを活用することで簡潔に処理をすることができるのではないか
という試みです。
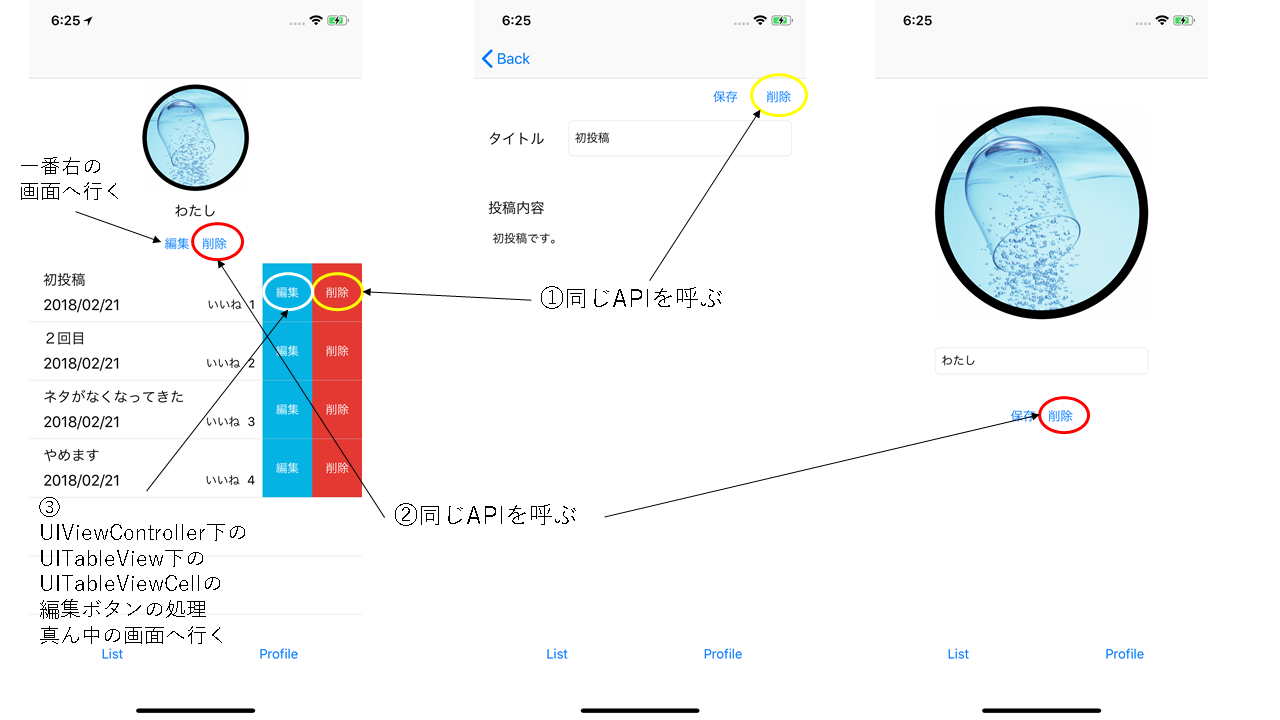
①と②が複数箇所からのアクションで同じAPIを呼び出す
③が深い階層にあるViewからのアクションでAPIを呼び出すを想定しています。
※画面遷移や動きは適当です。
まずUIResponderと発生させたいActionを繋げるためにUIResponderを拡張します。
// 発生させるアクション
public protocol Action {
    associatedtype Responder
    func execute(responder: Responder)
}

public extension UIResponder {

    @discardableResult
    public func execute<A: Action>(action: A) -> A.Responder? {

        // Responder Chainを辿り、処理できるResponderを見つけたら処理をする
        if let responder = find(action: action) {
            action.execute(responder: responder)
            return responder
        }
        return nil
    }

    public func find<A: Action>(action: A) -> A.Responder? {
        var responder:UIResponder? = self

        // Reponder Chainを辿ってActionを処理できるUIReponderを探す
        while responder != nil {
            if let responder = responder as? A.Responder {
                return responder
            }
            responder = responder?.next
        }
        return nil
    }
}
発生させたいアクションを定義します。
struct DeleteBlogAction: Action {

    typealias Responder = DeleteBlogResponder

    let id: Int

    init(_ id: Int) {
        self.id = id
    }

    func execute(responder: Responder) {
        responder.deleteBlog(action: self)
    }
}

protocol DeleteBlogResponder {
    func deleteBlog(action: DeleteBlogAction)
}
処理をしたい階層のViewControllerでアクションに対応した処理を定義します。
extension MainFlowController: DeleteBlogResponder {
    func deleteBlog(action: DeleteBlogAction) {
        apiClient.deleteBlog(id: action.id)
        update()
    }
}
ボタンを押した時にアクションを起こします。
@IBAction func deleteButtonTapped(_ sender: Any) {
    guard let sender = sender as? UIView else {
        return
    }
    // アクション実行
    self.execute(action: DeleteBlogAction(sender.tag))
}
@IBAction func deleteButtonTapped(_ sender: Any) {

    // アクション実行
    self.execute(action: DeleteBlogAction(viewModel.blog.id))
}
同じような感じで、
struct ShowDetailAction: Action {

    typealias Responder = ShowDetailResponder

    let blog: Blog

    init(_ blog: Blog) {
        self.blog = blog
    }

    func execute(responder: Responder) {
        responder.showDetail(action: self)
    }
}

protocol ShowDetailResponder {
    func showDetail(action: ShowDetailAction)
}
extension BlogFlowController: ShowDetailResponder {

    func showDetail(action: ShowDetailAction) {
        showDetail(action.blog)
    }
}
@IBAction func editButtonTapped(_ sender: Any) {

    // アクション実行
    self.execute(action: ShowDetailAction(blog /* cell内で保持 */))
}
まとめ
Responder Chainを使うことで、手動で処理を渡す必要がなくなり、
すっきり処理をまとめられたような気がします。
あくまでこういうことなのかなということで検討しただけですので、
当日の講演を楽しみにしてまた色々考えてみたいと思います。