経緯
WWDC2018の中でCollectionViewに関するセッションがあり
今回はそれに関してまとめてみることで
改めてCollectionViewの動きに関して見直しをしてみました。
https://developer.apple.com/videos/play/wwdc2018/225/
※実は昨年これに関して発表する予定でしたが、
風邪で倒れて発表できなかった経緯もあります![]()
https://speakerdeck.com/shiz/0620
3つの主要コンセプト
CollectionViewを構成する要素として主に下記の3つがあります。
- Layout
- Datasource
- Delegate
UICollectionViewLayout
どこにコンテンツをどのように配置するのかを示します。
データなどは関わりません。
UICollectionViewDataSource
CollectionViewの内容を提供します。
セクションやアイテムの数なども管理します。
UICollectionViewDelegate
オプショナルなプロトコルです。
CollectionViewに対するユーザのアクションに対応します。
実装を通して理解を深める
以下ではFlowLayoutの実装を見ながら
ColletionViewの動きを見ていきたいと思います。
UICollectionViewFlowLayout
UICollectionViewLayoutのサブクラスです。
UICollectionViewのデフォルトのレイアウトとはこれが指定されています。
縦や横に均等に並べるようなLine-Basedのデザインはこれでカバーできます。
UICollectionViewFlowLayoutのカスタマイズ(実装)
prepareメソッドをoverrideすることで簡単にカスタマイズすることができます。
prepareメソッド
class ColumnFlowLayout: UICollectionViewFlowLayout {

    // After invalidateLayouts
    override func prepare() {
        super.prepare()

        guard let cv = collectionView else { return }
        self.itemSize = CGSize(width: cv.bounds.inset(by: cv.layoutMargins).size.width, height: 120.0)

        self.sectionInset = UIEdgeInsets(top: self.minimumInteritemSpacing, left: 0.0, bottom: 0.0, right: 0.0)
        self.sectionInsetReference = .fromSafeArea
    }
}
このメソッドはinvalidLayout発生する度に呼ばれます。
itemSizeの指定やsectionInsetsの指定をします。
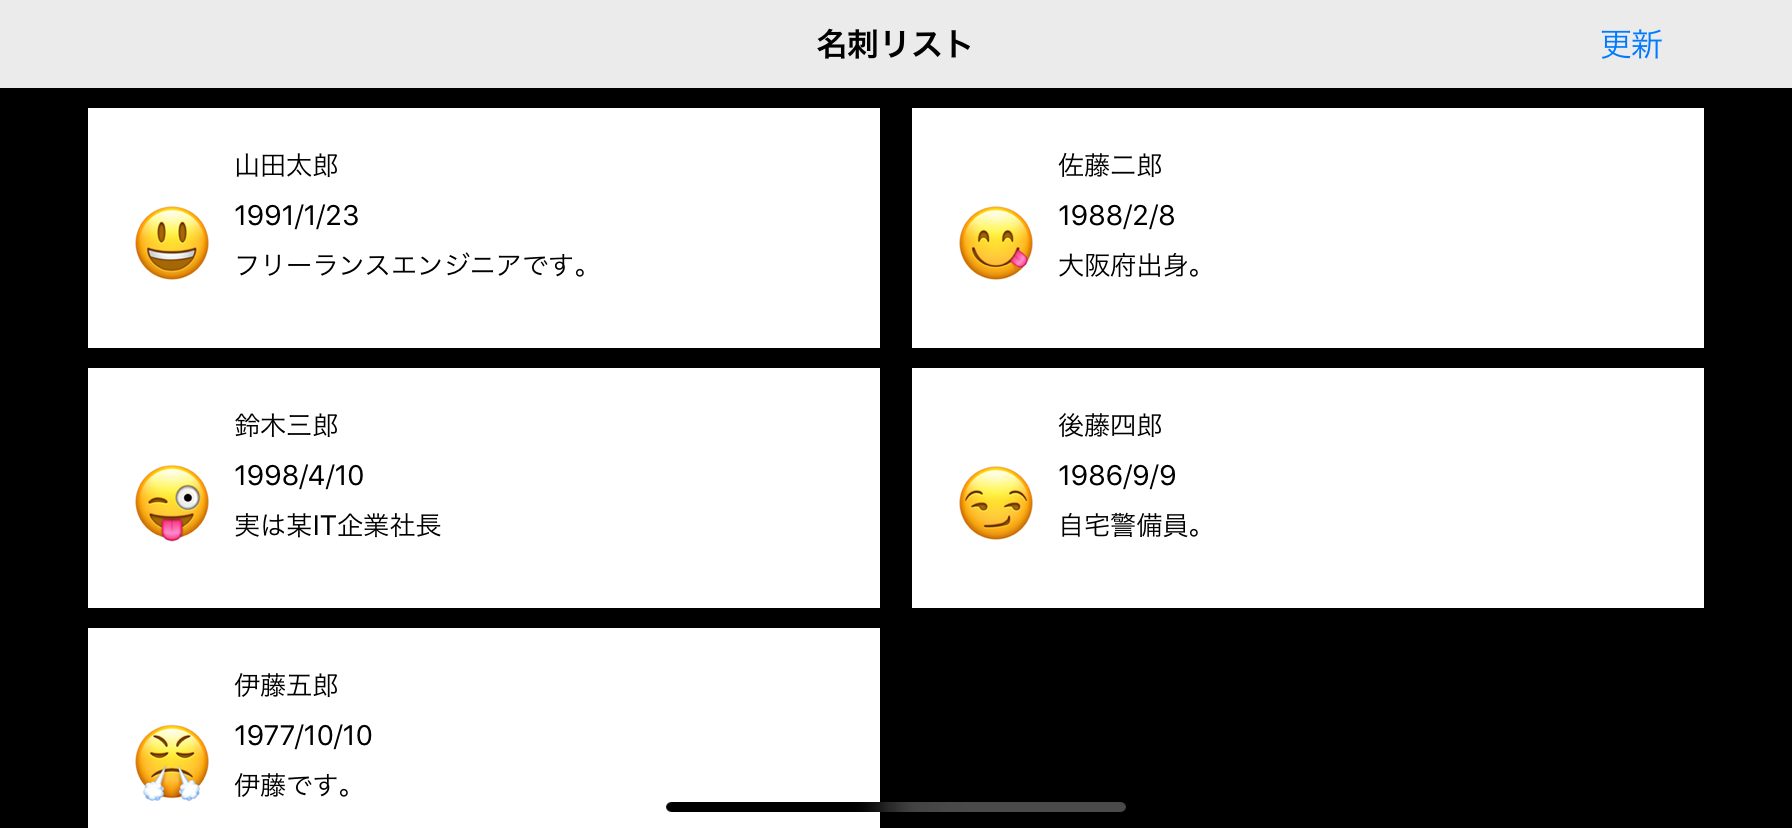
WWDCの発表の中では、
また、CollectionViewは横向きにした場合、
左右に対するsafeAreaの制約が効いていないように見え、
self.sectionInsetReference = .fromSafeArea
を設定すると解消されると紹介されていましたが
実際試してみると
あってもなくても特に挙動が変わりませんでした![]()
ドキュメントにも何も記載がないので謎です。
2019/03/15追記
ご指摘をいただき、確認してみたところ、解消されました。
もしかしたら私の勘違いだったのかもしれません。大変失礼しました![]()
下記のような違いが出ます。
設定なしの場合
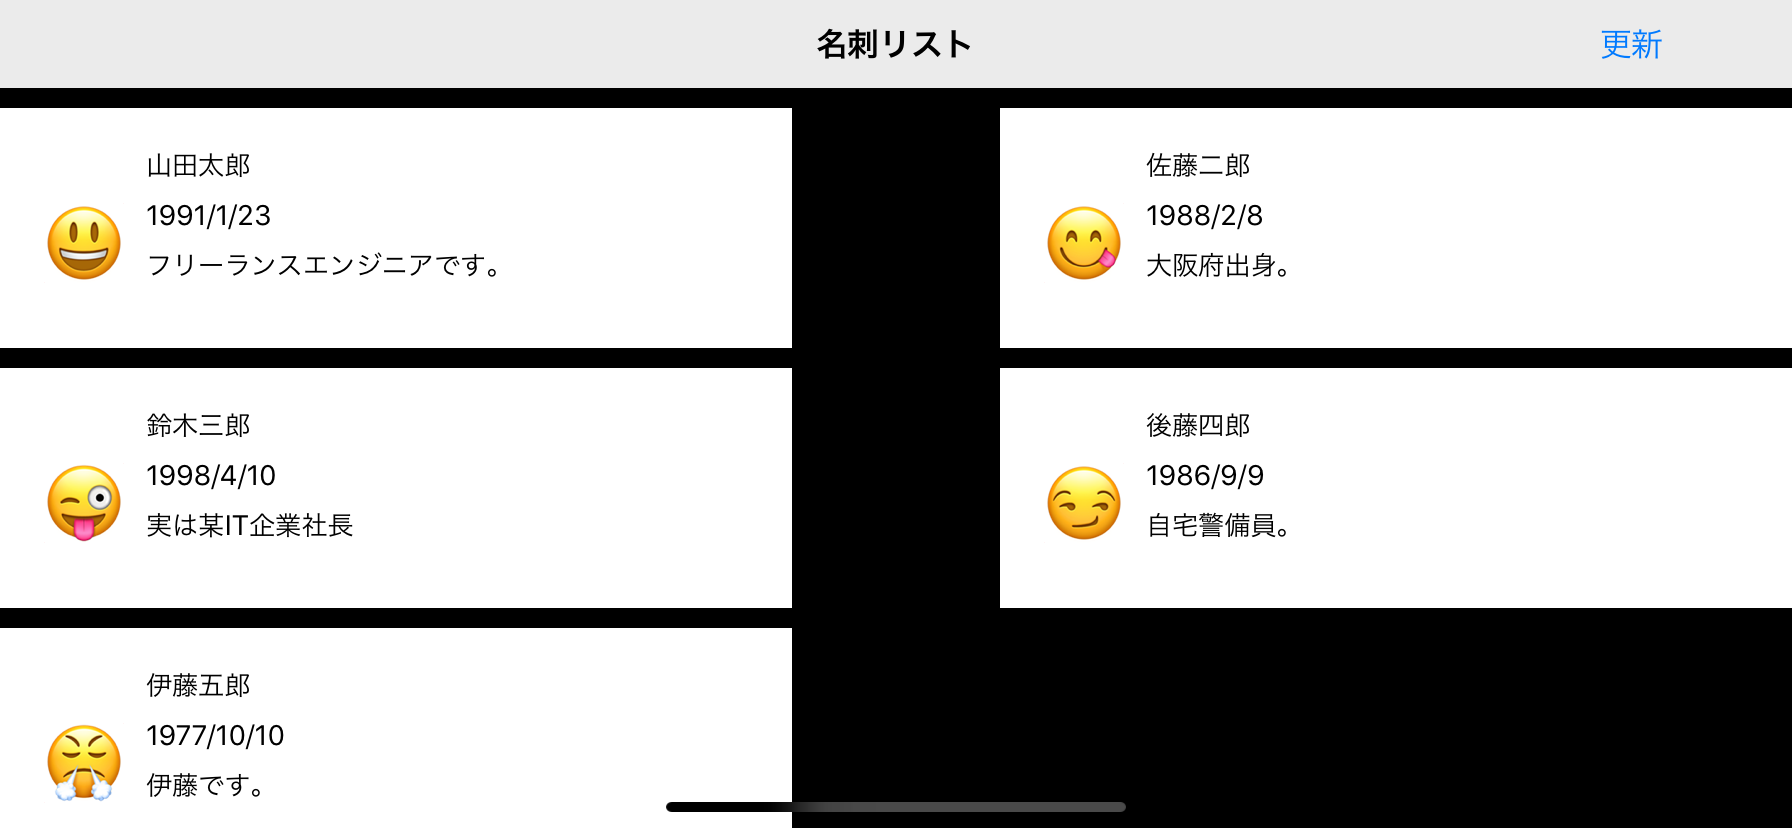
設定ありの場合
itemsizeを可変にしてみる
FlowaLayoutは
できる限り同じ行に列を詰めようとする性質があり
これを活用することでLandscape時のレイアウトを変更することができます。
上記のprepareメソッドの場合は下記のようになりますが、
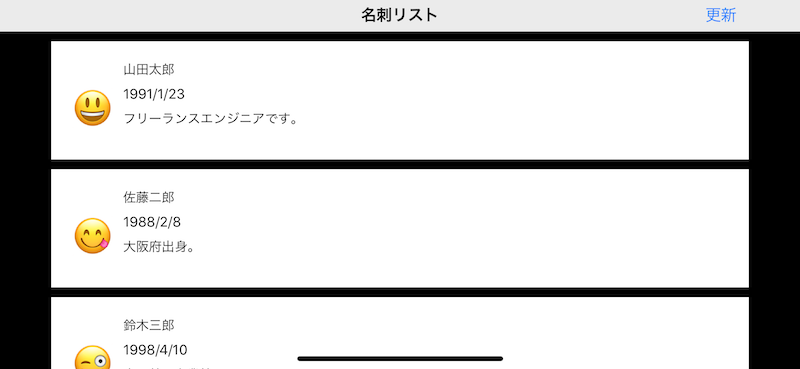
これを下記のようにitemSizeを設定することで
レイアウトが変わります。
class ColumnFlowLayout: UICollectionViewFlowLayout {

    // After invalidateLayouts
    override func prepare() {
        super.prepare()

        guard let cv = collectionView else { return }

        // 一行で利用できる幅
        let availableWidth = cv.bounds.inset(by: cv.layoutMargins).size.width

        // セルの最小幅を設定
        let minColumnWidth = CGFloat(300.0)

        // 表示可能なカラム数を決定
        let maxNumColumns = Int(availableWidth / minColumnWidth)

        // 1個1個のセルの幅を決定
        let cellWidth = (availableWidth / CGFloat(maxNumColumns)).rounded(.down)

        self.itemSize = CGSize(width: cellWidth, height: 120.0)

        self.sectionInset = UIEdgeInsets(top: self.minimumInteritemSpacing, left: 0.0, bottom: 0.0, right: 0.0)
        self.sectionInsetReference = .fromSafeArea
    }
}
すると下記のようになります。
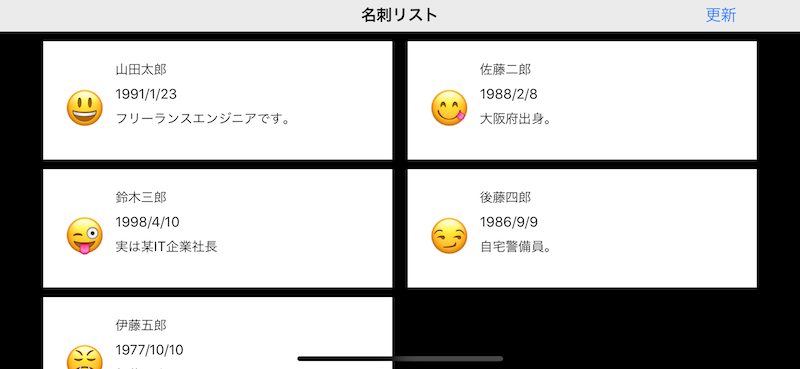
FlowLayoutには
できる限り同じ行にカラムを詰め込もうとする性質もあり
これを活用しています。
UICollectionViewLayoutの継承
LineBaseのFlowLayoutでは対応仕切れないLayoutが必要な場合
UICollectionViewLayoutを継承します。
基本的なメソッド
1つは上記でも出てきたprepareメソッドで
この中でUICollectionViewLayoutAttributesをメモリ上に保存したり
collectionViewContentSizeの計算を行います。
collectionViewContentSize
// CollectionView全体のサイズ
override var collectionViewContentSize: CGSize
これはUIScrollView.contentSizeに設定され
スクロールの量を知るために必要です。
layoutAttributesForItem
// IndexPathのアイテムのAttributesを返す
override func layoutAttributesForItem(at indexPath: IndexPath) -> UICollectionViewLayoutAttributes?
layoutAttributesForElements
// rectの範囲内に存在するアイテムのAttributesを返す
override func layoutAttributesForElements(in rect: CGRect) -> [UICollectionViewLayoutAttributes]?
shouldInvalidateLayout
shouldInvalidateLayoutはサイズや位置の変更があった場合に呼ばれ、
処理を加えることができます。
結果としてtrueを返すとInvalidateLayoutが呼ばれ
レイアウトの再描画が起きます。
これはスクロール中もずっと呼ばれます。
override func shouldInvalidateLayout(forBoundsChange newBounds: CGRect) -> Bool {
    guard let cv = collectionView else { return false }

    return !newBounds.size.equalTo(cv.bounds.size)
}
MosaicLayoutの例
UICollectionViewLayoutの継承の例として
簡単なモザイクアートのようなレイアウトを作成します。
final class MosaicLayout: UICollectionViewLayout {

    var columns = MosaicColumns()

    // 全体のサイズ
    var contentBounds = CGRect.zero

    // 各セルの属性情報を保持
    var cachedAttributes = [IndexPath: UICollectionViewLayoutAttributes]()

    // 今回は3カラム/行に限定
    var numberOfColumns = 3

    var rowHeight: CGFloat = 0.0

    private var contentWidth: CGFloat {
        get {
            let insets = collectionView!.contentInset
            return collectionView!.bounds.width - (insets.left + insets.right)
        }
    }

    override var collectionViewContentSize: CGSize {
        get {
            let height = columns.smallestColumn.columnHeight
            return CGSize(width: contentWidth, height: height)
        }
    }

    override func shouldInvalidateLayout(forBoundsChange newBounds: CGRect) -> Bool {
        guard let cv = collectionView else { return false }

        return !newBounds.size.equalTo(cv.bounds.size)
    }

    override func layoutAttributesForItem(at indexPath: IndexPath) -> UICollectionViewLayoutAttributes? {
        return cachedAttributes[indexPath]
    }

    override func layoutAttributesForElements(in rect: CGRect) -> [UICollectionViewLayoutAttributes]? {
        return cachedAttributes.values.filter { (attributes) -> Bool in
            return rect.intersects(attributes.frame)
        }
    }

    override func prepare() {
        super.prepare()

        guard let _ = collectionView else { return }

        reset()

        createAttributes()
    }
}
layoutAttributesForElementsのパフォーマンス問題
さらに、WWDCの発表ではlayoutAttributesForElementsの検索処理の効率が悪いということで
バイナリー検索を用いてより高速に動くようにしています。
minYの小さい順に属性の配列を並べることで、
最初にヒットした位置から横続きにどんどん調べていけば
欲しいデータが見つかるという考えです。
サンプルなどがありませんでしたので
仮で実装してみました
(実装がシンプルなの今回はあまり違いは感じられませんでした)
override func layoutAttributesForElements(in rect: CGRect) -> [UICollectionViewLayoutAttributes]? {

    var attributesArray = [UICollectionViewLayoutAttributes]()

    guard let firstMatchIndex = binarySearchAttributes(range: 0...cachedAttributes.endIndex, rect: rect) else { return attributesArray }

    for attributes in cachedAttributes[..<firstMatchIndex.item].reversed() {
        guard attributes.frame.maxY >= rect.minY else { break }
        attributesArray.append(attributes)
    }

    for attributes in cachedAttributes[firstMatchIndex.item...] {
        guard attributes.frame.minY <= rect.maxY else { break }
        attributesArray.append(attributes)
    }
    return attributesArray
}

private func binarySearchAttributes(range: ClosedRange<Int>, rect: CGRect) -> IndexPath? {

    var lower = range.lowerBound
    var upper = range.upperBound

    while (true) {
        let current = (lower + upper) / 2
        let indexPath = IndexPath(item: current, section: 0)

        guard cachedAttributes.count > indexPath.item else { return nil }

        let attributes = cachedAttributes[indexPath.item]
        if rect.intersects(attributes.frame) {
            return indexPath
        } else if lower > upper {
            return nil
        } else {
            if attributes.frame.maxY < rect.minY {
                lower = current + 1
            } else {
                upper = current - 1
            }
        }
    }
}
アニメーション
最後にアニメーションについて考えていきます。
アニメーションに加えてセルの部分更新にも関わってくるので
一緒にみていきたいと思います。
performBatchUpdates
複数のアニメーションを同時に行う際は
performBatchUpdatesを使います。
これはアニメーションのアップデートを一律で行ってくれます。
DataSourceの更新と
CollectionViewの更新を
updatesクロージャの中で定義します。
collectionView.performBatchUpdates({
    let movedPerson = people[3]

    people.remove(at: 3)
    people.remove(at: 2)

    people.insert(movedPerson, at: 0)

    collectionView.reloadItems(at: [IndexPath(item: 3, section: 0)])
    collectionView.deleteItems(at: [IndexPath(item: 2, section: 0)])
    collectionView.moveItem(at: IndexPath(item: 3, section: 0), to: IndexPath(item: 0, section: 0))
})
これを実行するときれいに...エラーになります。
reason: 'attempt to delete and reload the same index path (<NSIndexPath: 0x6000015c82c0> {length = 2, path = 0 - 3})'
エラーを見てみると
削除とリロードを同じIndexPath(item: 3, section: 0)に行おうとしていると書かれてあります。
しかし
IndexPath(item: 3, section: 0)に対して削除を行っているつもりはありませんでした。
どこで何が起こっているのでしょうか?
performBatchUpdatesの性質
performBatchUpdatesには以下の特徴があります。
クロージャ内のCollectionViewの更新は順序が関係ない(メソッド内で決まっている)
つまり
deleteItemsを先に書こうが
insertItemsを先に書こうが
実行される順番としてはdelete->insertになります。
下記は各アクションの一覧です。
| アクション | 特徴 | IndexPathの示すもの |
|---|---|---|
| Delete | 降順にIndexPathを扱う | 更新前のIndexPath |
| Insert | 昇順にIndexPathを扱う | 更新後のIndexPath |
| Move | 移動前:更新前のIndexPath 移動後:更新後のIndexPath | |
| Reload | DeleteとInsertに分解できる | 元のIndexPath |
Deleteは
更新が走る前のIndexPathを元に降順
にセルを削除し、
Insertは
削除が実行されたあとのIndexPathを元に昇順に
セルの挿入を行うということのようです。
さらにReloadに関してはDeleteとInsertに分解できます。
主要なエラーの原因4つ
上記のアクションを踏まえた上で
performBatchUpdatesのエラーと考えられる原因として
以下の4つがあげられます。
- 移動させる対象アイテムのIndexPathと削除するIndexPathに一致するものがある
- 移動させる対象アイテムのIndexPathと追加するIndexPathに一致するものがある
- 同じ位置に2つ以上のアイテムを移動させようとしている
- 不正なIndexPathを参照している
今回の場合は
reloadItemsとmoveItemで同じIndexPathを参照していることが原因で
これがエラーの元になっています。
解決策
reloadItemsの更新を別にすれば解決します。
UIView.performWithoutAnimation {

    // リロードは別の更新で行う
    collectionView.performBatchUpdates({
        collectionView.reloadItems(at: [IndexPath(item: 3, section: 0)])
    })
}

collectionView.performBatchUpdates({

    collectionView.deleteItems(at: [IndexPath(item: 2, section: 0)])
    collectionView.moveItem(at: IndexPath(item: 3, section: 0), to: IndexPath(item: 0, section: 0))
})
DataSourceの更新の問題点と注意点
先ほど、CollectionViewの更新は順序が関係ないと記載しましたが、DataSourceは逆に更新の順番が影響します。順番を間違えるとCollectionViewとデータの不整合が生じるなどエラーの原因になります。
そのため、DataSourceの更新は下記のルールに従って行うべきです。
DataSource Updatesの鉄則
・MoveはDelete+Insertに分解する
・DeleteとInsertをそれぞれ全て集める
・Deleteを最初に降順で行う
・Insertは最後に昇順で行う
先ほどの更新の場合だと下記のようになります。
UIView.performWithoutAnimation {
    collectionView.performBatchUpdates({
        collectionView.reloadItems(at: [IndexPath(item: 3, section: 0)])
    })
}

collectionView.performBatchUpdates({

    // 2 updates
    // index2の削除
    // index3のアイテムをindex0に移動する

    // delete item at index2
    // delete item at index3
    // insert item from index3 at index 0

    let movedPerson = people[3]

    // 降順で削除
    people.remove(at: 3)
    people.remove(at: 2)

    // 昇順で挿入
    people.insert(movedPerson, at: 0)

    collectionView.deleteItems(at: [IndexPath(item: 2, section: 0)])
    collectionView.moveItem(at: IndexPath(item: 3, section: 0), to: IndexPath(item: 0, section: 0))
})
Reload Dataは?
確かにあらゆる問題は解決できますが
アニメーションも何も起きず
かなり乱暴なやり方になりますので使わないのが得策です。
今回はperformBatchUpdatesでしたが
他の同じような性質を持ったメソッドに関しても同様のことが言えると思いますので
ぜひドキュメントなどで各アクションが
いつどのタイミングで、何を参照してアクションを起こしているのか
確認してみると良いかもしれません。
まとめ
UICollectionViewは頻繁に使われるViewですが
意外と知らなかったことがあるのではないかとWWDC2018の動画を見て感じました。
ドキュメントやWWDCの動画を改めて見返すと
今まで意識していなかった箇所や発見があり
理解を深めることができるので良いなと思いました![]()
もし何か間違いなどございましたら
ご指摘頂けますと幸いです![]()