RailsAPI×AngularでかっこいいWebアプリを作(ろうと試み)る【API呼んでみる編】の続きです。
前回のあらすじ
RailsAPIアプリでAPI作ってAngularで呼ぶ、それだけだ。
今回はシリーズ最後なので思いきってRailsの話一切しません。
ソース置いとくので参考にどうぞ。
AngularMaterialはご存知?
Googleが提唱するマテリアルデザインをAngularJSで使うためのUIコンポーネントライブラリ。
欲しいコンポーネントはあらかた揃っているし気軽に使えるしかっこいいしとっても重宝しています。ただ個人的にめっちゃ痒いのに手が届かないところが多々有りまして。せっかくなのでそのうちのひとつのオレオレ解決方法をご紹介させていただきたい。
$mdDialog使いづらい問題
AngularMaterialではダイアログを操作するためのサービス$mdDialogが用意されているのですが、これが絶妙に使いづらい。Alert,Confirmは特に問題無いがダイアログの中身をカスタムしようとすると急にムムム?な気持ちになる。
というのもカスタムするためにこんな実装が必要なのです。
- ダイアログに表示するViewを定義する
- ダイアログに表示するViewのActionをハンドリングするControllerを定義する
- 呼び出し元の画面とは$scopeを通じてやり取りする
この場合、ダイアログの数だけViewとControllerが量産される。
さらにせっかくControllerで制御しているにも関わらずscopeに変数を生やしまくるという時代の流れをダッシュで駆け戻るような勇気と行動が必要になる。
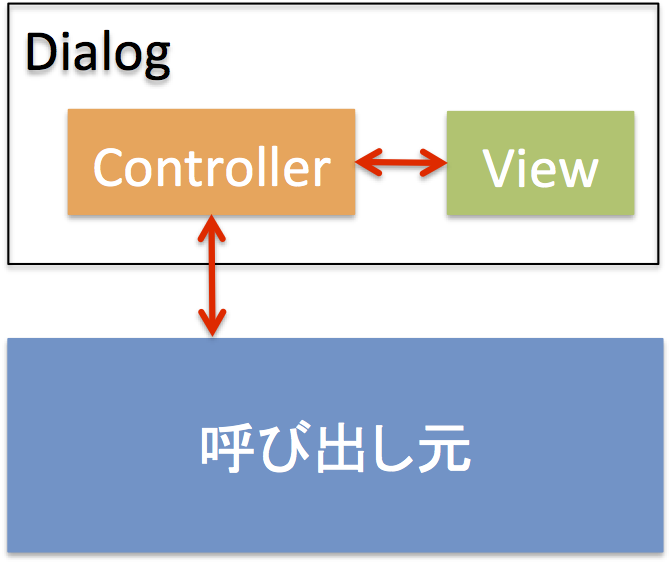
もう文章にすると全く分からなかったので久しぶりにExcel使って図を書いてみた。
現状のscopeカオスまっしぐらの図

そうそうこんな感じ。
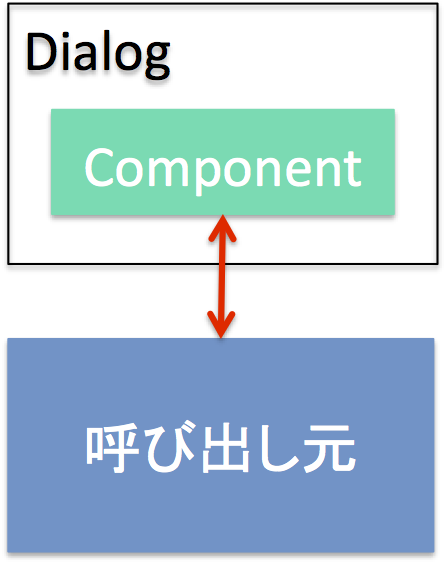
理想はscopeとっぱらってこうなること。
あったらいいな、の図
こうなるとControllerとViewをあえて分ける必要も無いので、定義したComponentを直接Dialogにつっこめるといちばんスッキリする。
もっとあったらいいな、の図
ということでこれを実現するために$mdDialogをラップしたdialogというServiceを作った。
まずは手っ取り早く使い方をご紹介。
parentからダイアログで表示するchildに初期値を渡す
↓
childで変更した値をparentに通知する
↓
parentで通知を受け取って値を保存してダイアログを閉じる
というフローを実現する場合これだけでOK
///<reference path="../typings/bundle.d.ts"/>

import angular = require('angular')
import Dialog from '../services/dialog'

class Parent {
	private value: string = 'しょきち'

	static $inject = ['dialog']
	constructor(private dialog: Dialog) {
	}

	private showDialog() {
		this.dialog.show(
			'タイトル',
			`<child value="$ctrl.value" call-back="$ctrl.callBack(newValue)"/>`,
			{
				locals: {
					value: this.value,
					callBack: newValue=>{
						this.value = newValue
						this.dialog.cancel()
					}
				}
			}
		)
	}
}

angular.module('App').component('parent', {
	controller: Parent,
	bindings: {},
	template: `
	<md-button class="md-raised md-primary" ng-click="$ctrl.showDialog()">ダイアログ開くよ</md-button>
	<p>{{$ctrl.value}}</p>
		`
})
///<reference path="../typings/bundle.d.ts"/>

import angular = require('angular')

class Child {
	private value: string
	private callBack: (newValue: {newValue: string})=> void

	static $inject = []

	constructor() {
	}

	private save() {
		if(this.callBack) {
			this.callBack({newValue: this.value})
		}
	}
}

angular.module('App').component('child', {
	controller: Child,
	bindings: {
		value: '=',
		callBack: '&'
	},
	template: `
	<md-input-container>
		<label>Value</label>
		<input ng-model="$ctrl.value">
	</md-input-container>
	<md-button class="md-raised md-primary" ng-click="$ctrl.save()">保存</md-button>
		`
})
解説
ポイントはparent.tsのこの部分
this.dialog.show(
	'タイトル',
	`<child value="$ctrl.value" call-back="$ctrl.callBack(newValue)"/>`,
	{
		locals: {
			value: this.value,
			callBack: newValue=>{
				this.value = newValue
				this.dialog.cancel()
			}
		}
	}
	)
第二引数でダイアログの中身を定義する際に出て来る$ctrl。
こいつに生やすプロパティ名・その中身の組み合わせを第三引数のlocalsで指定する。
$ctrlにvalueというプロパティを生やして、そこにparentが現在保持しているvalueプロパティの値を渡してね。
という指定をすると後はdialogサービスが勝手に値の受け渡しを自動でしてくれるという仕組み。
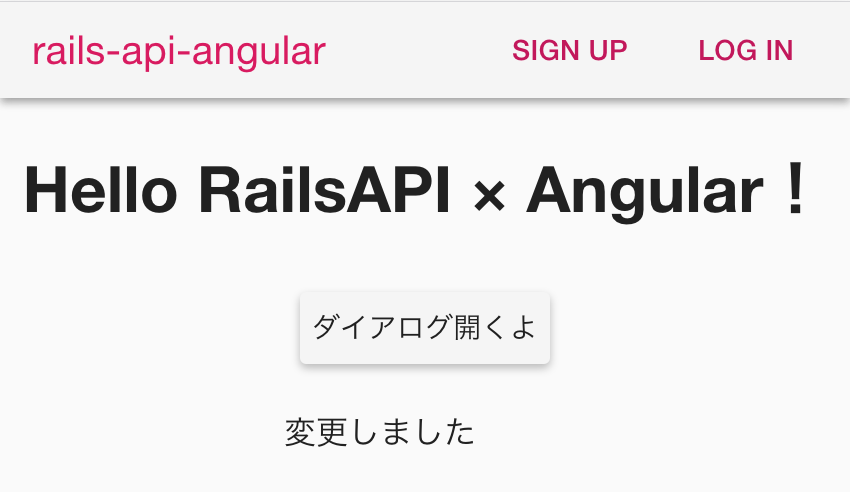
実行してみる
① 初期値でしょきちが表示される

②ダイアログを開くとchildに初期値が渡っている
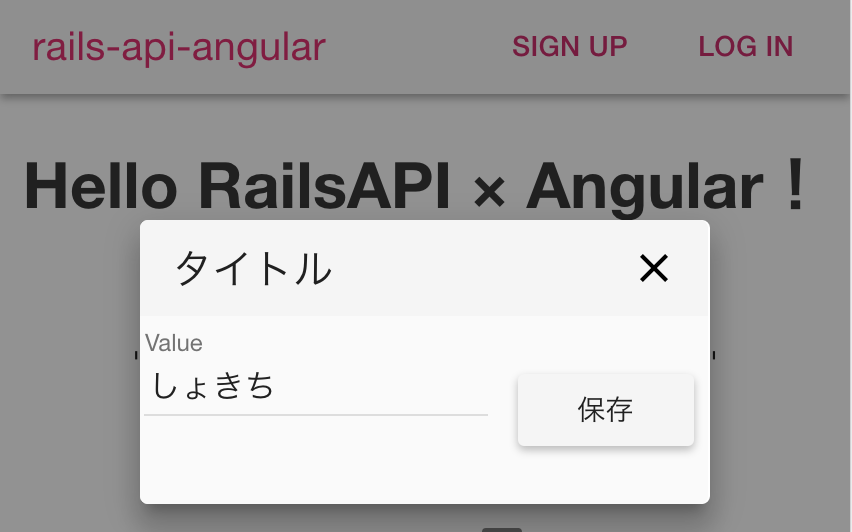
③値を変更して・・・

④保存を押すと、ほーらね!
dialog内部を見ていただくと分かる通りDialogControllerが定義されていて、localsの情報を受け流しています。
///<reference path="../typings/bundle.d.ts"/>

import angular = require('angular')
import md = angular.material

export class DialogOptions {
	locals: any
}

export default class Dialog {
	static $inject = ['$mdDialog']
	constructor(private mdDialog: md.IDialogService) {
	}

	// template : 表示htmlをつっこむ。
	show(title: string, template: string, options?: DialogOptions) {
		this.mdDialog.show({
			controller: DialogCtrl,
			controllerAs: '$ctrl',
			bindToController: true,
			template:
				`'<md-dialog aria-label="dialog">
              <md-toolbar>
                <div class="md-toolbar-tools">
                  <h2> ${title} </h2>
                  <span flex></span>
                  <md-button class="md-icon-button" ng-click="$ctrl.cancel()" aria-label="close">
                    <ng-md-icon class="icon-white" icon="clear"></ng-md-icon>
                  </md-button>
                </div>
              </md-toolbar>
              <md-dialog-content>
                <md-content>
                 ${template}
                </md-content>
              </md-dialog-content>
            </md-dialog>'`,
			locals: {
				options: options && options.locals ? options.locals : {}
			},
			parent: angular.element(document.body),
			clickOutsideToClose: true
		})
	}

	cancel() {
		this.mdDialog.cancel()
	}
}
angular.module('App').service('dialog', Dialog);

class DialogCtrl {
	static $inject = ['$mdDialog', 'options']
	constructor(
		private mdDialog: ng.material.IDialogService,
		private options: any) {
		// DialogController経由で子Componentに渡す
		if (this.options) {
			for (let l in this.options) {
				(<any>this)[l] = this.options[l]
			}
		}
	}

	cancel = () => { this.mdDialog.cancel() }
}
この方法を使うと
いいこと① ダイアログ専用のControllerとViewが量産されない
いいこと② ダイアログ呼び出し元の$scopeが汚染されない
いいこと③ 子コンポーネントはダイアログを一切意識する必要が無い
いいこと④ AngularMaterial側でこの問題が解決された際にdialogサービスだけ直せば事足りる(たぶん)
いいことばっかりと言いたいところですがほんのちょっとだけ黒魔術臭が漂っている気がしなくもないかな。
あくまで参考までに。