はじめに
CUDAプログラミングを行う場合、たいていの場合はRuntime APIが利用されると思います。
Runtime APIより細かい制御をしたい場合や、ホストコードとデバイスコードをプロジェクト上分けたいときなど、Driver APIを利用したいときのため、基本的な実行方法を整理しておきます。
実行環境
Windows 10 Home
Microsoft Visual Studio Community 2017
CUDA 9.0
NVIDIA GeForce GPU
kernelコード
kernelコードはCUDAコンパイラ(nvcc)を使います。
kernelはNVIDIAプロジェクトに自動生成されるサンプル(int型配列同士の加算
)をそのまま利用します。
- 新規作成→プロジェクト→NVIDIA→CUDA 9.0→CUDA 9.0 Runtime
kernel.cu
extern "C"
{
	__global__ void addKernel(int *c, const int *a, const int *b)
	{
		int i = threadIdx.x;
		c[i] = a[i] + b[i];
	}
}
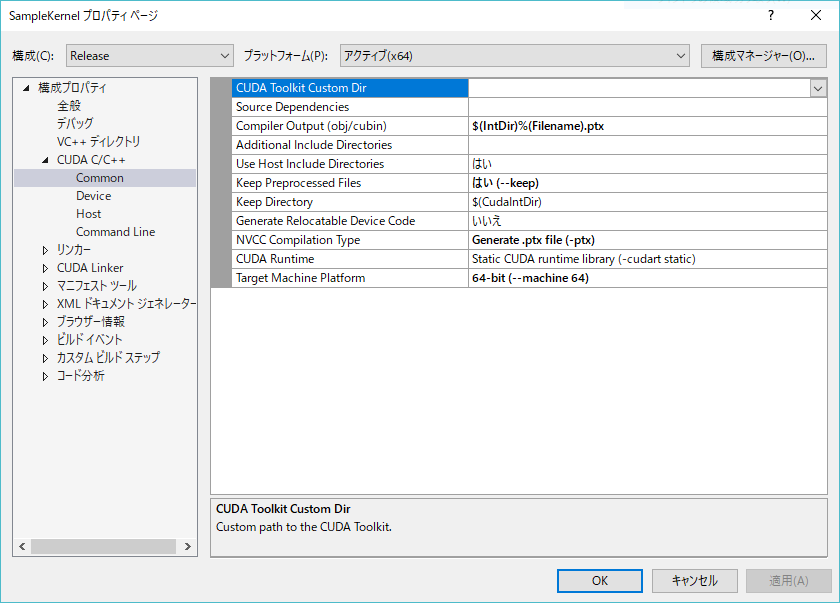
プロジェクトのプロパティから、ptxファイルが出力されるようにしておきます。
コンパイルすると、kernel.ptxが出力されます。
ホストコード
ホストコードはVCのコンパイラを使います。
- 新規作成→プロジェクト→Visual C++→Win32→Win32コンソールアプリケーション
Driver APIでkernelを実行する場合は、cuModuleLoadでptxファイルを外部モジュールとしてロードし、cuModuleGetFunctionで関数名をキーにエントリポイントを取得します。
その後、cuLaunchKernelにgridやthreadblockの設定とともに渡すことで、kernelが実行されます。
ちなみに、CUDA 9からCUDA_LAUNCH_PARAMS構造体が追加されており、cuLaunchKernelの引数相当の値を構造体をしてまとめておくことができますが、cuLaunchKernelには渡せません。
現状はマルチデバイス用のcuLaunchCooperativeKernelMultiDeviceにしか使えないようです。
main.cpp
# include "cuda.h"
# include <string>
# include <iostream>

//! CUresultエラーコード→エラーメッセージ
std::string GetErrorName(const CUresult& cuResult)
{
	const char* pStr;
	if (cuGetErrorName(cuResult, &pStr) != CUDA_ERROR_INVALID_VALUE)
	{
		return std::string(pStr);
	}

	return std::string();
}

int main()
{
	CUresult result = CUDA_SUCCESS;

	result = cuInit(0);
	if (result != CUDA_SUCCESS)
	{
		std::cout << GetErrorName(result) << std::endl;
		return 1;
	}

	int deviceNum = 0;
	result = cuDeviceGetCount(&deviceNum);
	if (result != CUDA_SUCCESS)
	{
		std::cout << GetErrorName(result) << std::endl;
		return 1;
	}
	if (deviceNum < 1)
	{
		std::cout << "No Device."<< std::endl;
		return 1;
	}

	CUdevice deviceID = 0;
	CUcontext context;
	result = cuCtxCreate(&context, CU_CTX_SCHED_AUTO, deviceID);
	if (result != CUDA_SUCCESS)
	{
		std::cout << GetErrorName(result) << std::endl;
		return 1;
	}

	cuCtxPushCurrent(context);

	//! kernel用入出力データ作成
	constexpr size_t length = 10;
	CUdeviceptr arrayAd, arrayBd, arrayCd;
	cuMemAlloc(&arrayAd, sizeof(int)*length);
	cuMemAlloc(&arrayBd, sizeof(int)*length);
	cuMemAlloc(&arrayCd, sizeof(int)*length);

	constexpr int arrayAh[length] = { 100, 100, 100, 100, 100, 100, 100, 100, 100, 100 };
	constexpr int arrayBh[length] = {   0,   1,   2,   3,   4,   5,   6,   7,   8,   9 };
	int arrayCh[length] = {};

	cuMemcpyHtoD(arrayAd, arrayAh, sizeof(int)*length);
	cuMemcpyHtoD(arrayBd, arrayBh, sizeof(int)*length);

	//! ptxファイルから関数のエントリポイントを取得
	CUmodule module;
	result = cuModuleLoad(&module, "kernel.ptx"); // 環境に合わせてパスを設定
	if (result != CUDA_SUCCESS)
	{
		std::cout << GetErrorName(result) << std::endl;
		return 1;
	}

	CUfunction addFunc;
	result = cuModuleGetFunction(&addFunc, module, "addKernel");
	if (result != CUDA_SUCCESS)
	{
		std::cout << GetErrorName(result) << std::endl;
		return 1;
	}

	//! kernel実行
	void* kernelArgs[] = { &arrayCd, &arrayAd, &arrayBd };
	result = cuLaunchKernel(addFunc, 1, 1, 1, length, 1, 1, 0, NULL, kernelArgs, 0);
	if (result != CUDA_SUCCESS)
	{
		std::cout << GetErrorName(result) << std::endl;
		return 1;
	}

	//! 結果確認
	cuMemcpyDtoH(arrayCh, arrayCd, sizeof(int)*length);

	for (int i = 0; i < length; i++)
	{
		std::cout << arrayCh[i] << ",";
	}
	std::cout << std::endl;

	cuModuleUnload(module);
	cuMemFree(arrayAd);
	cuMemFree(arrayBd);
	cuMemFree(arrayCd);
	cuCtxPopCurrent(&context);
	cuCtxDestroy(context);

    return 0;
}
実行結果
100,101,102,103,104,105,106,107,108,109,