はじめに
環境情報
- CentOS 7.2
- PHP 7.0.13
- MySQL 5.7.16
- Apache 2.4.6
これらの構築方法は別記事を参考にしてください。
CentOS7(Vagrant)でPHP7+Phalcon3環境を構築する
ownCloudをインストール
リポジトリを追加
コマンド
wget http://download.owncloud.org/download/repositories/stable/CentOS_7/ce:stable.repo -O /etc/yum.repos.d/ce:stable.repo
インストール
コマンド
yum -y install owncloud-files
※このときにパッケージを「owncloud」にするとPHP等も一緒にインストールしようとするため、すでにLAMP環境がある場合は「owncloud-files」をインストールする
/var/www/html/owncloudにファイルが一式展開される
HTTPSでアクセスする為の準備
Apache停止
コマンド
apachectl stop
mod_sslのインストール
コマンド
yum -y install mod_ssl
/etc/httpd/conf.d/ssl.confの編集
/etc/httpd/conf.d/ssl.con
# 追記
SSLStrictSNIVHostCheck off

# 以下の範囲を削除またはコメントアウト
<VirtualHost _default_:443>
...
</VirtualHost>
Certbotクライアントをインストール
コマンド
yum -y install --enablerepo=epel certbot python-certbot-apache
Let's Encrypt発行のSSL/TLSサーバ証明書を取得
コマンド
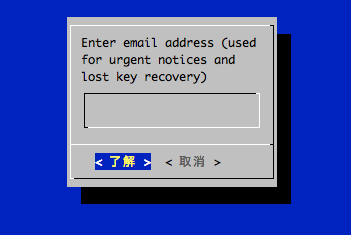
certbot certonly --standalone -d {証明書を取得するドメイン}
上記コマンドを実行すると次のようなGUIが立ち上がるので、緊急通知や鍵の有効期限が近づいた場合の連絡先を入力する。
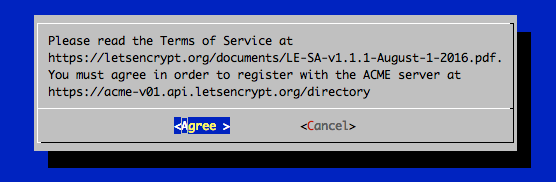
次に進むとLet's Encryptの利用規約への同意を求められるので、で進む。
無事に証明書の取得が終わると以下の結果が表示される
結果
IMPORTANT NOTES:
 - Congratulations! Your certificate and chain have been saved at
   /etc/letsencrypt/live/{証明書を取得したドメイン}/fullchain.pem. Your
   cert will expire on {証明書の有効期限}. To obtain a new or tweaked version
   of this certificate in the future, simply run certbot again. To
   non-interactively renew *all* of your certificates, run "certbot
   renew"
 - If you lose your account credentials, you can recover through
   e-mails sent to {設定したメールアドレス}.
 - Your account credentials have been saved in your Certbot
   configuration directory at /etc/letsencrypt. You should make a
   secure backup of this folder now. This configuration directory will
   also contain certificates and private keys obtained by Certbot so
   making regular backups of this folder is ideal.
 - If you like Certbot, please consider supporting our work by:

   Donating to ISRG / Let's Encrypt:   https://letsencrypt.org/donate
   Donating to EFF:                    https://eff.org/donate-le
証明書を更新する場合は上記結果内にも記載のある通りcertbot renewコマンドにて行う。
VirtualHostの設定
コマンド
cat <<EOF > /etc/httpd/conf.d/owncloud.conf
<VirtualHost *:443>
    ServerName {設定するドメイン}
    DocumentRoot /var/www/html/owncloud
    SSLEngine on
    SSLCertificateFile /etc/letsencrypt/live/{証明書を取得したドメイン}/cert.pem
    SSLCertificateKeyFile /etc/letsencrypt/live/{証明書を取得したドメイン}/privkey.pem
    SSLCertificateChainFile /etc/letsencrypt/live/{証明書を取得したドメイン}/chain.pem
    Header set Strict-Transport-Security "max-age=31536000; includeSubDomains"
    ErrorLog /var/log/httpd/owncloud/error_log
    CustomLog /var/log/httpd/owncloud/access_log combined env=!no_log
    <Directory "/var/www/html/owncloud">
        Options All
        AllowOverride All
        Require all granted
    </Directory>
</VirtualHost>
EOF
上記で設定するパスはシンボリックリンクとなっていて、実体は以下にある。
# サーバ証明書(公開鍵)
SSLCertificateFile /etc/letsencrypt/archive/{証明書を取得したドメイン}/cert{N}.pem
# 秘密鍵
SSLCertificateKeyFile /etc/letsencrypt/archive/{証明書を取得したドメイン}/privkey{N}.pem
# 中間証明書
SSLCertificateChainFile /etc/letsencrypt/archive/{証明書を取得したドメイン}/chain{N}.pem
※{N}は発行順の連番で証明書の番号となる。初めて当該ドメインで取得した場合は"1"となり、証明書を再取得した場合には{N}が"2"以上の番号となり古いものは上書きされないとのこと。
シンボリックリンクで指定しておくと、証明書等の更新時に設定ファイルの書き換えが不要になるらしい。
ログディレクトリ作成
コマンド
mkdir /var/log/httpd/owncloud
Apache起動
コマンド
apachectl start
PHP設定
ZIPモジュール追加
コマンド
yum -y install --enablerepo=remi-php70 php-pecl-zip
APCuモジュール追加
コマンド
yum -y install --enablerepo=remi-php70 php-pecl-apcu
Apache再起動
コマンド
apachectl restart
MySQL設定
データベース作成
mysqlコマンド
CREATE DATABASE owncloud;
ユーザー作成
mysqlコマンド
CREATE USER 'owncloud'@'localhost' IDENTIFIED BY 'ownCloud@pass1';
# ユーザー名、パスワードは適宜変更する
# MySQL5.7のセキュリティポリシーMEDIUMに則ったパスワードにする
ユーザーに権限付与
mysqlコマンド
GRANT ALL PRIVILEGES ON owncloud.* TO 'owncloud'@'localhost';
ownCloudの初期設定
メモリキャッシュ設定
コマンド
vim /var/www/html/owncloud/config/config.php
$CONFIG = array(...)内に以下を追加
追加
'memcache.local' => '\OC\Memcache\APCu',
データディレクトリを作成
コマンド
mkdir /home/data && chown -R apache:apache /home/data
ブラウザからアクセス
https://{設定したドメイン}にてアクセス
各入力項目を入力してセットアップを完了する
管理者アカウント
- ユーザー名
- パスワード
ストレージとデーターベース
データフォルダー
- 上記で作成した「
/home/data」を指定
データベース設定
- 「
MySQL/MariaDB」を選択 - DB接続情報
- データベース名 (上記で作成したDBを指定)
- ユーザー名 (上記で作成したユーザーを指定)
- パスワード (上記で作成したユーザーのパスワード)
- ホスト名 (複数台構成じゃなければ初期値localhostのままでOK)
「セットアップを完了します」ボタンを押下する。