■概要
OCI-C(Oracle Cloud Infrastructure Classic)サイトで、データセンターとIPネットワーク間のVPN接続を設定するには、VPN as a Service(VPNaaS)を使用します。
これにより、データセンターとIPネットワークに追加されたインスタンス間の安全な通信チャネルが提供されます。
OCI(Oracle Cloud Infrastructure)サイトは、OCI-CのVPNaaS と接続するために OCI側に今回はDRGではなく、LibreswanのCompute Instance を作成してIPSec VPN接続を行います
●NW構成イメージ

■OCI-C側手順
・IPNetwork、Compute Instance を上記NW構成イメージのように作成配置します
本手順ではVPnaaS作成を行います
●VPNaaS作成設定
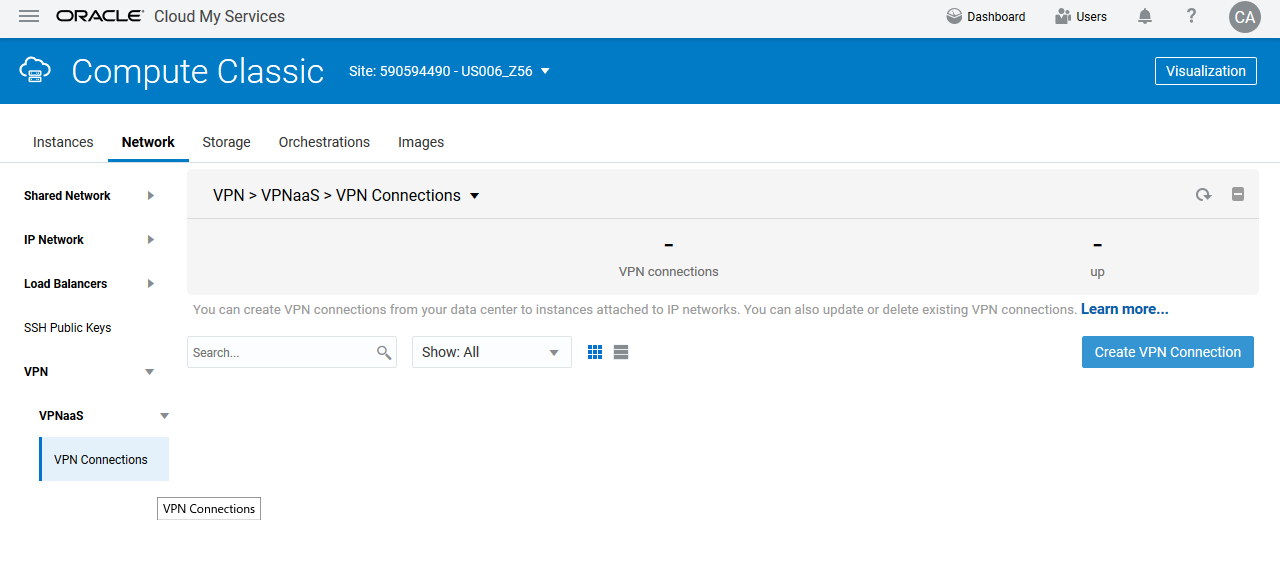
・OCI-Cコンソール画面
OCI-CコンソールのNetwork画面の左ペインより、[VPN]->[VPNaaS]->[VPN Connections]画面にて、[Create VPN Connection]ボタンをクリック
・Create VPN Connection 画面
以下項目を記入し[Create]ボタンをクリックしてVPnaaSを作成
                     - Name:VPnaaSの適当な名前を記入
               - IP Network:OCI-CのIP Network CIDERを記入
         - Customer Gateway:OCIのLibreswanインスタンスのPublic IPを記入
- Customer Reachable Routes:OCIのVCN CIDER を記入
           - Pre-shared key:VPN接続するための適当なパスワードを記入

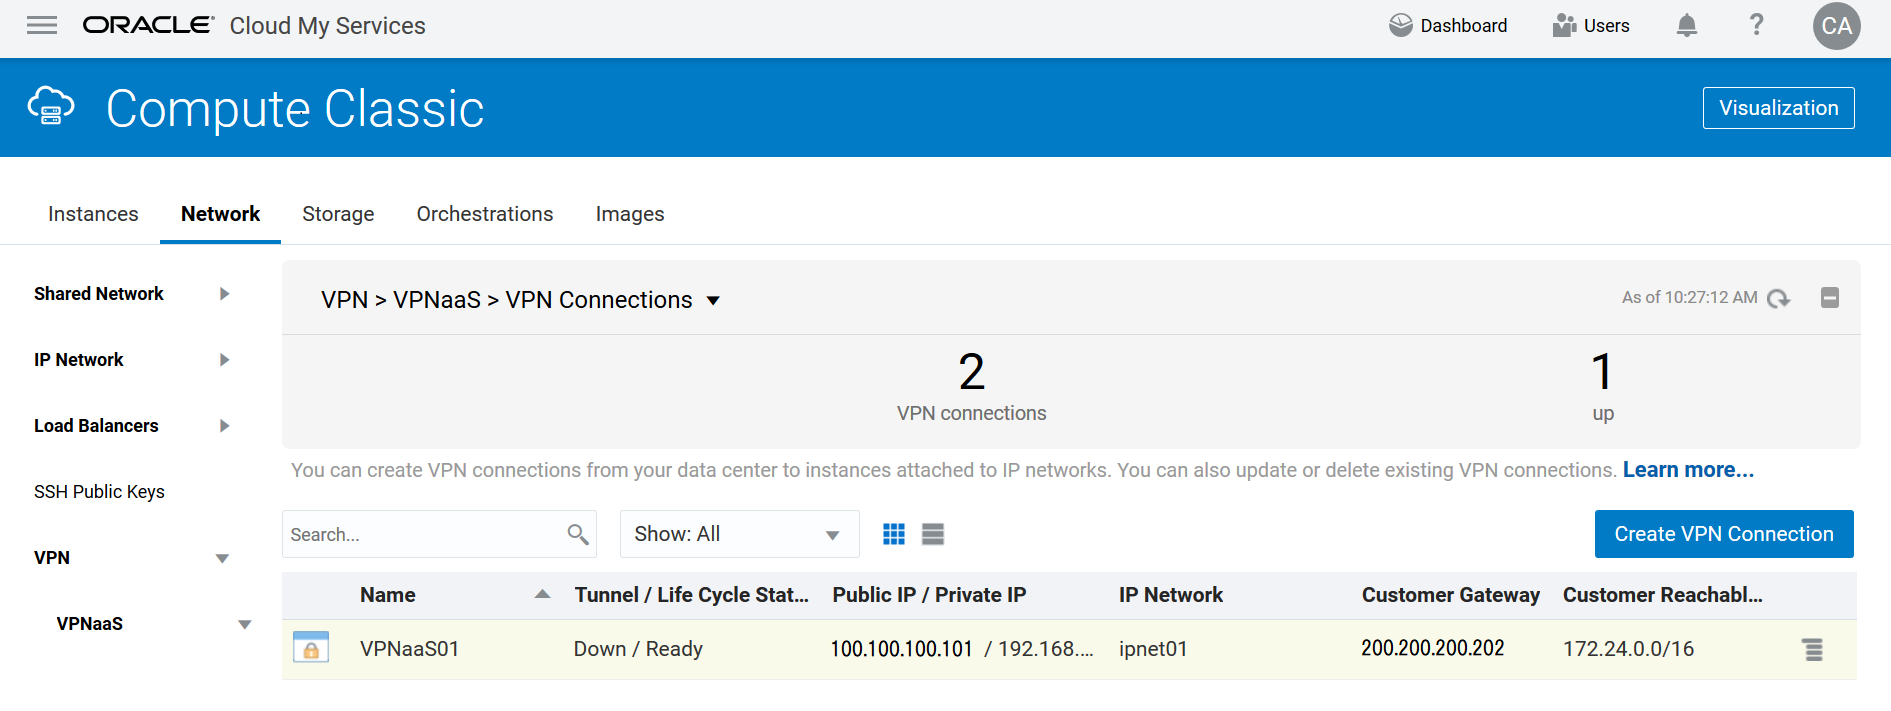
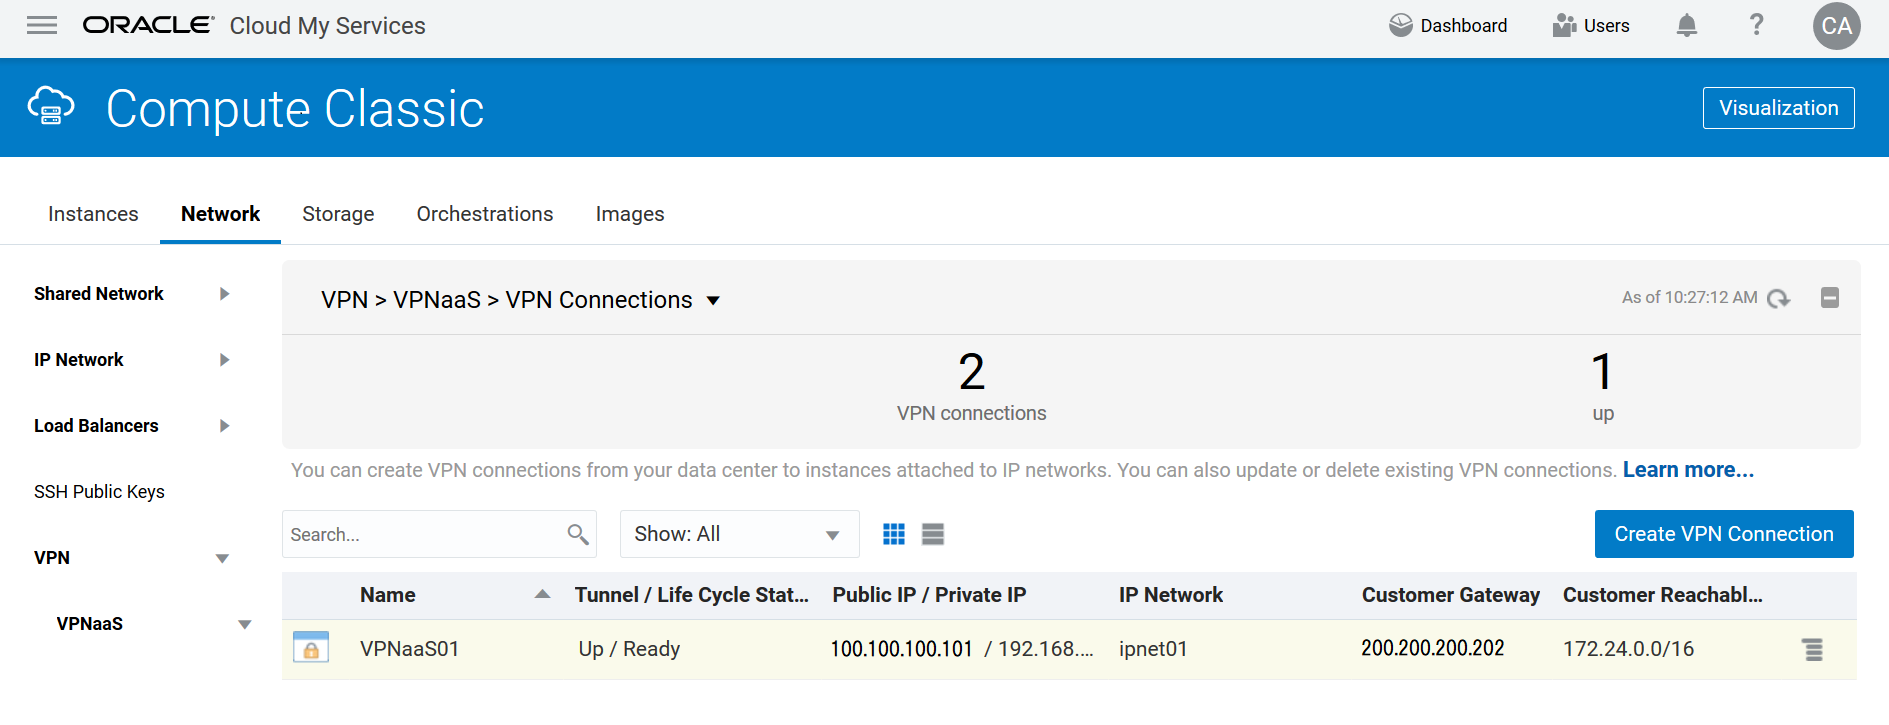
・作成後のコンソール画面
VPNaaSが作成されていることを確認
Tunnel Status は OCI側と疎通していないためDown状態
■OCI側手順
LibreswanインスタンスをVPN Gatewayとするための設定を行います
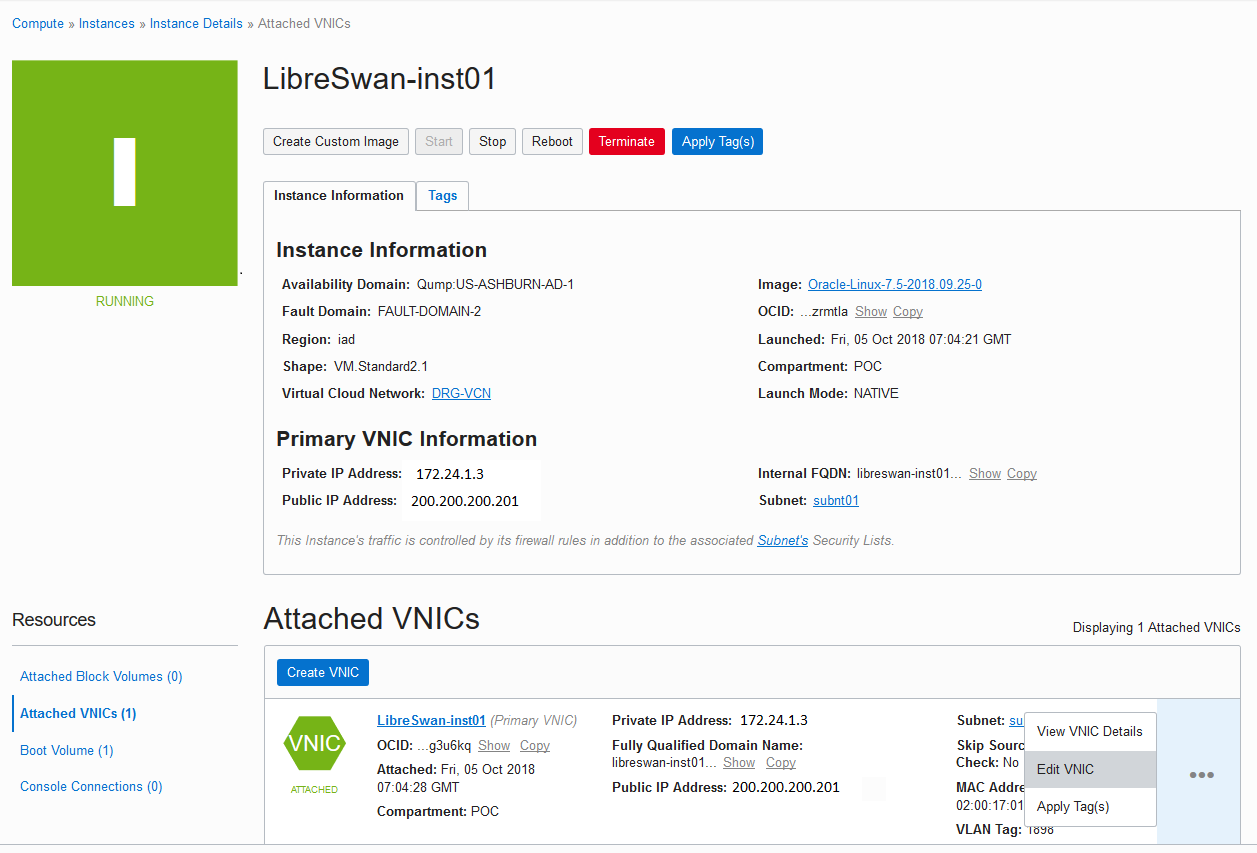
●Libreswan のCompute VNIC設定
デフォルトでは、すべてのVNICはネットワークトラフィックで送信元/宛先のチェックを実行し,VNICが送信元または宛先でない場合、パケットは廃棄されます。
VNICがトラフィックを転送する必要がある場合,VNICの"Skip Source/Destination Check"のチェックをしてVNICの送信元/宛先のチェックを無効にします。
① LibreswanのComputeインスタンス画面の左ペインにある[Attached VNICs]をクリックし、Gateway とするVNICを選択して、Edit VNICをクリック
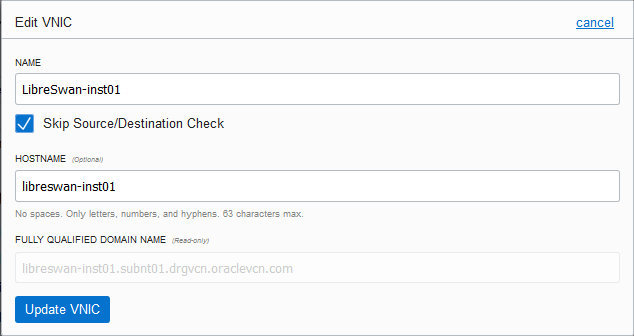
② "Skip Source/Destination Check"をチェックして[Update VNIC]をクリック
●Route Table 設定
以下2つのRouteを追加
①LibreSwanがVPN通信できるよう Internet Gateway 0.0.0.0/0 のRouteを追加
②OCIインスタンスから、OCI-C側のCIDR 192.168.0.0/16 は Libreswanインスタンス(172.24.1.3)を通るようRouteを追加

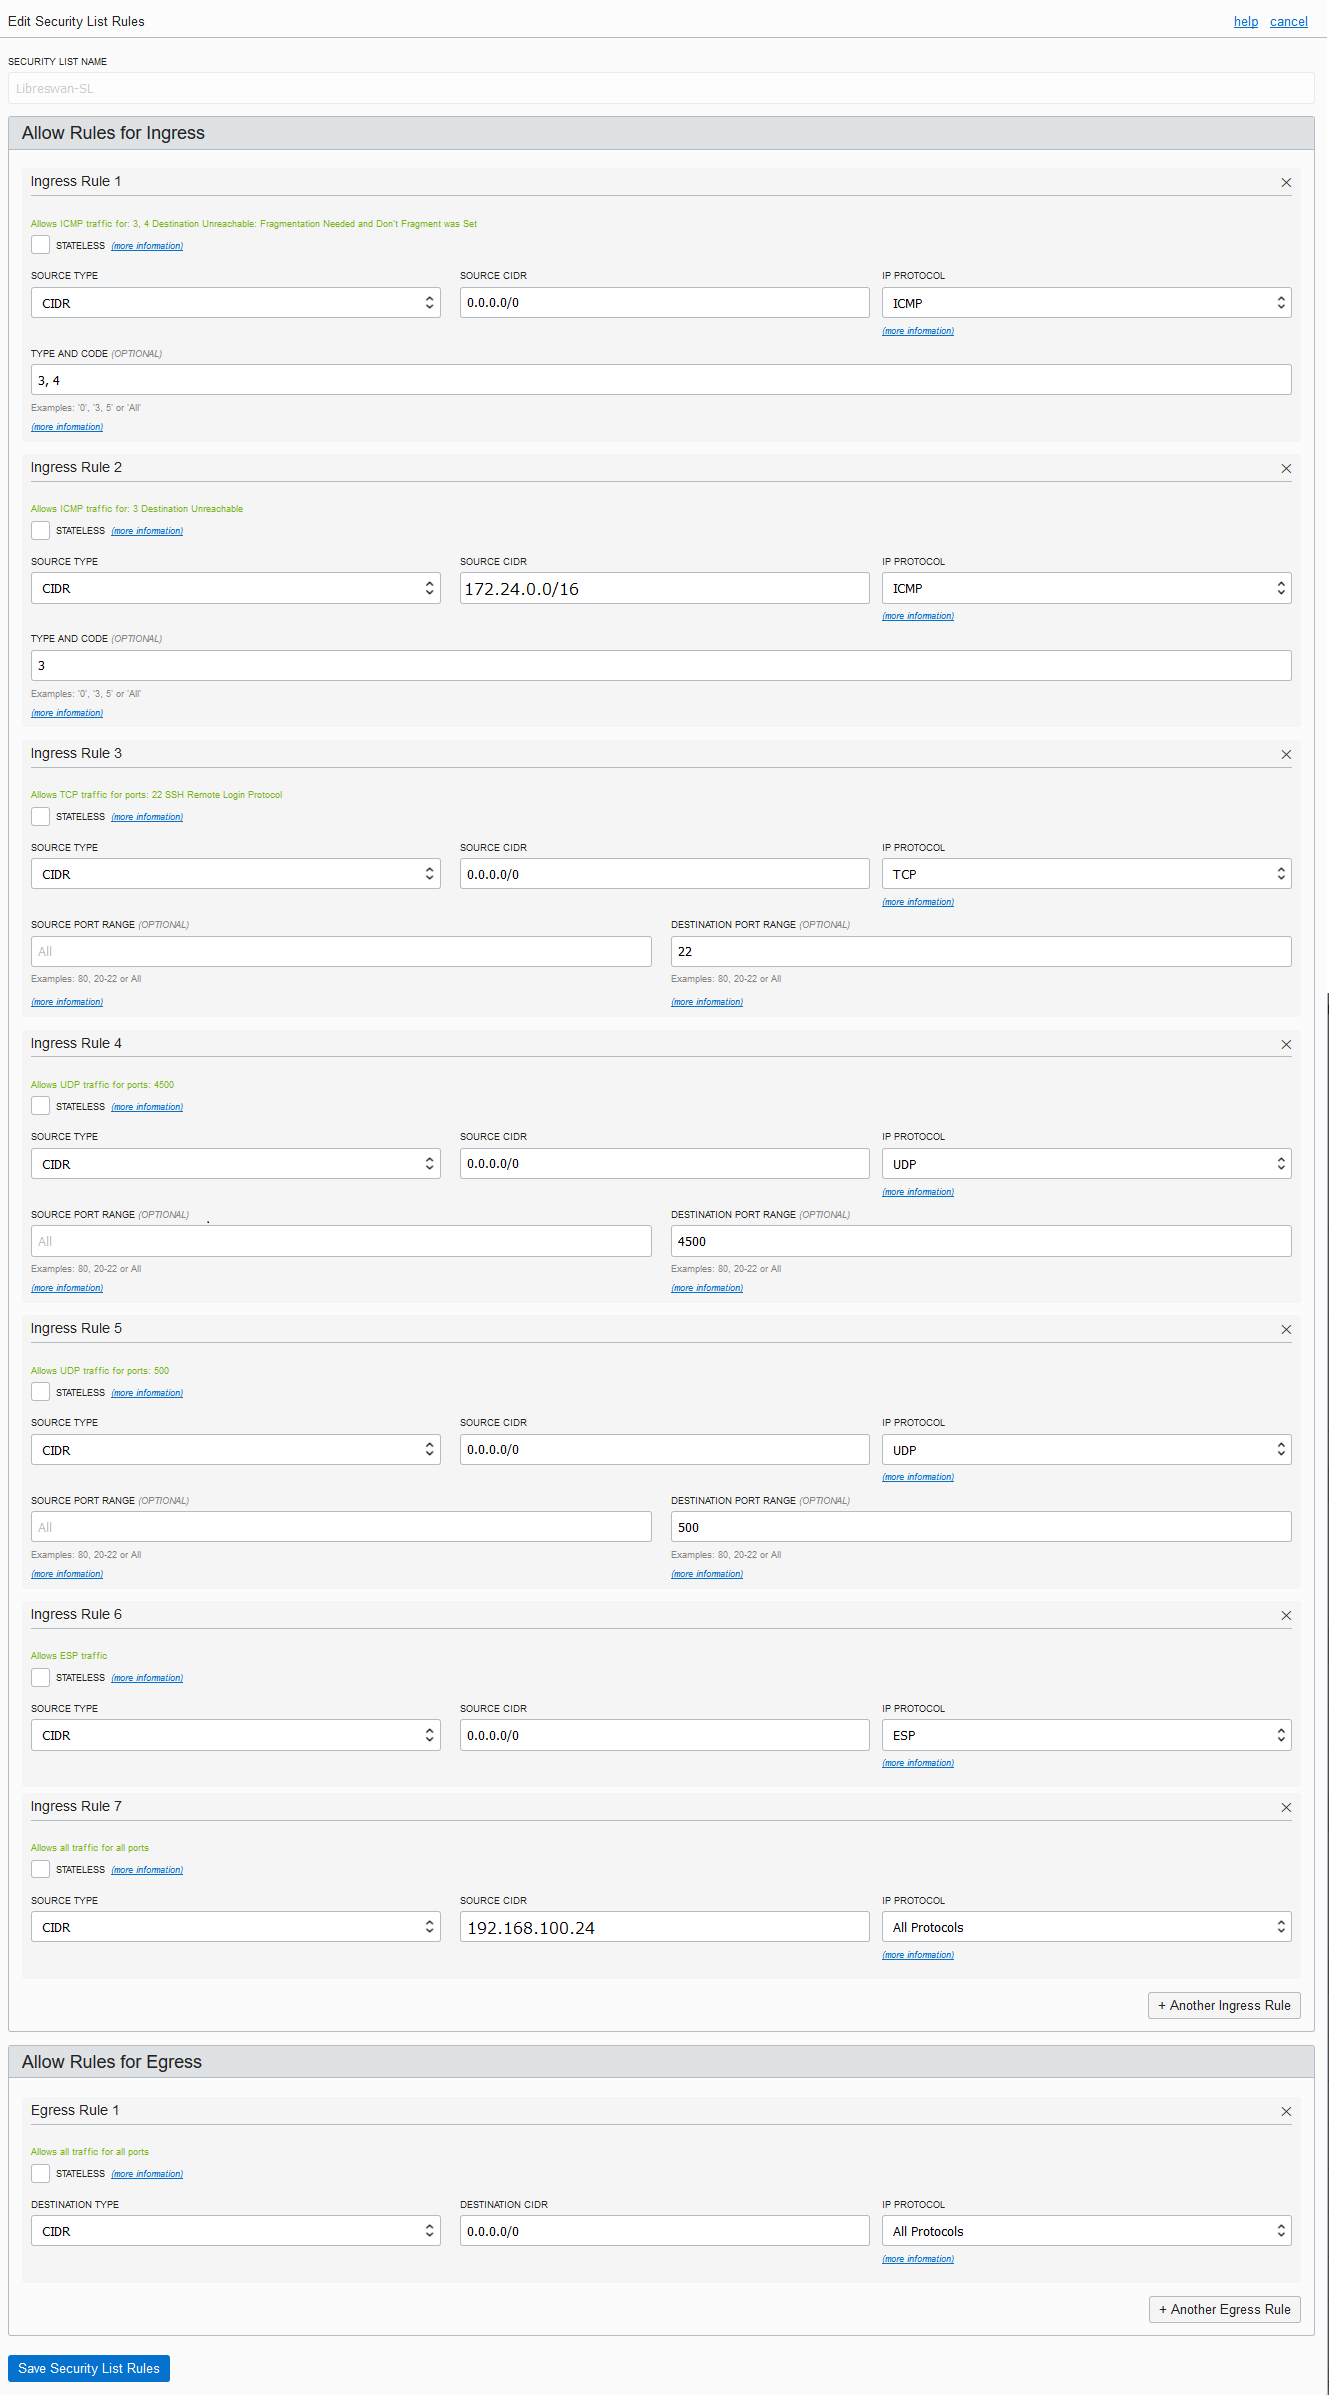
●Security List設定
- IPsec VPN接続用に以下ポートアクセスを許可
	Internet Key Exchange (IKE) プロトコル用:UDP ポート 500
	IKE NAT-Traversal 用:UDP ポート 4500
	Encapsulated Security Payload (ESP) IPsec パケット用 :プロトコル 50
- IPsec VPN接続用にOCI-Cインスタンスからのポートアクセスを許可
	ここでは、192.168.100.0/24 のAll Protocols を許可
●Libreswanインストール
Libreswan用Compute Instanceを作成し、yumでLibreswanをインストール
[root@libreswan-inst01 ~]$ yum -y install libreswan
	Loaded plugins: langpacks, ulninfo
	ol7_UEKR5                                                | 2.5 kB     00:00
	ol7_addons                                               | 2.5 kB     00:00
	ol7_developer                                            | 2.5 kB     00:00
	・・・
	Installed:
	  libreswan.x86_64 0:3.23-5.0.1.el7_5

	Dependency Installed:
	  ldns.x86_64 0:1.6.16-10.el7         unbound-libs.x86_64 0:1.6.6-1.el7

	Complete!
●Libreswan Version確認
[root@libreswan-inst01 ~]$ ipsec --version
	Linux Libreswan 3.23 (netkey) on 4.14.35-1818.2.1.el7uek.x86_64
●LibreSwan設定
・/etc/sysctl.conf設定
以下内容を追加
	net.ipv4.ip_forward = 1
	net.ipv4.conf.all.accept_redirects = 0
	net.ipv4.conf.all.send_redirects = 0
	net.ipv4.conf.default.send_redirects = 0
	net.ipv4.conf.ens3.send_redirects = 0
	net.ipv4.conf.default.accept_redirects = 0
	net.ipv4.conf.ens3.accept_redirects = 0
	net.ipv4.conf.all.rp_filter = 0
	net.ipv4.conf.default.rp_filter = 0
	net.ipv4.conf.ens3.rp_filter = 0
	net.ipv4.conf.ip_vti0.rp_filter = 0
	net.ipv4.conf.all.rp_filter = 0
・/etc/sysctl.conf設定反映
sysctl コマンドで設定を反映してエラー出力が無いことを確認
[root@libreswan-inst01 ~]$ sysctl -p
	net.ipv4.ip_forward = 1
	net.ipv4.conf.all.accept_redirects = 0
	net.ipv4.conf.all.send_redirects = 0
	net.ipv4.conf.default.send_redirects = 0
	net.ipv4.conf.ens3.send_redirects = 0
	net.ipv4.conf.default.accept_redirects = 0
	net.ipv4.conf.ens3.accept_redirects = 0
	net.ipv4.conf.all.rp_filter = 0
	net.ipv4.conf.default.rp_filter = 0
	net.ipv4.conf.ens3.rp_filter = 0
	net.ipv4.conf.ip_vti0.rp_filter = 0
	net.ipv4.conf.all.rp_filter = 0
・/etc/ipsec.conf設定
以下内容を追加
	config setup
           plutoopts="--perpeerlog"
           protostack=auto
           nat_traversal=yes
	include /etc/ipsec.d/*.conf
・/etc/ipsec.d/VPNaaS.conf作成設定
OCI-C接続用設定ファイルを作成して設定
[root@libreswan-inst01 ~]$ vi /etc/ipsec.d/VPNaaS.conf
	conn vpnaas1
	     authby=secret
	     auto=start
	     pfs=yes
	     leftid=146.56.1.108     #OCI-C VPNaaS IPSec Public IP
	     left=146.56.1.108       #OCI-C VPNaaS IPSec Public IP
	     leftsubnets={192.168.200.0/24} #OCI-C IP-Network CIDR
	     right=172.24.1.5            #OCI Libreswan local VPC internal address
	     rightid=129.213.179.43    #OCI Libreswan Public IP address
	     rightsubnet=172.24.0.0/16    #OCI VPC CIDR
・/etc/ipsec.d/VPNaaS.secrets作成設定
OCI-C接続用設定ファイルを作成して設定
Secret Keyは VPNaaS作成で設定した"Pre-shared key"を記入
[root@libreswan-inst01 ~]# vi /etc/ipsec.d/VPNaaS.secrets
	#OCI-C_VPNaaS-Public-IP  OCI_LibreSWAN-PublicIP   :   PSK    "Secret Key(VPNaaS Pre-shared key)"
	146.56.1.108 129.213.179.43   :    PSK    "password"
・Libreswan IPsec起動
[root@libreswan-inst01 ~]# systemctl restart ipsec
・Libreswan設定 Verifyチェック
すべて[OK]であることを確認
[root@libreswan-inst01 ~]# ipsec verify
	Verifying installed system and configuration files

	Version check and ipsec on-path                         [OK]
	Libreswan 3.23 (netkey) on 4.14.35-1818.2.1.el7uek.x86_64
	Checking for IPsec support in kernel                    [OK]
	 NETKEY: Testing XFRM related proc values
	         ICMP default/send_redirects                    [OK]
	         ICMP default/accept_redirects                  [OK]
	         XFRM larval drop                               [OK]
	Pluto ipsec.conf syntax                                 [OK]
	Two or more interfaces found, checking IP forwarding    [OK]
	Checking rp_filter                                      [OK]
	Checking that pluto is running                          [OK]
	 Pluto listening for IKE on udp 500                     [OK]
	 Pluto listening for IKE/NAT-T on udp 4500              [OK]
	 Pluto ipsec.secret syntax                              [OK]
	Checking 'ip' command                                   [OK]
	Checking 'iptables' command                             [OK]
	Checking 'prelink' command does not interfere with FIPS [OK]
	Checking for obsolete ipsec.conf options                [OK]
・Libreswan IPsec接続確認
OCI-C側のVPNaaS作成設定済みの場合、上記IPsec起動によりVPN接続が確立される
[root@libreswan opc]# ipsec auto --status |grep "==="
  000 "vpnaas1/1x0": 172.24.0.0/16===172.24.1.3<172.24.1.3>[200.200.200.201]...100.100.100.101<100.100.100.101>===192.168.100.0/24; erouted; eroute owner: #8883
・自動起動設定
[root@libreswan-inst01 ~]# systemctl status ipsec
	● ipsec.service - Internet Key Exchange (IKE) Protocol Daemon for IPsec
	Loaded: loaded (/usr/lib/systemd/system/ipsec.service; disabled; vendor preset: disabled)
	・・・
	==> disabledであること確認

[root@libreswan-inst01 ~]# systemctl enable ipsec
	Created symlink from /etc/systemd/system/multi-user.target.wants/ipsec.service to /usr/lib/systemd/system/ipsec.service.

[root@libreswan-inst01 ~]# systemctl status ipsec
	● ipsec.service - Internet Key Exchange (IKE) Protocol Daemon for IPsec
	   Loaded: loaded (/usr/lib/systemd/system/ipsec.service; enabled; vendor preset: disabled)
	・・・
	==> enabledであること確認
・OCI-CのVPNaaSのStatus確認
OCI-CのコンソールでVPNaaSのStatusがUPになっていることを確認
■VPN接続確認
●OCI-C:VPNaaSとOCI:Libreswan間疎通確認
・Libreswan - VPnaaS間のローカルアドレス疎通確認
[root@libreswan-inst01 ~]# ping 192.168.200.254
	PING 192.168.200.254 (192.168.200.254) 56(84) bytes of data.
	64 bytes from 192.168.200.254: icmp_seq=1 ttl=64 time=274 ms
	64 bytes from 192.168.200.254: icmp_seq=2 ttl=64 time=250 ms
	64 bytes from 192.168.200.254: icmp_seq=3 ttl=64 time=266 ms
	^C
	--- 192.168.200.254 ping statistics ---
	9 packets transmitted, 9 received, 0% packet loss, time 8010ms
	rtt min/avg/max/mdev = 241.165/261.181/274.139/10.852 ms
●OCI-Cインスタンス設定
OCI-CインスタンスがVPaaSをGateway経由としてOCI側NWに接続するようroute追加
・設定前確認
[root@koba-inst02 ~]# netstat -nr
	Kernel IP routing table
	Destination     Gateway         Genmask         Flags   MSS Window  irtt Iface
	0.0.0.0         10.10.7.85     0.0.0.0         UG        0 0          0 eth1
	10.10.7.85     0.0.0.0         255.255.255.252 U         0 0          0 eth1
	192.168.200.0   0.0.0.0         255.255.255.0   U         0 0          0 eth0
・Route追加
[root@koba-inst02 ~]# route add -net 172.24.0.0 netmask 255.255.0.0 gw 192.168.200.254 eth0
・設定反映確認
[root@koba-inst02 ~]$ netstat -nr
	Kernel IP routing table
	Destination     Gateway         Genmask         Flags   MSS Window  irtt Iface
	0.0.0.0         10.10.7.85     0.0.0.0         UG        0 0          0 eth1
	10.10.7.85     0.0.0.0         255.255.255.252 U         0 0          0 eth1
	172.24.0.0      192.168.200.254 255.255.0.0     UG        0 0          0 eth0
	192.168.200.0   0.0.0.0         255.255.255.0   U         0 0          0 eth0
●OCI-C と OCI Computeインスタンス間 疎通確認
・Libreswan インスタンスのfirewalld停止
Computeインスタンス間疎通動作確認のため、Libreswan インスタンス(libreswan-inst01)のファイアウォール停止します。
[root@libreswan-inst01 ~]# systemctl stop firewalld
・OCI-C -> OCI疎通確認
OCI-Cのインスタンス(OCI-C-inst01)に接続して、OCIのインスタンス(oci-inst01)に疎通できることを確認
[opc@OCI-C-inst01 ~]$ ping 172.24.2.7
	PING 192.168.100.3 (172.24.2.7) 56(84) bytes of data.
	64 bytes from 172.24.2.7: icmp_seq=1 ttl=63 time=171 ms
	64 bytes from 172.24.2.7: icmp_seq=2 ttl=63 time=170 ms
	64 bytes from 172.24.2.7: icmp_seq=3 ttl=63 time=172 ms
	^C
	--- 172.24.2.7 ping statistics ---
	10 packets transmitted, 10 received, 0% packet loss, time 9014ms
	rtt min/avg/max/mdev = 169.559/171.463/178.846/2.808 ms

[opc@OCI-C-inst01 ~]$ ssh -i ”ssh鍵” opc@172.24.2.7 hostname
	oci-inst01
	==>OCIインスタンス名が出力されればOK
・OCI -> OCI-C疎通確認
OCIのインスタンス(oci-inst01)に接続して、OCI-Cのインスタンス(OCI-C-inst01)に疎通できることを確認
[opc@oci-inst01 ~]$ ping  192.168.100.3
	PING 192.168.100.3 (192.168.100.3) 56(84) bytes of data.
	64 bytes from 192.168.100.3: icmp_seq=1 ttl=62 time=2.82 ms
	64 bytes from 192.168.100.3: icmp_seq=2 ttl=62 time=1.54 ms
	64 bytes from 192.168.100.3: icmp_seq=3 ttl=62 time=1.75 ms
	^C
	--- 192.168.100.3 ping statistics ---
	3 packets transmitted, 3 received, 0% packet loss, time 2004ms
	rtt min/avg/max/mdev = 1.543/2.040/2.820/0.559 ms

[opc@oci-inst01 ~]$ ssh -i ”ssh鍵” opc@192.168.100.3 hostname
	OCI-C-inst01
	==>OCI-Cインスタンス名が出力されればOK