■目的
OCIのDNS名は、VCN DNSリゾルバ(169.254.169.254)を使用してVCN内でのみ解決できます。このIPアドレス(169.254.169.254)は、VCN内のインスタンスからのみ到達可能です。
オンプレミスのデータセンターが(VPNまたはFastConnectを介して)VCNに接続されている場合、オンプレミスのクライアントからのVCNインスタンスとその逆のインスタンスのDNS名の解決を可能にするために、VCN側にオンプレミスのDNSと同期するDNSキャッシュサーバーを配置します。
■Network構成

●1. オンプレミスからVCNへのDNS Resolutionフロー
 ①クライアント(onp-inst)は、オンプレミスのDNSサーバー(192.168.0.2)へのDNSクエリ(oci-inst.ap.testvcn.oraclevcn.com)を開始
 ②オンプレミスDNSサーバーは、要求をプライベート接続(VPNまたはFastConnect)経由でVCNのDNS VM(10.0.0.2)に転送
 ③DNSクエリをVCN DNSリゾルバ(169.254.169.254)に転送
 ④DNS VM(10.0.0.2)はFQDNのIPアドレスを取得し、それをオンプレミスDNSサーバー(192.168.0.2)に戻す
 ⑤オンプレミスDNSサーバーがIPアドレスを取得し、クライアンに返します
●2. VCNからオンプレミスへのDNS Resolutionフロー
①VCNのインスタンス(oci-inst)がDNSクエリ開始(onp-inst.customer.net)
②VCN内のサブネットで使用されるDHCPオプションで構成されたDNSサーバーは、DNS要求を受信します。 この場合、要求はVCNのDNS VMによって受信されます
③DNSクエリはプライベート接続(VPNのFastconnect)でオンプレミスDNSサーバー(192.168.0.2)に転送
④DNS VMは応答を取得し、それをクライアントに返します
■OCI側DNSサーバー作成手順
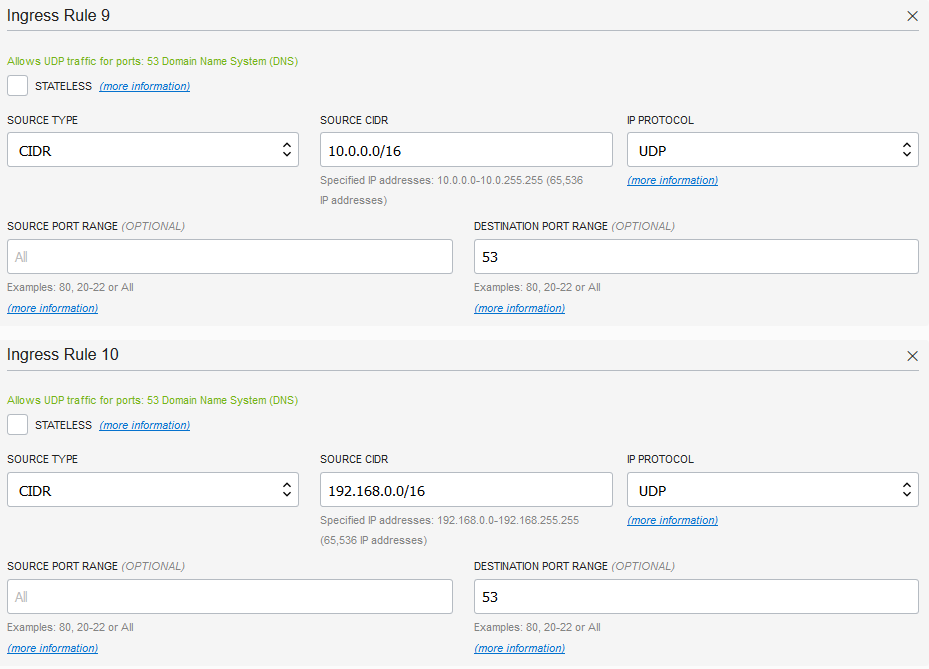
OCIにDNSサーバー用のSecurity ListとDHCPオプション、Subnetを作成して、DNSサーバーを作成します
●1. Security List 作成
DNS用 udp 53 Portを設定して作成

●2. DHCPオプション作成
DNS type を "Internet and VCN resolver"として設定して作成

●3. Subnet作成
作成したSecurity ListとDNS type を追加して作成

●4. DNSサーバー用 VMインスタンス作成
Oracle Linux7.6のOC で VM インスタンスを 作成
●5. Named(bind)インストールと設定
作成したVM インスタンスへ bindをインストール
①install bind
yum でbindをインストール
[root@customer-dns ~]# yum install bind
	Loaded plugins: langpacks, ulninfo
	ksplice-uptrack                                          |  951 B     00:00
	ol7_UEKR5                                                | 1.2 kB     00:00
	ol7_addons                                               | 1.2 kB     00:00
	ol7_developer                                            | 1.2 kB     00:00
	ol7_developer_EPEL                                       | 1.2 kB     00:00
	ol7_latest                                               | 1.4 kB     00:00
	ol7_optional_latest                                      | 1.2 kB     00:00
	ol7_software_collections                                 | 1.2 kB     00:00
	(1/16): ol7_addons/x86_64/updateinfo                       |  46 kB   00:00
	(2/16): ol7_developer/x86_64/updateinfo                    |  134 B   00:00
	(3/16): ol7_developer/x86_64/primary                       | 185 kB   00:00
	(4/16): ol7_developer_EPEL/x86_64/updateinfo               | 2.4 kB   00:00
	(5/16): ol7_UEKR5/x86_64/updateinfo                        |  11 kB   00:00
	(6/16): ol7_developer_EPEL/x86_64/primary                  | 8.0 MB   00:00
	(7/16): ol7_latest/x86_64/updateinfo                       | 755 kB   00:00
	(8/16): ol7_UEKR5/x86_64/primary                           | 2.4 MB   00:00
	(9/16): ol7_optional_latest/x86_64/updateinfo              | 585 kB   00:00
	(10/16): ol7_optional_latest/x86_64/primary                | 2.7 MB   00:00
	(11/16): ol7_latest/x86_64/primary                         |  11 MB   00:00
	(12/16): ol7_latest/x86_64/group                           | 659 kB   00:00
	(13/16): ol7_addons/x86_64/primary                         |  65 kB   00:00
	(14/16): ol7_software_collections/updateinfo               | 8.7 kB   00:00
	(15/16): ksplice-uptrack/7Server/x86_64/primary            | 2.7 kB   00:00
	(16/16): ol7_software_collections/primary                  | 3.7 MB   00:00
	ksplice-uptrack                                                           12/12
	ol7_UEKR5                                                               108/108
	ol7_addons                                                              247/247
	ol7_developer                                                           482/482
	ol7_developer_EPEL                                                  24124/24124
	ol7_latest                                                          11684/11684
	ol7_optional_latest                                                   9234/9234
	ol7_software_collections                                            12604/12604
	Resolving Dependencies
	--> Running transaction check
	---> Package bind.x86_64 32:9.9.4-72.el7 will be installed
	--> Finished Dependency Resolution

	Dependencies Resolved

	================================================================================
	 Package      Arch           Version                   Repository          Size
	================================================================================
	Installing:
	 bind         x86_64         32:9.9.4-72.el7           ol7_latest         1.8 M

	Transaction Summary
	================================================================================
	Install  1 Package

	Total download size: 1.8 M
	Installed size: 4.5 M
	Is this ok [y/d/N]: y
	Downloading packages:
	bind-9.9.4-72.el7.x86_64.rpm                               | 1.8 MB   00:05
	Running transaction check
	Running transaction test
	Transaction test succeeded
	Running transaction
	  Installing : 32:bind-9.9.4-72.el7.x86_64                                  1/1
	  Verifying  : 32:bind-9.9.4-72.el7.x86_64                                  1/1

	Installed:
	  bind.x86_64 32:9.9.4-72.el7

	Complete!
②firewalld設定
DNS使用Port 53を通すように設定
[root@customer-dns ~]# firewall-cmd --permanent --add-port=53/udp
	success
[root@customer-dns ~]# firewall-cmd --permanent --add-port=53/tcp
	success
[root@customer-dns ~]# systemctl restart firewalld
③/etc/named.conf設定
・デフォルトの/etc/named.confをバックアップ
[root@customer-dns ~]# mv /etc/named.conf /etc/named.conf.org
・DNS設定
オンプレミスDNSサーバー(192.168.0.2)のキャッシュDNSとなるよう設定
[root@customer-dns ~]# vi /etc/named.conf
	options {
	        listen-on port 53 { any; };
	        allow-query    { localhost; 10.0.0.0/16; 192.168.0.0/16; };
	        forward        only;
	        forwarders     { 169.254.169.254; };
	        recursion yes;
	};

	zone "customer.net" {
	        type       forward;
	        forward    only;
	        forwarders { 192.168.0.2; };
	};
④named起動
[root@customer-dns ~]# service named restart
	Redirecting to /bin/systemctl restart named.service
■OCI側インスタンスのDNSサーバー指定設定
OCI内のインスタンスが作成したDNSサーバーにアクセスするためには、VCNのSubnetに付与されているDHCP Optionsを設定します
●1. DHCP Options作成
ここでは、AP-Subnet用のDHCP Optionを作成し以下項目を設定して[Create DHCP Option]をクリックして作成
・Options:Custom Resolver
・Search Domain:オンプレミスのドメイン(customer.net)を設定

●2. OCIインスタンスのVCN Subnet設定
●3. OCIインスタンスの設定確認
OCIインスタンスを再起動することによって、設定したDHCP OptionのDNSサーバーにアクセスするようにOS設定がされます
①OCIインスタンス再起動
oci-instを [Reboot]ボタンで再起動

②設定反映確認
再起動したインスタンスにログインして、/etc/resolv.confを読み、オンプレミスのドメインが付与され、作成したDNS(nameserver)のIPが設定されていることを確認
[opc@oci-inst ~]$ cat /etc/resolv.conf
	; generated by /usr/sbin/dhclient-script
	search customer.net ap.testvcn.oraclevcn.com testvcn.oraclevcn.com
	nameserver 10.0.0.2
■DNS名前解決確認
●1. OCI-->オンプレミス確認
OCIのインスタンス(oci-inst)からオンプレミスのインスタンス(onp-inst)のDNS名前解決できることを確認
① nslookupで名前解決確認
ホスト名でnslookupを実行し、ドメイン名とIPアドレス、DNSサーバーのIPアドレスを確認
[opc@oci-inst ~]$ nslookup onp-inst
	Server:         10.0.0.2
	Address:        10.0.0.2#53

	Non-authoritative answer:
	Name:   onp-inst.customer.net
	Address: 192.168.1.11
② ホスト名でssh接続できることを確認
sshを実行して接続先のホスト名を確認
[opc@oci-inst ~]$ ssh -i id_rsa opc@onp-inst hostname
	onp-inst
●2. オンプレミス-->OCI確認
・オンプレミスのインスタンス(onp-inst)からOCIのインスタンス(oci-inst)のDNS名前解決できることを確認
① nslookupで名前解決確認
ホスト名でnslookupを実行し、ドメイン名とIPアドレス、DNSサーバーのIPアドレスを確認
[root@onp-inst ~]# nslookup oci-inst
	Server:         192.168.0.2
	Address:        192.168.0.2#53

	Non-authoritative answer:
	Name:   oci-inst.ap.testvcn.oraclevcn.com
	Address: 10.0.2.11
② ホスト名でssh接続できることを確認
sshを実行して接続先のホスト名を確認
[root@onp-inst ~]# ssh -i id_rsa opc@oci-inst hostname
oci-inst
