今回、Debian OS は debian.org より、qcow2 イメージをダウンロードして 使用します
Debian OS のインスタンスを起動するための大まかな手順は次となります。
① OSイメージダウンロード
② Oracle Cloud の Object Storage にqcow2イメージをUpload
③ qcow2イメージから Custom Imageを作成
④ Custom Imageから、インスタンス作成
■ Debian OS インストール
● qcow2イメージダウンロード
debian.org より、qcow2 イメージをダウンロード
・Debian qcow2イメージ
	http://cdimage.debian.org/cdimage/openstack
●Object Storage にqcow2イメージをUploadしてCustome Image作成
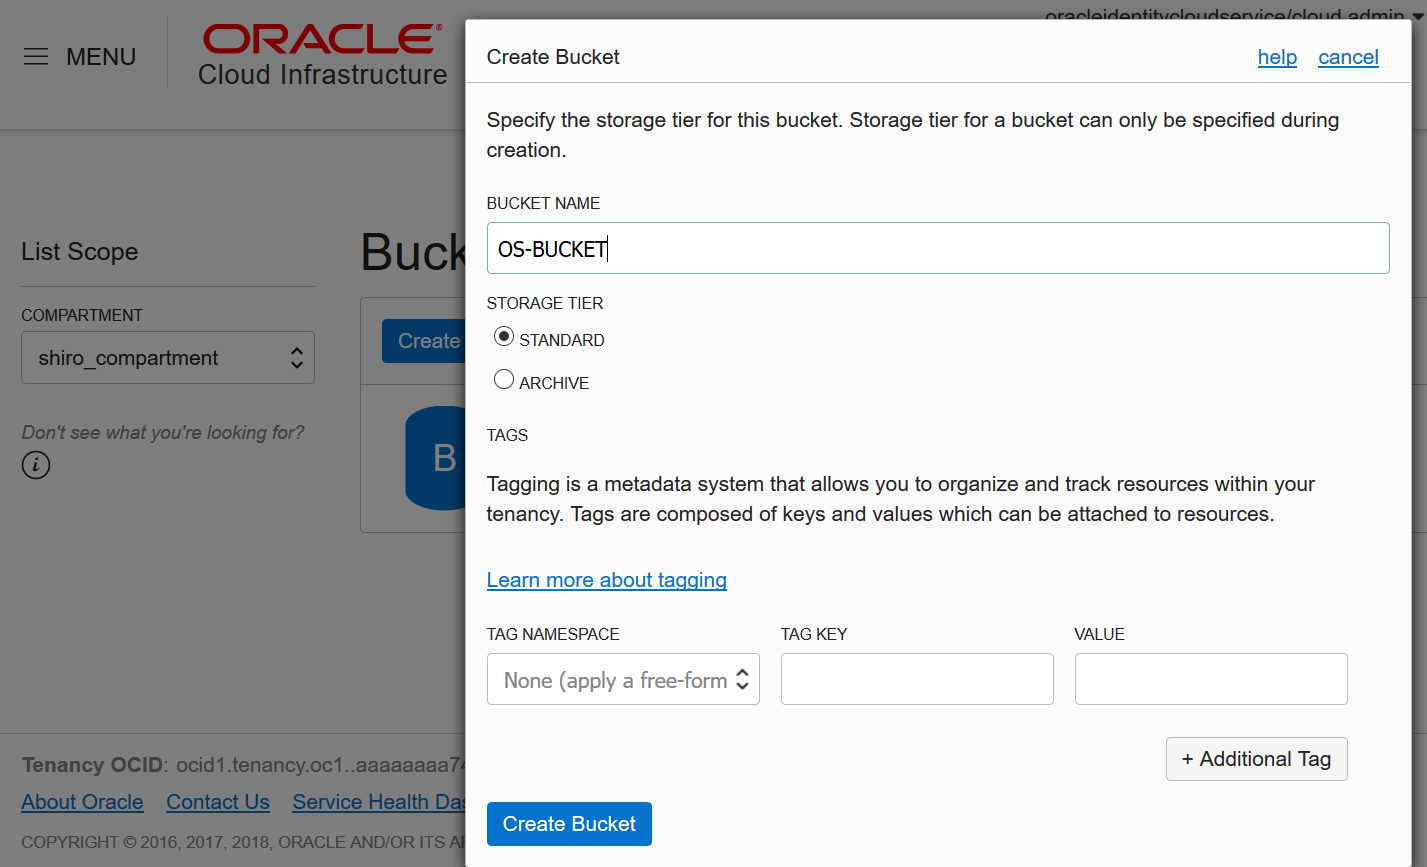
① Bucket作成
・qcow2イメージをUpload するためのObject Storage を作成
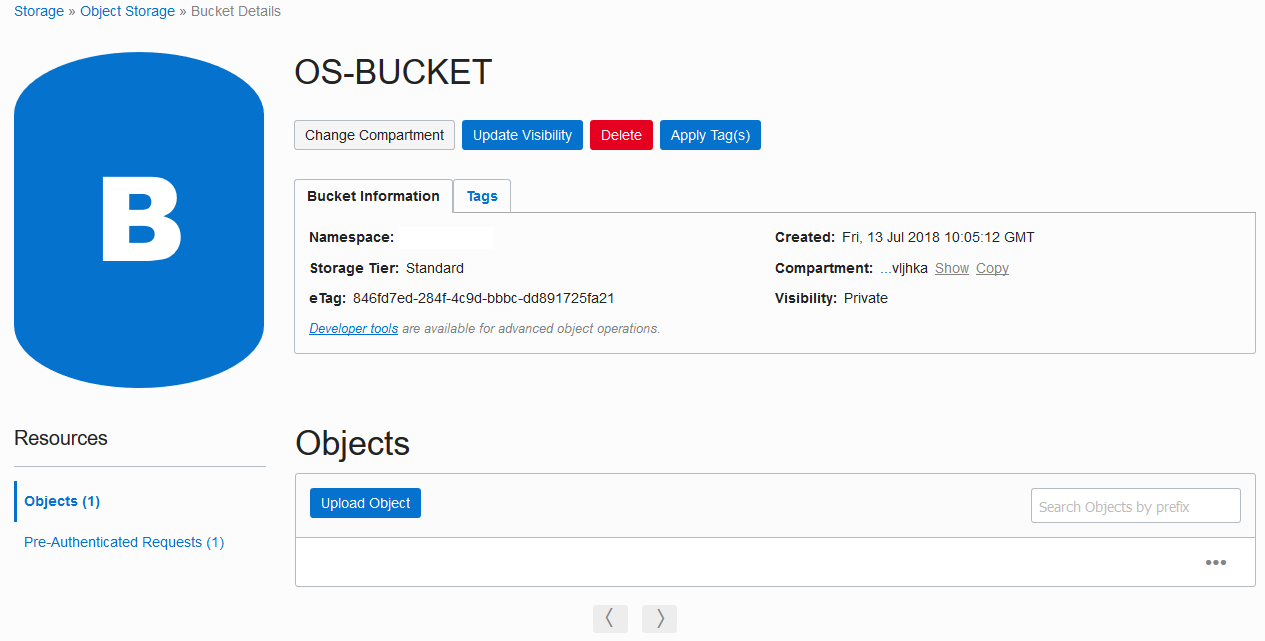
② 作成したObject Storageにqcow2イメージをUpload

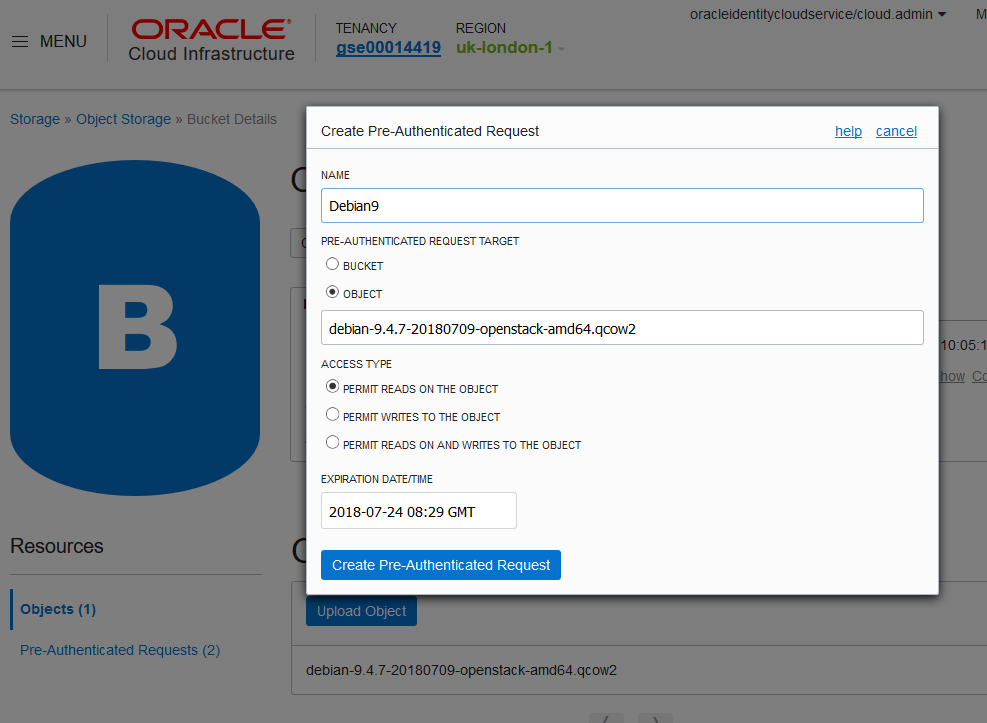
③ Pre-Authenticated Request(PAR)作成
Object Storageへ URLアクセスするための PARを作成
・Upload したファイルの右側にある [・・・]ボタンから [Create Pre-Authenticated Request]をクリック

・NAMEを設定して[Create Pre-Authenticated Request]をクリック
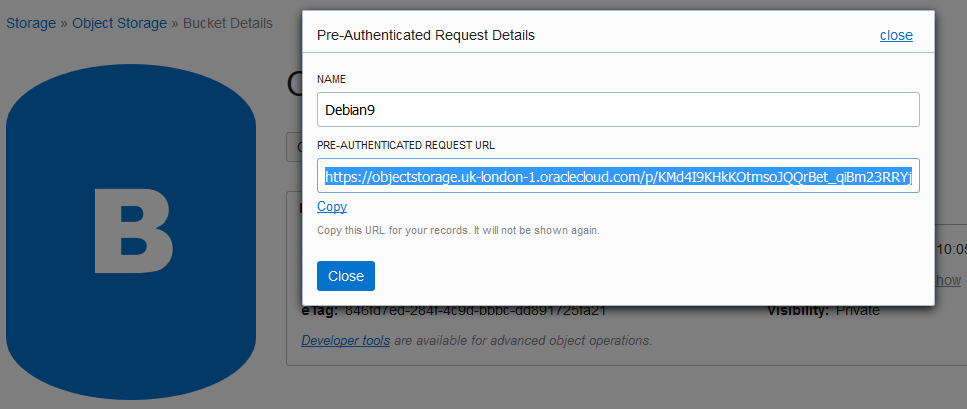
・Details画面にある URL文字列 をコピーして[Close]をクリック
④ Custom Image 作成
・Compute Service 画面から、[Custom Image]をクリックし[Import Image]ボタンをクリック
- NAME:適切な名前を記入
- OPERATING SYSTEM:Linuxを選択
- OBJECT STORAGE URL:作成したPARのURLを記入
- IMAGE TYPE:QCOW2を選択
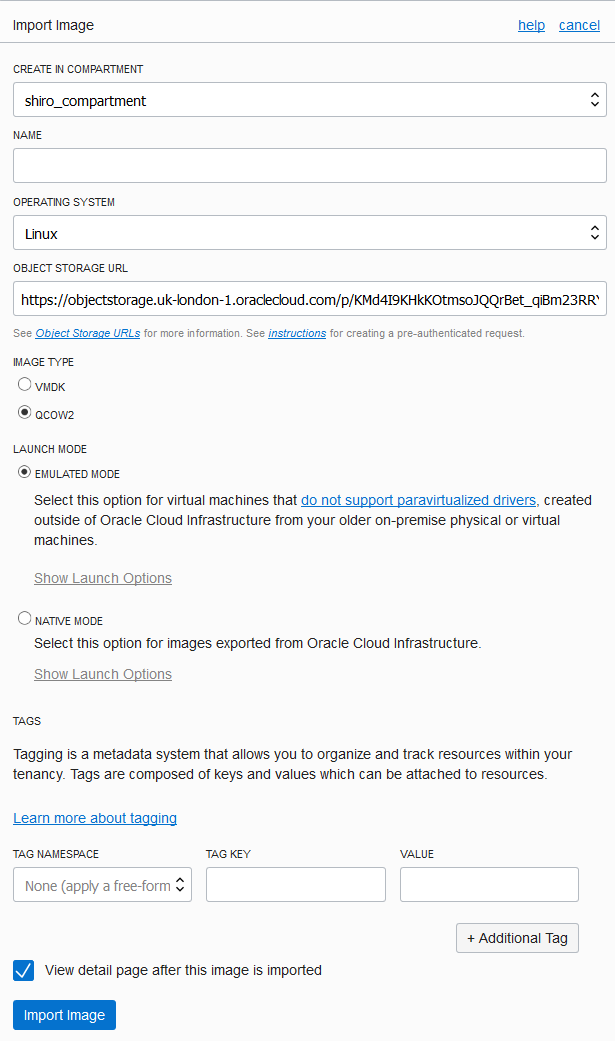
・作成完了すると以下画面のように ステータスが AVAILABLEとなる

● Debian インスタンス作成
・作成したCustme Image からDebian Instance 作成
- NAME:適切な名前を記入
- IMAGE: 作成したCustome Image を選択
- SSH KEYS:OSアクセスするための SSH KEYを設定

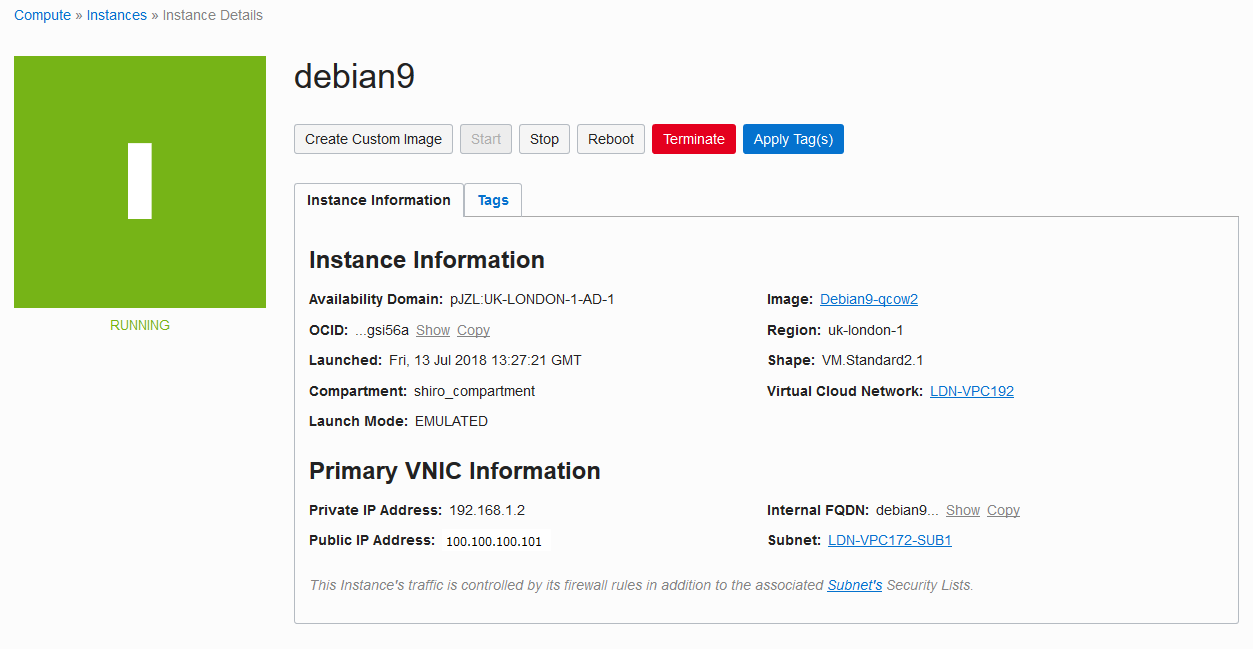
・作成完了すると以下画面のようにステータスがRUNNINGとなる
● DPDK用VNIC追加
・OCIコンソールからAttached VNICs画面にてDPDK用VNICを追加

■ Debian インスタンス確認
● OS情報
[root@debian9 ~]# hostname
	debian9
[root@debian9 ~]# uname -a
	Linux debian9 4.9.0-6-amd64 #1 SMP Debian 4.9.82-1+deb9u3 (2018-03-02) x86_64 GNU/Linux
[root@debian9 ~]# cat /etc/debian_version
	9.4
[root@debian9 ~]# cat /etc/issue
	Debian GNU/Linux 9 \n \l
● NICドライバー確認
[root@debian9 ~]# lspci
	・・・
	00:03.0 Ethernet controller: Intel Corporation 82540EM Gigabit Ethernet Controller (rev 03)
	00:04.0 Ethernet controller: Intel Corporation 82540EM Gigabit Ethernet Controller (rev 03)
■ DPDKインストール
● DPDK依存RPMをInstall
①apt-get update
[root@debian9 ~]# apt-get update
②RPM Install
	[root@debian9 ~]# /home/opc# apt-get install -y gcc g++ numactl xz-utils make libnuma-dev pciutils
	[root@debian9 ~]# apt-get install linux-headers-$(uname -r)
● Download DPDK
[root@debian9 ~]# wget https://fast.dpdk.org/rel/dpdk-17.11.2.tar.xz
		--2018-07-09 07:24:11--  https://fast.dpdk.org/rel/dpdk-17.11.2.tar.xz
		Resolving fast.dpdk.org... 151.101.198.49
		Connecting to fast.dpdk.org|151.101.198.49|:443... connected.
		HTTP request sent, awaiting response... 200 OK
		Length: 10215652 (9.7M) [application/octet-stream]
		Saving to: “dpdk-17.11.2.tar.xz”

		100%[======================================>] 10,215,652  6.43M/s   in 1.5s

		2018-07-09 07:24:18 (6.43 MB/s) - “dpdk-17.11.2.tar.xz” saved [10215652/10215652]
● DPDK Install事前準備
① tarファイル解凍
[root@debian9 ~]# tar xJf dpdk-17.11.2.tar.xz
② Change make option
[root@debian9 ~]# cd /home/opc/dpdk-stable-17.11.2/config
[root@debian9 ~]# cp common_linuxapp common_linuxapp.org
[root@debian9 ~]# vi common_linuxapp
		CONFIG_RTE_KNI_KMOD=y
		CONFIG_RTE_LIBRTE_KNI=y
		CONFIG_RTE_LIBRTE_PMD_KNI=y

	==>To below
		CONFIG_RTE_KNI_KMOD=n
		CONFIG_RTE_LIBRTE_KNI=n
		CONFIG_RTE_LIBRTE_PMD_KNI=n

[root@debian9 config]# cat common_linuxapp | grep =n
	CONFIG_RTE_KNI_KMOD=n
	CONFIG_RTE_LIBRTE_KNI=n
	CONFIG_RTE_LIBRTE_PMD_KNI=n
● DPDK Install
・dpdk-setup.sh実行
[root@debian9 ~]# cd /home/opc/dpdk-stable-17.11.2/usertools
[root@debian9 usertools]# ls
	cpu_layout.py  dpdk-devbind.py  dpdk-pmdinfo.py  dpdk-setup.sh
[root@debian9 usertools]# ./dpdk-setup.sh
		------------------------------------------------------------------------------
		 RTE_SDK exported as /tmp/dpdk-stable-17.11.2
		------------------------------------------------------------------------------
		----------------------------------------------------------
		 Step 1: Select the DPDK environment to build
		----------------------------------------------------------
		[1] arm64-armv8a-linuxapp-clang
		[2] arm64-armv8a-linuxapp-gcc
		[3] arm64-dpaa2-linuxapp-gcc
		[4] arm64-dpaa-linuxapp-gcc
		[5] arm64-thunderx-linuxapp-gcc
		[6] arm64-xgene1-linuxapp-gcc
		[7] arm-armv7a-linuxapp-gcc
		[8] i686-native-linuxapp-gcc
		[9] i686-native-linuxapp-icc
		[10] ppc_64-power8-linuxapp-gcc
		[11] x86_64-native-bsdapp-clang
		[12] x86_64-native-bsdapp-gcc
		[13] x86_64-native-linuxapp-clang
		[14] x86_64-native-linuxapp-gcc
		[15] x86_64-native-linuxapp-icc
		[16] x86_x32-native-linuxapp-gcc

		----------------------------------------------------------
		 Step 2: Setup linuxapp environment
		----------------------------------------------------------
		[17] Insert IGB UIO module
		[18] Insert VFIO module
		[19] Insert KNI module
		[20] Setup hugepage mappings for non-NUMA systems
		[21] Setup hugepage mappings for NUMA systems
		[22] Display current Ethernet/Crypto device settings
		[23] Bind Ethernet/Crypto device to IGB UIO module
		[24] Bind Ethernet/Crypto device to VFIO module
		[25] Setup VFIO permissions

		----------------------------------------------------------
		 Step 3: Run test application for linuxapp environment
		----------------------------------------------------------
		[26] Run test application ($RTE_TARGET/app/test)
		[27] Run testpmd application in interactive mode ($RTE_TARGET/app/testpmd)

		----------------------------------------------------------
		 Step 4: Other tools
		----------------------------------------------------------
		[28] List hugepage info from /proc/meminfo

		----------------------------------------------------------
		 Step 5: Uninstall and system cleanup
		----------------------------------------------------------
		[29] Unbind devices from IGB UIO or VFIO driver
		[30] Remove IGB UIO module
		[31] Remove VFIO module
		[32] Remove KNI module
		[33] Remove hugepage mappings

		[34] Exit Script
dpdk-setup.shを実行すると上記のように 34 の設定項目が出力されるので、
以下番号を選択して設定していく
①[14]入力して実行:ソースコードを実行可能なライブラリにコンパイル
Option: 14

	Configuration done using x86_64-native-linuxapp-gcc
	== Build lib
    ・・・

	Build complete [x86_64-native-linuxapp-gcc]
	Installation cannot run with T defined and DESTDIR undefined
	------------------------------------------------------------------------------
	 RTE_TARGET exported as x86_64-native-linuxapp-gcc
	------------------------------------------------------------------------------

	Press enter to continue ...
②[17]実行後 [18]を実行して Driver Module をLoad
Option: 17

	Unloading any existing DPDK UIO module
	Loading uio module
	Loading DPDK UIO module

	Press enter to continue ...

Option: 18

	Unloading any existing VFIO module
	Loading VFIO module
	chmod /dev/vfio
	OK

	Press enter to continue ...
③[20]実行して HugePagesを設定
Option: 20

	Removing currently reserved hugepages
	Unmounting /mnt/huge and removing directory

	  Input the number of 2048kB hugepages
	  Example: to have 128MB of hugepages available in a 2MB huge page system,
	  enter '64' to reserve 64 * 2MB pages
	Number of pages: 4096
	Reserving hugepages
	Creating /mnt/huge and mounting as hugetlbfs

	Press enter to continue ...
③[22]実行して現在のDPDK Driver の設定を確認
初期状態では登録されていないので、「Network devices using kernel driver」項から、DPDK-compatibleに設定する Network devices番号を確認
Option: 22

		Network devices using DPDK-compatible driver
		============================================
		<none>

		Network devices using kernel driver
		===================================
		0000:00:03.0 '82540EM Gigabit Ethernet Controller 100e' if=eth0 drv=e1000 unused=igb_uio,vfio-pci *Active*
		0000:00:04.0 '82540EM Gigabit Ethernet Controller 100e' if=eth1 drv=e1000 unused=igb_uio,vfio-pci

		Other Network devices
		=====================
		<none>

		Crypto devices using DPDK-compatible driver
		===========================================
		<none>

		Crypto devices using kernel driver
		==================================
		<none>

		Other Crypto devices
		====================
		<none>

		Eventdev devices using DPDK-compatible driver
		=============================================
		<none>

		Eventdev devices using kernel driver
		====================================
		<none>

		Other Eventdev devices
		======================
		<none>

		Mempool devices using DPDK-compatible driver
		============================================
		<none>

		Mempool devices using kernel driver
		===================================
		<none>

		Other Mempool devices
		=====================
		<none>

	Press enter to continue ...
④[23]実行してDPDK Driver を設定
[22]で確認した追加するNetwork devices番号を設定
Option: 23


		Network devices using DPDK-compatible driver
		============================================
		<none>

		Network devices using kernel driver
		===================================
		0000:00:03.0 '82540EM Gigabit Ethernet Controller 100e' if=eth0 drv=e1000 unused=igb_uio,vfio-pci *Active*
		0000:00:04.0 '82540EM Gigabit Ethernet Controller 100e' if=eth1 drv=e1000 unused=igb_uio,vfio-pci

		Other Network devices
		=====================
		<none>

		Crypto devices using DPDK-compatible driver
		===========================================
		<none>

		Crypto devices using kernel driver
		==================================
		<none>

		Other Crypto devices
		====================
		<none>

		Eventdev devices using DPDK-compatible driver
		=============================================
		<none>

		Eventdev devices using kernel driver
		====================================
		<none>

		Other Eventdev devices
		======================
		<none>

		Mempool devices using DPDK-compatible driver
		============================================
		<none>

		Mempool devices using kernel driver
		===================================
		<none>

		Other Mempool devices
		=====================
		<none>

		Enter PCI address of device to bind to IGB UIO driver: 0000:00:04.0
		OK

Press enter to continue ...
⑤[22]実行してDPDK Driver設定確認
	Option: 22


		Network devices using DPDK-compatible driver
		============================================
		0000:00:04.0 '82540EM Gigabit Ethernet Controller 100e' drv=igb_uio unused=e1000,vfio-pci

		Network devices using kernel driver
		===================================
		0000:00:03.0 '82540EM Gigabit Ethernet Controller 100e' if=eth0 drv=e1000 unused=igb_uio,vfio-pci *Active*

		Other Network devices
		=====================
		<none>

		Crypto devices using DPDK-compatible driver
		===========================================
		<none>

		Crypto devices using kernel driver
		==================================
		<none>

		Other Crypto devices
		====================
		<none>

		Eventdev devices using DPDK-compatible driver
		=============================================
		<none>

		Eventdev devices using kernel driver
		====================================
		<none>

		Other Eventdev devices
		======================
		<none>

		Mempool devices using DPDK-compatible driver
		============================================
		<none>

		Mempool devices using kernel driver
		===================================
		<none>

		Other Mempool devices
		=====================
		<none>

	Press enter to continue ...
⑥設定されたことを確認したら[34]実行して終了
Option: 34

[root@debian9 ~]#
● DPDK動作確認
testpmdツールで Interfaceテストを実施
[root@debian9 ~]# ~/dpdk-stable-17.11.2/x86_64-native-linuxapp-gcc/app/testpmd -- -i
testpmd> show port info all
		********************* Infos for port 0  *********************
		MAC address: 02:00:17:02:9A:A0
		Driver name: net_e1000_em
		Connect to socket: 0
		memory allocation on the socket: 0
		Link status: up
		Link speed: 1000 Mbps
		Link duplex: full-duplex
		MTU: 1500
		Allmulticast mode: disabled
		Maximum number of MAC addresses: 15
		Maximum number of MAC addresses of hash filtering: 0
		VLAN offload:
		  strip on
		  filter on
		  qinq(extend) off
		No flow type is supported.
		Max possible RX queues: 1
		Max possible number of RXDs per queue: 4096
		Min possible number of RXDs per queue: 32
		RXDs number alignment: 8
		Max possible TX queues: 1
		Max possible number of TXDs per queue: 4096
		Min possible number of TXDs per queue: 32
		TXDs number alignment: 8

testpmd> show port stats all

		  ######################## NIC statistics for port 0  ########################
		  RX-packets: 9          RX-missed: 0          RX-bytes:  576
		  RX-errors: 9
		  RX-nombuf:  0
		  TX-packets: 0          TX-errors: 0          TX-bytes:  0

		  Throughput (since last show)
		  Rx-pps:            0
		  Tx-pps:            0
		  ############################################################################


testpmd> quit

		Shutting down port 0...
		Stopping ports...
		Done
		Closing ports...
		Done

		Bye...

		Shutting down port 0...
		Stopping ports...
		Done
		Closing ports...
		Port 0 is already closed
		Done

		Bye...
[root@debian9 ~]#