gqlgenを用いてGoサーバを構築する
間違っている部分、エラーが発生する部分、わかりにくい部分などがございましたら、是非ご指摘をお願い致します。
今回はPart2になります。
基本的な事をメインに行っているので前回までの内容を知らなくても基本的には問題ありません。前回までの内容をgithubから取得して来ても良いかと思います。(importのgithub.comを調整する必要があるかも知れないですが...)
前回:Dockerを使用してGoとPostgreSQLの環境構築
この記事の内容
実際にgqlgenを使用してGraphQLサーバを立ち上げて動かします!
Github Repo
この記事で紹介するコードはGithubに置いています。
Part2までの切り取り
最初にdockerを起動します。
$ docker-compose start
Starting db     ... done
Starting server ... done
Remote Explorerを使わない場合
Goプロジェクトを新規に始める際に、 go.mod という設定ファイルを作成します。
[username] にはご自身のgithubのアカウント名を入力してください。
ex) go mod init github.com/shion0625/gqlgen-todos
また、今後もgithub.com/shion0625/gqlgen-todosと言う部分がimport文のところで出てくるのでshion0625の部分をご自身のgithubのアカウント名に変換してください。
$ docker-compose exec server go mod init github.com/[username]/gqlgen-todos
docker-compose exec コンテナ名でそのコンテナの中でそれ以降に記述したコマンドを実行することが出来ます。
Remote Explorerを使う場合
もしくは、visual studio codeの拡張機能のRemote Explorerを使用することでコンテナ内でコマンドを実行できます。
この拡張機能をインストールをすると左側のナビゲーションバーに下記のアイコンが追加されます。

そのアイコンを選択し、今回はgqlgen-todosを選択します。(postgresでは無い方)そしてコンテナに接続したら開くディレクトリを/app今回の作業ディレクトリを指定し開くことでコンテナの中で作業を行うことが出来ます。
コマンドラインでもappにいることを確認して下記のコマンドを入力してください。
$ go mod init github.com/[username]/gqlgen-todos
今後はRemote Explorerを使用していることを想定して行うため、docker-compose exec serverを省略したコマンドのみで記載いたします。コンテナ外でコマンドを打つ際は別途記述いたします。
スケルトンプロジェクトの作成
Getting Startedを参考にし、GoとGraphQLのプロジェクトを作成します。
次に、tools.go ファイルを作成し、モジュールのツールの依存関係として gqlgen を追加します。今回は、コメントアウトされている部分も含めて記述を行ってください。
//go:build tools
// +build tools

package tools

import (
	_ "github.com/99designs/gqlgen"
)
そして、パッケージの依存関係などを整理します。
$ go mod tidy
go: finding module for package github.com/99designs/gqlgen
go: found github.com/99designs/gqlgen in github.com/99designs/gqlgen v0.17.22
パッケージのダウンロードが行われます。
それでは、下準備が済んだので、GraphQLのフレームワークであるgqlgenを導入していきます。
$ go get -d github.com/99designs/gqlgen
$ go run github.com/99designs/gqlgen init
ここまでの操作でのディレクトリの構成
.
├── docker
│   └── go
│       └── Dockerfile
├── docker-compose.yaml
├── go.mod
├── go.sum
├── gqlgen.yml //gqlgenの設定ファイル。コードを自動生成する際の設定ファイル
├── graph
│   ├── generated.go //gqlgenによって作成されたコード達(編集しない)
│   ├── model
│   │   └── models_gen.go //schemaで定義した型などが定義されている
│   ├── resolver.go //ルートのリゾルバの型定義ファイル
│   ├── schema.graphqls //GraphQLスキーマー定義ファイル
│   └── schema.resolvers.go //スキーマをもとに生成されるファイル。実際の処理を記述するファイル
├── server.go //アプリへのエントリポイント
└── tools.go
スキーマファイルの確認
生成されたスキーマファイル
- Type: オブジェクトタイプ。これは単にサービスから取得できるオブジェクトの種類と、それがどのようなフィールドを持っているかを表しています
- Query: データの取得処理をするリゾルバーの定義
- Mutation: データの追加、更新、削除処理をするリゾルバーの定義
- input: データの入力値のオブジェクトの定義
(スキーマの随所にある!は必須の値(null不可)という意味)
# Todo型の定義
# id,text,done,userが必須
type Todo {
  id: ID!
  text: String!
  done: Boolean!
  user: User!
}

# User型の定義
# id,nameが必須
type User {
  id: ID!
  name: String!
}

# Todosというリゾルバーでデータの取得処理を実装する。
# 戻り値がTodo型の配列で必須
type Query {
  todos: [Todo!]!
}
# 入力のNewTodo型の定義
#text,userIdが必須
input NewTodo {
  text: String!
  userId: String!
}

# createTodoというリゾルバでtodoの作成処理を実装
# 入力値がNewTodoが必須で戻り値がTodo型で必須
type Mutation {
  createTodo(input: NewTodo!): Todo!
}
リゾルバの実装
resolver.goは、再生成されないのでモデルやデータベ−スなどresolver内で参照し続けたいデータを持たすことができます。また、全てのリゾルバで参照することができます。
package graph

import "github.com/shion0625/gqlgen-todos/graph/model" //追加

//go:generate go run github.com/99designs/gqlgen generate //追加
//今後schema.graphqlsを変更した際に go generate ./...で更新することができるようになる。

// This file will not be regenerated automatically.
//
// It serves as dependency injection for your app, add any dependencies you require here.

type Resolver struct{
	todos []*model.Todo //追加
}
次回では、データベースにデータを保存するのですが、一旦今回は、メモリにtodosを保存する処理で記述しています。[]*model.TodoTodo型の配列をメモリに保存していきます。
import部分に必要なパケージの追加とCreateTodoではTodoの作成処理を記述しています。
schema.graphqlsで定義したとおり、CreateTodoはMutationなので追加の処理を実装しています。
対してTodosはQueryなので取得の処理を記述しています。
package graph

// This file will be automatically regenerated based on the schema, any resolver implementations
// will be copied through when generating and any unknown code will be moved to the end.
// Code generated by github.com/99designs/gqlgen version v0.17.22

import (
	"context"
	"crypto/rand" //追加
	"fmt"
	"math/big" //追加

	"github.com/shion0625/gqlgen-todos/graph/model"
)

// CreateTodo is the resolver for the createTodo field.
func (r *mutationResolver) CreateTodo(ctx context.Context, input model.NewTodo) (*model.Todo, error) {
	//ランダムな数字の生成
	rand, _ := rand.Int(rand.Reader, big.NewInt(100))
	todo := &model.Todo{
		Text:   input.Text,
		ID:     fmt.Sprintf("T%d", rand),
		User: &model.User{ID: input.UserID, Name: "user " + input.UserID},
	}
    //ここでのrはresolver.goで宣言したResolver型を示しているそのため、t.todosはresolver.goで先ほど記述したもの
	r.todos = append(r.todos, todo)
	return todo, nil
}

// Todos is the resolver for the todos field.
func (r *queryResolver) Todos(ctx context.Context) ([]*model.Todo, error) {
	return r.todos, nil
}

// Mutation returns MutationResolver implementation.
func (r *Resolver) Mutation() MutationResolver { return &mutationResolver{r} }

// Query returns QueryResolver implementation.
func (r *Resolver) Query() QueryResolver { return &queryResolver{r} }

type mutationResolver struct{ *Resolver }
type queryResolver struct{ *Resolver }
GraphQLサーバを実行する
$go run server.go
GraphQLの動作確認
写真の文字は気にしなくて良いがこのPlayGroundが開ければ第一関門クリア
Mutationの起動確認
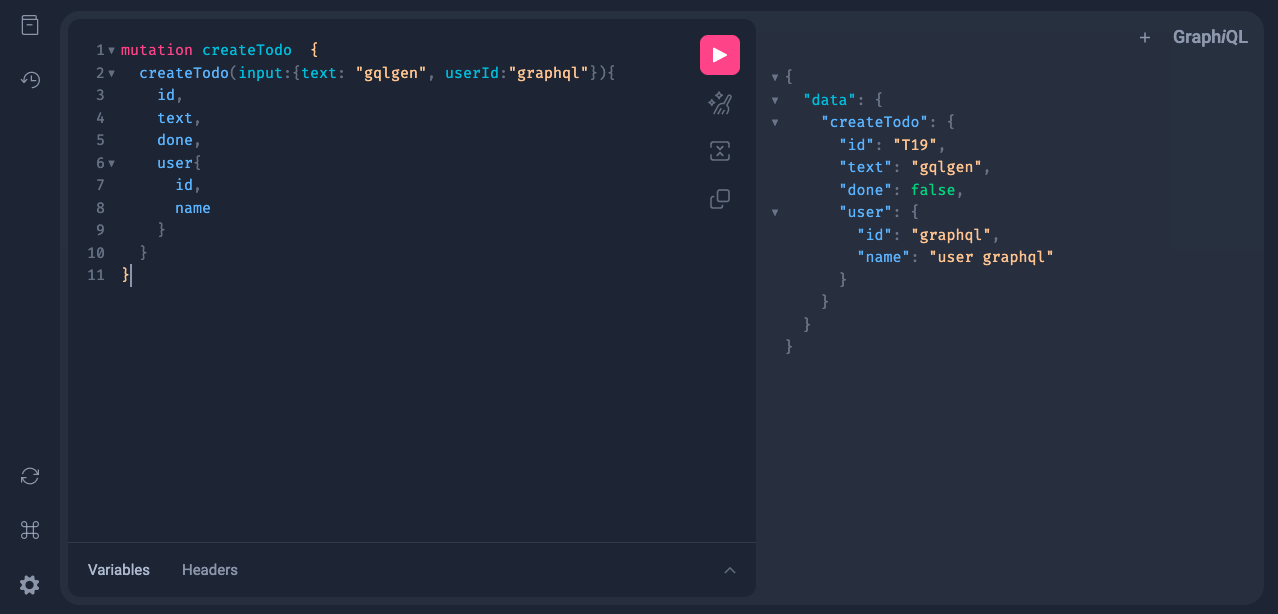
PlayGroundは左が入力エリア、右が出力エリアとなっている。入力が完了したらピンクのボタンを押すと実行結果が出力エリアに表示される。
下記のコードを入力して写真のように動けば第2関門クリア
mutation createTodo  {
  createTodo(input:{text: "gqlgen", userId:"graphql"}){
    id,
    text,
    done,
    user{
      id,
      name
    }
  }
}
このコードは、まずmutationに関しては、RestfulAPIで言うメソッドだと考えていただければいい。
1行目: mutationのcreateTodoを実行する。
2行目: schema.graphqlsで記述した通りに記載していきます。createTodo(input: NewTodo!): Todo!
つまり、引数にinputそして形式はNewTodoオブジェクトで入力なのでtext,userIdを入力します。
3行目: ここからがGraphQLの真骨頂のオーバーフェッチを減らすと言う点になります。
先ほどはTodo型の値を全て結果として出力しましたが、欲しいものだけを選んで出力することが出来ます。下記のようにTodo型の中のテキストとユーザ名だけのように出力することが出来ます。
mutation createTodo  {
  createTodo(input:{text: "gqlgen", userId:"graphql"}){
    text,
    user{
      name
    }
  }
}
Queryの起動確認
mutationと同じように今回は引数が無いため、欲しい値だけを指定して全てのTodosを取得することが出来ます。
query Todos  {
  todos{
    text,
    user{
      name
    }
  }
}
まとめ
今回はスケルトンプロジェクトの作成を行いました。しかし、実際にメモリにデータを保存してプロジェクトを作ることは殆どありませんよね。次回は、このコードを書き換えてデータベースを使用します!
次回Part3の記事
