説明
1. Hello, World! で、Kotlin を使って Hello, World! を動かしてみました。
その時は、Kotlin ファイルに直接記述し、kotlinc でコンパイルして実行しました。
しかし実際には、Kotlin のプロジェクトを作ってビルドをするには Gradle や Maven といったビルドツールを使用すると思います。
そこで、Gradle を用いた Kotlin のビルドを行ってみます。
前提
次の環境で作業しています。
| 項目 | 内容 |
|---|---|
| OS | MacOS |
| Homebrew が使えること | |
| JDK | 1.8.0_152 |
| Gradle | 4.3.1 |
手順
1. プロジェクトテンプレートの作成
1.1. gradle init
gradle init を実行すると gradle プロジェクトの雛形を作成する事ができます。
オプションをつけずにそのまま実施するとソースフォルダなどは作られず、build.gradle ファイルや、gradle/gradlew などが作成されます。
また、いくつかのオプションがあるので、それらを選択する事で目的にあった雛形を作成する事ができます。
オプションの一覧はヘルプコマンドで確認する事ができます。
$ gradle help --task init

> Task :help
Detailed task information for init

Path
     :init

Type
     InitBuild (org.gradle.buildinit.tasks.InitBuild)

Options
     --type     Set type of build to create.
                Available values are:
                     basic
                     groovy-application
                     groovy-library
                     java-application
                     java-library
                     pom
                     scala-library

     --test-framework     Set alternative test framework to be used.
                          Available values are:
                               spock
                               testng

Description
     Initializes a new Gradle build.

Group
     Build Setup
1.1.1. 指定タイプ一覧
| タイプ | 内容 |
|---|---|
| basic | タイプ指定なしと同様、build.gradleはコメントアウト |
| java-application | Javaアプリケーション用途 |
| java-library | Javaライブラリ用途 |
| groovy-application | Groovyアプリケーション用途 |
| groovy-library | Groovyライブラリ用途 |
| scala-library | Scalaライブラリ用途 |
| pom | Mavenプロジェクトからの変換 |
1.1.2. java-application build.gradle内容
// Apply the java plugin to add support for Java
apply plugin: 'java'

// Apply the application plugin to add support for building an application
apply plugin: 'application'

// In this section you declare where to find the dependencies of your project
repositories {
    // Use jcenter for resolving your dependencies.
    // You can declare any Maven/Ivy/file repository here.
    jcenter()
}

dependencies {
    // This dependency is found on compile classpath of this component and consumers.
    compile 'com.google.guava:guava:23.0'

    // Use JUnit test framework
    testCompile 'junit:junit:4.12'
}

// Define the main class for the application
mainClassName = 'App'
1.1.3. java-library build.gradle内容
// Apply the java-library plugin to add support for Java Library
apply plugin: 'java-library'

// In this section you declare where to find the dependencies of your project
repositories {
    // Use jcenter for resolving your dependencies.
    // You can declare any Maven/Ivy/file repository here.
    jcenter()
}

dependencies {
    // This dependency is exported to consumers, that is to say found on their compile classpath.
    api 'org.apache.commons:commons-math3:3.6.1'

    // This dependency is used internally, and not exposed to consumers on their own compile classpath.
    implementation 'com.google.guava:guava:23.0'

    // Use JUnit test framework
    testImplementation 'junit:junit:4.12'
}
1.1.4. groovy-application build.gradle内容
// Apply the groovy plugin to add support for Groovy
apply plugin: 'groovy'

// Apply the application plugin to add support for building an application
apply plugin: 'application'

// In this section you declare where to find the dependencies of your project
repositories {
    // Use jcenter for resolving your dependencies.
    // You can declare any Maven/Ivy/file repository here.
    jcenter()
}

dependencies {
    // Use the latest Groovy version for building this library
    compile 'org.codehaus.groovy:groovy-all:2.4.12'

    // Use the awesome Spock testing and specification framework
    testCompile 'org.spockframework:spock-core:1.0-groovy-2.4'
}

// Define the main class for the application
mainClassName = 'App'
1.1.5. groovy-library build.gradle内容
// Apply the groovy plugin to add support for Groovy
apply plugin: 'groovy'

// In this section you declare where to find the dependencies of your project
repositories {
    // Use jcenter for resolving your dependencies.
    // You can declare any Maven/Ivy/file repository here.
    jcenter()
}

dependencies {
    // Use the latest Groovy version for building this library
    compile 'org.codehaus.groovy:groovy-all:2.4.12'

    // Use the awesome Spock testing and specification framework
    testCompile 'org.spockframework:spock-core:1.0-groovy-2.4'
}
1.1.6. scala-library build.gradle内容
// Apply the scala plugin to add support for Scala
apply plugin: 'scala'

// In this section you declare where to find the dependencies of your project
repositories {
    // Use jcenter for resolving your dependencies.
    // You can declare any Maven/Ivy/file repository here.
    jcenter()
}

dependencies {
    // Use Scala 2.11 in our library project
    compile 'org.scala-lang:scala-library:2.11.8'

    // Use Scalatest for testing our library
    testCompile 'junit:junit:4.12'
    testCompile 'org.scalatest:scalatest_2.11:3.0.4'

    // Need scala-xml at test runtime
    testRuntime 'org.scala-lang.modules:scala-xml_2.11:1.0.6'
}
1.2. java-application として作成
デフォルトでは kotlin 用の雛形を作成するためのタイプ指定がありません。そこで、java-application として雛形を作成し、カスタマイズを行います。
1.2.1. gradle init 実行
以下のコマンドを実行します。
$ gradle init --type java-application
2. プロジェクトテンプレートのカスタマイズ
2.1. build.gradle のカスタマイズ
作成されている build.gradle は Java アプリケーション用なので、Kotlin 用にカスタマイズを行います。
以下の内容に、build.gradle を修正します。
buildscript {
    ext.kotlin_version = '1.2.0'

    repositories {
        mavenCentral()
    }
    dependencies {
        classpath "org.jetbrains.kotlin:kotlin-gradle-plugin:$kotlin_version"
    }
}

apply plugin: 'kotlin'

repositories {
    mavenCentral()
}

dependencies {
    compile "org.jetbrains.kotlin:kotlin-stdlib-jdk8:$kotlin_version"
}

compileKotlin {
    kotlinOptions.jvmTarget = "1.8"
}
compileTestKotlin {
    kotlinOptions.jvmTarget = "1.8"
}
2.2. プロジェクト構成のカスタマイズ
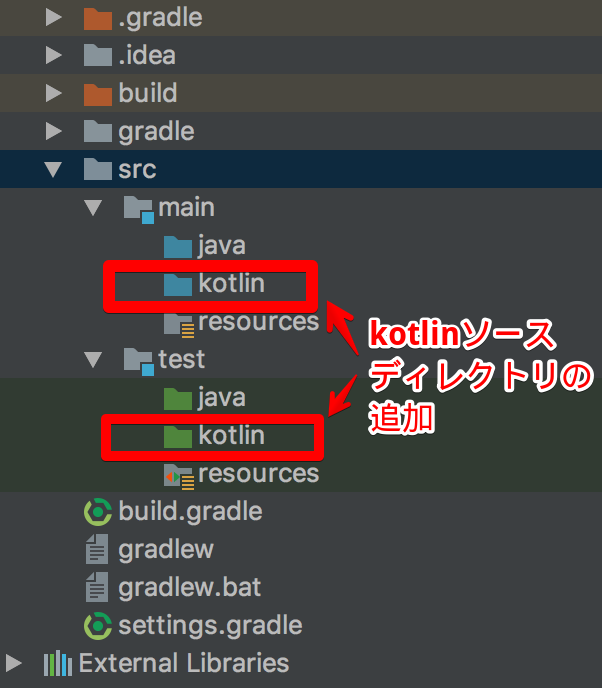
java 用に作成されたソースディレクトリはありますが、kotlin 用のソースディレクトリがないので、以下のように追加します。
java ディレクトリの並びにkotlinディレクトリを作成します。
以上で、Gradle プロジェクトの準備は完了です。
Kotlin のソースを追加してみます。
3. Kotlin ソースの追加と実行
3.1. Kotlin ソースコードの追加
以下で作成した Hello, World! を出力するソースを src/main/kotlin 配下にコピーします。
3.2. application プラグインの追加
Gradle の application プラグインを使用すると、Gradle のタスクに run が追加されます。これを用いる事で Gradle からアプリケーションを実行できるようになります。
以下の2行を build.gradle に追加ですることで application プラグインを使用できるようになります。
apply plugin:'application'
mainClassName = "main関数を定義しているクラス名"
追加した Kotlin ファイルは HelloKotlin.kt でした。このファイルをコンパイルして生成されるクラスファイルは、末尾に Kt をつけた HelloKotlinKt となります。
そのため、今回は次の2行をbuild.gradle に追加を行います。
apply plugin:'application'
mainClassName = "HelloKotlinKt"
3.3. ビルド
gradle を使ってビルドを行います。build.gradle ファイルが置かれているディレクトリで次のコマンドを実行します。
$ gradle build
生成された Jar ファイルを確認してみます。Gradle では、build/libs ディレクトリのは以下に出力されます。
$ ls -l build/libs/
total 1888
-rw-r--r--  1 shinyay  staff  962905 12 12 13:30 sample-1.0-SNAPSHOT.jar
sample という名前がついています。これは、最初に gradle init を実行したディレクトリ名から設定されています。この設定は、settings.gradle の修正で変更が行なえます。
settings.gradle は次のように記述されています。ここで定義されている rootProject.name を変更することで 名前を変更することができます。
rootProject.name = 'sample'
3.4. 実行
最後に Gradle からアプリケーションを実行してみます。
次のコマンドにより実行が行なえます。
$ gradle run
実行結果は次のように表示されます。
$ gradle run

> Task :run
Hello, Kotlin!
まとめ
Kotlin も Java 同様に Gradle や Maven 利用したビルド環境を用意した方が作業効率があがる事がわかります。
