説明
.NET Core アプリケーションを Application Container Cloud Service にデプロイできるようになっていたので試してみる事にしました。
対応しているランタイムバージョンは、以下の2バージョンとなっていました。公式マニュアル
- 1.1.2
- 2.0.0
ここでは、2.0.0 でアプリケーションを作ってみようと思います。
前提
以下の環境を前提としています。
- Oracle Application Container Cloud Service アカウントを持っていること
- .NET Core コマンドライン インターフェイス (CLI) ツール 導入済みであること
手順
1. プロジェクトの作成
.NET Core CLI を使用してプロジェクトを作成、ビルドなどの操作を行っていきます。
まず、プロジェクトを作成します。
1.1. dotnet new
プロジェクトの作成は、dotnet new コマンドで行います。
dotnet new コマンドは、コマンド引数として指定するテンプレートに基いて、様々なプロジェクトを自動生成してくれます。
1.1.1. シンタックス
dotnet new <TEMPLATE> [--force] [-i|--install] [-lang|--language] [-n|--name] [-o|--output] [-u|--uninstall] [Template options]
に、次で列挙している様々なテンプレート名を指定してプロジェクトを作成します。
-i|--install オプションを使用して、デフォルトで用意されているテンプレート以外にもカスタムテンプレートをインストールする事が可能です。
-lang|--language オプションでは、生成されるプロジェクトがどのプログラム言語として生成されるかを指定します。デフォルトでは、C# になっていますが、それ以外 VB.NET や F# を指定する事がテンプレートにより可能になっています。
-n|--name オプションで、作成するプロジェクト名を指定します。デフォルトでは、現在のディレクトリ名になります。
-o|--output オプションで、出力先ディレクトリを指定します。デフォルトでは、現在のディレクトリに出力されます。
1.1.2. テンプレートの種類
指定できるテンプレートには以下のものがあります。
| テンプレートの説明 | テンプレート名 | 言語 |
|---|---|---|
| コンソール アプリケーション | console | [C#], F#, VB |
| クラス ライブラリ | classlib | [C#], F#, VB |
| 単体テスト プロジェクト | mstest | [C#], F#, VB |
| xUnit テスト プロジェクト | xunit | [C#], F#, VB |
| ASP.NET Core 空 | Web | [C#], F# |
| ASP.NET Core Web アプリ (モデル ビュー コントローラー) | mvc | [C#], F# |
| ASP.NET Core Web アプリ | razor | [C#] |
| Angular 付きの ASP.NET Core | angular | [C#] |
| React.js 付きの ASP.NET Core | react | [C#] |
| React.js および Redux 付きの ASP.NET Core | reactredux | [C#] |
| ASP.NET Core Web API | webapi | [C#], F# |
| global.json file | globaljson | |
| Nuget 構成 | nugetconfig | |
| Web 構成 | webconfig | |
| ソリューション ファイル | sln | |
| Razor ページ ページ | page | |
| MVC/ViewImports | viewimports | |
| MVC ViewStart | viewstart |
1.2. コマンド実行
今回は、シンプルに Hello World を出力する ASP.NET Core プロジェクトを作成する事にします。
そのため、選択するテンプレートは、「ASP.NET Core 空」 とします。
以下のコマンドを実行します。
$ dotnet new web -n helloworld -o helloworldApp
| 項目 | 説明 |
|---|---|
| テンプレート | web: ASP.NET Core 空 |
| プロジェクト名 | helloworld |
| 出力ディレクトリ | helloworldApp |
以下のようにプロジェクトが生成されます。
.
└── helloworldApp
    ├── helloworld.csproj
    ├── obj
    │   ├── helloworld.csproj.nuget.cache
    │   ├── helloworld.csproj.nuget.g.props
    │   ├── helloworld.csproj.nuget.g.targets
    │   └── project.assets.json
    ├── Program.cs
    ├── Startup.cs
    └── wwwroot
2. ソースの確認
dotnet new web コマンドにより、以下の2つのソースコードが生成されています。
- Program.cs
- Startup.cs
これらが何をしているのかを確認してみます。
2.1. Program.cs
namespace helloworld
{
    public class Program
    {
        public static void Main(string[] args)
        {
            BuildWebHost(args).Run();
        }

        public static IWebHost BuildWebHost(string[] args) =>
            WebHost.CreateDefaultBuilder(args)
                .UseStartup<Startup>()
                .Build();
    }
}
Program クラスの Main メソッドは、WebHost.CreateDefaultBuilder を呼び出して Web アプリケーションホストを作成するためのビルダーを生成します。このビルダーは、UseStartup をはじめとする Webサーバの定義を行うAPIを提供しています。
2.2. Startup.cs
namespace helloworld
{
    public class Startup
    {
        // This method gets called by the runtime. Use this method to add services to the container.
        // For more information on how to configure your application, visit https://go.microsoft.com/fwlink/?LinkID=398940
        public void ConfigureServices(IServiceCollection services)
        {
        }

        // This method gets called by the runtime. Use this method to configure the HTTP request pipeline.
        public void Configure(IApplicationBuilder app, IHostingEnvironment env)
        {
            if (env.IsDevelopment())
            {
                app.UseDeveloperExceptionPage();
            }

            app.Run(async (context) =>
            {
                await context.Response.WriteAsync("Hello World!");
            });
        }
    }
}
Startup クラスでは、Configure メソッドで HTTP リクエストに対する処理を実装します。ここでは、どのようなリクエストが来ても、「Hello World!」が表示されるようになっています。
3. 自動生成コードの実行
自動生成されたプロジェクトを実行し、起動してみます。
起動するコマンドは、dotnet run です。
3.1. dotnet run
dotnet run コマンドで実行してみます。
$ dotnet run
Hosting environment: Production
Content root path: C:\helloworldApp
Now listening on: http://localhost:5000
Application started. Press Ctrl+C to shut down.
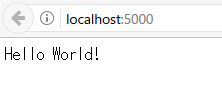
5000 番ポートでリッスンし起動しました。
http://localhost:5000 にアクセスすると、以下のように Hello Wold! と表示された事が確認できます。
それでは、Ctrl+C でサーバを止めておきます。
4. Application Container Cloud Service 用のコード改修
それでは、自動生成されたコードを Application Container Cloud Service 用に改修します。
Application Container Cloud Service では、使用するポート番号を環境変数から取得するという仕様になっています。
そこで、WebHost.CreateDefaultBuilder を使用して Webサーバの定義を追加する事にします。
Program クラスの BuildWebHost メソッドに以下の1行を追加し、環境変数からポート番号を取得するように定義します。
UseUrls("http://0.0.0.0:"+ Environment.GetEnvironmentVariable("PORT"))
BuildWebHost メソッド全量では以下のようになります。
public static IWebHost BuildWebHost(string[] args) =>
    WebHost.CreateDefaultBuilder(args)
        .UseStartup<Startup>()
        .UseUrls("http://0.0.0.0:"+ Environment.GetEnvironmentVariable("PORT"))
        .Build();
5. ビルド
修正したソースコードをビルドします。
$ dotnet restore
$ dotnet publish -c Release -r linux-x64 -o publish
-c|--configuration {Debug|Release} オプションで、Release 構成を設定します。デフォルトでは、Debug になっています。
-r|--runtime <RUNTIME_IDENTIFIER> オプションで、Linux 環境を設定します。Application Container Cloud Service で稼働する環境は Linux (Oracle Linux) となっています。
-o|--output <OUTPUT_DIRECTORY> オプションで、出力先を publish ディレクトリとしています。デフォルトでは、./bin/[configuration]/[framework]/[runtime] に出力されます。
 $ ls -l publish/helloworld*
-rw-r--r-- 1 syanagih なし  97408 1月  15 13:14 publish/helloworld
-rw-r--r-- 1 syanagih なし 392564 1月  15 14:18 publish/helloworld.deps.json
-rwxr-xr-x 1 syanagih なし   6656 1月  15 14:18 publish/helloworld.dll
-rw-r--r-- 1 syanagih なし   1120 1月  15 14:18 publish/helloworld.pdb
-rw-r--r-- 1 syanagih なし     98 1月  15 14:18 publish/helloworld.runtimeconfig.json
publish ディレクトリ配下に生成される helloworld.dll が公開用の実行ファイルとなります。
6. Application Container Cloud Service 用メタファイルの作成
Application Container Cloud Service は、デプロイするアプリケーションをパッケージ (Zip) する際に、アプリケーション情報を記載するメタファイル (manifest.json) が必要になります。
以下のような記述内容で manifest.json を作成します。
{
  "runtime":{
    "majorVersion":"2.0.0-runtime"
},
  "command": "dotnet helloworld.dll"
}
| 項目 | 説明 |
|---|---|
| majorVersion | .NET Core のバージョンを指定します。 前述したように選択できるバージョンは、2.0.0 または 1.1.2 です。 |
| command | このアプリケーションを実行するコマンドを指定します。 |
7. Application Container Cloud Service 用のパッケージ
先に作った manifest.json を publish ディレクトリに入れて合わせて zip でアーカイブします。
この時注意するのは、publish ディレクトリを zip するのではなく、publish ディレクトリ内部で zip するようにします。
$ cd publish
$ zip helloworld.zip *
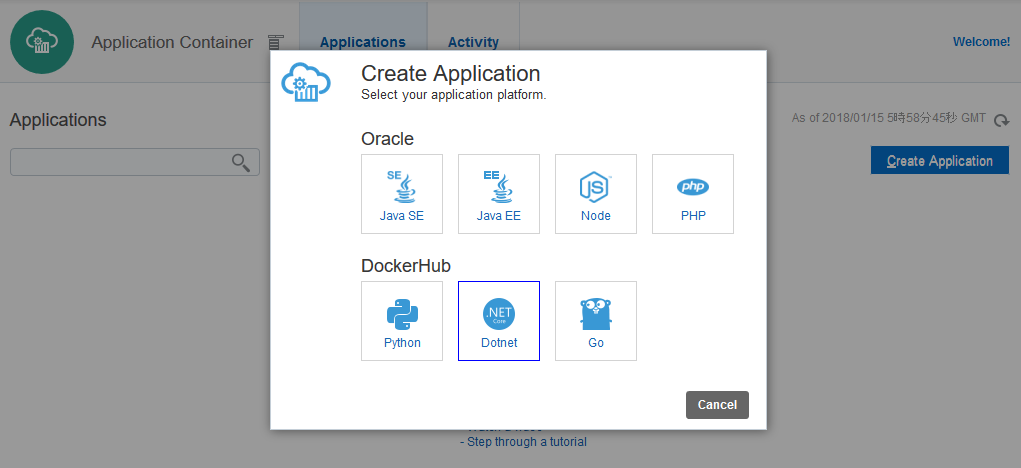
8. Application Container Cloud Service へデプロイ
アプリケーション種別で、Dotnet を選択します。
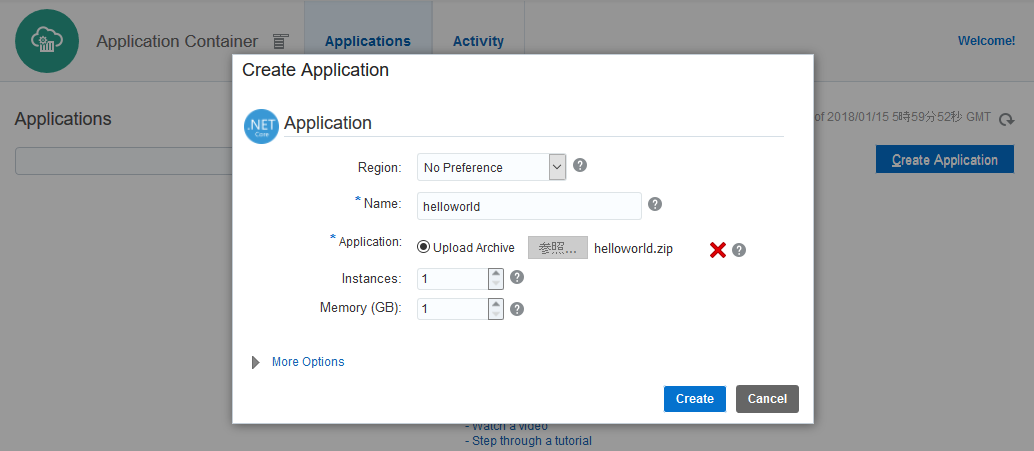
先程作成した helloworld.zip をアップロードし、Create ボタンをクリックします。
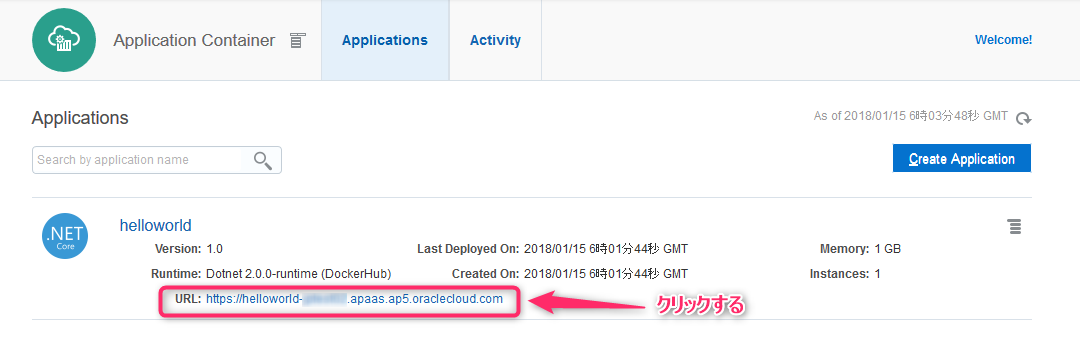
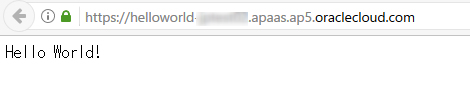
デプロイが完了するとアプリケーション一覧画面になります。そこで表示されているURLをクリックすると、起動しているアプリケーションにアクセスができます。
まとめ
エントリポイントを指定する Program クラスの編集だけで、簡単に Application Container Cloud Service に.NET Core をデプロイできる事が分かりました。
今回は空プロジェクトのデプロイでしたが、Angular や React を含み依存ライブラリが存在するようなアプリケーションもデプロイを行ってみたいと思います。