目的
爆速でWEBAPIを作れると巷で噂のFastAPIの導入からテストの作り方までを爆速で知る。
背景
最近Python関連のコードを書くことがあるが、FlaskやFastAPI、DjangoなどのWEB開発フレームワークの名前をよく目にしており、実際に使ったことがなかったので、お話のネタ程度に試してみた。
FastAPIを選んだ理由はとして、SwaggerUIの表示やテストが簡易的だったこと。
最初はFlaskを試していたが、SwaggerUIを表示するためにライブラリを別で入れないといけなく、エラーが出てなんか失敗してしまったが、FastAPIは特に何もせずとも表示ができたため、それも含めたトータル的な敷居の低さから選択。Djangoは一度も触れず、検索すらしていなかった。ごめん。
FastAPIとは
Python3.6以降でAPIを構築するための爆速なWEBフレームワークです。
ライセンスはMITライセンスです。
実行環境
os: macOS Monterey 12.5
machine: MacBook Air(Retina, 13-inch, 2018)
cpu: 1.6GHz デュアルコアIntel Core i5
% python3 --version
Python 3.10.6
内容
Python環境構築
仮想環境作って進めます。
任意のフォルダを作成しそこで実行してください。
出力結果は割愛とします。
% python3 -m venv .venv
% source .venv/bin/activate
% pip3 install fastapi
% pip3 install uvicorn
WEBAPI処理作成
WEBAPIの処理を作成します。
今回はGETとPOSTの処理を作りました。
import uvicorn
from fastapi import FastAPI
from pydantic import BaseModel

app = FastAPI()


class Item(BaseModel):
    name: str
    price: int


@app.get("/items/{item_name}")
def get_item(item_name):
    return {"name": item_name, "price": 200}


@app.post("/items/new")
def add_item(item: Item):
    return item


if __name__ == "__main__":
    uvicorn.run(app, host="0.0.0.0", port=8080)
app = FastAPI()
FastAPIのインスタンスを生成しています。
@app.get("/items/{item_name}")
FastAPIのインスタンスへGETメソッドとパスを登録しています。
{item_name}部分はパスで指定される可変値となります。
この値はファンクションの引数で受け取ることが可能です。
def get_item(item_name):
@app.post("/items/new")
FastAPIのインスタンスへPOSTメソッドとそのパスを登録しています。
POSTメソッドで送られてきたデータをファクションの引数で受け取ることが可能です。
受け取るデータ形式の定義(スキーマ)はclassで定義します。
class Item(BaseModel):
    name: str
    price: int

@app.post("/items/new")
def add_item(item: Item):
    return item
uvicorn.run(app, host="0.0.0.0", port=8080)
サーバの起動処理です。
バインドアドレスとポートを指定しています。
サーバ起動
main.pyを実行するだけです。
% python3 main.py
INFO:     Started server process [20415]
INFO:     Waiting for application startup.
INFO:     Application startup complete.
INFO:     Uvicorn running on http://0.0.0.0:8080 (Press CTRL+C to quit)
これでサーバの起動が完了しました。
API仕様表示
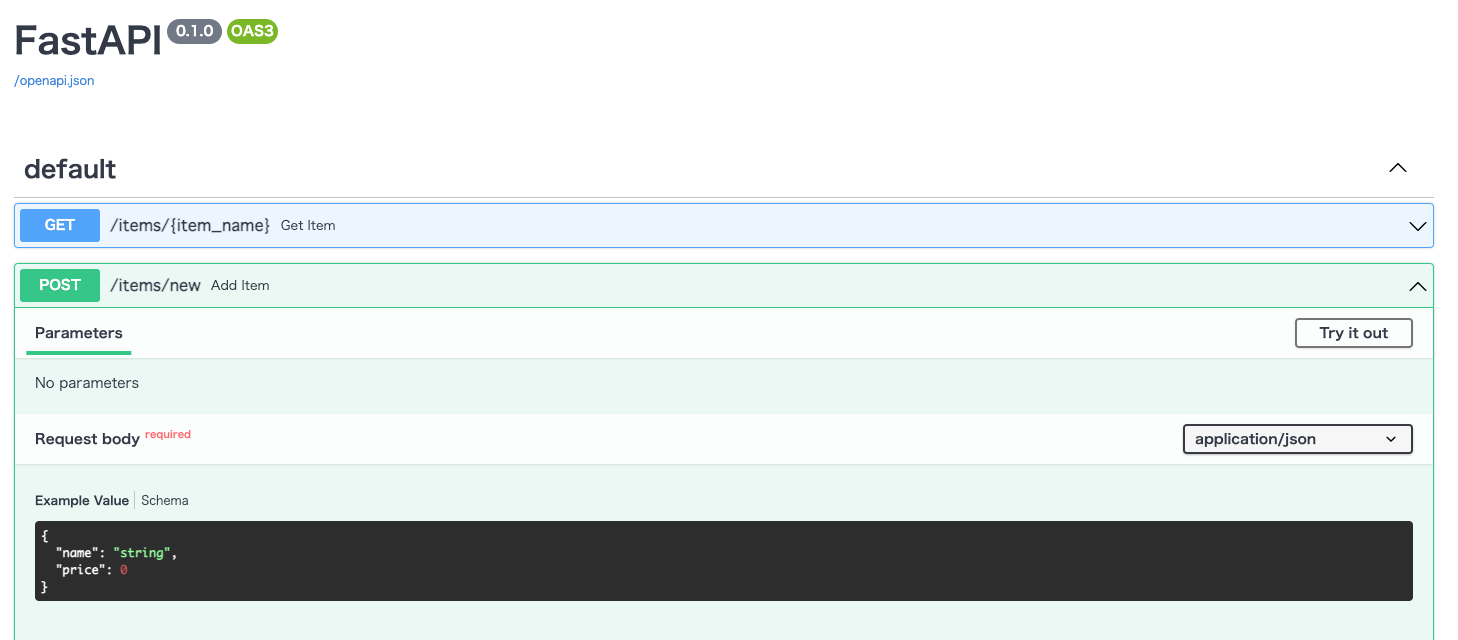
下記にアクセスすることでSwaggerUIが表示されます。
curlコマンドや自作クライアントからもアクセスできますが、この画面からAPIへアクセスすることもできます。
デバッグや動作確認をするときに便利ですね。
WEBAPIの処理を記述しただけでここまで表示してくれます。

ただ、これでは殺風景なので、もう少し情報を追加してみましょう。
import uvicorn
from fastapi import FastAPI
+ from fastapi.openapi.utils import get_openapi
from pydantic import BaseModel

app = FastAPI()


+ def custom_openapi():
+     if app.openapi_schema:
+         return app.openapi_schema
+     openapi_schema = get_openapi(
+         title="Example Web API",
+         version="0.0.1",
+         description="FastAPIで作ったWebAPIです。",
+         routes=app.routes,
+     )
+     app.openapi_schema = openapi_schema
+     return app.openapi_schema
+
+
+ app.openapi = custom_openapi


class Item(BaseModel):
    name: str
    price: int


- @app.get("/items/{item_name}")
+ @app.get(
+     "/items/{item_name}",
+     summary="アイテム取得",
+     description="指定されたアイテムを取得し返却します。",
+ )
def get_item(item_name):
    return {"name": item_name, "price": 200}


- @app.post("/items/new")
+ @app.post(
+     "/items/new",
+     summary="アイテム追加",
+     description="渡されたアイテムを追加します。",
+ )
def add_item(item: Item):
    return item


if __name__ == "__main__":
    uvicorn.run(app, host="0.0.0.0", port=8080)
再度API仕様にアクセスします。

いい感じになりましたね。
SwaggerUIやOpenAPIについての解説は今回割愛とさせていただきます。
WEBAPIアクセス
前項のSwaggerUIからもアクセス可能ですが、今回はcurlコマンドを利用します。
% curl http://localhost:8080/items/item_a
{"name":"item_a","price":200}
% curl -X POST -H "Content-Type: application/json" -d '{"name": "商品A", "price": 100}' http://localhost:8080/items/new
{"name":"商品A","price":100}
アクセスができましたね。
テスト
FastAPIの導入は良いですが、テストはどういったものがあるのか気になります。
FastAPIもスタンダードなテスト方法pytestでできます。
まずは必要ライブラリをインストールします。
% pip3 install pytest
% pip3 install requests
今回はGETメソッドのテストを作ります。
from fastapi.testclient import TestClient

from main import app

client = TestClient(app)


def test_get_item():
    response = client.get("/items/item_a")
    assert response.status_code == 200
    assert response.json() == {"name": "item_a", "price": 200}
テストを実行します。
実際の出力結果が横に長いので見やすいように編集してます。
% pytest
=================== test session starts ====================
platform darwin -- Python 3.10.6, pytest-7.1.2, pluggy-1.0.0
rootdir: /Users/xxx/Documents/proj/fast_api
plugins: anyio-3.6.1
collected 1 item
test_main.py .                                        [100%]

==================== 1 passed in 0.76s =====================
通ってますね!!
最後に
思ったより爆速で構築することができました。
紹介した内容は一部に過ぎないので、もっと詳しく知りたい方は公式ドキュメントをチェックしてみてください。