RecyclerViewをいざ使うときに忘れがちなのでRecyclerViewの導入手順から順を追ってを纏めようと思います。
下準備
RecyclerViewを使う前に下準備をします。
build.gradle
    dependencies {
        // 追加
        classpath 'com.android.support:recyclerview-v7:28.0.0'
    }
表示するアイテムのレイアウトを作成
今回はListを表示していくので各要素の1つ1つがこのレイアウトになります。
list_item.xml
<?xml version="1.0" encoding="utf-8"?>
<LinearLayout
    xmlns:app="http://schemas.android.com/apk/res-auto"
    xmlns:android="http://schemas.android.com/apk/res/android"
    xmlns:tools="http://schemas.android.com/tools"
    android:orientation="horizontal"
    android:layout_margin="5dp"
    android:layout_width="match_parent"
    android:layout_height="wrap_content"
    >

    <ImageView
        android:id="@+id/image"
        android:layout_width="wrap_content"
        android:layout_height="wrap_content"
        android:layout_margin="10dp"
        android:contentDescription="@null"
        app:srcCompat="@mipmap/ic_launcher"
        />

    <TextView
        android:id="@+id/text"
        android:layout_width="match_parent"
        android:layout_height="match_parent"
        android:gravity="center"
        android:textSize="20sp"
        tools:text="TextArea"/>

</LinearLayout>
ViewHolderを作る
RecyclerViewHolder.kt
package com.example.recyclerviewproject

import android.view.View
import androidx.recyclerview.widget.RecyclerView
import kotlinx.android.synthetic.main.list_item.view.*

class RecyclerViewHolder(view: View) : RecyclerView.ViewHolder(view) {
    val itemImage = view.image
    val itemText = view.text
}
Adapterを作成する
RecyclerViewAdapter.kt
package com.example.recyclerviewproject

import android.view.LayoutInflater
import android.view.View
import android.view.ViewGroup
import androidx.recyclerview.widget.RecyclerView


class RecyclerViewAdapter(private val itemList: List<String>) :
    RecyclerView.Adapter<RecyclerViewHolder>() {

    override fun onCreateViewHolder(parent: ViewGroup, viewType: Int): RecyclerViewHolder {
        val layoutInflater = LayoutInflater.from(parent.context)
        val item = layoutInflater.inflate(R.layout.list_item, parent, false)
        return RecyclerViewHolder(item)
    }

    override fun onBindViewHolder(holder: RecyclerViewHolder, position: Int) {
        holder.run {
            itemImage.setImageResource(R.mipmap.ic_launcher)
            itemText.text = itemList[position]
            itemView.setOnClickListener(View.OnClickListener {})
        }
    }

    override fun getItemCount(): Int = itemList.size
}
下準備は以上で完了です。
次は下準備した材料を呼び出していきます。
盛り付け
MainActivity.kt
package com.example.recyclerviewproject

import androidx.appcompat.app.AppCompatActivity
import android.os.Bundle
import androidx.recyclerview.widget.LinearLayoutManager
import androidx.recyclerview.widget.RecyclerView

class MainActivity : AppCompatActivity() {

    override fun onCreate(savedInstanceState: Bundle?) {
        super.onCreate(savedInstanceState)
        setContentView(R.layout.activity_main)

        val listItem = resources.getStringArray(R.array.item_list).toMutableList()

        val recyclerView = findViewById<RecyclerView>(R.id.recyclerView)
        recyclerView.adapter = RecyclerViewAdapter(listItem)
        recyclerView.layoutManager = LinearLayoutManager(this, LinearLayoutManager.VERTICAL, false)
    }
}
以上で盛り付けまで完成です。
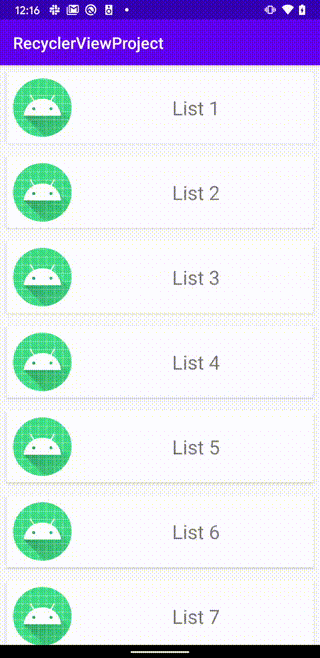
では、表示してみます。
表示

CardViewを使って少し整えます
レイアウトを少し修正します。
list_item.xml
<?xml version="1.0" encoding="utf-8"?>
<androidx.cardview.widget.CardView xmlns:android="http://schemas.android.com/apk/res/android"
    xmlns:app="http://schemas.android.com/apk/res-auto"
    xmlns:tools="http://schemas.android.com/tools"
    android:layout_width="match_parent"
    android:layout_height="wrap_content"
    android:layout_margin="8dp"
    android:foreground="?android:attr/selectableItemBackground">

    <LinearLayout
        android:layout_width="match_parent"
        android:layout_height="match_parent">

        <ImageView
            android:id="@+id/image"
            android:layout_width="wrap_content"
            android:layout_height="wrap_content"
            android:layout_margin="8dp"
            android:contentDescription="@null"
            app:srcCompat="@mipmap/ic_launcher" />

        <TextView
            android:id="@+id/text"
            android:layout_width="match_parent"
            android:layout_height="match_parent"
            android:gravity="center"
            android:textSize="24sp"
            tools:text="TextArea" />

    </LinearLayout>
</androidx.cardview.widget.CardView>
表示
整ったので表示してみます。