AidemyのAI アプリ開発講座の成果物として、3種類の動物の画像を識別するWebアプリを作成しました。
Google Colaboratoryでモデルを構築し、RenderでWebアプリを公開しています。
画像認識、Webアプリともに初めてとなりますので、いろいろとコメントいただけると嬉しいです。
Webアプリ作成までの流れ
1. 学習用データの準備
2. モデルの構築
3. Webアプリの作成
さいごに
STEP1. 学習用データの準備
学習用データはスクレイピングで用意しました。
(スクレイピングの詳細については省略します)
- 取得した画像はGoogleDriveに保存し、GoogleColaboratoryにマウント
from google.colab import drive
drive.mount('./gdrive')
フォルダの階層は以下のようになっています。
content
├ gdrive
└ My Drive
└ Colab Notebooks
├ Dogs
├ Cats
├ Rabbits
├ test_Dogs
├ test_Cats
└ test_Rabbits
一応それぞれのファイル数を確認。犬、猫、うさぎで各500枚程度用意。
import os

path = "ファイルが入っているフォルダ"

# フォルダ内のすべてのファイル名をリスト
files = os.listdir(path)
count = len(files)

print(count)
STEP2. モデルの構築
- モジュール、パッケージのインポート
import os
from keras.applications.vgg16 import VGG16
from keras.preprocessing.image import ImageDataGenerator
from keras.models import Sequential, Model
from keras.layers import Input, Activation, Dropout, Flatten, Dense
from keras.preprocessing.image import ImageDataGenerator
from keras import optimizers
import numpy as np
import time
import matplotlib.pyplot as plt
from google.colab import files
- 分類するクラスの準備
classes = ["Dogs","Cats","Rabbits"]
nb_classes = len(classes)
- 画像のサイズと、保存されているフォルダを指定
img_width, img_height = 150, 150

data_dir = "/content/gdrive/MyDrive/Colab Notebooks/"
- ImageDateGeneratorで画像が水増しできるようにする
cv2で画像を読み込むとかなり時間がかかったのでImageDateGeneratorを使ってみました
datagen = ImageDataGenerator(
    rescale=1./255,
    validation_split=0.3,
    zca_epsilon=1e-06,
    rotation_range=10.0,
    width_shift_range=0.0,
    height_shift_range=0.0,
    brightness_range=None,
    zoom_range=0.0,
    horizontal_flip=True,
    vertical_flip=True,
    )
- 訓練、検証、テストデータを作成
# トレーニングデータとバリデーションデータを分割する
train_generator = datagen.flow_from_directory(
  data_dir,
  target_size=(img_width, img_height),
  color_mode='rgb',
  classes=classes,
  class_mode='categorical',
  batch_size=32,
  subset='training',
  shuffle=True)

validation_generator = datagen.flow_from_directory(
  data_dir,
  target_size=(img_width, img_height),
  color_mode='rgb',
  classes=classes,
  class_mode='categorical',
  batch_size=32,
  subset='validation',
  shuffle=True)

# テストデータを作成
test_datagen = ImageDataGenerator(
    rescale=1./255,
    )

test_generator = test_datagen.flow_from_directory(
  data_dir,
  target_size=(img_width, img_height),
  color_mode='rgb',
  classes=["Dogs_test", "Cats_test", "Rabbits_test"],
  class_mode='categorical',
  batch_size=32,
  shuffle=True)
- VGG16を使ってモデルを構築する
# tensorを定義
input_tensor = Input(shape=(img_width, img_height, 3))
vgg16 = VGG16(include_top=False, weights='imagenet', input_tensor=input_tensor)

# 全結合層を構築
top_model = Sequential()
top_model.add(Flatten(input_shape=vgg16.output_shape[1:]))
top_model.add(Dense(256, activation='relu'))
top_model.add(Dropout(0.5))
top_model.add(Dense(nb_classes, activation='softmax'))

# VGG16と全結合層を結合
vgg_model = Model(inputs=vgg16.input, outputs=top_model(vgg16.output))

# VGG16の15層目までの重みを固定
for layer in vgg_model.layers[:15]:
  layer.trainable = False

# コンパイル。最適化関数はSGDがよい(らしい)
vgg_model.compile(loss='categorical_crossentropy',
                 optimizer=optimizers.SGD(lr=1e-3, momentum=0.9),
                 metrics=['accuracy'])

# モデルの学習
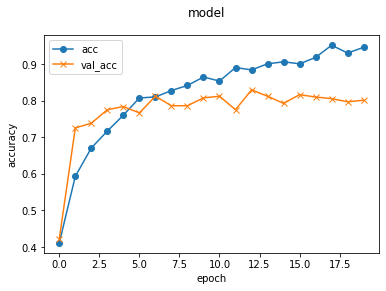
history = vgg_model.fit(train_generator, batch_size=32, epochs=20, verbose=1, validation_data=validation_generator)

# 可視化
plt.plot(history.history['accuracy'], label='acc', ls='-', marker='o')
plt.plot(history.history['val_accuracy'], label='val_acc', ls='-', marker='x')
plt.ylabel('accuracy')
plt.xlabel('epoch')
plt.suptitle('model', fontsize=12)
plt.legend()
plt.show()

scores = vgg_model.evaluate(test_generator, verbose=1)
print('Test loss:', scores[0])
print('Test accuracy:', scores[1])

X_test, y_test = next(test_generator)
for i in range(10):
    plt.subplot(2, 5, i+1)
    plt.imshow(X_test[i])
plt.suptitle("10 images of test data",fontsize=16)
plt.show()

pred = np.argmax(vgg_model.predict(X_test[0:10]), axis=1)
print(pred)
※はまったところ
最初は以下のようにしていたのですが、これだとnextをした際にX_train, y_trainに代入されたデータ(32枚分のデータ)だけをfitで使うことになって、正解率が全くあがりませんでした。
X_train, y_train = next(train_generator)
X_test, y_test = next(validation_generator)

history = vgg_model.fit(X_train, y_train, batch_size=32, epochs=20, verbose=1, validation_data=validation_generator)
- 混合行列で分類結果を確認
# 混合行列
label_cm = np.argmax(y_test, axis=1)
pred_cm = np.argmax(vgg_model.predict(X_test), axis=1)


val_mat = confusion_matrix(label_cm, pred_cm)
print(val_mat)

# 混合行列の可視化
type_list = ["Dogs", "Cats", "Rabbits"]
cm = pd.DataFrame(data=val_mat, index=type_list, columns=type_list)
sns.heatmap(cm, square=True, cbar=True, annot=True, cmap='Blues', fmt='d')
plt.yticks(rotation=0)
plt.xlabel("Predict", fontsize=13, rotation=0)
plt.ylabel("True", fontsize=13)
- Webアプリで利用するためにモデルをダウンロード
モデルのダウンロード
result_dir = "/content/gdrive/MyDrive/Colab Notebooks/model_result"
vgg_model.save(os.path.join(result_dir, "model.h5"))

files.download( "/content/gdrive/MyDrive/Colab Notebooks/model_result" )
val_accが0.8009で8割を超えたので、まあまあいい結果が得られた(と思う)

予測ごとにやや変動しますが、うさぎの正解率がやや低い傾向があるようです。

STEP3. Webアプリの作成
構築したモデルを使ってFlaskでWebアプリを作成します。
import os
from flask import Flask, request, redirect, render_template, flash
from werkzeug.utils import secure_filename
from tensorflow.keras.models import Sequential, load_model
from tensorflow.keras.preprocessing import image

import numpy as np


classes = ["犬", "猫", "うさぎ"]
image_size = 150

UPLOAD_FOLDER = "static/uploads"
ALLOWED_EXTENSIONS = set(['png', 'jpg', 'jpeg', 'gif'])

app = Flask(__name__)

def allowed_file(filename):
    return '.' in filename and filename.rsplit('.', 1)[1].lower() in ALLOWED_EXTENSIONS

model = load_model('./model.h5')#学習済みモデルをロード


@app.route('/', methods=['GET', 'POST'])
def upload_file():
    if request.method == 'POST':
        if 'file' not in request.files:
            flash('ファイルがありません')
            return redirect(request.url)
        file = request.files['file']
        if file.filename == '':
            flash('ファイルがありません')
            return redirect(request.url)
        if file and allowed_file(file.filename):
            filename = secure_filename(file.filename)
            file.save(os.path.join(UPLOAD_FOLDER, filename))
            filepath = os.path.join(UPLOAD_FOLDER, filename)
            print(filepath)

            #受け取った画像を読み込み、np形式に変換
            # img = image.load_img(filepath, grayscale=True, target_size=(image_size,image_size))
            img = image.load_img(filepath,target_size=(image_size,image_size))
            img = image.img_to_array(img)
            img = img / 255.0
            #img = np.expand_dims(img, axis=0)
            #print(img)
            data = np.array([img])
            #print(data)
            #変換したデータをモデルに渡して予測する
            print(model.predict(data))
            result = model.predict(data)[0]
            print(result)
            predicted = result.argmax()
            print(predicted)
            pred_answer = "これは " + classes[predicted] +  " の画像です"

            return render_template("index.html",answer=pred_answer, imagefile=filepath)

    return render_template("index.html",answer="")

if __name__ == "__main__":
    port = int(os.environ.get('PORT', 8080))
    app.run(host ='0.0.0.0',port = port)
- HTML
<!DOCTYPE html>
<html lang="ja">
<head>
    <meta charset="UTF-8">
    <meta name="viewport" content="width=device-width, initial-scale=1.0">
    <meta http-equiv="X-UA-Compatible" content="ie=edge">
    <title>Animal Image Classifier</title>
    <link rel="stylesheet" href="./static/stylesheet.css">
</head>
<body>
    <header>
        <a class="header-logo" href="#">Animal Image Classifier</a>
    </header>

    <div class="main">
        <h2> AIが犬、猫、うさぎの画像を識別します</h2>
        <p>画像を送信してください</p>
        <form method="POST" enctype="multipart/form-data">
            <div class="image_choose"><input class="file_choose" type="file" name="file"></div>
            <div><input class="btn" value="画像を識別する" type="submit"></div>
        </form>
        <!-- <img src="{{imagefile}}" style="display: block; margin: auto;"> -->
        <img class="upload_image" src="{{imagefile}}">
        <!-- <div>{{imagefile}}</div> -->
        <div class="answer">{{answer}}</div>
    </div>

    <footer>

    </footer>

</body>
</html>
Renderにデプロイ
なかなかいい確率で分類してくれます。
さいごに
今回、画像認識、Webアプリと作成しましたが、なかなか正解率が上がらなかったりと手探りな部分が多くかなり苦労しました。
うさぎの画像で正解率が上がりずらい傾向があったのは、
・元データが犬、猫にくらべて枚数が少なかった
・風景の一部にうさぎがいるような、うさぎが中心ではない画像も含まれていた
あたりが一因かと思ってます。
データの集め方から工夫が必要かなと思いました。
今後も引き続きいろいろと調べてよりよいアプリケーションが作成できるようにしていきたいと思います。
