kubernetesを学ぶ~その1~
目次
- 背景
- 環境情報
- 環境構築
- インストール
- GitHubからダウンロード
- vagrantの起動
- マスタノードにログイン
- ノードの状態を確認する
- あとがき
1.背景
kubernetesを学ぼうとしたきっかけは、仕事の業務で必要という点が大きい。とは言うものの、以前よりインフラ業務を自動化して楽してーぇ!ということを考えていたので興味があった。そこで、少し学習の時間を設けれそうなので、色々と試して技術習得をしようと思いやるぞー!!となった。
何回かに分けて投稿するが、ノード2つぐらいの管理ができるところまでをやり遂げようかなと思う。内容はメモみたいになるかも。エラーとかも載せていきます。
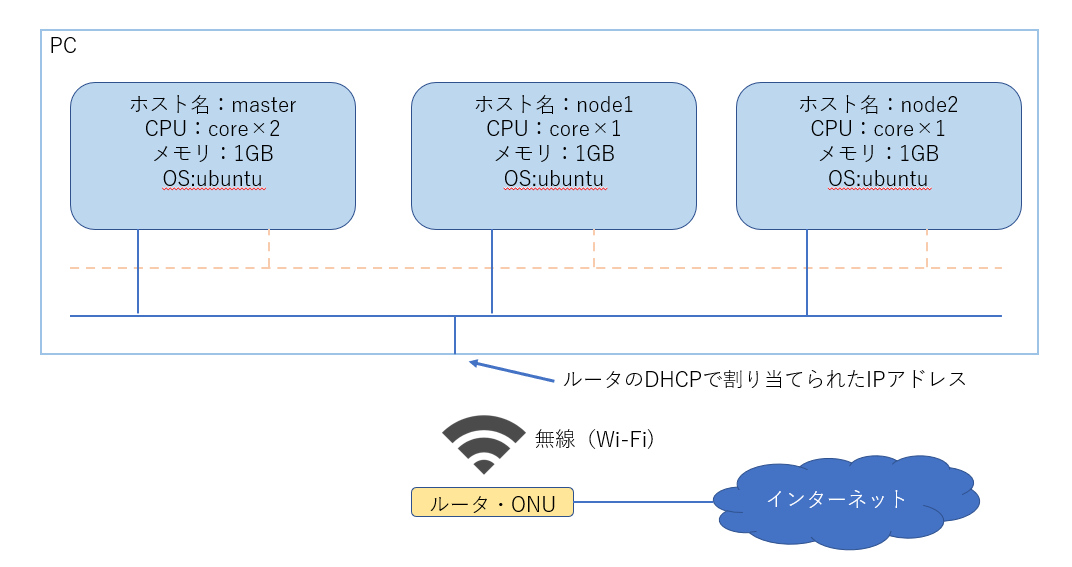
2.環境情報
クラウド環境に立てようと思ったが、いかんせん貧乏SEなので固定費がかかることは避けたい。そのため、利用している研究用ノートPCに構築することにした。いずれは、手元にあるRaspberry Piに構築できるかやってみようかな。
まずは、参考文献に従ってやってみよう。
ノートPC:DELL XPS13
OS:Windows 10 Pro
CPU:Intel(R) Core(TM) i7-1065G7
メモリ:16.0GB
Doker Desktop for Windows 3.1.0(51484)
vagrant 2.2.14(64bit)
VirtualBox 6.1.18
git version 2.29.2
kubectl on Windows 1.20
システム構成
↓こんなイメージにする予定
3.環境構築
インストール
インストールについては、ダウンロード先だけ記載。インストール手順は難しくもないし、いろんなところに手順があるんで。システム要件もリンク先参照で!
・Doker Desktop for Windows
・vagrant
・VirtualBox
・git
・kubectl on Windows
GitHubからダウンロード
1.コマンドプロンプとを管理者として起動。
※検索ボックスに cmd と入力して、Ctrl + Shift + Enterすると管理者として起動するかACLのメッセージがでます。こっちのほうがメニューから探すより早いね。
2.クローン先にディレクトリを移動
容量の都合上、Dドライブへ移動
C:\Windows\system32>d:

Repositoryというフォルダを事前に作っていたので、移動
D:\>cd Repository

kubernetes用のフォルダを作成
D:\Repository>mkdir kubernetes

kubernetes用のフォルダにカレントディレクトリを移動
D:\Repository\kubernetes>
※TABキーで入力補完できるようになって、よかったよ。Windowsさん
3.GitHubからクローン
takara9さんのリポジトリからお借りします。
クローンコマンド
D:\Repository\kubernetes>git clone https://github.com/takara9/vagrant-kubernetes
Cloning into 'vagrant-kubernetes'...
remote: Enumerating objects: 138, done.
remote: Counting objects: 100% (138/138), done.
remote: Compressing objects: 100% (82/82), done.
remote: Total 975 (delta 43), reused 104 (delta 23), pack-reused 837 eceiving objects:  95% (927/975)
Receiving objects: 100% (975/975), 139.02 KiB | 443.00 KiB/s, done.
Resolving deltas: 100% (484/484), done.

vagrant-kubernetesフォルダへ移動
D:\Repository\kubernetes>cd vagrant-kubernetes
D:\Repository\kubernetes\vagrant-kubernetes>
vagrantの起動
フレッツ光・GMOの環境で、17:00ごろに試したのですが、10分ぐらいかかります。
vagrantを起動します。
D:\Repository\kubernetes\vagrant-kubernetes>vagrant up
Bringing machine 'master' up with 'virtualbox' provider...
Bringing machine 'node1' up with 'virtualbox' provider...
Bringing machine 'node2' up with 'virtualbox' provider...
==> master: Box 'ubuntu/bionic64' could not be found. Attempting to find and install...
    master: Box Provider: virtualbox
    master: Box Version: >= 0
==> master: Loading metadata for box 'ubuntu/bionic64'
    master: URL: https://vagrantcloud.com/ubuntu/bionic64
==> master: Adding box 'ubuntu/bionic64' (v20210129.0.0) for provider: virtualbox
    master: Downloading: https://vagrantcloud.com/ubuntu/boxes/bionic64/versions/20210129.0.0/providers/virtualbox.box
Download redirected to host: cloud-images.ubuntu.com
    master:
==> master: Successfully added box 'ubuntu/bionic64' (v20210129.0.0) for 'virtualbox'!
==> master: Importing base box 'ubuntu/bionic64'...
==> master: Matching MAC address for NAT networking...
==> master: Checking if box 'ubuntu/bionic64' version '20210129.0.0' is up to date...
==> master: Setting the name of the VM: vagrant-kubernetes_master_1612167472328_4785
Vagrant is currently configured to create VirtualBox synced folders with
the `SharedFoldersEnableSymlinksCreate` option enabled. If the Vagrant
guest is not trusted, you may want to disable this option. For more
information on this option, please refer to the VirtualBox manual:

  https://www.virtualbox.org/manual/ch04.html#sharedfolders

This option can be disabled globally with an environment variable:

  VAGRANT_DISABLE_VBOXSYMLINKCREATE=1

or on a per folder basis within the Vagrantfile:

  config.vm.synced_folder '/host/path', '/guest/path', SharedFoldersEnableSymlinksCreate: false
==> master: Clearing any previously set network interfaces...
==> master: Preparing network interfaces based on configuration...
    master: Adapter 1: nat
    master: Adapter 2: hostonly
==> master: Forwarding ports...
    master: 22 (guest) => 2222 (host) (adapter 1)
==> master: Running 'pre-boot' VM customizations...
==> master: Booting VM...
==> master: Waiting for machine to boot. This may take a few minutes...
    master: SSH address: 127.0.0.1:2222
    master: SSH username: vagrant
    master: SSH auth method: private key
Timed out while waiting for the machine to boot. This means that
Vagrant was unable to communicate with the guest machine within
the configured ("config.vm.boot_timeout" value) time period.

If you look above, you should be able to see the error(s) that
Vagrant had when attempting to connect to the machine. These errors
are usually good hints as to what may be wrong.

If you're using a custom box, make sure that networking is properly
working and you're able to connect to the machine. It is a common
problem that networking isn't setup properly in these boxes.
Verify that authentication configurations are also setup properly,
as well.

If the box appears to be booting properly, you may want to increase
the timeout ("config.vm.boot_timeout") value.
なんか、SSHつながらないみたいなメッセージ出てるけど。
masterノードしかできてねー!!!!
SSHのポートを22から2222に変更しているところと、ループバックアドレスに対して接続をして、応答なしになっていることからWindowsのパーソナルファイアウォールが原因と想像。
FWにポート2222、2200、2201を許可して再実行してみる。
※node1とnode2のポートが2200、2201になってた!もう一回やり直したのはナイショ。
D:\Repository\kubernetes\vagrant-kubernetes>vagrant up
Bringing machine 'master' up with 'virtualbox' provider...
Bringing machine 'node1' up with 'virtualbox' provider...
Bringing machine 'node2' up with 'virtualbox' provider...
==> master: Importing base box 'ubuntu/bionic64'...
==> master: Matching MAC address for NAT networking...
==> master: Checking if box 'ubuntu/bionic64' version '20210129.0.0' is up to date...
==> master: Setting the name of the VM: vagrant-kubernetes_master_1612174217612_99544
==> master: Clearing any previously set network interfaces...
==> master: Preparing network interfaces based on configuration...
    master: Adapter 1: nat
    master: Adapter 2: hostonly
==> master: Forwarding ports...
    master: 22 (guest) => 2222 (host) (adapter 1)
==> master: Running 'pre-boot' VM customizations...
==> master: Booting VM...
==> master: Waiting for machine to boot. This may take a few minutes...
    master: SSH address: 127.0.0.1:2222
    master: SSH username: vagrant
    master: SSH auth method: private key
    master: Warning: Connection aborted. Retrying...
    master: Warning: Connection reset. Retrying...
    master:
    master: Vagrant insecure key detected. Vagrant will automatically replace
    master: this with a newly generated keypair for better security.
    master:
    master: Inserting generated public key within guest...
    master: Removing insecure key from the guest if it's present...
    master: Key inserted! Disconnecting and reconnecting using new SSH key...
==> master: Machine booted and ready!
==> master: Checking for guest additions in VM...
    master: The guest additions on this VM do not match the installed version of
    master: VirtualBox! In most cases this is fine, but in rare cases it can
    master: prevent things such as shared folders from working properly. If you see
    master: shared folder errors, please make sure the guest additions within the
    master: virtual machine match the version of VirtualBox you have installed on
    master: your host and reload your VM.
    master:
    master: Guest Additions Version: 5.2.42
    master: VirtualBox Version: 6.1
==> master: Setting hostname...
==> master: Configuring and enabling network interfaces...
==> master: Mounting shared folders...
    master: /vagrant => D:/Repository/kubernetes/vagrant-kubernetes
==> master: Detected mount owner ID within mount options. (uid: 1000 guestpath: /vagrant)
==> master: Detected mount group ID within mount options. (gid: 1000 guestpath: /vagrant)
==> master: Running provisioner: ansible_local...
    master: Installing Ansible...
    master: Running ansible-playbook...

~ 省略 ~

PLAY RECAP *********************************************************************
master                     : ok=38   changed=33   unreachable=0    failed=0    skipped=13   rescued=0    ignored=0

==> node1: Importing base box 'ubuntu/bionic64'...
==> node1: Matching MAC address for NAT networking...
==> node1: Checking if box 'ubuntu/bionic64' version '20210129.0.0' is up to date...
==> node1: Setting the name of the VM: vagrant-kubernetes_node1_1612174813674_52577
==> node1: Fixed port collision for 22 => 2222. Now on port 2200.
==> node1: Clearing any previously set network interfaces...
==> node1: Preparing network interfaces based on configuration...
    node1: Adapter 1: nat
    node1: Adapter 2: hostonly
==> node1: Forwarding ports...
    node1: 22 (guest) => 2200 (host) (adapter 1)
==> node1: Running 'pre-boot' VM customizations...
==> node1: Booting VM...
==> node1: Waiting for machine to boot. This may take a few minutes...
    node1: SSH address: 127.0.0.1:2200
    node1: SSH username: vagrant
    node1: SSH auth method: private key
    node1: Warning: Connection reset. Retrying...
    node1: Warning: Connection aborted. Retrying...
    node1:
    node1: Vagrant insecure key detected. Vagrant will automatically replace
    node1: this with a newly generated keypair for better security.
    node1:
    node1: Inserting generated public key within guest...
    node1: Removing insecure key from the guest if it's present...
    node1: Key inserted! Disconnecting and reconnecting using new SSH key...
==> node1: Machine booted and ready!
==> node1: Checking for guest additions in VM...
    node1: The guest additions on this VM do not match the installed version of
    node1: VirtualBox! In most cases this is fine, but in rare cases it can
    node1: prevent things such as shared folders from working properly. If you see
    node1: shared folder errors, please make sure the guest additions within the
    node1: virtual machine match the version of VirtualBox you have installed on
    node1: your host and reload your VM.
    node1:
    node1: Guest Additions Version: 5.2.42
    node1: VirtualBox Version: 6.1
==> node1: Setting hostname...
==> node1: Configuring and enabling network interfaces...
==> node1: Mounting shared folders...
    node1: /vagrant => D:/Repository/kubernetes/vagrant-kubernetes
==> node1: Detected mount owner ID within mount options. (uid: 1000 guestpath: /vagrant)
==> node1: Detected mount group ID within mount options. (gid: 1000 guestpath: /vagrant)
==> node1: Running provisioner: ansible_local...
    node1: Installing Ansible...
    node1: Running ansible-playbook...

~ 省略 ~

PLAY RECAP *********************************************************************
node1                      : ok=24   changed=18   unreachable=0    failed=0    skipped=11   rescued=0    ignored=0

==> node2: Importing base box 'ubuntu/bionic64'...
==> node2: Matching MAC address for NAT networking...
==> node2: Checking if box 'ubuntu/bionic64' version '20210129.0.0' is up to date...
==> node2: Setting the name of the VM: vagrant-kubernetes_node2_1612175260258_24940
==> node2: Fixed port collision for 22 => 2222. Now on port 2201.
==> node2: Clearing any previously set network interfaces...
==> node2: Preparing network interfaces based on configuration...
    node2: Adapter 1: nat
    node2: Adapter 2: hostonly
==> node2: Forwarding ports...
    node2: 22 (guest) => 2201 (host) (adapter 1)
==> node2: Running 'pre-boot' VM customizations...
==> node2: Booting VM...
==> node2: Waiting for machine to boot. This may take a few minutes...
    node2: SSH address: 127.0.0.1:2201
    node2: SSH username: vagrant
    node2: SSH auth method: private key
    node2:
    node2: Vagrant insecure key detected. Vagrant will automatically replace
    node2: this with a newly generated keypair for better security.
    node2:
    node2: Inserting generated public key within guest...
    node2: Removing insecure key from the guest if it's present...
    node2: Key inserted! Disconnecting and reconnecting using new SSH key...
==> node2: Machine booted and ready!
==> node2: Checking for guest additions in VM...
    node2: The guest additions on this VM do not match the installed version of
    node2: VirtualBox! In most cases this is fine, but in rare cases it can
    node2: prevent things such as shared folders from working properly. If you see
    node2: shared folder errors, please make sure the guest additions within the
    node2: virtual machine match the version of VirtualBox you have installed on
    node2: your host and reload your VM.
    node2:
    node2: Guest Additions Version: 5.2.42
    node2: VirtualBox Version: 6.1
==> node2: Setting hostname...
==> node2: Configuring and enabling network interfaces...
==> node2: Mounting shared folders...
    node2: /vagrant => D:/Repository/kubernetes/vagrant-kubernetes
==> node2: Detected mount owner ID within mount options. (uid: 1000 guestpath: /vagrant)
==> node2: Detected mount group ID within mount options. (gid: 1000 guestpath: /vagrant)
==> node2: Running provisioner: ansible_local...
    node2: Installing Ansible...
    node2: Running ansible-playbook...

~ 省略 ~

PLAY RECAP *********************************************************************
node2                      : ok=24   changed=18   unreachable=0    failed=0    skipped=11   rescued=0    ignored=0


D:\Repository\kubernetes\vagrant-kubernetes>
マスタノードにログインする。
ノードの名前は、vagrant up 時に表示された
Bringing machine 'master' up with 'virtualbox' provider...
Bringing machine 'node1' up with 'virtualbox' provider...
Bringing machine 'node2' up with 'virtualbox' provider...
より、master、node1、node2です。
マスタノードにログインします。
D:\Repository\kubernetes\vagrant-kubernetes>vagrant ssh master
Welcome to Ubuntu 18.04.5 LTS (GNU/Linux 4.15.0-135-generic x86_64)

 * Documentation:  https://help.ubuntu.com
 * Management:     https://landscape.canonical.com
 * Support:        https://ubuntu.com/advantage

  System information as of Mon Feb  1 10:48:32 UTC 2021

  System load:  0.83              Users logged in:        0
  Usage of /:   7.6% of 38.71GB   IP address for enp0s3:  10.0.2.15
  Memory usage: 35%               IP address for enp0s8:  172.16.20.11
  Swap usage:   0%                IP address for docker0: 172.17.0.1
  Processes:    140               IP address for cni0:    10.244.0.1


7 packages can be updated.
0 of these updates are security updates.
To see these additional updates run: apt list --upgradable

New release '20.04.1 LTS' available.
Run 'do-release-upgrade' to upgrade to it.


vagrant@master:~$
ログインできた!
ノードの状態を確認する。
kubernetesクラスタを操作するコマンドkubectlを使用して確認します。
ちなみに、K8sって省略して今後記載します。
Kubernetesのuberneteが8文字で、最後がsなので、K8sです。
疑問だったので復習がてら書いてみた。
vagrant@master:~$ kubectl get node
NAME     STATUS   ROLES    AGE   VERSION
master   Ready    master   29m   v1.14.10
node1    Ready    <none>   21m   v1.14.10
node2    Ready    <none>   13m   v1.14.10
あとがき
今回は、時間短縮のためVagrantで構築済の環境を利用しましたが、本来はそれぞれの現場に適した環境(OSやパッケージ)を構築するのだと思います。Ansibleやterraformを使って構築するとよりいいんだろうなと思います。
次回は、構築した環境のネットワーク周りの確認と設定、NFSサーバについてやってみよう。