背景
前回に続いて、Fusion360用のデバイスを制作しました。
作成に至った詳細やハードウエアについては、別のブログ記事に書いています。
こちらでは、電気回路とコード内容について書きました。
電気回路
使用した電気部品は次の通りです。
| アイテム | 数量 | 備考 |
|---|---|---|
| マイコンProMicro | 1個 | |
| ジョイスティックモジュールA | 1個 | 傾けるタイプ |
| ジョイスティックモジュールB | 2個 | 平行移動タイプ |
| タクトスイッチ | 1個 | リセット用 |
次のブレッドボード図を参考お願いします。
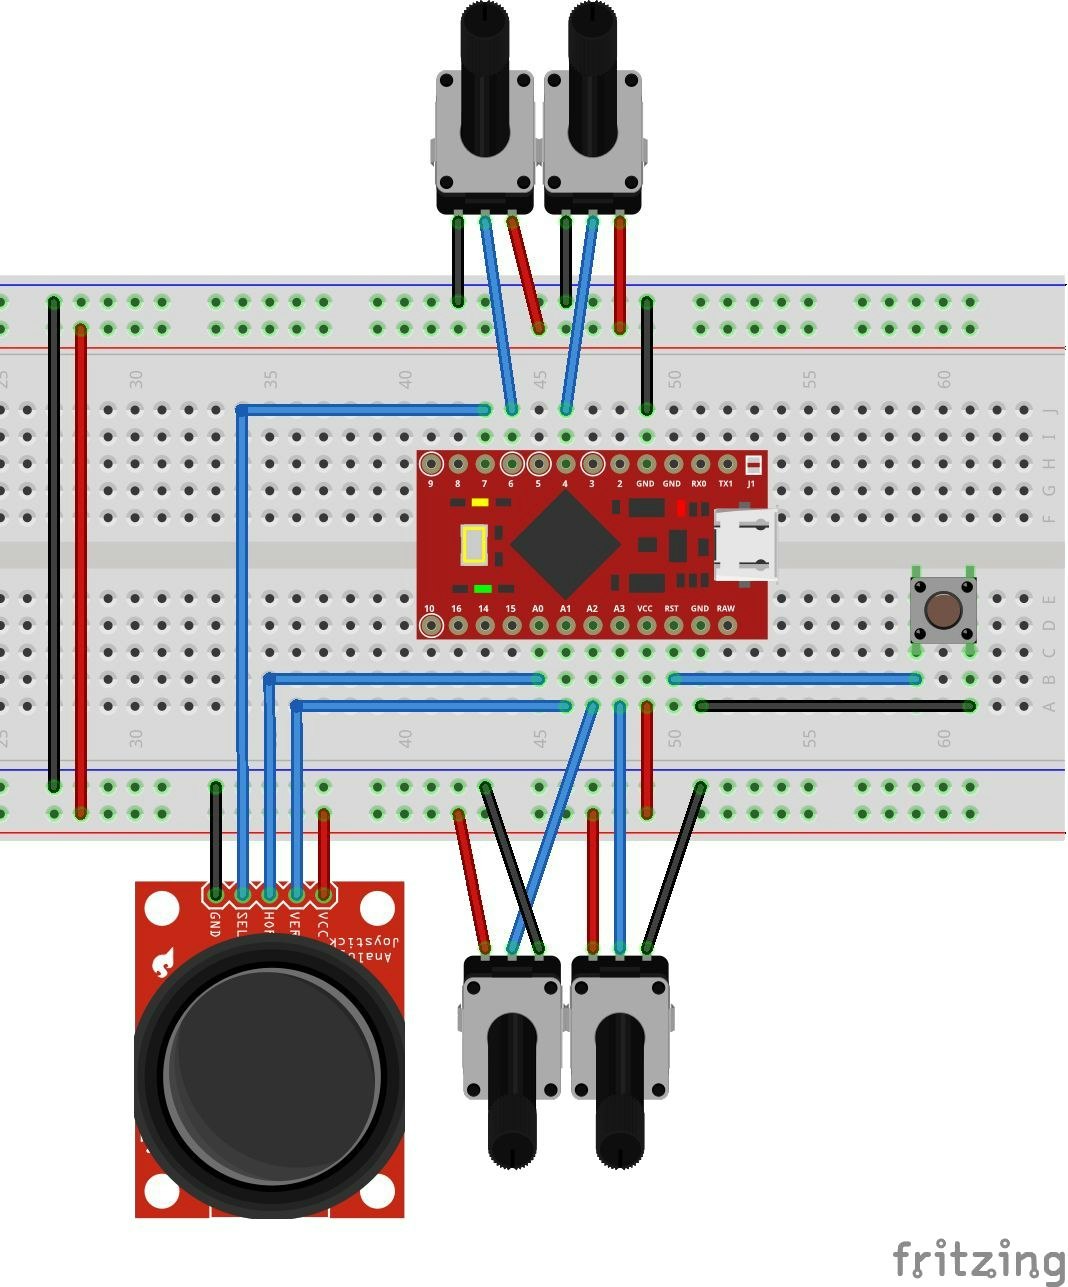
可変抵抗(ボリューム)が2個並んでいるのは、ジョイスティックB(平行移動タイプ)1個
の意味です。丁度良い素材が無く、回路的に等価なので、このような表現にさせて
いただきました。
コード内容
Arduino IDE 1.8.0 を使用しました。
スケッチ例 => 09.USB => Mouse => JoystickMouseControl を参考にしました。
以下、コードを少し区切って説明します。
順番に全てを繋げれば動くはずですが、必要に応じて適時修正お願いします。
# include "Keyboard.h"
# include "Mouse.h"

// set pin numbers for switch, joystick axes, and LED:
const int txAxis = A0;         // tilt joystick X axis
const int tyAxis = A1;         // tilt joystick Y axis
const int s1xAxis = A2;         // shift1 joystick X axis
const int s1yAxis = A3;         // shift1 joystick Y axis
const int s2xAxis = A6;         // shift2 joystick X axis(A6=4)
const int s2yAxis = A7;         // shift2 joystick Y axis(A7=6)
const int fitButton = 7;         // input pin for zoom fit mode

// parameters for reading the joystick:
int range = 30;               // output range of X or Y movement
int responseDelay = 40;        // response delay of the mouse, in ms
int threshold = range / 6;    // resting threshold
int center = range / 2;       // resting position value
int zmSens = 6;            // zoom sensitivity

int modeState = 0;          // effective mode state
int lastModeState = 0;      // previous mode state
int modeTimes = 10;         // reset at stated periods
int modeTime = 0;
int xMoved = 0;             // x moved total
int yMoved = 0;             // y moved total

void setup() {
  pinMode(fitButton, INPUT_PULLUP);
  // take control of the mouse:
  Mouse.begin();
  Keyboard.begin();
}

void loop() {

  // read and scale the two axes:
  int txMove = - readAxis(txAxis);
  int tyMove = - readAxis(tyAxis);
  int sxMove = - (readAxis(s1xAxis) + readAxis(s2xAxis) ) / 2;
  int syMove = (readAxis(s1yAxis) - readAxis(s2yAxis) ) / 2;
  int zmMove = (readAxis(s1yAxis) + readAxis(s2yAxis) ) / 2;
  int fitMode = digitalRead(fitButton);
冒頭は、I/Oピン定義、各変数の定義です。
全ての変数の意味は、すみませんが説明省略します。
loopの最初、各ジョイスティックの入力を変数に代入しています。
向きを間違えていたので、マウス座標に合わせるために正負符号付けました。
| 変数 | 目的 | センサー | 操作 |
|---|---|---|---|
| t*Move | 3Dモデル回転 | ジョイスティックA | 傾ける |
| s*Move | 3Dモデル移動 | ジョイスティックB | 2個を同じ方向に動かす (=水平移動) |
| zmMove | 拡大縮小 | ジョイスティックB | 2個を逆方向に動かす (=ひねる) |
| fitMode | 全画面表示 | ジョイスティックA | 押し込む |
  // mode select
  if (fitMode == 0){
    modeState = 1;
  }
  else if (txMove != 0 or tyMove != 0){
    if (modeTime > 0){
      modeState = 2;
      modeTime--;
    }
    else{
      modeState = 0;
    }
  }
  else if (sxMove != 0 or syMove != 0 or zmMove != 0){
    if (modeTime > 0){
      modeState = 3;
      modeTime--;
    }
    else{
      modeState = 0;
    }
  }
  else{
    modeState = 0;
  }

  // screen fit mode
  switch (modeState){
    case 1:
      if (lastModeState != 1){
        if (!Mouse.isPressed(MOUSE_MIDDLE)) {
          Keyboard.releaseAll();
          Mouse.release(MOUSE_MIDDLE);
        }
        delay(responseDelay);
        if (fitMode == 0){
          Mouse.press(MOUSE_MIDDLE);      // middle button double click
          delay(100);
          Mouse.release(MOUSE_MIDDLE);
          delay(100);
          Mouse.press(MOUSE_MIDDLE);
          delay(100);
          Mouse.release(MOUSE_MIDDLE);
          delay(500);
          lastModeState = 1;
        }
      }
      break;

    // tilt mode
    case 2:
      if (!Mouse.isPressed(MOUSE_MIDDLE)) {
        Keyboard.press(KEY_LEFT_SHIFT);
        Mouse.press(MOUSE_MIDDLE);
      }
      Mouse.move(txMove, tyMove, 0);
      xMoved += txMove;
      yMoved += tyMove;
      lastModeState = 2;
      break;

    // shift and zoom mode
    case 3:
      if (!Mouse.isPressed(MOUSE_MIDDLE)) {
        Keyboard.releaseAll();
        Mouse.press(MOUSE_MIDDLE);
      }
      Mouse.move(sxMove, syMove, 0);
      if (zmMove > zmSens){
        Mouse.move(0, 0, 1);
      }
      else if (zmMove < -zmSens){
        Mouse.move(0, 0, -1);
      }
      xMoved += sxMove;
      yMoved += syMove;
      lastModeState = 3;
      break;

    // release and reset
    default:
      if (Mouse.isPressed(MOUSE_MIDDLE)) {
        Keyboard.releaseAll();
        Mouse.release(MOUSE_MIDDLE);
      }
      Mouse.move(-xMoved, -yMoved, 0);
      xMoved = 0;
      yMoved = 0;
      modeTime = modeTimes;
      lastModeState = 0;
      break;
  }
  delay(responseDelay);
}
各操作をswich文で切り替えています。
| 場合分け | 目的 | 命令 |
|---|---|---|
| case1 | 全画面表示 | 真ん中ダブルクリック |
| case2 | 3Dモデル回転 | Shift+真ん中ボタン+マウス移動 |
| case3 | 3Dモデル移動&拡大縮小 | 真ん中ボタン+マウス移動 or スクロール |
| その他 | リセット | キー&マウスボタン離す、マウスカーソル移動 |
3Dモデル「回転」と「移動」は命令が重複しており、同時に出せないので
(少なくとも私には方法が分からない....)、切り替えています。
また、画面のマウスカーソルも動いてしまうので、一定時間毎に戻しています。
int readAxis(int thisAxis) {
  // read the analog input:
  int reading = analogRead(thisAxis);

  // map the reading from the analog input range to the output range:
  reading = map(reading, 0, 1023, 0, range);

  // if the output reading is outside from the rest position threshold, use it:
  int distance = reading - center;

//  if (abs(distance) < threshold) {
//    distance = 0;
//  }
  if (distance > 0){
    distance = distance - threshold;
      if (distance < 0){
        distance = 0;
      }
  }
  else {
    distance = distance + threshold;
      if (distance > 0){
        distance = 0;
      }
  }

  // return the distance for this axis:
  return distance;
}
ジョイスティックのアナログ入力をデジタルに変換、処理しています。
中央位置の遊び(=threshold)をキャンセルする処理方法は少し変更しました。
元のスケッチ例をコメントアウトしているので参考ください。
最後に
最後まで読んでいただき、ありがとうございました。
末尾に参考にさせていただいたブログ記事リンクを記載しました。感謝いたします!
また、自作キーボード(Self-Made Keyboards in Japan)のDiscordにて、カテゴリ違い
気味にも関わらずアドバイスくださった有識者の方々にも、改めて感謝いたします!
◆Hobby Plus:第62回 USBデバイスが作れるArduino?Arduino Pro Micro(Leonardo)でHID機能を使ってみる
◆物を作る者:ジョイスティックとタクトスイッチでマウスを作る
◆K.H.WEBLOG:Arduino Micro を使って、試しに USB スライドパッド マウスを作ってみた(小型USBキーボード自作のための準備色々)