第2回 Raspberry Pi もくもく会 - connpassで発表した,有機ELミニ液晶「PiOLED」で会場でラズパイを起動させた瞬間,自分のIPアドレスがわかるようにお金で解決(2,500 円くらい)してみたエントリーです.(瞬間というのは,言い過ぎです.)
参考資料
【小さいは正義】Raspberry Pi Zeroに最適な有機ELミニ液晶「PiOLED」 - Mana Blog Next
Adafruit PiOLED - Raspberry Pi用 128x32 モノクロOLEDモジュール - スイッチサイエンス
Overview | Adafruit PiOLED - 128x32 Mini OLED for Raspberry Pi | Adafruit Learning System
Raspberry Piを再起動・シャットダウンさせてみた: Raspberry Piでやってみた
Raspberry Pi ピン配置などを公式ドキュメントで調べる - Qoosky
環境
私のラズパイ
$ lsb_release -a
No LSB modules are available.
Distributor ID: Raspbian
Description: Raspbian GNU/Linux 8.0 (jessie)
Release: 8.0
Codename: jessie
PiOLED接続前の準備
ssh でラズパイに接続
$ ssh pi@192.168.xxx.xxx
pi@raspberrypi:~ $
PRi.GPIO インストール
pi@raspberrypi:~ $ sudo apt-get update
pi@raspberrypi:~ $ sudo apt-get install build-essential python-dev python-pip
pi@raspberrypi:~ $ sudo pip install RPi.GPIO
Python Imaging ライブラリ、python-smbus ライブラリをインストール
pi@raspberrypi:~ $ sudo apt-get install python-imaging python-smbus
git インストール
pi@raspberrypi:~ $ sudo apt-get install git
最新のAdafruit と サンプルコードをgit clone してインストール
pi@raspberrypi:~ $ git clone https://github.com/adafruit/Adafruit_Python_SSD1306.git
pi@raspberrypi:~ $ cd Adafruit_Python_SSD1306 $ sudo python setup.py install
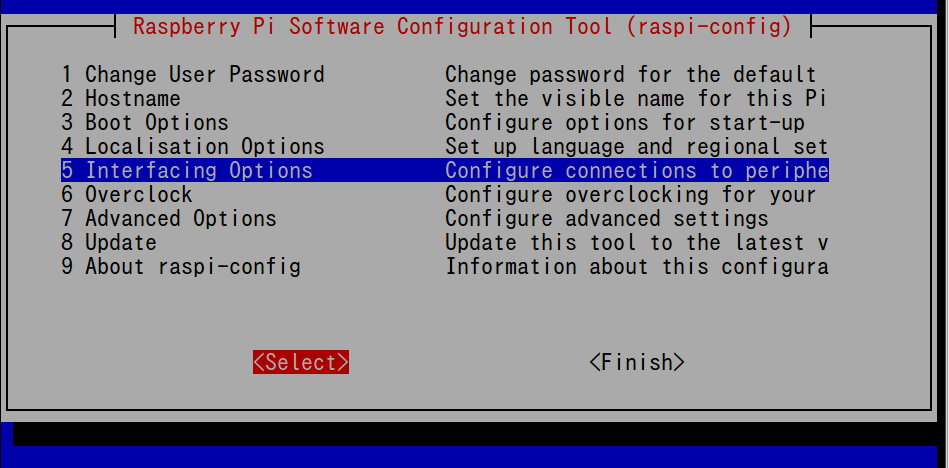
i2c を有効にする
pi@raspberrypi:~ $ sudo raspi-config
-
このような画面が出てくるので,5.Interfacing Options を選択して, →ボタンを押すと,<Select>が赤になるので,Enter押下
-
同じ要領で,P5 I2C をSelect

-
Would you like the ARM I2C interface to be enabled? と聞かれるので <はい>
-
The ARM I2C interface is enabled <了解>
-
Escでターミナルに戻って再起動し,SSHで再接続
pi@raspberrypi:~ $ sudo reboot
$ ssh pi@192.168.xxx.xxx
pi@raspberrypi:~ $
PiOLED接続
いったんラズパイをシャットダウンして,電源も抜く
pi@raspberrypi:~ $ sudo shutdown -h now
PiOLED装着
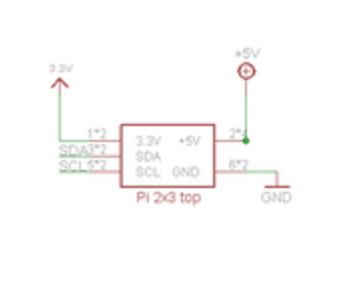
ディスプレイの回路図
を見ると,こうなっているので各ピンが合うように設置し,ラズパイの電源を入れる.
ラズパイ起動して,PiOLEDのアドレス 0x3c を確認
$ ssh pi@192.168.xxx.xxx
pi@raspberrypi:~ $ sudo i2cdetect -y 1

## こんな表示が出てきたらOK
 0 1 2 3 4 5 6 7 8 9 a b c d e f
00: -- -- -- -- -- -- -- -- -- -- -- -- --
10: -- -- -- -- -- -- -- -- -- -- -- -- -- -- -- --
20: -- -- -- -- -- -- -- -- -- -- -- -- -- -- -- --
30: -- -- -- -- -- -- -- -- -- -- -- -- 3c -- -- --
40: -- -- -- -- -- -- -- -- -- -- -- -- -- -- -- --
50: -- -- -- -- -- -- -- -- -- -- -- -- -- -- -- --
60: -- -- -- -- -- -- -- -- -- -- -- -- -- -- -- --
70: -- -- -- -- -- -- -- --
サンプルコード実行
pi@raspberrypi: cd ~/Tools/Adafruit_Python_SSD1306
$ sudo python examples/stats.py
IPアドレスやCPU Loadなんかが表示されたと思います!stats.pyの中を見ると,何をしてるかわかると思いますので覗いてください.
ただ,このままではループして表示し続けるので,Ctrl + C などで Killしてください.
ラズパイ起動時に表示
では,ラズパイ起動時に⇑のスクリプトを立ち上げ表示させて,ループはせずに終了させます.一度表示すれば液晶には表示されたままなので,問題ありません.
rc.local に追記
pi@raspberrypi:~ $ sudo nano /etc/rc.local
# 以下を 最終行の exit 0 の前に追記

# Display on PiOLED
sudo python /home/pi/Tools/Adafruit_Python_SSD1306/examples/my_stats.py &
(最後の & も書き忘れないように)
my_stats.py 作成
(名前は my_stats.py じゃなくても何でもいいので適当にしてください)
exampl/stats.py を参考に,やりたいことするスクリプトを書きましょう.
~/Tools/Adafruit_Python_SSD1306/examples $ cp stats.py my_stats.py
pythonの書き方はみなさんのお好きなように書かれるといいと思います.とりあえず私のアドホックなもので良ければどうぞ.
import time
import sys

import Adafruit_GPIO.SPI as SPI
import Adafruit_SSD1306

from PIL import Image
from PIL import ImageDraw
from PIL import ImageFont

import subprocess

# Raspberry Pi pin configuration:
RST = None     # on the PiOLED this pin isnt used
# Note the following are only used with SPI:
DC = 23
SPI_PORT = 0
SPI_DEVICE = 0

# Beaglebone Black pin configuration:
# RST = 'P9_12'
# Note the following are only used with SPI:
# DC = 'P9_15'
# SPI_PORT = 1
# SPI_DEVICE = 0

# 128x32 display with hardware I2C:
disp = Adafruit_SSD1306.SSD1306_128_32(rst=RST)

# 128x64 display with hardware I2C:
# disp = Adafruit_SSD1306.SSD1306_128_64(rst=RST)

# Note you can change the I2C address by passing an i2c_address parameter like:
# disp = Adafruit_SSD1306.SSD1306_128_64(rst=RST, i2c_address=0x3C)

# Alternatively you can specify an explicit I2C bus number, for example
# with the 128x32 display you would use:
# disp = Adafruit_SSD1306.SSD1306_128_32(rst=RST, i2c_bus=2)

# 128x32 display with hardware SPI:
# disp = Adafruit_SSD1306.SSD1306_128_32(rst=RST, dc=DC, spi=SPI.SpiDev(SPI_PORT, SPI_DEVICE, max_speed_hz=8000000))

# 128x64 display with hardware SPI:
# disp = Adafruit_SSD1306.SSD1306_128_64(rst=RST, dc=DC, spi=SPI.SpiDev(SPI_PORT, SPI_DEVICE, max_speed_hz=8000000))

# Alternatively you can specify a software SPI implementation by providing
# digital GPIO pin numbers for all the required display pins.  For example
# on a Raspberry Pi with the 128x32 display you might use:
# disp = Adafruit_SSD1306.SSD1306_128_32(rst=RST, dc=DC, sclk=18, din=25, cs=22)

# Initialize library.
disp.begin()

# Clear display.
disp.clear()
disp.display()

# Create blank image for drawing.
# Make sure to create image with mode '1' for 1-bit color.
width = disp.width
height = disp.height
image = Image.new('1', (width, height))

# Get drawing object to draw on image.
draw = ImageDraw.Draw(image)

# Draw a black filled box to clear the image.
draw.rectangle((0,0,width,height), outline=0, fill=0)

# Draw some shapes.
# First define some constants to allow easy resizing of shapes.
padding = -2
top = padding
bottom = height-padding
# Move left to right keeping track of the current x position for drawing shapes.
x = 0


# Load default font.
font = ImageFont.load_default()

# Alternatively load a TTF font.  Make sure the .ttf font file is in the same directory as the python script!
# Some other nice fonts to try: http://www.dafont.com/bitmap.php
# font = ImageFont.truetype('Minecraftia.ttf', 8)

# while True:
time.sleep(10) ## 下に説明があります.
if True:

    # Draw a black filled box to clear the image.
    draw.rectangle((0,0,width,height), outline=0, fill=0)

    # Shell scripts for system monitoring from here : https://unix.stackexchange.com/questions/119126/command-to-display-memory-usage-disk-usage-and-cpu-load
    cmd = "hostname -I | cut -d\' \' -f1"
    IP = subprocess.check_output(cmd, shell = True )
    cmd = "top -bn1 | grep load | awk '{printf \"CPU Load: %.2f\", $(NF-2)}'"
    CPU = subprocess.check_output(cmd, shell = True )
    cmd = "free -m | awk 'NR==2{printf \"Mem: %s/%sMB %.2f%%\", $3,$2,$3*100/$2 }'"
    MemUsage = subprocess.check_output(cmd, shell = True )
    cmd = "df -h | awk '$NF==\"/\"{printf \"Disk: %d/%dGB %s\", $3,$2,$5}'"
    Disk = subprocess.check_output(cmd, shell = True )

    # Write two lines of text.

    draw.text((x, top),       "IP: " + str(IP),  font=font, fill=255)
    draw.text((x, top+8),     str(CPU), font=font, fill=255)
    draw.text((x, top+16),    str(MemUsage),  font=font, fill=255)
    draw.text((x, top+25),    str(Disk),  font=font, fill=255)

    # Display image.
    disp.image(image)
    disp.display()
    time.sleep(.1)
    sys.exit()
time.sleep(10) を入れた理由:起動時,すぐに表示すると,四桁のIPではなく,もっと桁数の多いIPv6を表示させてします.マッピングを待つ時間として10秒待たせています.
再起動
$ sudo reboot
表示されましたか?
おつかれさまでしたー\(^o^)/
これで,どこででもラズパイモクモク出来ますね(ほんとか?)