Spriteとは
libGDXとはWindows/Mac/Linux/iPhone/Android/HTMLへ対応したクロスプラットフォームなゲーム用ライブラリです。
有名どころではIngressで使われていますね。
前回の最後に次からは高レベルAPIへいくと書いたが、あれは嘘だ。今回もまだ低レベルAPI。実際はゲームなどでも直接使うことは少ないと思われるが、基礎的な大事なところなので飛ばせない。特に非アクションならばまず使わないだろう。
そんなSpriteを軽く解説する。
これはシンプルな最小単位のオブジェクトとして管理、描画をするという意味。
画像を描画する場合、前回のTextureRegion、その前のTextureを利用することで行えた。ただし、単純な座標と拡大縮小以外は行えず、どちらのインスタンスかを意識する必要があった。Textureは1枚の画像を丸ごと使うのに対して、TextureRegionはその一部分。確かに描画する箇所は違うものの、両方とも同じ画像を表示するということで統一して扱いたい。
そういうときにSpriteはうってつけだ。
わかりやすく言うと、今までは座標や描画方法などをその都度設定してあげる必要性があったものが、スプライトを利用することによってスプライトのインスタンスに対して座標等を設定すると、あとは描画命令を発行するだけでその状態に合わせたものが描画される、といううこと。
使い方
SpriteのコンストラクタにTextureやTextureRegionのインスタンスを渡す。それだけ。
座標系のメソッドなどがたくさんあるので細かいことはJavaDocを見て確認してほしい。
ソース
画像は前回、前々回と同じものを用意してください。
package test.libgdx;

import com.badlogic.gdx.ApplicationListener;
import com.badlogic.gdx.Gdx;
import com.badlogic.gdx.backends.lwjgl.LwjglApplication;
import com.badlogic.gdx.files.FileHandle;
import com.badlogic.gdx.graphics.GL20;
import com.badlogic.gdx.graphics.Texture;
import com.badlogic.gdx.graphics.g2d.Sprite;
import com.badlogic.gdx.graphics.g2d.SpriteBatch;
import com.badlogic.gdx.graphics.g2d.TextureAtlas;

public class MainListener4 implements ApplicationListener{

    SpriteBatch batch;
    Sprite sp1;
    Sprite sp2;
    Sprite sp3;
    Sprite sp4;
    Sprite sp5;//テクスチャまるごと


    @Override
    public void create() {

        //テクスチャの一部分を描画
        {
            FileHandle fh = Gdx.files.internal("atlas/data.txt");
            TextureAtlas atlas = new TextureAtlas(fh);
            TextureAtlas.AtlasRegion region1 = atlas.findRegion("001");
            sp1 = new Sprite(region1);
            sp1.setPosition(0, 0);

            TextureAtlas.AtlasRegion region2 = atlas.findRegion("002");
            sp2 = new Sprite(region2);
            sp2.setPosition(200, 0);
            sp2.setAlpha(0.5f);//半透明

            TextureAtlas.AtlasRegion region3 = atlas.findRegion("003");
            sp3 = new Sprite(region3);
            sp3.setPosition(0, 200);
            sp3.setFlip(true, true);//上下と左右反転

            TextureAtlas.AtlasRegion region4 = atlas.findRegion("004");
            sp4 = new Sprite(region4);
            sp4.setPosition(200, 200);
            sp4.setColor(0, 0, 1, 1);//青成分のみ描画
        }

        //テクスチャを丸ごと1枚で描画
        {
            FileHandle fh = Gdx.files.internal("enemy.png");
            Texture texture = new Texture(Gdx.files.internal("enemy.png"));
            sp5 = new Sprite(texture);
            sp5.setScale(2);//拡大
            sp5.setRotation(45);//回転
            sp5.setPosition(100, 100);
        }


        batch = new SpriteBatch();
    }

    @Override
    public void resize(int w, int h) {
    }

    @Override
    public void render() {

        Gdx.gl.glClear(GL20.GL_COLOR_BUFFER_BIT);
        Gdx.gl.glClearColor(0, 0, 0, 1);

        batch.begin();

        sp5.draw(batch);//拡大回転ミミック

        sp1.draw(batch);//ノーマルのコボルト
        sp2.draw(batch);//半透明のスライム
        sp3.draw(batch);//上下左右反転のフェアリー
        sp4.draw(batch);//青成分のみのスケルトン

        batch.end();

    }

    @Override
    public void pause() {
    }

    @Override
    public void resume() {
    }

    @Override
    public void dispose() {
    }

    //起動部分
    public static void main(String[] args) {
        ApplicationListener listener = new MainListener4();
        new LwjglApplication(listener);
    }
}
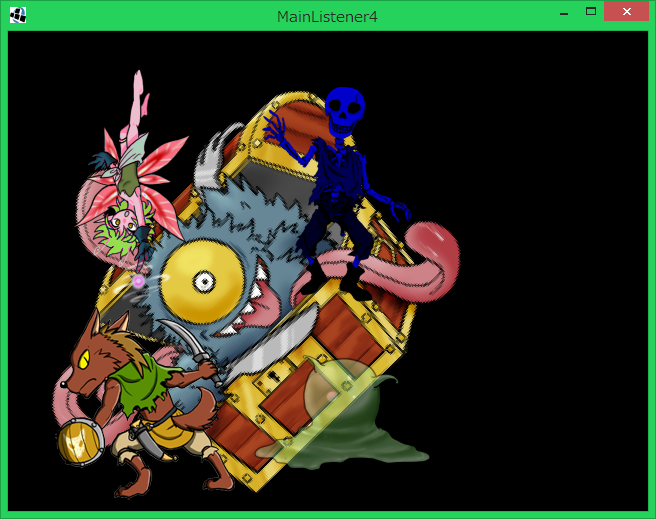
実行
- うしろに拡大+回転したミミック、
- 通常描画のコボルト
- 半透明のスライム
- 上下と左右を反転したフェアリー
- 青成分のみ有効にしたスケルトン
が描画された。2D描画のほとんどの機能はこれだけで大抵入ったのがわかると思う。
しかも、座標系などの情報はcreateメソッドの中で設定したのみ。それぞれのSpriteのインスタンスが保持している。そのため、描画部分(renderメソッド)がシンプルになっているのがわかる。
あとは座標等をそれぞれのSpriteのインスタンスに対して設定してあげるだけでキャラは動き出す。
前回、前々回のソースコードと見比べてみてほしい。
次こそ実際にアプリで利用することが多い高レベルAPIにいける・・・はず?
