Amazonが先日発表したオープンソースのDeep LearningライブラリのDSSTNE(デスティニーと読む)を↓のYouTubeのビデオを見ながらやってみました
Amazon Deep Scalable Sparse Tensor Network Engine (DSSTNE)

Setup on AWS
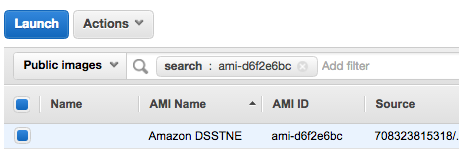
US East (N. Virginia)で GPUインスタンス(今回はg2.2xlarge)を ami-d6f2e6bc というAMIから起動します。
Public imagesでAMIを検索してLaunch
GPUということでg2インスタンス

SSHでインスタンスに接続
UbuntuなAMIなので、ユーザー名は ubuntu です。
$ ssh -i xxxx.pem ubuntu@ec2-xxx-xxx-xxx-xxx.compute-1.amazonaws.com
ls叩くと cuda とか出てきてそれっぽい感じ。
$ ls -l
total 12
drwxr-xr-x 11 ubuntu ubuntu 4096 Mar 30 01:42 NVIDIA_CUDA-7.0_Samples
drwxrwxr-x 2 ubuntu ubuntu 4096 Mar 30 01:39 cuda
drwxrwxr-x 8 ubuntu ubuntu 4096 Mar 30 01:27 installations
コードのダウンロードとビルド
git cloneして
$ git clone https://github.com/amznlabs/amazon-dsstne.git
Cloning into 'amazon-dsstne'...
remote: Counting objects: 550, done.
remote: Total 550 (delta 0), reused 0 (delta 0), pack-reused 550
Receiving objects: 100% (550/550), 894.06 KiB | 0 bytes/s, done.
Resolving deltas: 100% (255/255), done.
Checking connectivity... done.
ソースのディレクトリに移動して
$ cd amazon-dsstne/src/amazon/dsstne
cudaのツールを使えるようにしてから、
export PATH=/usr/local/openmpi/bin:/usr/local/cuda/bin:$PATH
makeすると、、、失敗します… (2016年9月13日 現在)
$ make
cd engine && make
************ RELEASE mode ************
make[1]: Entering directory `/home/ubuntu/amazon-dsstne/src/amazon/dsstne/engine'
mpiCC -DOMPI_SKIP_MPICXX -std=c++0x -O3 -I/usr/local/cuda/include -IB40C -IB40C/KernelCommon -I/usr/local/include -I/usr/local/openmpi/include -I/usr/include/jsoncpp -I../utils -I../engine -c NNTypes.cpp
In file included from NNTypes.cpp:13:0:
GpuTypes.h:23:19: fatal error: cudnn.h: No such file or directory
#include <cudnn.h>
^
compilation terminated.
make[1]: *** [NNTypes.o] Error 1
GithubのIssueみてみると、、、https://github.com/amznlabs/amazon-dsstne/issues/58
juliensimonさんという人が 9f08739 のブランチを使いなされ、と。(compute_60ってヤツがどうの、と…)
Quick fix (?) : branch at 9f08739. The next commit introduces architecture "compute_60" which is unsupported by the bundled 'nvcc' :-/
ということで↓に従って、対象のブランチをチェックアウトしてきて、、
Revised build instructions:
git clone https://github.com/amznlabs/amazon-dsstne.git
git branch stable 9f08739
git checkout stable
再度make。無事に進みはじめて、$?叩いたら0で返ってきました :)
$ make
cd engine && make
************ RELEASE mode ************
make[1]: Entering directory/home/ubuntu/amazon-dsstne/src/amazon/dsstne/engine' mpiCC -DOMPI_SKIP_MPICXX -std=c++0x -O3 -I/usr/local/cuda/include -IB40C -IB40C/KernelCommon -I/usr/local/include -I/usr/local/openmpi/include -I/usr/include/jsoncpp -I../utils -I../engine -c NNTypes.cpp mpiCC -DOMPI_SKIP_MPICXX -std=c++0x -O3 -I/usr/local/cuda/include -IB40C -IB40C/KernelCommon -I/usr/local/include -I/usr/local/openmpi/include -I/usr/include/jsoncpp -I../utils -I../engine -c NNWeight.cpp mpiCC -DOMPI_SKIP_MPICXX -std=c++0x -O3 -I/usr/local/cuda/include -IB40C -IB40C/KernelCommon -I/usr/local/include -I/usr/local/openmpi/include -I/usr/include/jsoncpp -I../utils -I../engine -c NNLayer.cpp mpiCC -DOMPI_SKIP_MPICXX -std=c++0x -O3 -I/usr/local/cuda/include -IB40C -IB40C/KernelCommon -I/usr/local/include -I/usr/local/openmpi/include -I/usr/include/jsoncpp -I../utils -I../engine -c NNNetwork.cpp mpiCC -DOMPI_SKIP_MPICXX -std=c++0x -O3 -I/usr/local/cuda/include -IB40C -IB40C/KernelCommon -I/usr/local/include -I/usr/local/openmpi/include -I/usr/include/jsoncpp -I../utils -I../engine -c GpuTypes.cpp nvcc -use_fast_math --ptxas-options="-v" -gencode arch=compute_50,code=sm_50 -gencode arch=compute_30,code=sm_30 -DOMPI_SKIP_MPICXX -std=c++11 -I/usr/local/cuda/include -IB40C -IB40C/KernelCommon -I/usr/local/include -I/usr/local/openmpi/include -I/usr/include/jsoncpp -I../utils -I../engine -c kernels.cu 〜略〜 mpiCC -o encoder Utils.o ParserUtils.o NetCDFhelper.o NNRecsGenerator.o Filters.o main.o ../lib/libdsstne.a -L/usr/lib/atlas-base -L/usr/local/cuda/lib64 -L. -L/usr/local/lib/ -lcurand -lcublas -lcudart -lmpi -lmpi_cxx -ljsoncpp -lnetcdf_c++4 -lnetcdf -l:libcblas.a -l:libatlas.a -ldl -lstdc++ cp encoder ../bin/ make[1]: Leaving directory/home/ubuntu/amazon-dsstne/src/amazon/dsstne/utils'
最後にパス通してセットアップはおしまい。
export PATH=
pwd/bin:$PATH
MovieLensのデータを使った学習とレコメンデーション
データの元ネタは http://grouplens.org/datasets/movielens/ の20M Datasetってヤツ。
データの取得およびinput dataの生成
wgetでデータを取ってきて、
$ mkdir movies
$ cd movies/
$ wget https://s3-us-west-2.amazonaws.com/amazon-dsstne-samples/data/ml20m-all
ニューラルネットワーク用にinput dataを生成
$ generateNetCDF -d gl_input -i ml20m-all -o gl_input.nc -f features_input -s samples_input -c
ここではDSSTNEエンジンが解釈できるNetCDFというファイルと、それぞれのニューロンのインデックスファイルであるfeatures_inputと、全てのサンプルのインデックスファイルであるsamples_inputが生成されるって書いてありました。
gl_input.nc : NetCDF file in the format which DSSTNE Engine understand
features_input : An index file with the indexes of each neuron
samples_input : An index file with the indexes of all samples
ログみてるとそれっぽい感じ
Generating dataset of type: indicator
Will create a new samples index file: samples_input
Will create a new features index file: features_input
Indexing 1 files
Indexing file: ml20m-all
Progress Parsing10000Time 2.44202
Progress Parsing20000Time 2.31611
Progress Parsing30000Time 2.35452
Progress Parsing40000Time 2.27897
Progress Parsing50000Time 2.31182
Progress Parsing60000Time 2.37012
Progress Parsing70000Time 2.32451
Progress Parsing80000Time 2.3533
Progress Parsing90000Time 2.42208
Progress Parsing100000Time 2.33698
Progress Parsing110000Time 2.32099
Progress Parsing120000Time 2.40413
Progress Parsing130000Time 2.31568
Exported features_input with 26744 entries.
Exported samples_input with 138493 entries.
Raw max index is: 26744
Rounded up max index to: 26752
Created NetCDF file gl_input.nc for dataset gl_input
Total time for generating NetCDF: 34.4124 secs.
output dataの生成
inputと同様にコマンドを叩いて、
$ generateNetCDF -d gl_output -i ml20m-all -o gl_output.nc -f features_output -s samples_input -c
Please ensure that the number of examples and the examples are the same between the input and the outputって書いてあるので、比較しておきます。
・input
Raw max index is: 26744
Rounded up max index to: 26752
Created NetCDF file gl_input.nc for dataset gl_input
・output
Raw max index is: 26744
Rounded up max index to: 26752
Created NetCDF file gl_output.nc for dataset gl_output
inputとoutputの出来上がり。
大丈夫そうなので進みます。
$ ls -l
total 463856
-rw-rw-r-- 1 ubuntu ubuntu 855 Apr 1 18:56 config.json
-rw-rw-r-- 1 ubuntu ubuntu 306845 Sep 13 06:05 features_input
-rw-rw-r-- 1 ubuntu ubuntu 306845 Sep 13 06:12 features_output
-rw-rw-r-- 1 ubuntu ubuntu 81115936 Sep 13 06:05 gl_input.nc
-rw-rw-r-- 1 ubuntu ubuntu 81115937 Sep 13 06:12 gl_output.nc
-rw-rw-r-- 1 ubuntu ubuntu 310410427 Apr 1 18:58 ml20m-all
-rw-rw-r-- 1 ubuntu ubuntu 1716687 Sep 13 06:05 samples_input
Train(いよいよ学習)
3つのレイヤのニューラルネットワークを学習します。仕様はJSONに記載する感じ。
JSONは↓こちらですが、
https://s3-us-west-2.amazonaws.com/amazon-dsstne-samples/configs/config.json
レイヤーに関しては↓こんな感じ。128ノードで、シグモイド関数。
"Layers" : [
        { "Name" : "Input", "Kind" : "Input", "N" : "auto", "DataSet" : "gl_input", "Sparse" : true },
        { "Name" : "Hidden", "Kind" : "Hidden", "Type" : "FullyConnected", "N" : 128, "Activation" : "Sigmoid", "Sparse" : true },
        { "Name" : "Output", "Kind" : "Output", "Type" : "FullyConnected", "DataSet" : "gl_output", "N" : "auto", "Activation" : "Sigmoid", "Sparse" : true }
    ],
ちなみに、ローンチ当初はSingle-GPU Modelingしかできなかったのが、今ではProduction用途で使えるように↓こんな感じでサポートしてます、と。
Multi-GPU Scale: Training and prediction both scale out to use multiple GPUs, spreading out computation and storage in a model-parallel fashion for each layer.
Large Layers: Model-parallel scaling enables larger networks than are possible with a single GPU.
Sparse Data: DSSTNE is optimized for fast performance on sparse datasets. Custom GPU kernels perform sparse computation on the GPU, without filling in lots of zeroes.
前置きはそれくらいにして、さっそく学習させてみます。
$ train -c config.json -i gl_input.nc -o gl_output.nc -n gl.nc -b 256 -e 10
〜略〜
NNetwork::Train: Epoch 10, average error 350.244080, average training error 348.062836, average regularization error 2.181255, elapsed time 9.065056s
NNNetwork::Train: saving checkpoint gl.nc10.nc
Total Training Time 90.7254GPU Memory Usage: 372826 KB
CPU Memory Usage: 0 KB
NNLayer::Allocate: Deallocating all data for layer Input
NNLayer::Allocate: Deallocating all data for layer Hidden
NNLayer::Allocate: Deallocating all data for layer Output
アウトプットとしては、1行毎にユーザーがいつどの映画を、といった形。
14万弱くらいのユーザーっぽいですね。
$ wc -l ml20m-all
138493 ml20m-all
ということで、モデル作りが終わりました。
Prediction(レコメンデーション)
それぞれのサンプルのトップ10のレコメンデーション結果を取得。
predict -b 1024 -d gl -i features_input -o features_output -k 10 -n gl.nc -f ml20m-all -s recs -r ml20m-all
映画のレコメンデーションがrecsに出力されました。
ユーザー数的にも大丈夫そう。
$ wc -l recs
138493 recs
中身をみてみると、、それぞれのユーザー毎に10個の映画をレコメンド〜
↓のような並び順になっています。
ユーザーID 映画ID,スコア:映画ID,スコア:映画ID,スコア ...
$ more recs
1 2571,0.904:1206,0.864:1210,0.853:1270,0.794:1274,0.668:592,0.661:6874,0.652:1197,0.631:5618,0.612:3793,0.
611:
2 1200,0.464:1240,0.460:1097,0.361:1127,0.288:32,0.265:593,0.251:2571,0.240:2628,0.237:1198,0.211:780,0.200
:
3 2716,0.878:1580,0.874:1527,0.811:2021,0.801:750,0.799:1371,0.776:1387,0.705:3471,0.689:2174,0.679:1320,0.
671:
4 500,0.562:597,0.532:457,0.527:587,0.414:780,0.372:592,0.371:442,0.355:344,0.329:539,0.317:364,0.275:
5 356,0.963:1,0.878:539,0.841:597,0.811:527,0.735:586,0.653:357,0.653:592,0.617:34,0.570:733,0.558: