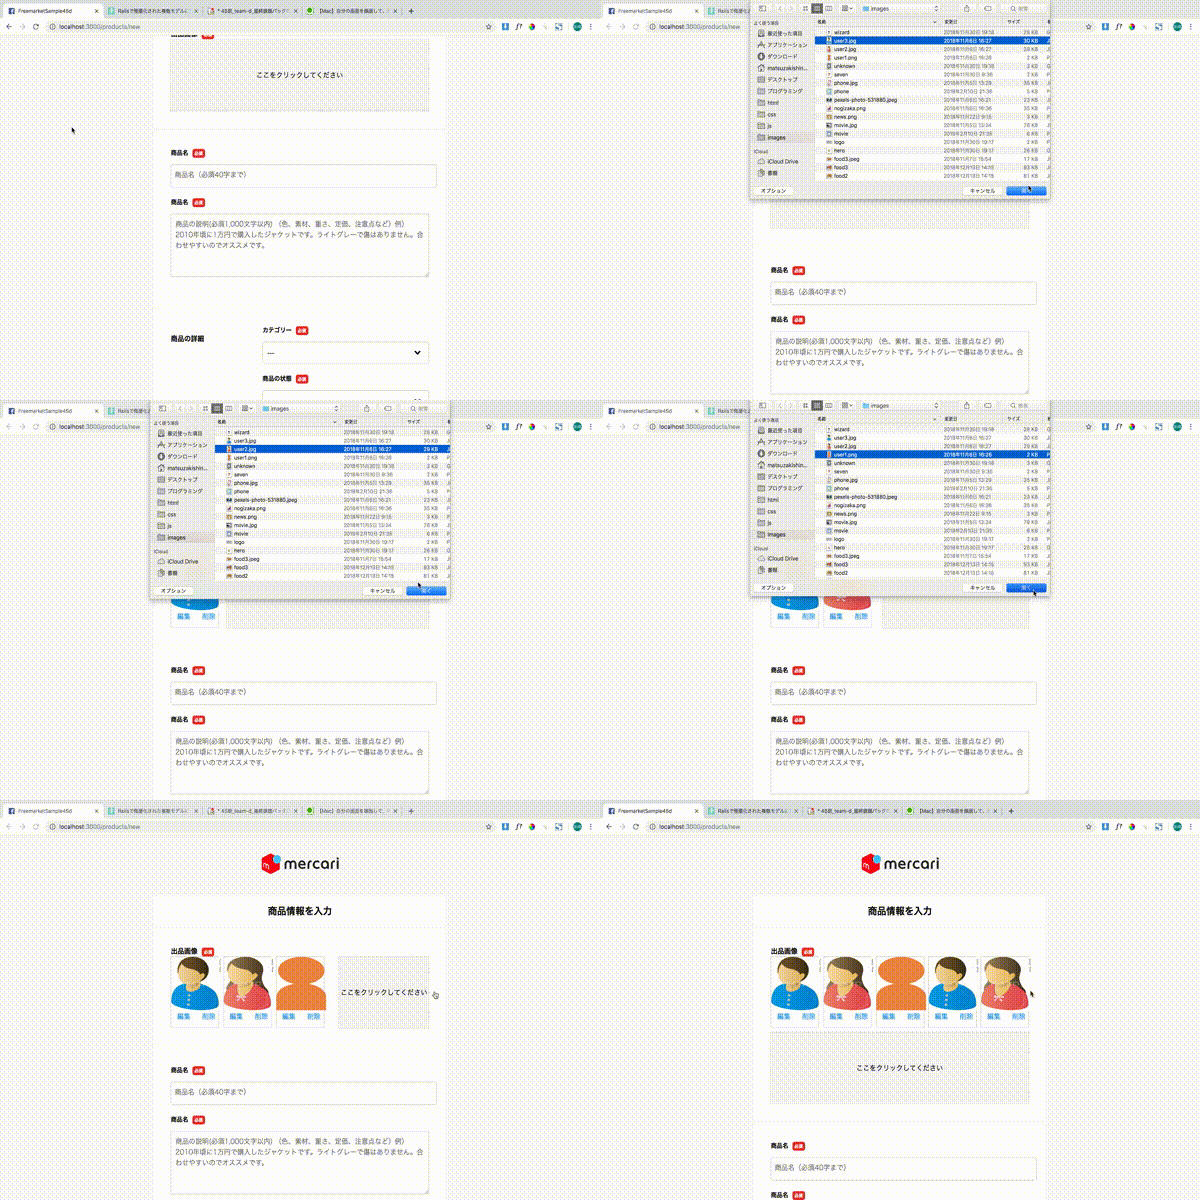
某プログラミングスクールの最終課題で某フリマアプリのクローンを作り、その中でも出品画面における画像の投稿が大変だったので忘れないために記事を書くことにしました。
環境
- ruby 2.3.1
- rails 5.0.1
やりたいこと
- ネストしたフォームにおける画像の複数投稿
モデル同士の関係は以下の通りです
# product.rb
 has_many :product_images, dependent: :destroy
 accepts_nested_attributes_for :product_images
# product_images.rb
  belongs_to :product, optional: true
留意点
- 一応動きますよというだけでいい方法かは保証できません。
- 画像の削除において画像の削除する順番によっては削除できない時があった。(基本消せる)
まあ以上のことがあるのですが参考になればなあと思います。
  = form_for @product, html: {class: "sell-form dropzone", id: "item-dropzone"} do |f|
    %h2.sell-form__header
      商品情報を入力
    .sell-form-container
      %label.sell-form-container__label
        出品画像
      %span.sell-form-container__require
        必須
      = f.fields_for :product_images do |image|
        .dropzone-container.clearfix
          #preview
          .dropzone-area
            = image.label :image, class: "dropzone-box", for: "upload-image" do
              .input_area
                = image.file_field :image, multiple: true, name: 'product_images[image][]', id: "upload-image", class: "upload-image", 'data-image': 0
              %p ここをクリックしてください
          #preview2
          .dropzone-area2
            = image.label :image, class: "dropzone-box", for: "upload-image" do
              %p ここをクリックしてください
ビューはこんな感じです。ネストさせるためにneste_fields_forを使っています
$(document).on('turbolinks:load', function(){
  var dropzone = $('.dropzone-area');
  var dropzone2 = $('.dropzone-area2');
  var dropzone_box = $('.dropzone-box');
  var images = [];
  var inputs  =[];
  var input_area = $('.input_area');
  var preview = $('#preview');
  var preview2 = $('#preview2');

  $(document).on('change', 'input[type= "file"].upload-image',function(event) {
    var file = $(this).prop('files')[0];
    var reader = new FileReader();
    inputs.push($(this));
    var img = $(`<div class= "img_view"><img></div>`);
    reader.onload = function(e) {
      var btn_wrapper = $('<div class="btn_wrapper"><div class="btn edit">編集</div><div class="btn delete">削除</div></div>');
      img.append(btn_wrapper);
      img.find('img').attr({
        src: e.target.result
      })
    }
    reader.readAsDataURL(file);
    images.push(img);

    if(images.length >= 5) {
      dropzone2.css({
        'display': 'block'
      })
      dropzone.css({
        'display': 'none'
      })
      $.each(images, function(index, image) {
        image.attr('data-image', index);
        preview2.append(image);
        dropzone2.css({
          'width': `calc(100% - (135px * ${images.length - 5}))`
        })
      })
      if(images.length == 9) {
        dropzone2.find('p').replaceWith('<i class="fa fa-camera"></i>')
      }
    } else {
        $('#preview').empty();
        $.each(images, function(index, image) {
          image.attr('data-image', index);
          preview.append(image);
        })
        dropzone.css({
          'width': `calc(100% - (135px * ${images.length}))`
        })
      }
      if(images.length == 4) {
        dropzone.find('p').replaceWith('<i class="fa fa-camera"></i>')
      }
    if(images.length == 10) {
      dropzone2.css({
        'display': 'none'
      })
      return;
    }
    var new_image = $(`<input multiple= "multiple" name="product_images[image][]" class="upload-image" data-image= ${images.length} type="file" id="upload-image">`);
    input_area.prepend(new_image);
  });
  $(document).on('click', '.delete', function() {
    var target_image = $(this).parent().parent();
    $.each(inputs, function(index, input){
      if ($(this).data('image') == target_image.data('image')){
        $(this).remove();
        target_image.remove();
        var num = $(this).data('image');
        images.splice(num, 1);
        inputs.splice(num, 1);
        if(inputs.length == 0) {
          $('input[type= "file"].upload-image').attr({
            'data-image': 0
          })
        }
      }
    })
    $('input[type= "file"].upload-image:first').attr({
      'data-image': inputs.length
    })
    $.each(inputs, function(index, input) {
      var input = $(this)
      input.attr({
        'data-image': index
      })
      $('input[type= "file"].upload-image:first').after(input)
    })
    if (images.length >= 5) {
      dropzone2.css({
        'display': 'block'
      })
      $.each(images, function(index, image) {
        image.attr('data-image', index);
        preview2.append(image);
      })
      dropzone2.css({
        'width': `calc(100% - (135px * ${images.length - 5}))`
      })
      if(images.length == 9) {
        dropzone2.find('p').replaceWith('<i class="fa fa-camera"></i>')
      }
      if(images.length == 8) {
        dropzone2.find('i').replaceWith('<p>ココをクリックしてください</p>')
      }
    } else {
      dropzone.css({
        'display': 'block'
      })
      $.each(images, function(index, image) {
        image.attr('data-image', index);
        preview.append(image);
      })
      dropzone.css({
        'width': `calc(100% - (135px * ${images.length}))`
      })
    }
    if(images.length == 4) {
      dropzone2.css({
        'display': 'none'
      })
    }
    if(images.length == 3) {
      dropzone.find('i').replaceWith('<p>ココをクリックしてください</p>')
    }
  })
});
javascriptはこんな感じです。jqueryで書きました。
コードを区切って説明していきたいと思います。
  $(document).on('change', 'input[type= "file"].upload-image',function(event) {
    var file = $(this).prop('files')[0];
    var reader = new FileReader();
    inputs.push($(this));
    var img = $(`<div class= "img_view"><img></div>`);
    reader.onload = function(e) {
      var btn_wrapper = $('<div class="btn_wrapper"><div class="btn edit">編集</div><div class="btn delete">削除</div></div>');
      img.append(btn_wrapper);
      img.find('img').attr({
        src: e.target.result
      })
    }
    reader.readAsDataURL(file);
    images.push(img);
ここではfile_fieldで選択されたファイルを読み込んでプレビュー画像を作っています。
FileReader オブジェクトは選択した画像を読み込むためのオブジェクトでreaderAsDataURLに引数でファイルを渡してあげることでreader.onloadから先の関数が動きます。
そして画像と一緒にそれを消すようの削除ボタンを編集ボタンも一緒に作っておきます(今回は編集ボタンは機能しません。)
そしてこの時に使ったinputタグとimmageはそれぞれ配列に入れておき、後で画像を削除する時に使います。
var new_image = $(`<input multiple= "multiple" name="product_images[image][]" class="upload-image" data-image= ${images.length} type="file" id="upload-image">`);
input_area.prepend(new_image);
画像を読み込んだら新しいinputタグを作ります。そうすることで複数枚の写真のparameterを送ることがきます。(ただし同じidをもつinputタグが複数できてしまうのでそこが大丈夫かはよくわかりません。)
そしてinputタグを集めておくためのinput_areaにprependしていきます。
同じタグがあった場合先に存在している方が読まれるらしく,appendではなく要素を前に入れていくprependを使うことにしました。
画像の削除
 $(document).on('click', '.delete', function() {
    var target_image = $(this).parent().parent();
    $.each(inputs, function(index, input){
      if ($(this).data('image') == target_image.data('image')){
        $(this).remove();
        target_image.remove();
        var num = $(this).data('image');
        images.splice(num, 1);
        inputs.splice(num, 1);
        if(inputs.length == 0) {
          $('input[type= "file"].upload-image').attr({
            'data-image': 0
          })
        }
      }
    })
ここら辺が画像の削除に関するコードです。先ほどつけた削除ボタンを押すと発火します。
イメージとしてはdeleteボタンの親の親要素、つまり画像と同じdata-imageの値を持つをinputタグを繰り返しを使って探して消すという作業をしています。
それより下のコードは画像を消して新しく画像を追加していくと写真に持たせているdata-imageの値がズレてくるのでそれを調整するために再度くる返しを使ってdata-imageを入れ直しています。
コントローラーのコードはこんな感じ
  def new
    @product = Product.new
    @product.product_images.build
  end

  def create
    @product = Product.new(product_parameter)
    respond_to do |format|
      if @product.save
          params[:product_images][:image].each do |image|
            @product.product_images.create(image: image, product_id: @product.id)
          end
        format.html{redirect_to root_path}
      else
        @product.product_images.build
        format.html{render action: 'new'}
      end
    end
  end

  def product_parameter
    params.require(:product).permit(:name, :description, :first_category_id, :second_category_id, :third_category_id, :size, :product_status, :delivery_fee, :prefecture_id, :lead_time, :price, :transaction_status, product_images_attributes: [:image]).merge(user_id: current_user.id)
  end
newアクションで@product.product_images.buildの記述をすることでネストしたモデルのデータを保存することが来ます。
送られてきた画像の配列を繰り返してで分解して一つ一つの画像を違うレコードとしてデータベースに保存しているという形になります。
こんな感じに動きます。
説明は追加するかもしれませんがとりあえず以上です。
参考にしたサイト
https://kolosek.com/carrierwave-upload-multiple-images/

