はじめに Autoencoderと本稿をメモする動機
Autoencoderは深層学習で重要な手法の一つになっています。Autoencoderはデータを教師なし(正確には自己学習)で圧縮する手法で、次元圧縮や異常検知などいろんな応用例があります。
この手法のバリエーションは色々ありますので、ここにそれぞれの手法の特徴、実装方法を整理します。自分の備忘のためにも、いろんなバリエーションの特徴とKerasでの実装方法をここにメモします。
以下のサイト、書籍を参考にしています。
Building AutoEncoders in keras Official Blog(以下Keras公式ブログ)
Advanced Deep Learning with Keras
オートエンコーダーを学習するコードはほぼこの2つの通りですが、精度評価などは独自に作ったりしています。また、Keras公式ブログでおかしいと思った事項も書いています。参考にしていただいたりコメントいただけると助かります。
Autoencoder 1 最もシンプルなAutoencoder
全結合層だけからなるシンプルなautoencoderです。コードはKeras公式ブログほぼそのままです。
optimizerは"adam"に変更しています。
まず、モデルを定義する部分のコードです。
from keras.layers import Input, Dense
from keras.models import Model

# this is the size of our encoded representations
encoding_dim = 32  # 32 floats -> compression of factor 24.5, assuming the input is 784 floats

# this is our input placeholder
input_img = Input(shape=(784,))
# "encoded" is the encoded representation of the input
encoded = Dense(encoding_dim, activation='relu')(input_img)
# "decoded" is the lossy reconstruction of the input
decoded = Dense(784, activation='sigmoid')(encoded)

# this model maps an input to its reconstruction
autoencoder = Model(input_img, decoded)

# Encoder (Input_imgからencoded)までのモデルを定義
# this model maps an input to its encoded representation
encoder = Model(input_img, encoded)

# Decoder部分のモデルを定義
# create a placeholder for an encoded (32-dimensional) input
encoded_input = Input(shape=(encoding_dim,))
# retrieve the last layer of the autoencoder model
decoder_layer = autoencoder.layers[-1]
# create the decoder model
decoder = Model(encoded_input, decoder_layer(encoded_input))

# optimizerにAdamを使う。learning rateはデフォルトの値を使う
from keras.optimizers import Adam
# adam = keras.optimizers.Adam(lr=0.001)
adam = Adam(lr=0.001)
autoencoder.compile(optimizer=adam, loss='binary_crossentropy')

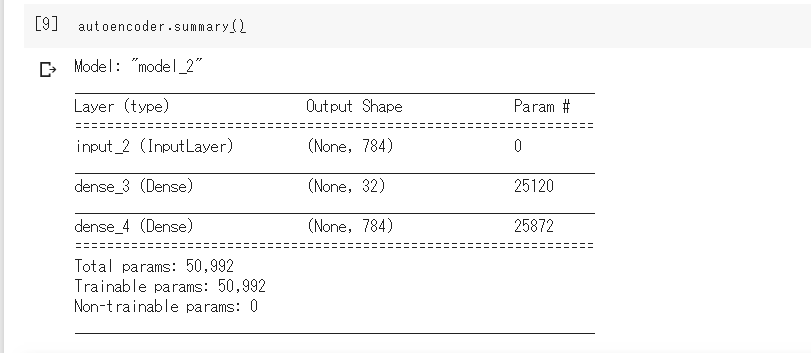
autoencoder.summary()
最後の行を実行すると、次のようにモデルの構造が出力されます。いたってシンプルです。

MNISTデータを読み込んで、学習を実行するまでは以下の通りです。
# MNISTデータの読み込み
from keras.datasets import mnist
import numpy as np
(x_train, _), (x_test, _) = mnist.load_data()

x_train = x_train.astype('float32') / 255.
x_test = x_test.astype('float32') / 255.
print(x_train.shape)
print(x_test.shape)

print(x_train.shape[1:])


x_train = x_train.reshape((len(x_train), np.prod(x_train.shape[1:])))
x_test = x_test.reshape((len(x_test), np.prod(x_test.shape[1:])))
print(x_train.shape)
print(x_test.shape)

# 学習の実行
history = autoencoder.fit(x_train, x_train,
                epochs=50,
                batch_size=256,
                shuffle=True,
                validation_data=(x_test, x_test))
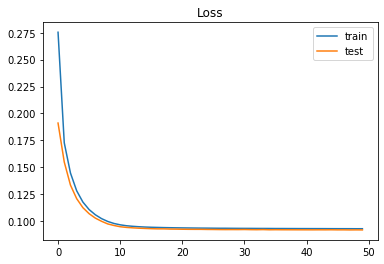
エポックごとの損失(Loss)の推移です。いい感じで学習できています。
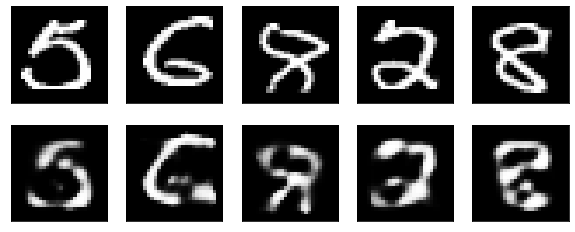
もとの手書き数字(上)と、Autoencoderで復元した数字(下)の比較です。シンプルなモデルなので、細かいところは復元できていませんね。

optimizerをadamではなく、公式ブログのままadadeltaにしていたら、うまく学習できなかった。この原因はまだわかっていません。突き止められたらお知らせします。
復元の誤差を自己流に求めてみる
ここはKeras公式ブログには記載されていない自分流の検証です。作ったモデルの精度をデータごとに評価してみます。
import numpy as np
import pandas as pd

# 各データの誤差を保持するリスト
error_list = []
# テストデータ全体の誤差
sum_error = 0

for ii in range(len(x_test)):
    #誤差をユークリッド距離で評価
    error_tmp = np.linalg.norm(x_test[ii] - decoded_imgs[ii])

    error_list.append( error_tmp )
    sum_error += error_tmp

print(sum_error)

df_error = pd.DataFrame(error_list, columns=['error'])
df_error.sort_values(by='error', ascending=False)
sum_errorは26329.98と求まりました。
また、誤差が大きかったもの上位5つの元の手書き数字と再現データを比較してみました。

誤差が大きく再現が悪かったものは、元の手書きも少し汚いですね。(MNISTにこういうデータもあったんだ)
Keras公式ブログの誤り?
損失関数に binary cross entropyを使っているのですが、これは主に2値クラス分類で使われるのではなかったか?
0-255までのデータを255で割って[0,1]に規格化してはいるが、0と1の2値クラス分類ではないのでおかしいのでは?。
Advanced Depp Learning with Keras の方では損失関数にmse(mean squared error : 平均二乗誤差)を使っています。やっぱりそうだよな。
というわけで、損失関数をmseにして実行してみました。変更したのは以下の箇所。
# 損失関数は平均二乗誤差(mse)
autoencoder.compile(optimizer=adam, loss='mse')
この場合、sum_errorは26326.41で、lossにcross_entropyを使っていた時よりわずかに0.014%誤差が小さくなりました。Keras公式ブログそのままでも結果は殆ど変わりません。でも、個人的に気持ちが悪いので以下でもmseを使うことにします。
Autoencoder 2 最もシンプルなAutoencoderを疎にする
圧縮された次元をよりシンプルにするため、正則化項を入れて学習します。ユニットの係数を評価して損失を小さくしようとしても、正則化項があるため係数の一部は0となるような力が働き、発火するユニットの数が減ります。
係数が0となるようにすることが目的ですので、l1正則化を用います。このあたりの話は「正則化の種類と目的 L1正則化 L2正則化について」などを参照してください。
上のコードの最上部を次のように変更します。
from keras.layers import Input, Dense
from keras.models import Model
# regularizerを追加
from keras import regularizers

# this is the size of our encoded representations
encoding_dim = 32  # 32 floats -> compression of factor 24.5, assuming the input is 784 floats

# this is our input placeholder
input_img = Input(shape=(784,))
# "encoded" is the encoded representation of the input
# l1正則化を追加
encoded = Dense(encoding_dim, activation='relu',activity_regularizer=regularizers.l1(10e-7))(input_img)
# "decoded" is the lossy reconstruction of the input
decoded = Dense(784, activation='sigmoid')(encoded)

# this model maps an input to its reconstruction
autoencoder = Model(input_img, decoded)
Keras公式ブログではencoded_imgs.mean()、つまり圧縮されたデータの平均値で、どれだけ疎な表現になっているかを評価しています。ここでもこれに倣ってみます。
正則化を加えないとき encoded_imgs.mean()=8.84267
正則化を加えたとき encoded_imgs.mean()=0.4759977
とだいぶ疎な表現になっています。復元した結果を見ると、上の結果と殆ど変わりませんので、効果はあったと言えます。

上と同じように自流で求めたsum_errorは28292.64で、上の結果より約7%悪くなっています。この程度の精度を犠牲にしても次元圧縮したいときには使える手法だと思います。
続きは別の稿に起こしたいと思います。
