初めに
OpenCVで提供されるフィルタリング処理について調べてみました
動作環境
Python3,OpenCV
単純平滑化(ぼかし・ブラー)処理
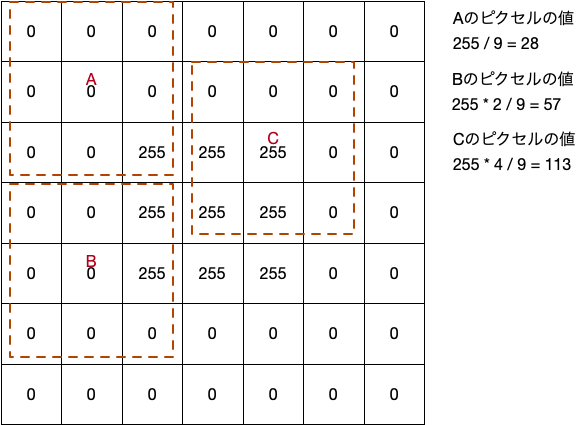
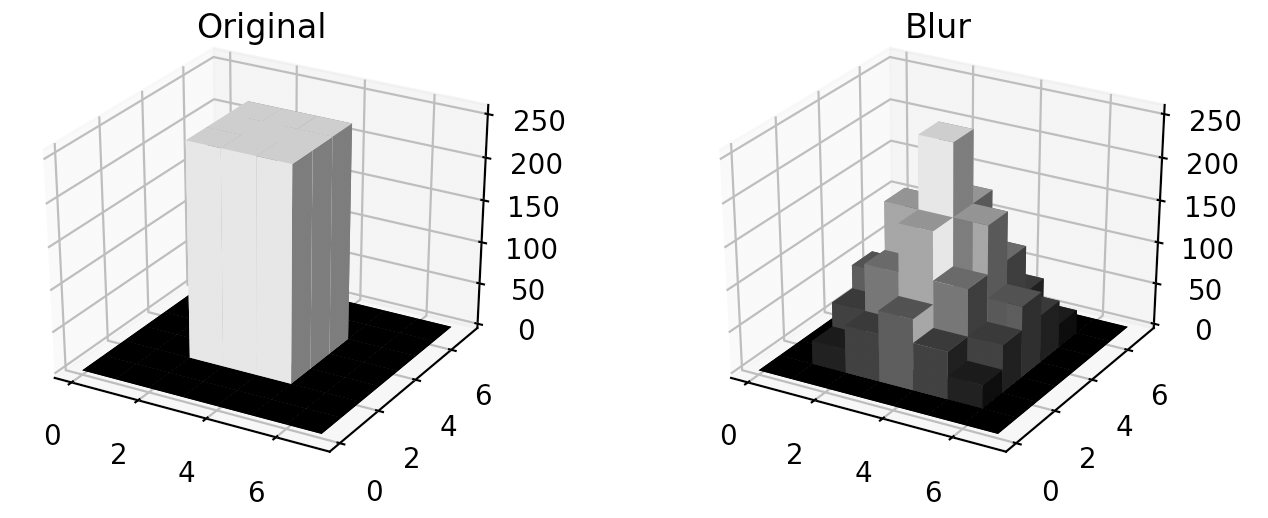
オリジナルの画像は以下のデータ(グレースケール)であるとして、単純平滑化(ブラー)を行います

単純平滑化は、それぞれのピクセルを囲む複数のピクセルの長方形の単純平均を、そのピクセルの値とします
ここでは長方形のサイズを(3*3)としている為に以下のように計算されます

import numpy as np
import cv2 as cv
import matplotlib.pyplot as plt
import matplotlib.colors as colors
import matplotlib.cm as cm

black = [0x00, 0x00, 0x00]
white = [0xFF, 0xFF, 0xFF]

img = np.array([
                [black, black, black, black, black, black, black]
                ,[black, black, black, black, black, black, black]
                ,[black, black, white, white, white, black, black]
                ,[black, black, white, white, white, black, black]
                ,[black, black, white, white, white, black, black]
                ,[black, black, black, black, black, black, black]
                ,[black, black, black, black, black, black, black]
                ]
                , dtype=np.uint8)

# グレースケール化
img = cv.cvtColor(img, cv.COLOR_RGB2GRAY)

# グラフ描画域
fig = plt.figure(figsize=(8, 3))
ax1 = fig.add_subplot(121, projection='3d')
ax2 = fig.add_subplot(122, projection='3d')

# X,Y
_x = np.arange(img.shape[1])
_y = np.arange(img.shape[0])
_xx, _yy = np.meshgrid(_x, _y)
x, y = _xx.ravel(), _yy.ravel()
width = depth = 1

# 高さ
top = img.ravel()
bottom = np.zeros_like(top)

# 0-255 を 0.0-1.0に変換する関数の定義(グレースケール表示の為)
norm = colors.Normalize(0, 255)

# オリジナル
color_values = cm.gray(top.tolist())
ax1.bar3d(x, y, bottom, width, depth, top, color=color_values)
ax1.set_title('Original')

# Blur(カーネルサイズ 3*3)
blurImg = cv.blur(img, (3, 3))
top = blurImg.ravel()
color_values = cm.gray(norm(top.tolist()))
ax2.bar3d(x, y, bottom, width, depth, top, color=color_values)
ax2.set_title('Blur')

plt.show()


メディアンフィルタ処理
メディアンフィルタは、それぞれのピクセルを囲む長方形の中間値を、そのピクセルの値とします

# medianBlur(カーネルサイズ 3*3)
mBlurImg = cv.medianBlur(img, 3)
top = mBlurImg.ravel()
color_values = cm.gray(norm(top.tolist()))
ax2.bar3d(x, y, bottom, width, depth, top, color=color_values)
ax2.set_title('medianBlur')


Gaussian(ガウシアン)フィルタ処理
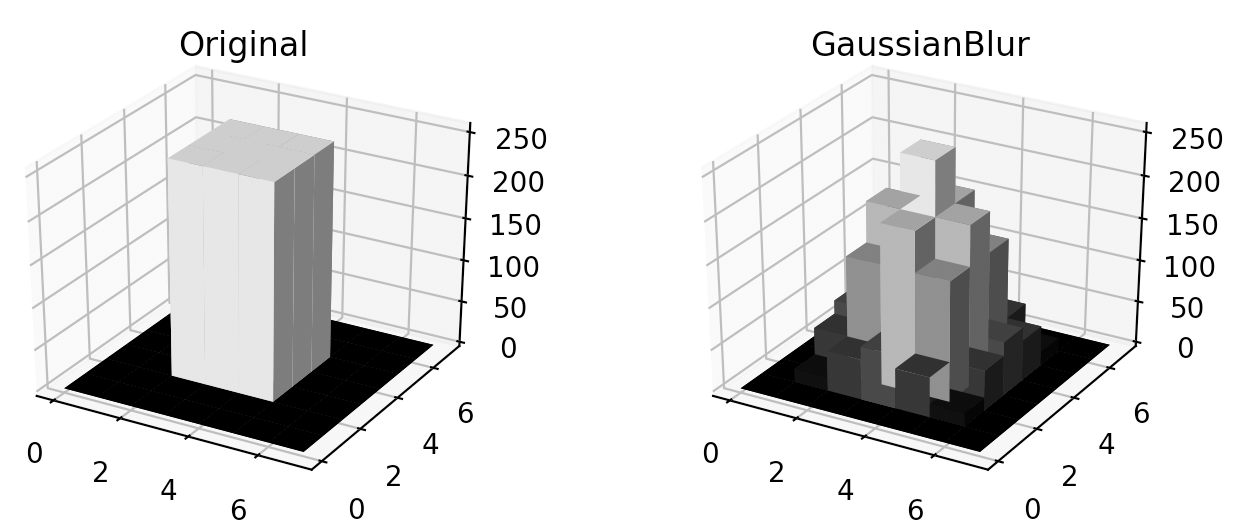
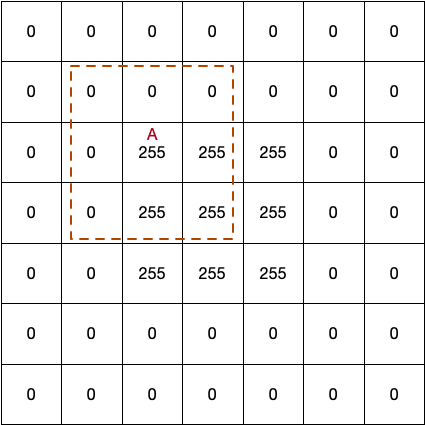
ガウシアンフィルタは、それぞれのピクセルを囲む長方形にガウスカーネルと呼ばれる行列を乗じて、その合計値をそのピクセルの値とします
ここで用いている3*3のガウスカーネルは以下のようになります
\begin{pmatrix}
1/16 & 2/16 & 1/16 \\
2/16 & 4/16 & 2/16 \\
1/16 & 2/16 & 1/16
\end{pmatrix}
PixelAは以下のように計算されます
import numpy as np

pixelA = np.array([[0, 0, 0]
                   ,[0, 255, 255]
                   ,[0, 255, 255]])
gaussKernel = np.array([[1/16, 2/16, 1/16]
                        ,[2/16, 4/16, 2/16]
                        ,[1/16, 2/16, 1/16]])
print(sum(sum(pixelA * gaussKernel)))
# 143
# GaussianBlur
gBlurImg = cv.GaussianBlur(img, (3, 3), 0, 0)
top = gBlurImg.ravel()
color_values = cm.gray(norm(top.tolist()))
ax2.bar3d(x, y, bottom, width, depth, top, color=color_values)
ax2.set_title('GaussianBlur')


