この記事はリンク情報システムの2018年アドベントカレンダーのリレー記事です。
engineer.hanzomon のグループメンバによってリレーされます。
(リンク情報システムのFacebookはこちらから)
はじめに
アドベントカレンダー13日目担当の@shinevillageです。主にJavaによるWebアプリの開発を担当しています。
今回は、とあるお仕事を担当した際、テスト用ツールとして、Javaでリバースプロキシを作った話をします。
なぜ作ったのか?
「リバースプロキシ」というと、どちらかというと、インフラ系の方々の方がなじみ深いイメージのあるものですが、Web開発者にとっても、時々欲しくなる場合があります。(「そもそもリバースプロキシって何?」という方はこちら)
私の場合は、以下の構成のアプリのテストを行うにあたり、クロスドメイン問題が勃発したため、欲しくなったという経緯です。
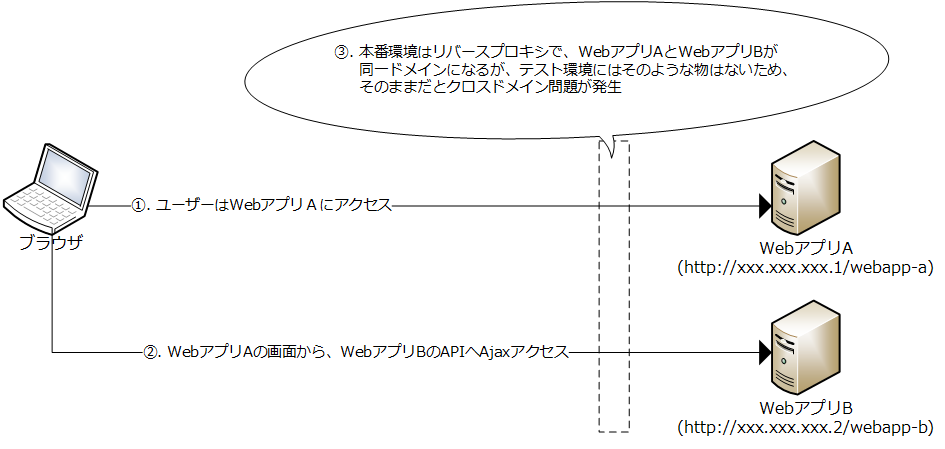
リバースプロキシの構築には、ApacheやNginxを使うのが最もポピュラーであるかと思われますが、私の場合、悲しいことに**「フリーソフトのexeインストールは禁止。自分で書いたスクリプト等はまあ許してやろう」**的な環境でお仕事をしており、上記のソフトは使えなかったため、アプリを書いている言語であるJavaで、テスト用のリバースプロキシを書きました。
使ったもの
- Java 1.8 (選定理由:お仕事で使っているため)
- Smiley's HTTP Proxy Servlet 1.10 (選定理由:使い勝手が良いため)
- Spring Boot 1.5.14 (選定理由:実行可能warがサクッと作れるため)
構成
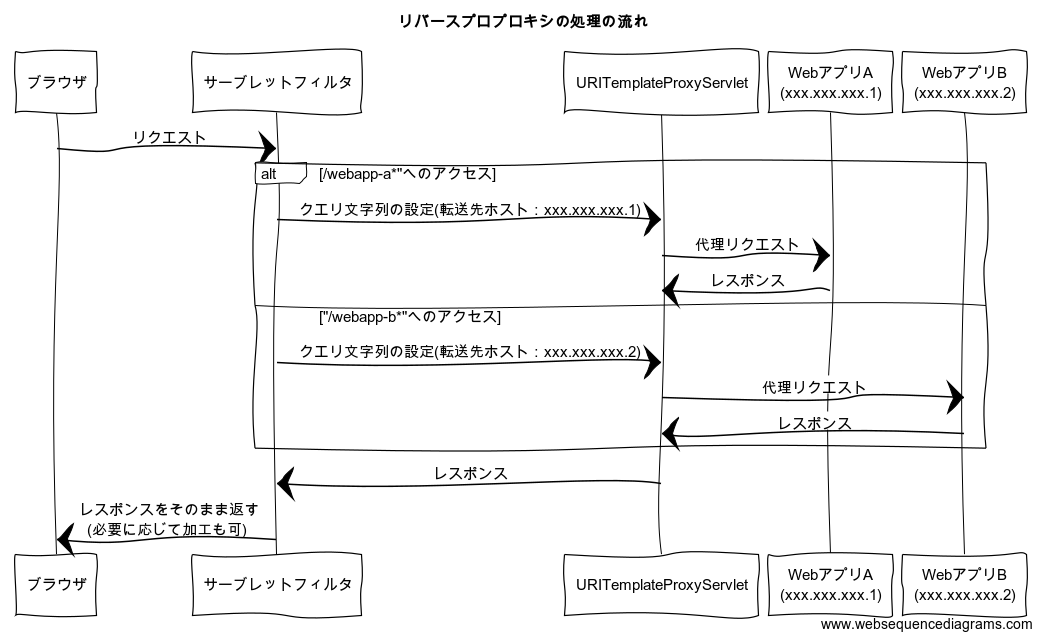
Smiley's HTTP Proxy Servletでは、プロキシサーバーの役割を果たすサーブレット(ProxyServlet)を提供します。
そのうち URITemplateProxyServlet を使うと、クエリ文字列で転送先(ホスト名、ポート番号、コンテキストパス)を動的に制御することができます。
リクエストされたURLに応じたクエリ文字列を、サーブレットフィルタで設定してやることによって、リバースプロキシの動作を再現します。
実装
Mavenを使ってビルドを行います。
<project xmlns="http://maven.apache.org/POM/4.0.0" xmlns:xsi="http://www.w3.org/2001/XMLSchema-instance" xsi:schemaLocation="http://maven.apache.org/POM/4.0.0 http://maven.apache.org/xsd/maven-4.0.0.xsd">
  <modelVersion>4.0.0</modelVersion>
  <groupId>riverse-proxy</groupId>
  <artifactId>riverse-proxy</artifactId>
  <version>1.0</version>
  <packaging>war</packaging>
    <parent>
        <groupId>org.springframework.boot</groupId>
        <artifactId>spring-boot-starter-parent</artifactId>
        <version>1.5.14.RELEASE</version>
    </parent>
    <properties>
        <project.build.sourceEncoding>Windows-31j</project.build.sourceEncoding>
        <project.reporting.outputEncoding>Windows-31j</project.reporting.outputEncoding>
        <maven.compile.source>1.8</maven.compile.source>
        <maven.compile.target>1.8</maven.compile.target>
        <java.version>1.8</java.version>
        <spring.version>4.3.18.RELEASE</spring.version>
    </properties>
    <dependencies>
        <dependency>
          <groupId>org.springframework.boot</groupId>
          <artifactId>spring-boot-starter-web</artifactId>
        </dependency>
        <dependency>
            <groupId>org.mitre.dsmiley.httpproxy</groupId>
            <artifactId>smiley-http-proxy-servlet</artifactId>
            <version>1.10</version>
        </dependency>
    </dependencies>
    <build>
        <plugins>
            <plugin>
                <groupId>org.springframework.boot</groupId>
                <artifactId>spring-boot-maven-plugin</artifactId>
            </plugin>
        </plugins>
    </build>
</project>
次はメインクラス。ここでサーブレットフィルタ、ProxyServletの登録を行います。
@SpringBootApplication
public class Main extends SpringBootServletInitializer implements WebApplicationInitializer {

  /**
   * 単独起動時のエントリーポイント.
   */
  public static void main(String[] args) throws Throwable {
    SpringApplicationBuilder builder = new SpringApplicationBuilder(Main.class);
    builder.run();
  }

  /**
   * サーブレットコンテナ起動時のエントリーポイント.
   */
  @Override
  protected SpringApplicationBuilder configure(SpringApplicationBuilder application) {
    return application.sources(Main.class);
  }

  /**
   * {@see org.springframework.web.filter.HiddenHttpMethodFilter} の無効化.
   *
   * URITemplateProxyServletは、{@link ServletRequest#getInputStream} を使うため、
   * フィルタ側でリクエストパラメータへのアクセスが行われるとプロクキサーブレット側で、
   * リクエストパラメータの取得が出来なくなる。
   * そのため、本ツールでは、HiddenHttpMethodFilterで提供する機能は不用のためフィルタを無効にする。
   */
  @Bean
  public FilterRegistrationBean hiddenHttpMethodFilterRegistration(HiddenHttpMethodFilter filter) {
    FilterRegistrationBean registration = new FilterRegistrationBean(filter);
    registration.setFilter(filter);
    registration.setEnabled(false);
    return registration;
  }

  /**
   * {@see org.springframework.web.filter.HttpPutFormContentFilter} の無効化.
   *
   * URITemplateProxyServletは、{@link ServletRequest#getInputStream} を使うため、
   * フィルタ側でリクエストパラメータへのアクセスが行われるとプロキシサーブレット側で、
   * リクエストパラメータの取得が出来なくなる。
   * そのため、本ツールでは、HttpPutFormContentFilterで提供する機能は不用のためフィルタを無効にする。
   */
  @Bean
  public FilterRegistrationBean httpPutFormContentFilterRegistration(HttpPutFormContentFilter filter) {
    FilterRegistrationBean registration = new FilterRegistrationBean(filter);
    registration.setFilter(filter);
    registration.setEnabled(false);
    return registration;
  }

  /**
   * WebアプリA用サーブレットフィルタの登録.
   */
  @Bean
  public FilterRegistrationBean applicationARiverseProxyFilterRegistration() {
    Filter filter = new AAppRiverseProxyFilter();
    FilterRegistrationBean registration = new FilterRegistrationBean(filter);
    registration.setOrder(FilterRegistrationBean.REQUEST_WRAPPER_FILTER_MAX_ORDER);
    registration.setUrlPatterns(Arrays.asList("/webapp-a/*"));
    registration.setDispatcherTypes(EnumSet.of(DispatcherType.REQUEST));
    return registration;
  }

  /**
   * WebアプリB用サーブレットフィルタの登録.
   */
  @Bean
  public FilterRegistrationBean applicationBRiverseProxyFilterRegistration() {
    Filter filter = new BAppRiverseProxyFilter();
    FilterRegistrationBean registration = new FilterRegistrationBean(filter);
    registration.setOrder(FilterRegistrationBean.REQUEST_WRAPPER_FILTER_MAX_ORDER);
    registration.setUrlPatterns(Arrays.asList("/webapp-b/*"));
    registration.setDispatcherTypes(EnumSet.of(DispatcherType.REQUEST));
    return registration;
  }

  /**
   * プロキシサーブレットの登録.
   * @see https://github.com/mitre/HTTP-Proxy-Servlet
   */
  @Bean
  public ServletRegistrationBean riverseProxyServletRegistration() {
    HttpServlet servlet = new URITemplateProxyServlet();
    ServletRegistrationBean registration = new ServletRegistrationBean(servlet);
    registration.addInitParameter("preserveHost", "true");
    registration.addInitParameter("preserveCookies", "true");
    registration.addInitParameter("http.protocol.handle-redirects", "true");
    registration.addInitParameter("http.socket.timeout", "300000");
    registration.addInitParameter("http.read.timeout", "300000");
    registration.addInitParameter("targetUri", "http://{__proxyHost}/{__proxyContextRoot}");
    registration.setUrlMappings(Arrays.asList("/webapp-a/*", "/webapp-b/*"));
    return registration;
  }
}
次はサーブレットフィルタ。主なふるまいは抽象クラスとして定義し、サブクラス側で転送先に依存する処理を記載します。
/**
 * リバースプロキシフィルタ.
 * {@see org.mitre.dsmiley.httpproxy.URITemplateProxyServlet} を
 * リバースプロキシとして動作させるため、リクエスト、レスポンスのカスタマイズを行います。
 */
abstract public class AbstractRiverseProxyFilter implements Filter {

  /**
   * 転送先ホストの取得
   */
  abstract protected String getTransfarHost();

  /**
   * 転送先コンテキストルートの取得
   */
  abstract protected String getTransfarContextRoot();

  @Override
  public void doFilter(ServletRequest _request, ServletResponse _response,
            FilterChain filterChain) throws IOException, ServletException {

    HttpServletRequest  request  = (HttpServletRequest)  _request;

    // {@see org.mitre.dsmiley.httpproxy.URITemplateProxyServlet} に
    // 転送先を指定するパラメータを、クエリ文字列上へ追記
    StringBuilder routingQuery = new StringBuilder();
    String query = request.getQueryString();
    if (!StringUtils.isEmpty(query)) {
      routingQuery.append(query);
      routingQuery.append("&");
    }
    routingQuery.append(String.format("__proxyHost=%s&__proxyContextRoot=%s",
        this.getTransfarHost(), this.getTransfarContextRoot()));

    // サーブレットコンテナのデフォルトエンコーディングが設定されることを抑止する
    _response.setCharacterEncoding(null);

    // リクエストオブジェクトにラッパーをかぶせ、プロキシサーブレットへ引き渡す
    RequestRewriteWrapper wrapRequest
       = new RequestRewriteWrapper(request, routingQuery.toString());
    filterChain.doFilter(wrapRequest, _response);
  }

  @Override
  public void init(FilterConfig filterConfig) throws ServletException {}

  @Override
  public void destroy() {}

  /**
   * クエリ文字列を書き換えるためのリクエストラッパー
   */
  private static class RequestRewriteWrapper extends HttpServletRequestWrapper {

    private final String queryString;

    public RequestRewriteWrapper(HttpServletRequest request, String query) {
      super(request);
      this.queryString = query;
    }

    /**
     * {@link HttpServletRequest#getQueryString()} のラッパー.
     * 転送先が追記されたクエリ文字列を返す。
     */
    @Override
    public String getQueryString() {
      return this.queryString;
    }
  }
}
/**
 * WebアプリA用リバースプロキシフィルタ.
 */
public class AAppRiverseProxyFilter extends AbstractRiverseProxyFilter {

  @Override
  protected String getTransfarHost() {
    return "xxx.xxx.xxx.1";
  }

  @Override
  protected String getTransfarContextRoot() {
    return "webapp-a";
  }
}
/**
 * WebアプリB用リバースプロキシフィルタ.
 */
public class BAppRiverseProxyFilter extends AbstractRiverseProxyFilter {

  @Override
  protected String getTransfarHost() {
    return "xxx.xxx.xxx.2";
  }

  @Override
  protected String getTransfarContextRoot() {
    return "webapp-b";
  }
}
実行
以下のコマンドで起動します。
$ mvn spring-boot:run
ツール起動後、ブラウザから「http://localhost:8080/webapp-a/」でWebアプリAへ、
「http://localhost:8080/webapp-b/」でWebアプリBへアクセス出来るようになります。
最後に
本記事の内容は、作ったツールのうち基本的な部分のみ抜粋して記載してます。
実際にツールを作る場合、転送先の情報は上記サンプルのような、ソースコードに書くのではなく、
@Valueアノテーション等の仕組みを使い、取ってくるようにすると良いでしょう。
ネットを漁っても、リバースプロキシをJavaで書く記事があまりなかったので、今回書いてみました。
本記事のリバースプロキシは、あくまで**「テスト用のツール」**であるため、本番環境には、きちんとした製品を使いましょう。<(_ _)>
明日は14日目。@modestさんの記事となります。