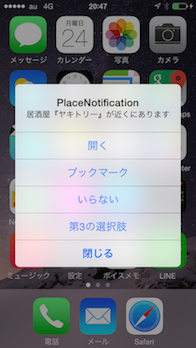
概要
iOS8ではUILocalNotificationが地味に拡張されています。
- UILocalNotificationの設定だけで、領域(CLRegion)に入出したことを検知できる(Location-Based Notifications)
- 通知にボタンを設置できる(Notification Actions)
ひとつめの領域検知ですが、iOS7以前はCLLocationManagerのデリゲートを使って実装していました。iOS8では主にUILocalNotificationの設定だけで領域検知を行うことができます。今回はiBeaconの領域を使いますが、緯度経度で指定するCLCircularRegionを対象とすることも可能です。
ふたつめですが、ローカル通知にボタンを設置してアクションを実行させることができます(リモート通知でも可能)。なお、標準アプリの「メッセージ」では、通知上でテキストを入力して送信できますが、現時点(14/11/24)で公開されているAPIでは、ボタンの設置のみが可能です。
今回は、この2つをあわせて使ってみたい思います。
2つのテーマを扱うので見にくいかもしれませんが、それぞれ「領域を検知して通知を行う」と「通知にボタンを設置する」の2つの項目に分けて書きたいと思います。
領域を検知して通知を行う
事前にCoreLocation.framworkをプロジェクトに追加しているものとします。
Info.plistの設定
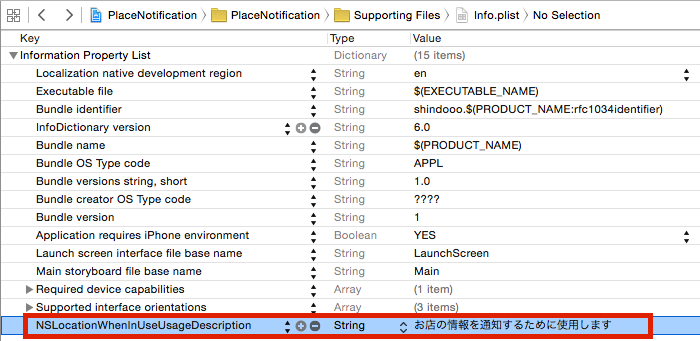
まず、位置情報を扱うので、Info.plistに[NSLocationWhenInUseUsageDescription]キーを追加します。通常、バックグラウンドで位置情報を使用する場合は[NSLocationAlwaysUsageDescription]キーも必要ですが、LocalNotificationで領域検知をする場合は必要ありません。
位置情報利用の許可を求める
Info.plistの設定に加え、位置情報利用の許可を求めるコードを記述します。
var locationManager: CLLocationManager!

	func application(application: UIApplication, didFinishLaunchingWithOptions launchOptions: [NSObject: AnyObject]?) -> Bool {

         // 〜 省略(後述する通知アクションの設定) 〜

        self.locationManager = CLLocationManager()
        self.locationManager.delegate = self
        // 位置情報使用許可を求める
        self.locationManager.requestWhenInUseAuthorization()

        return true
    }
位置情報使用許可の認証状態が変わったときに呼ばれるデリゲートの中で、位置情報の使用が許可されていることを確認してから領域検知の設定を行います。実際はこのデリゲートを実装しなくても動作しましたが、Appleのドキュメント*にはデリゲートで使用許可を確認すべきであると記載されています。
    // 位置情報使用許可の認証状態が変わったタイミングで呼ばれるデリゲートメソッド
    func locationManager(manager: CLLocationManager!, didChangeAuthorizationStatus status: CLAuthorizationStatus) {

        if status == .AuthorizedWhenInUse {
            let uuid: NSUUID! = NSUUID(UUIDString:"XXXXXXXX-XXXX-XXXX-XXXX-XXXXXXXXXXXX")
            let message = "居酒屋『ヤキトリー』が近くにあります"

            // ビーコン領域をトリガーとした通知を作成(後述)
            let notification = createRegionNotification(uuid, message: message)
            // 通知を登録する
            UIApplication.sharedApplication().scheduleLocalNotification(notification)
        }
    }
ビーコン領域をトリガーとした通知を作成する
上記のコードで呼び出しているcreateRegionNotificationメソッドを実装します。
    private func createRegionNotification(uuid: NSUUID, message: String) -> UILocalNotification {

        // ## ビーコン領域を作成 ##
        let beaconRegion :CLBeaconRegion = CLBeaconRegion(proximityUUID: uuid, identifier: "RegionId")
        beaconRegion.notifyEntryStateOnDisplay = false
        beaconRegion.notifyOnEntry = true
        // 領域に入ったときにも出たときにも通知される
        // 今回は領域から出たときの通知はRegion側でOFFにしておく
        beaconRegion.notifyOnExit = false

        // ## 通知を作成し、領域を設定 ##
        let notification = UILocalNotification()
        notification.soundName = UILocalNotificationDefaultSoundName
        notification.alertBody = message

         // 通知の対象となる領域 *今回のポイント
        notification.region = beaconRegion
        // 一度だけの通知かどうか
        notification.regionTriggersOnce = false
        // 後述するボタン付き通知のカテゴリ名を指定
        notification.category = "NOTIFICATION_CATEGORY_INTERACTIVE"

        return notification
    }
UILocalNotificationのオブジェクトを生成して、regionプロパティに対象の領域を設定するだけです。このUILocalNotificationオブジェクトを登録しておけば、領域を検知したときに通知が行われます。
なお、LocalNotificationによる領域検知では、領域に入ったときにも出たときにも通知される点に注意してください。
通知にボタンを設置する
つづいて、ボタン付きの通知を実装していきます。
おおまかな流れは次の通りです。
- 「アクション(=ボタン)」を作成する
- 通知の「カテゴリ」を作成して1.のアクションをセットする
- 2.で作成したカテゴリを属性として持つ、通知の「設定」を作成する
- 3.で作成した設定をアプリケーションに登録する
- ボタンが押された時の処理を実装する
ボタン付き通知の設定を作成する
上記1〜3の実装を一気に見ていきましょう。詳細はコード中のコメントをご覧ください。特に注意すべき点は後で改めて説明します。
    // ボタン付きの通知設定を作成する
    private func createInteractiveNotificationSettings() -> UIUserNotificationSettings {

        // ## アクションを作成する ##
        // ひとつめのアクション(ボタン)を作成
        let bookmark = UIMutableUserNotificationAction()
        bookmark.title = "ブックマーク";
        bookmark.identifier = "BOOKMARK"
        // ボタンが押されたらバックグラウンドで処理する
        bookmark.activationMode = .Background;
        // 強調表示しない
        bookmark.destructive = false;
        // ロック解除を必要としない
        bookmark.authenticationRequired = false

        // ふたつめのアクション(ボタン)を作成
        let destruction = UIMutableUserNotificationAction()
        destruction.title = "いらない";
        destruction.identifier = "DESTRUCTION"
        // ボタンが押されたらバックグラウンドで処理する
        destruction.activationMode = .Background;
        // (警告的な)強調表示する
        destruction.destructive = true;
        // ロック解除を必要としない
        destruction.authenticationRequired = false

        // みっつめのアクション(ボタン)を作成
        let third = UIMutableUserNotificationAction()
        third.title = "第3の選択肢";
        // identifierはどのボタンが押下されたか識別するために使用する
        third.identifier = "THIRD";
        // このボタンが押された時はアプリをフォアグラウンドで起動する
        third.activationMode = .Foreground;
        // 強調表示しない
        third.destructive = false;


        // ## 通知カテゴリにアクションをセットする ##
        // 通知カテゴリ
        let interactiveCategory = UIMutableUserNotificationCategory()
        // カテゴリID 実際に通知を作成するときに、このIDを指定する
        interactiveCategory.identifier = "NOTIFICATION_CATEGORY_INTERACTIVE"
        // カテゴリに、最低限表示する2つのアクションを登録する ※別途説明します
        interactiveCategory.setActions([bookmark, destruction], forContext:.Minimal)
        // カテゴリに、ダイアログモードのときオプションで表示するアクション(ボタン)を登録する ※別途説明します
        interactiveCategory.setActions([bookmark, destruction, third], forContext:.Default)


        // ## カテゴリを通知設定に登録する ##
        // カテゴリはセット単位で登録する
        let categories: NSSet? = NSSet(object:interactiveCategory);
        // アクションを登録したカテゴリで通知設定を生成する
        let notificationSettings =  UIUserNotificationSettings(forTypes: .Alert | .Sound, categories: categories)

        // この通知設定を登録する
        return notificationSettings
    }
UIMutableUserNotificationCategoryのsetActionsメソッドのcontextについて
setActionsメソッドの第2引数contextはボタンを表示する場所を Minimal または Default で指定します。
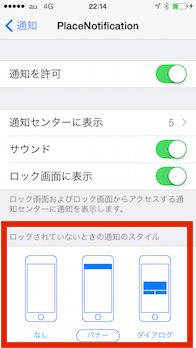
ここで注意しなければならないのは、システム設定の[ロックされていない時の通知のスタイル]にも関係する点です。
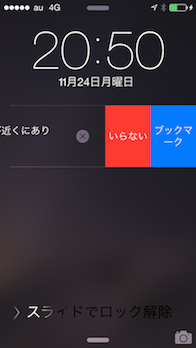
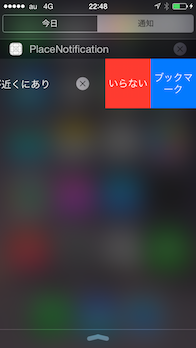
Minimalコンテキストには2個までアクションをセットできます(最初の2個だけ有効)。Minimalにセットしたアクションは、通知スタイルの設定にかかわらず、ロック画面または通知センターの通知を左にスライドしたときに表示されます。
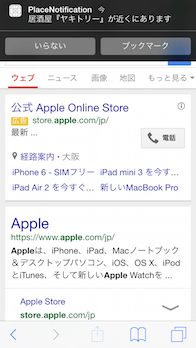
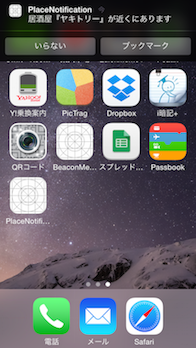
さらに、バナースタイルの通知に表示されるのもMinimalにセットしたアクションです(バナーを少し下に引っ張るとボタンが出てきます)。
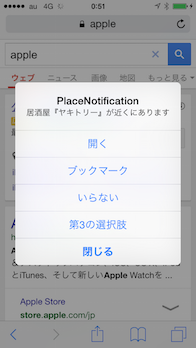
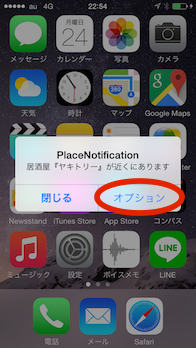
Defaultコンテキストには4個までアクションを設定できます。これはダイアログスタイルの通知のオプションに表示されます。
通知スタイルはあくまでユーザーの設定に依存するので、最低限必要なアクションをMinimalコンテキストに登録し、DefaultコンテキストにはMinimalに登録したアクション+付加的なアクションを登録するようにすればよいでしょう。
通知設定をアプリケーションに登録する
UIApplicationのregisterUserNotificationSettingsメソッドで通知設定を登録します。
    func application(application: UIApplication, didFinishLaunchingWithOptions launchOptions: [NSObject: AnyObject]?) -> Bool {

        // ボタン付きの通知の通知設定を作成する
        let settings = createInteractiveNotificationSettings()
        // アプリケーションに通知設定を登録
        application.registerUserNotificationSettings(settings)

        // 〜 省略 〜

        return true
    }
ボタンが押された時の処理を実装する
通知のボタンが押されると、以下のアプリケーションデリゲートのメソッドが呼ばれます。引数で渡されてくるアクションのidentifierで、押下されたボタンの判別をします。
    func application(application: UIApplication, handleActionWithIdentifier identifier: String?, forRemoteNotification userInfo: [NSObject : AnyObject], completionHandler: () -> Void) {

        if let actionId = identifier{
            switch actionId {

            case "BOOKMARK":
                println("「ブックマーク」が押された")

            case "DESTRUCTION":
                println("「いらない」が押された")

            default:
                println("その他のボタンが選択された")
            }
        }
        // メソッドの最後にかならず呼ばなければならない
        completionHandler()
    }
実際に通知を作成するとき
アクションをセットしているカテゴリの名前を、UILocalNotificationオブジェクトのcategoryプロパティにセットしておけば、ボタン付きの通知が発行されます。
(本稿では、領域検知をするLocalNotificationを作成するときに指定しました)
        let notification = UILocalNotification()
        notification.category = "NOTIFICATION_CATEGORY_INTERACTIVE"
        UIApplication.sharedApplication().scheduleLocalNotification(notification)
まとめ
最初に触れたUILocalNotificationによる領域検知ですが、単純な領域通知をするだけなら実装がかなり楽になりました。ただ、やはり細かなことをしたいのであれば従来通りデリゲートで実装する必要があるように思います。
ボタン付きの通知は、今のところボタンしか設置できないので使いどころは難しいかもしれません。ただ、アプリを切り替えることなく操作ができるのは今までにないことです。アイデア次第ではユーザービリティの向上につながると思います。個人的には「メッセージ」アプリのようにテキストボックスなども使えるようになるのを期待しています。
