はじめに
nuxtでテストをする環境構築の手順をご説明します。
nuxtとタイトルにありますが、別にnuxtである必要はありません。
e2eテストには、testcafe を用います。
この構築がベストプラクティスかはわかりませんが、ローカルで簡単にテストが実行できるので便利だと思います。
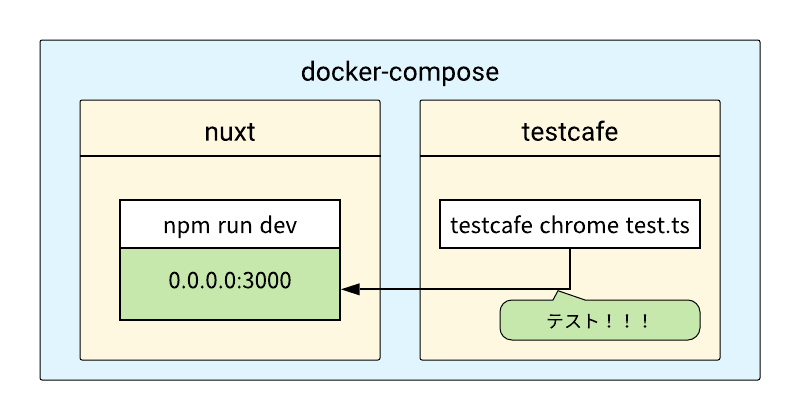
イメージ図
docker-compose で2つのコンテナを構築します。
1つ目は、0.0.0.0:3000 で nuxt を起動させるコンテナ。
2つ目は、1つ目のコンテナに対しテストを実行するコンテナです。
それでは構築していきましょう。
ディレクトリ構成
.
├── app
│   ├── 略(pages とか store とか)
│   └── tests
├── docker-compose.yml
├── nuxt
│   └── Dockerfile
└── testcafe
    ├── Dockerfile
    └── wait.sh
説明の便宜上、./app にnuxtのソースコードが入っていることとします。
./app/testsの中に、テストコードを書くことにします。
docker-compose.yml
version: '3'

services:
  nuxt:
    build: ./nuxt
    volumes:
      - ./app:/usr/src/
    ports:
      - "3000:3000"
  testcafe:
    build: ./testcafe
    volumes:
      - ./app:/usr/src/
nuxtコンテナの方は、3000番を公開しておきましょう。
nuxtコンテナ(0.0.0.0:3000で nuxt を公開)
このコンテナは、Dockerfileを書くだけです。
Dockerfile
FROM node:10
MAINTAINER shindex

ENV HOST 0.0.0.0

CMD bash -c "cd /usr/src && npm run dev"
デフォルトでは、nuxtは localhost:3000 でページを公開します。
これでは、testcafeのコンテナからアクセスができません。
環境変数として、HOST に 0.0.0.0 を設定することで、
nuxtは 0.0.0.0:3000 でページを公開し、testcafeのコンテナからのアクセスが可能になります。
testcafeコンテナ
先程よりは工程が多いですが、大したことはありません。
Dockerfile
FROM node:10
MAINTAINER shindex

# install google chrome
RUN wget -q -O - https://dl-ssl.google.com/linux/linux_signing_key.pub | apt-key add - && \
    sh -c 'echo "deb [arch=amd64] http://dl.google.com/linux/chrome/deb/ stable main" >> /etc/apt/sources.list.d/google.list' && \
    apt-get update && \
    apt-get install -y google-chrome-stable && \
    # install testcafe
    npm install -g testcafe

COPY ./wait.sh /

CMD [ "sh", "/wait.sh" ]
testcafeを実行するためには、なにかしらのブラウザが必要です。
今回は、chromeをインストールします。testcafeのインストールもここで行います。
また、後述するwait.shをコピーして、CMDで実行します。
コンパイル終了まで待機する
# !/bin/bash

while :
do
  statusCode=`curl -LI nuxt:3000 -o /dev/null -w '%{http_code}\n' -s`
  if [ $statusCode = "200" ] ; then
    compileStatus=`curl -s nuxt:3000 | grep -cE 'div id="nuxt_loading_screen"'`
    if [ $compileStatus = 0 ] ; then
      break;
    fi
  fi
  sleep 3;continue
done

cd /usr/src
testcafe chrome:headless tests/*.ts
最終的には、docker-compose up のコマンド1つで、
コンテナを2つ起動して、npm run dev して テスト実行 をしたい訳です。
ただ、普通にやると間違いなく失敗します。
なぜなら、npm run dev のコンパイルが終わる前に、テストが実行されてしまうからです。
コンパイルが終了するまで、待機しなければなりません。
そのため、ここでは無限ループで、コンパイルが完了しているかを3秒ごとにチェックしています。
nuxtのコンパイル中は、皆さんおなじみ

この画面が出ますね。
これをコンパイル終了の判断材料にします。
<div id="nuxt_loading_screen">
この画面は↑のidが振られてます。
これが存在する間は、コンパイル中。無くなれば、コンパイル終了です。
よって、確実にコンパイル終了後にテストを実行できます。
テストファイルの用意
この記事は、環境構築の説明がメインなので、testcafeの詳しい説明はしません。
今回は実験用に、testcafeのREADME.mdにある例を少し変更した、以下のようなテストファイルを用意します。
import { Selector } from 'testcafe';

fixture `Getting Started`
    .page `http://nuxt:3000`;

test('My first test', async t => {
    await t
        .expect(Selector('#login-btn').exists).ok();
});
トップページに、#login-btnが存在するかをテストするだけです。
(実際にindex.vueに、このidでボタンを作成しました。)
ポイントは、http://nuxt:3000 ですね。nuxt は、docker-composeのサービス名です。
テスト実行
$ docker-compose build
  (略)
$ docker-compose up
Starting src_nuxt_1       ... done
Recreating src_testcafe_1 ... done
Attaching to src_nuxt_1, src_testcafe_1
nuxt_1      |
nuxt_1      | > app[at]1.0.0 dev /usr/src
nuxt_1      | > nuxt
nuxt_1      |
nuxt_1      | ℹ Listening on: http://172.21.0.2:3000/
nuxt_1      | ℹ Preparing project for development
nuxt_1      | ℹ Initial build may take a while
nuxt_1      | ✔ Builder initialized
nuxt_1      | ✔ Nuxt files generated
nuxt_1      | ℹ Compiling Client
nuxt_1      | ℹ Compiling Server
nuxt_1      | ✔ Server: Compiled successfully in 25.18s
nuxt_1      | ✔ Client: Compiled successfully in 27.57s
nuxt_1      | ℹ Waiting for file changes
nuxt_1      | ℹ Memory usage: 303 MB (RSS: 525 MB)
testcafe_1  |  Running tests in:
testcafe_1  |  - Chrome 79.0.3945.88 / Linux 0.0
testcafe_1  |
testcafe_1  |  Getting Started
testcafe_1  |  ✓ My first test
testcafe_1  |
testcafe_1  |
testcafe_1  |  1 passed (5s)
こんな感じで実行できます。
テストが成功したことがわかりますね。
