はじめに
Nuxt(Vue)の Typescript 環境構築は、確立された手法が存在しません。
よって、いろんな人が、いろんなやり方で、環境を構築されています。
ここで紹介するのは、僕が色々な手法を試した中で、
一番楽で、一番使いやすいと感じた環境構築の手法です。
型推論が 100% 完璧ではなかったりしますが、完璧を目指すと大変です。
ある程度妥協して、まぁこんくらいなら十分かなと思えるような環境を構築します。
完璧を求める方は、他の方の手法をお試しください。
それでは、構築していきましょう。
追記:あまり頑張らないために重要なこと
2020年4月に、nuxtの環境構築コマンドcreate-nuxt-appが改良され、
Typescript環境を簡単に構築できるようになりました。
この記事の前半の内容は、このコマンドによって代替できますので、
こちらを利用することを推奨します。
create-nuxt-appの公式ページ
ただ、この記事の肝である Vuex の型推論は、現状のcreate-nuxt-appコマンドでは提供されません。
よって、この記事は「Vuex の Typescript 化」から読み進めることをおすすめします。
使うモジュール
構築にあたって、以下の3つのモジュールを利用します。
@nuxt/types@nuxt/typescript-buildnuxt-typed-vuex
この内、 @nuxt/typescript-build は @nuxt/types を同梱しています。
よって、 @nuxt/types を直接インストールする必要はありません。
追記(2021/01/05)
コメントでご指摘いただきました。
現在、@nuxt/typescript-build は @nuxt/types を同梱していないようです。
@nuxt/typesは手動でインストールして下さい。
また、VSCodeの Vetur という拡張機能を使っています。
NuxtJS の Typescript 化
Nuxtプロジェクトの作成
$ npx create-nuxt-app nuxt-ts
create-nuxt-app v2.12.0
✨  Generating Nuxt.js project in nuxt-ts
? Project name nuxt-ts
? Project description My geometric Nuxt.js project
? Author name
? Choose the package manager Yarn
? Choose UI framework None
? Choose custom server framework None (Recommended)
? Choose Nuxt.js modules (Press <space> to select, <a> to toggle all, <i> to invert selection)
? Choose linting tools (Press <space> to select, <a> to toggle all, <i> to invert selection)
? Choose test framework None
? Choose rendering mode Universal (SSR)
? Choose development tools (Press <space> to select, <a> to toggle all, <i> to invert selection)
今回は yarn を使います。
その他のモジュールは、皆さんのご自由でどうぞ。
@nuxt/typescript-build のセットアップ
ここに関しては、公式ページと全く同じです。
まずはインストールします。
$ yarn add --dev @nuxt/typescript-build

// npm の場合は
$ npm install --save-dev @nuxt/typescript-build
次に、 nuxt.config.js の buildModules に @nuxt/typescript-build を追加します。
export default {
  ...
  buildModules: [
    '@nuxt/typescript-build'
  ],
  ...
}
そして、 tsconfig.json を作成します。
{
  "compilerOptions": {
    "target": "es2018",
    "module": "esnext",
    "moduleResolution": "node",
    "lib": [
      "esnext",
      "esnext.asynciterable",
      "dom"
    ],
    "esModuleInterop": true,
    "allowJs": true,
    "sourceMap": true,
    "strict": true,
    "noEmit": true,
    "baseUrl": ".",
    "paths": {
      "~/*": [
        "./*"
      ],
      "@/*": [
        "./*"
      ]
    },
    "types": [
      "@types/node",
      "@nuxt/types"
    ]
  },
  "exclude": [
    "node_modules"
  ]
}
最後に、vueファイルの型を提供します。
今回は、 types というディレクトリを作成し、vue-shim.d.ts というファイル名にします。
declare module "*.vue" {
  import Vue from 'vue'
  export default Vue
}
ちゃんとできているか確認
Vuexを利用しない場合は、ここまでで環境構築は終了です。
確認してみましょう。
$ yarn dev
yarn run v1.22.0
nuxt
   ╭─────────────────────────────────────────────╮
   │                                             │
   │   Nuxt.js v2.11.0                           │
   │   Running in development mode (universal)   │
   │                                             │
   │   Listening on: http://localhost:3000/      │
   │                                             │
   ╰─────────────────────────────────────────────╯
ℹ Preparing project for development                                                                                                                   21:26:26
ℹ Initial build may take a while                                                                                                                      21:26:26
✔ Builder initialized                                                                                                                                 21:26:26
✔ Nuxt files generated                                                                                                                                21:26:26
ℹ Starting type checking service...                                                                                                   nuxt:typescript 21:26:31
ℹ Using 1 worker with 2048MB memory limit                                                                                             nuxt:typescript 21:26:31

✔ Client
  Compiled successfully in 10.53s

✔ Server
  Compiled successfully in 9.43s

ℹ Type checking in progress...         <-- type checkが走っています                                                                                                     nuxt:typescript 21:26:42
ℹ Waiting for file changes                                                                                                                            21:26:42
ℹ Memory usage: 244 MB (RSS: 375 MB)                                                                                                                  21:26:42
ℹ No type errors found                 <-- type error は無かったようです                                                                                                nuxt:typescript 21:26:43
ℹ Version: typescript 3.7.5                                                                                                           nuxt:typescript 21:26:43
ℹ Time: 12217ms
yarn dev コマンドを実行すると、コンパイル後に、タイプチェックが行われている事がわかります。
使い方
pages/index.vue を例に、Typescriptの書き方を説明します。
<template>
...
</template>

<script>
import Logo from '~/components/Logo.vue'

export default {
  components: {
    Logo
  }
}
</script>

<style>
...
</style>
デフォルトではこの様になっていますね。
script タグの部分を修正します。
<template>
...
</template>

<script lang="ts">
import Logo from '~/components/Logo.vue'
import Vue from 'vue'

export default Vue.extend({
  components: {
    Logo
  }
})
</script>

<style>
...
</style>
これだけです。
vue をインポートして、Vue.extend() で囲ってあげます。
そうすることで、この script タグは Typescript と見なされ、型チェックが行われます。
この手法の良いところは、今までの VueJS の記法をそのまま記述できるところです。
他の Typescript化 の手法として、vue-property-decorator というモジュールを利用する手法がありますが、そちらでは今までの VueJS の記法をそのまま記述できません。
あまりTypescriptに慣れていない僕としては、この Vue.extend() を使う手法がとっつきやすかったので、こちらを選びました。
どのように型推論されるか
<script lang="ts">
import Logo from '~/components/Logo.vue'
import Vue from 'vue';

export default Vue.extend({
  data() {
    return {
      text: '' as string
    }
  },
  components: {
    Logo
  },
  created() {
    this.text = 1
  }
})
</script>
こんなコードを書いてみました。
data() に text を用意します。
型を指定するには、初期値の後ろに、as 型名 と記述します。
ここでは、text は string型 ですね。
created() で text に1、つまり number型 を代入しています。
もちろん、タイプエラーですね。
yarn dev すると、
ℹ Type checking in progress...                                                                                                        nuxt:typescript 21:51:00

 ERROR  ERROR in /Users/shindex/js/nuxt/nuxt-ts/pages/index.vue(45,5):                                                                nuxt:typescript 21:51:04
45:5 Type '1' is not assignable to type 'string'.
    43 |   },
    44 |   created() {
  > 45 |     this.text = 1
       |     ^
    46 |   }
    47 | })
    48 | </script>
ちゃんとタイプエラーが出ますね。
VSCode で Vetur という拡張機能を利用している場合は、
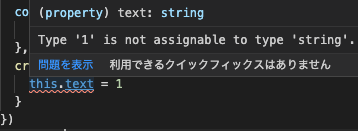
赤波線でこんな感じに教えてくれます。
また、

このような、
components/Logo.vue is not a module.
というエラーが出るかもしれません。
これは、
<template>
  ...
</template>

// script を追加し、中身は無しで export する
<script lang="ts">
import Vue from 'vue'
export default Vue.extend({
  //
})
</script>

<style>
...
</style>
上記のように、中身がない状態で export することで解消できます。
エラーが気になる方は、たとえ script を書く必要がないコンポーネントでも
export することを心がけましょう。
middleware など
import { Context } from '@nuxt/types'

export default ({ redirect, isDev }: Context) => {
  //
}
nuxt特有のコンテキストは、@nuxt/types から提供される Context型 を利用します。
Vuex の Typescript 化
これが、この記事の本題と言っても過言ではありません。
Vuex と Typescript の相性は良くないです。
他の方も述べていますが、完全な Typescript 環境を求めるのであれば、Vuexを使わないという選択肢も考えて良いでしょう。
しかし、それでも、Vuex は使いたいですね。
ここでは、nuxt-typed-vuex というモジュールを使い、Vuex の Typescript 化を図ります。
詳しい説明は、公式ページを参照してください。
モジュールのセットアップ
まずはインストールします。
$ yarn add nuxt-typed-vuex

// npm の場合は
$ npm i nuxt-typed-vuex
次に、nuxt.config.js に変更を加えます。
buildModules に nuxt-typed-vuex を、
build の tranpile に /typed-vuex/ を追加します。
export default {
  ...
  buildModules: [
    '@nuxt/typescript-build',
    'nuxt-typed-vuex'
  ],
  ...
  build: {
    /*
    ** You can extend webpack config here
    */
    transpile: [
      /typed-vuex/,
    ],
    extend (config, ctx) {
    }
  },
  ...
}
store/index.ts の作成
import { getAccessorType } from 'typed-vuex'

// 例えば、store/age.ts のようなサブモジュールが存在する場合、
// ここで import しておきます。
import * as age from '~/store/age'

// ここでは、state, getters, mutations, actions の記法は省略しています。
// 記法については、後ほど記述する store/age.ts を参照してください。
// これらは、たとえ必要なくても、以下のように空でいいので、必ず記述してください。
export const state = () => {
  return {}
}

export const getters = {
  //
}

export const mutations = {
  //
}

export const actions = {
  //
}

export const accessorType = getAccessorType({
  state,
  getters,
  mutations,
  actions,
  modules: {
    // import したサブモジュールはここに記述します。
    age,
  },
})
ここが肝です。
ここで定義される accessorType が、Vuex の型推論問題を解決します。
サブモジュールはインポートし、accessorType の modules に記述します。
state 等をここに記述する場合は、後ほど記述する store/age.ts を真似てください。
また、store/index.ts には、state等が必要ない場合でも、必ず上記のように記述してください。
そして、型定義を提供します。
import { accessorType } from '~/store'

declare module 'vue/types/vue' {
  interface Vue {
    $accessor: typeof accessorType
  }
}

declare module '@nuxt/types' {
  interface NuxtAppOptions {
    $accessor: typeof accessorType
  }
}
ここまでが、構築手順です。
使い方
storeの書き方
まずは、state, getters, mutations, actions をどう記述するかですが、
例えば、今まで以下のように書いていた場合、
export const state = () => ({
  age: 0
})

export const getters = {
  age: state => state.age,
}

export const mutations = {
  setAge(state, age) {
    state.age = age
  }
}

export const actions = {
  getOlder({ getters, commit }) {
    const currentAge = getters.age
    commit('setAge', currentAge + 1);
  }
}
これを、Typescript化するには、こう記述します。
import { getterTree, mutationTree, actionTree } from 'typed-vuex'

export const state = () => ({
  age: 0 as number
})

export type RootState = ReturnType<typeof state>

export const getters = getterTree(state, {
  age: state => state.age,
})

export const mutations = mutationTree(state, {
  setAge(state, age: number): void {
    state.age = age
  }
})

export const actions = actionTree({ state, getters, mutations }, {
  getOlder({ getters, commit }) {
    const currentAge = getters.age
    commit('setAge', currentAge + 1)
  }
})
typed-vuexから、
getterTree、 mutationTree、 actionTreeをインポートして利用します。
これにより、state、getters、commitの型が提供されます。
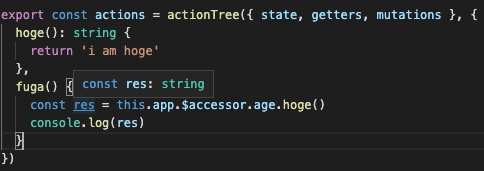
actions で 自分自身の getters、mutations にアクセスする場合、以下のように問題なく型推論されます。


ただし、dispatch については、型推論がされません。
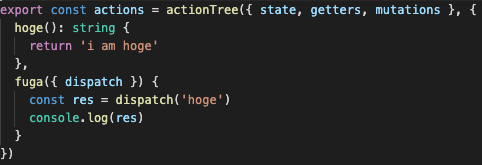
このような2つの関数を store/age.ts に用意して、dispatch で fuga() から hoge() を呼びます。
huga() の戻り値は string 型ですが、
変数 res をタゲると、Promise<any> となってしまいます。
これは不便です。
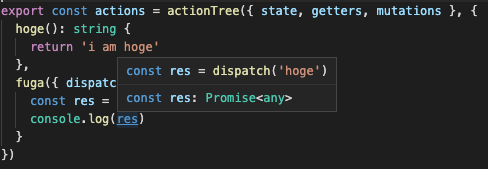
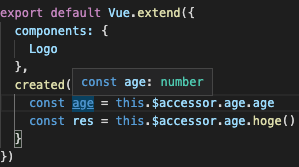
これの解決法として、ドキュメントにはこう書かれています。
WARNING
If you use the helper function, only the commit method is typed - and only for mutations within the module. Anything else should be accessed in a type-safe way through this.app.$accessor.
つまり、this.app.$accessor を経由してアクセスしてね ということです。
今度は、問題なく型推論がされています。
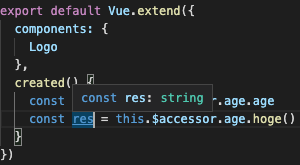
ただ、上記のスクリーンショットでは上手く型推論がされていますが、
上手く行かないことがありました。
これについては、同様の問題が issue にも上がっており、まだ解決がなされていないようです。
自分自身、気づいたときには型推論が効くようになっていて、解決法がわかっていません。
公式によって解決されるまでは、
我慢して型推論がされない dispatch を利用するのが懸命かもしれません。
コンポーネントからstoreにアクセス
従来の、this.$store はもう使いません。
<template>
...
</template>

<script lang="ts">
import Logo from '~/components/Logo.vue'
import Vue from 'vue';

export default Vue.extend({
  components: {
    Logo
  },
  created() {
    const age = this.$accessor.age.age
    this.$accessor.age.hoge()
  }
})
</script>

<style>
...
</style>
上記のように、this.$accessor を経由して、store にアクセスできます。
さきほど、$accessor経由のアクセスで型推論が上手く行かないことがある と書きましたが、
それは、store から store にアクセスする際に上手く行かないというだけであり、
コンポーネントからのアクセスは問題ありません。
以下のように、問題なく型推論がされます。
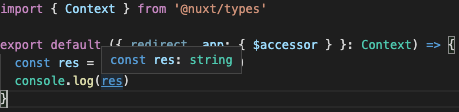
middleware などから store にアクセス
import { Context } from '@nuxt/types'

export default ({ redirect, app: { $accessor } }: Context) => {
  const res = $accessor.age.hoge()
  console.log(res)
}
上記のように、$accessor を引数として渡してあげます。
そうすることで、問題なく型推論がなされます。
おわりに
いかがでしたでしょうか。
完璧ではないものの、実際に開発していくには十分な型推論がされていると思います。
環境構築もそこまで大変でもないので、ぜひやってみてください。