はじめに
slackのslash commandの処理をlaravelで行うときの方法について、日本語の記事がほとんどなかったので紹介する。
今回は、Spatieが公開しているLaravel Slack Slash Commandという便利なものを使う。
以下の手順でセットアップしていこう。
今回の目標
 slackに`/hoge test`を送信すると、
 を応答し、
を応答し、
 というような`test`以外の文字列を送信すると、
 「文字列がtestじゃない」と言って、「Hoge」と応答してくれないようにする。
Slash Commandsの設定
これの設定については、他の方が書いた記事がいくつもあるが、せっかくなのでここで説明する。
まずはSlash Commandsにアクセスする。
リンク先から、[設定の追加]をクリックすると、以下のようなサイトに飛ぶ。
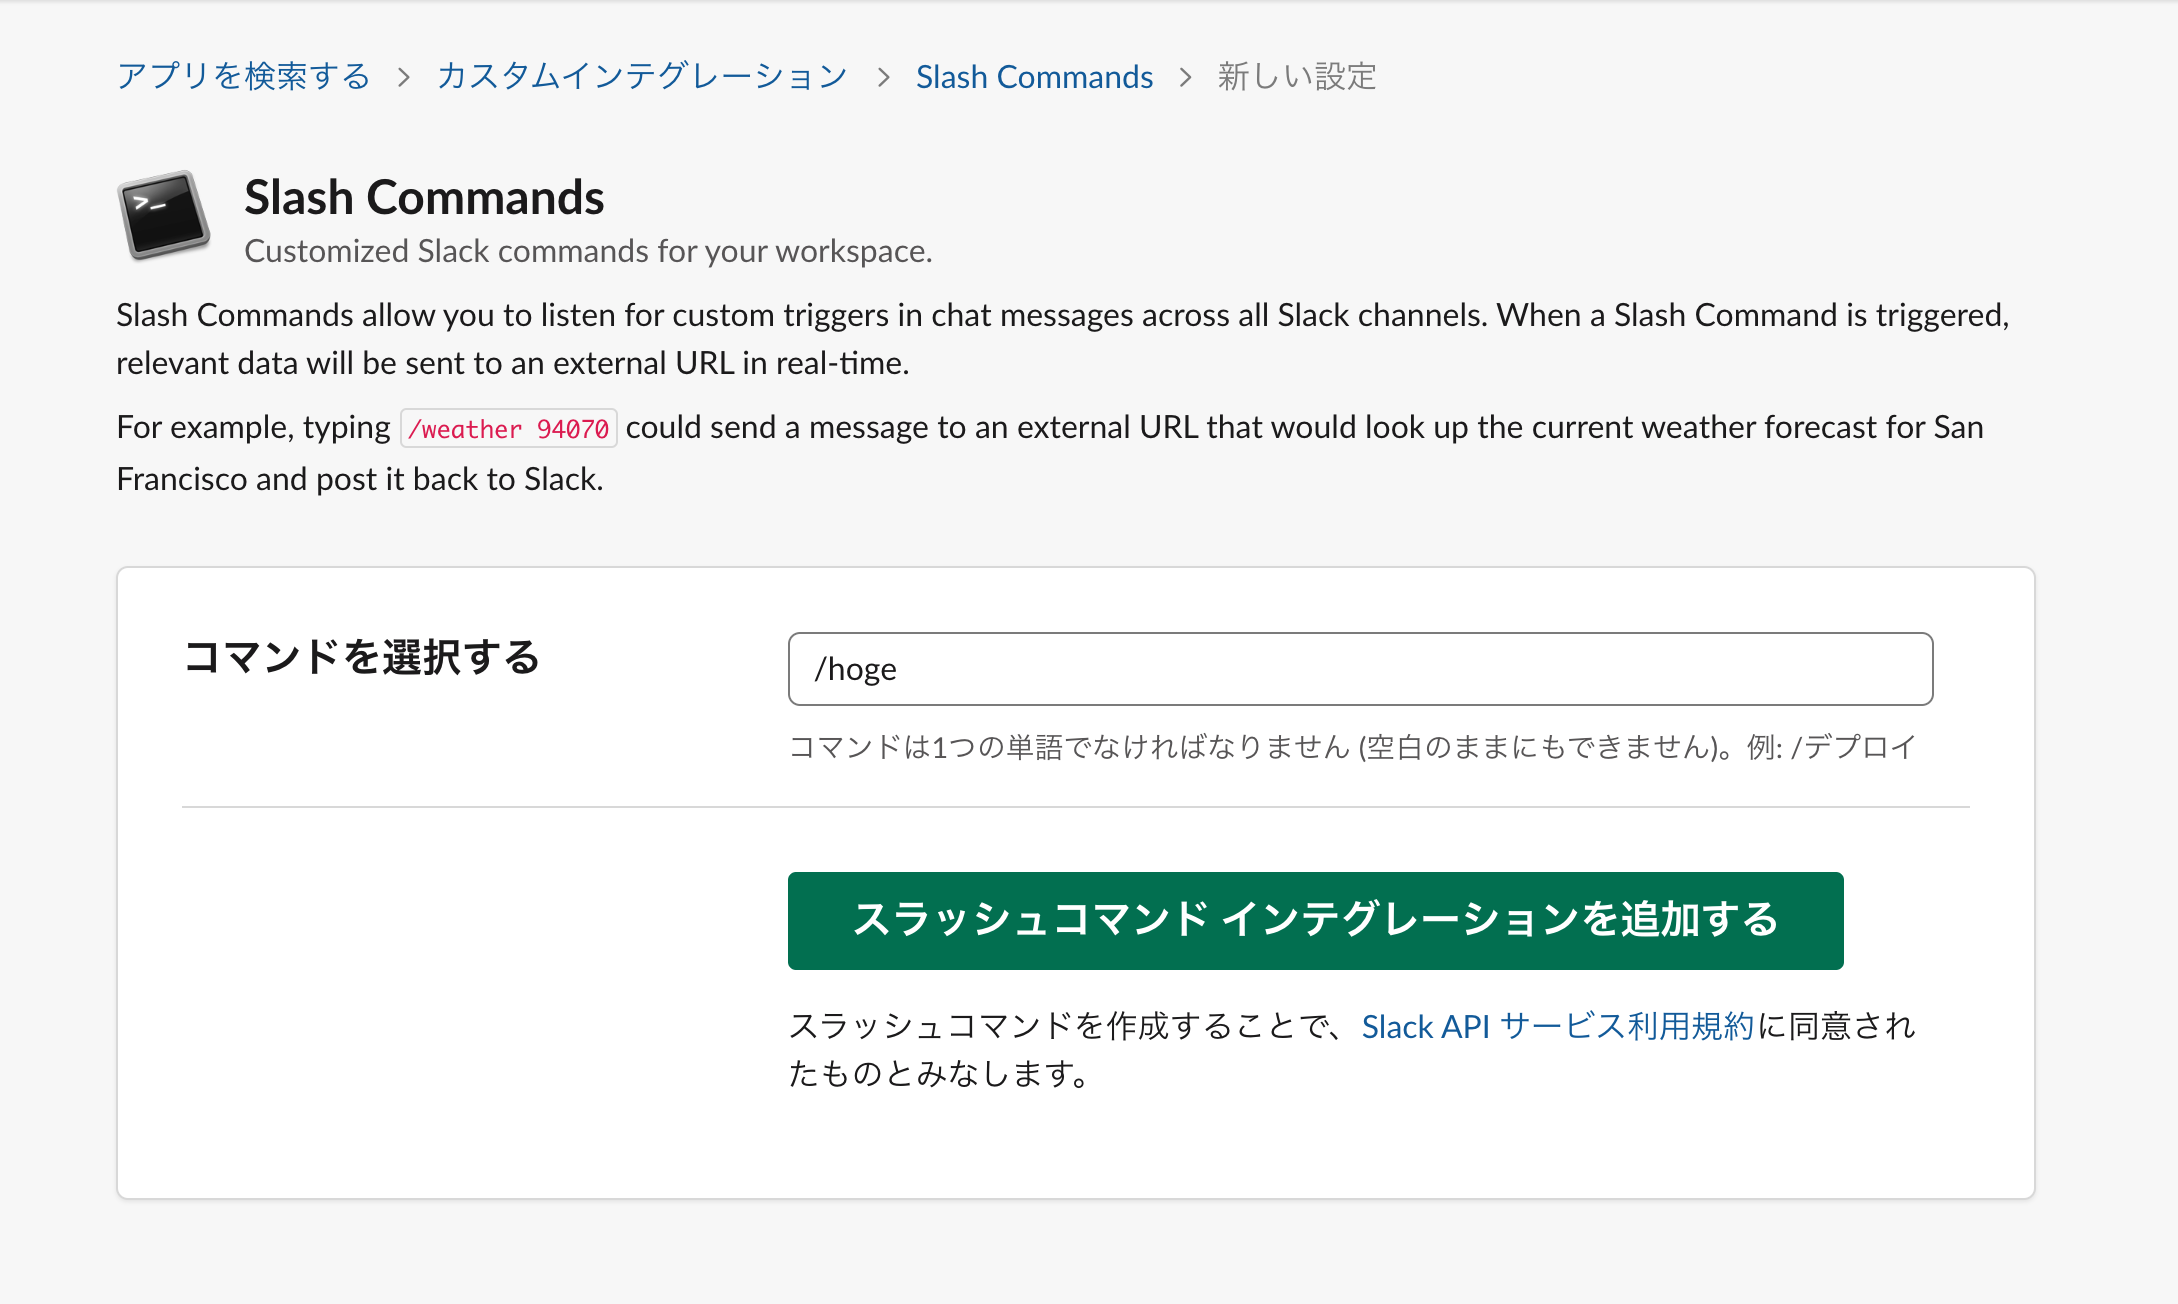
今回は /hoge というコマンド名にする。
自分で任意のコマンドを決めて、[スラッシュコマンドインテグレーションを追加する]をクリックしよう。
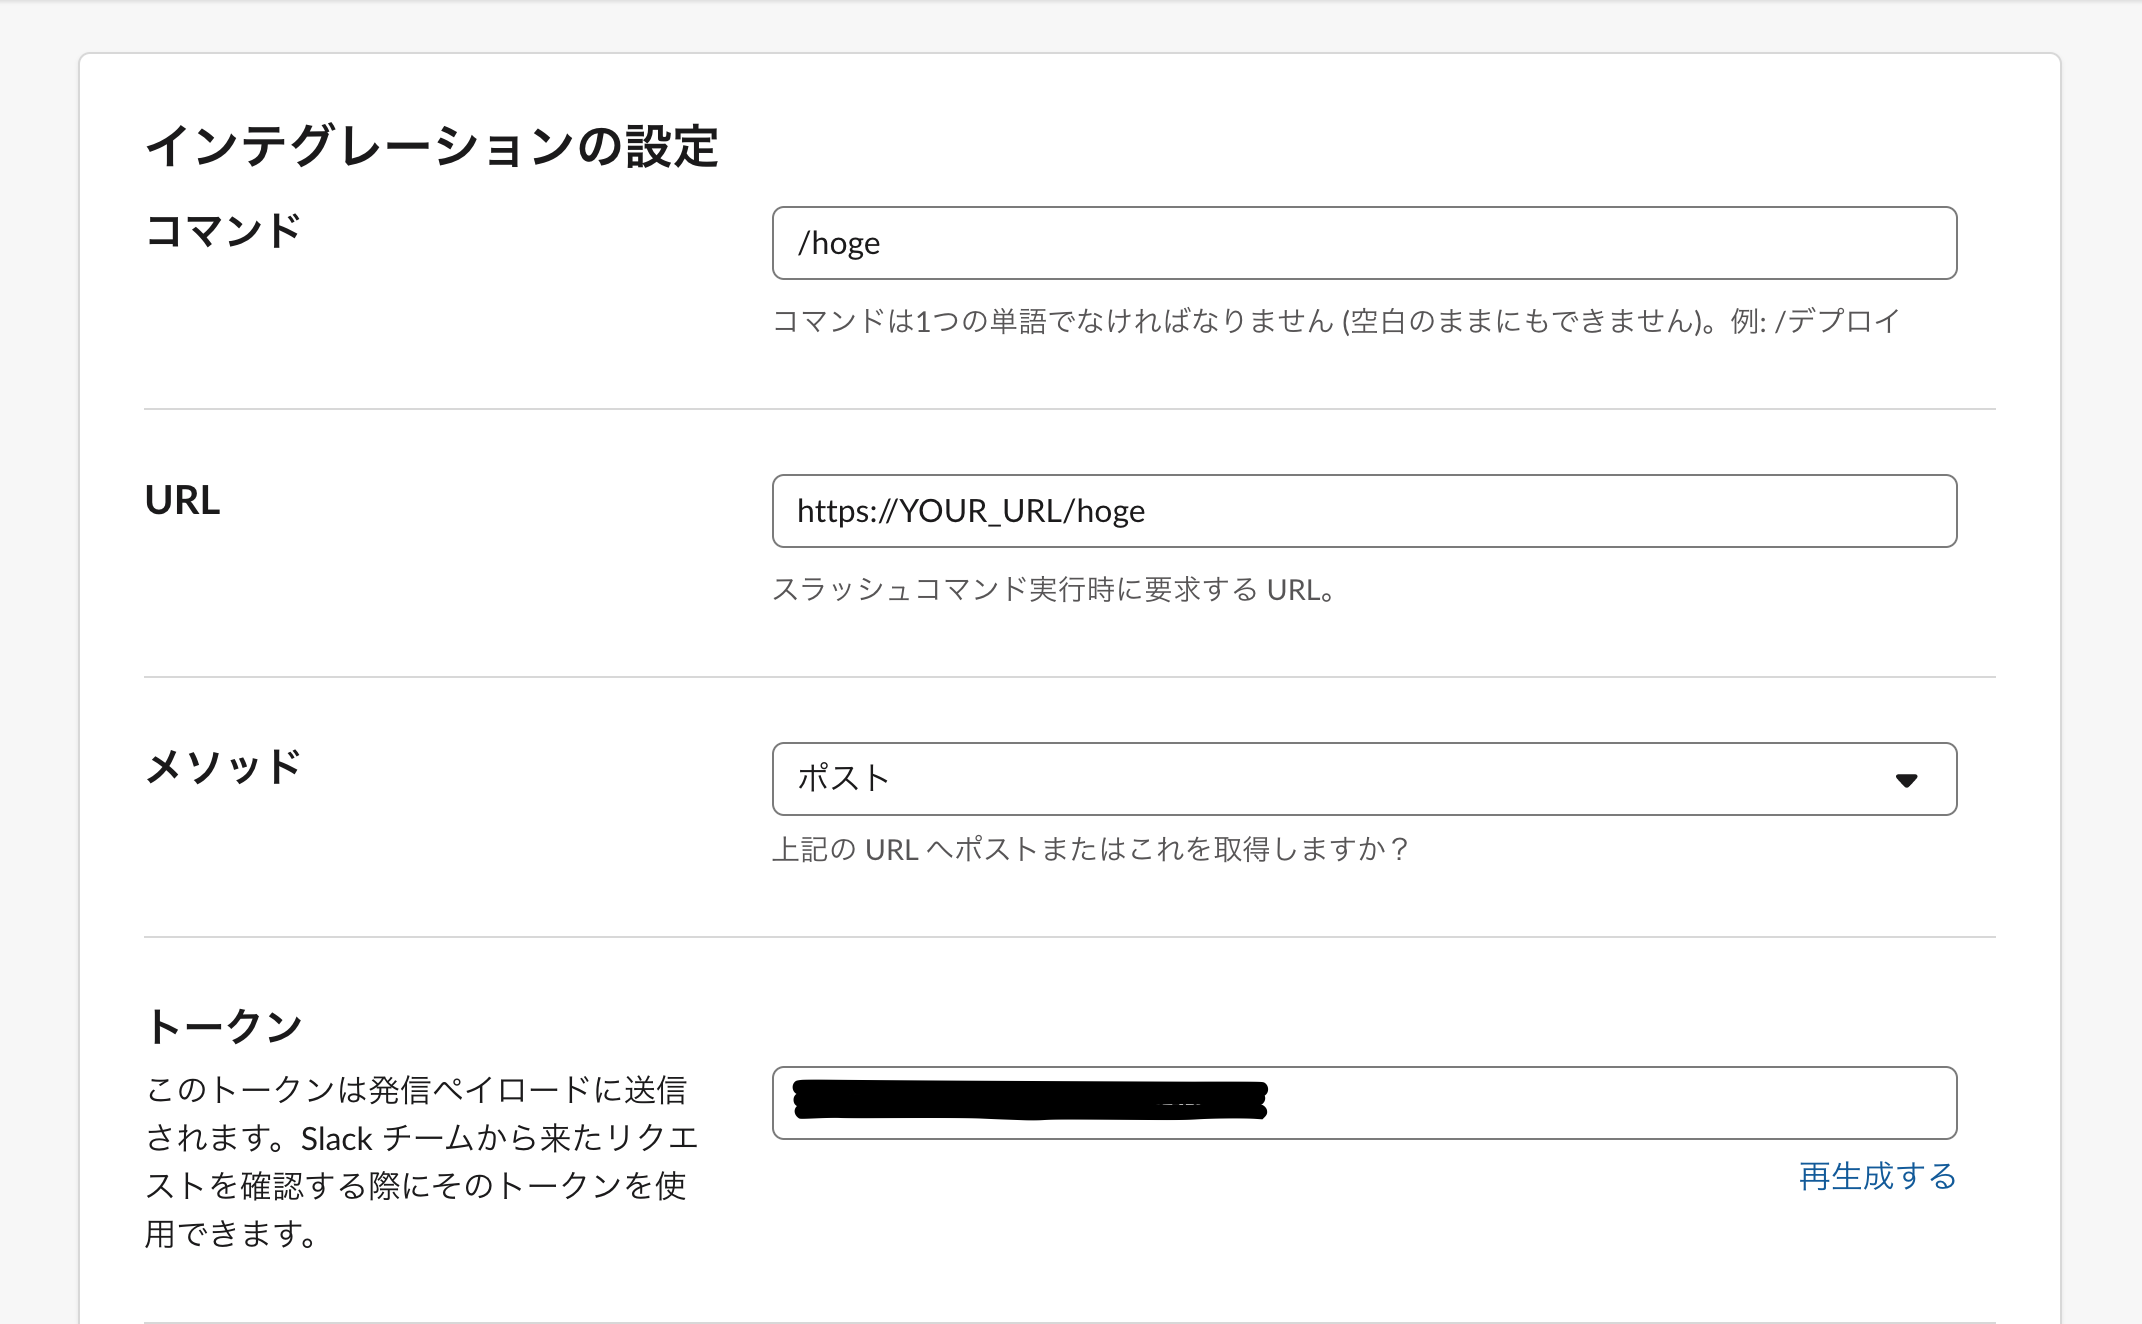
今回は最小限の設定のみを行う。メソッドはポストにして説明を進める。
POST先のURLが必要なので、ngrok等を使うなりして利用可能なURLを用意し、YOUR_URLのところに入力しよう。
トークンは、Laravel側の設定をするときに使うよ。
これらを入力したら、ページ下部の[Save Integration]をクリックして、Slash Commandsの設定は終わりだ。
Laravel Slack Slash Commandのインストールとセットアップ
はじめに、
$ composer require spatie/laravel-slack-slash-command
でパッケージをインストールする。
次に、config/app.phpで
'providers' => [
    ...
    Spatie\SlashCommand\SlashCommandServiceProvider::class,     //追加する一文
];
となるように一行書き加えよう。
次に、
$ php artisan vendor:publish --provider="Spatie\SlashCommand\SlashCommandServiceProvider" --tag="config"
を入力しよう。
次に、config/laravel-slack-slash-command.phpに変更を加える。
<?php

return [

    /*
     * At the integration settings over at Slack you can configure the url to which the
     * slack commands are posted. Specify the path component of that url here.
     *
     * For `http://example.com/slack` you would put `slack` here.
     */
    'url' => 'hoge',        //URLのpathを書く

    /*
     * The token generated by Slack with which to verify if a incoming slash command request is valid (deprecated).
     */
    'token' => env('SLACK_SLASH_COMMAND_VERIFICATION_TOKEN','***')     //第二引数に、先程のトークンを入力する

    /*
     * The signing_secret generated by Slack with which to verify if a incoming slash command request is valid.
     */
    'signing_secret' => env('SLACK_SIGNING_SECRET'),

    /*
     * Verify requests from slack with signing_secret signature
     */
    'verify_with_signing' => false,

    /*
     * The handlers that will process the slash command. We'll call handlers from top to bottom
     * until the first one whose `canHandle` method returns true.
     */
    'handlers' => [
        //add your own handlers here
        App\SlashCommandHandlers\Hoge::class,        //クラスのディレクトリ
        App\SlashCommandHandlers\Error::class,       //クラスのディレクトリ
        //this handler will display instructions on how to use the various commands.
        Spatie\SlashCommand\Handlers\Help::class,

        //this handler will respond with a `Could not handle command` message.
        Spatie\SlashCommand\Handlers\CatchAll::class,
        ],
    ];
変更点は3つ。
1つ目は、URLのpathを書くこと。これにより、Routeが自動で生成される。
2つ目は、
'token' => env('SLACK_SLASH_COMMAND_VERIFICATION_TOKEN','***')
の***に、先程Slack Commandsを設定したときに発行されたトークンを入力すること。
3つ目は、
'handlers' => [
   //add your own handlers here
   ここに入力
]
「ここに入力」というところに、処理を書く予定のクラスのディレクトリを記述すること。
今回はApp\SlashCommandHandlersというディレクトリを作り、その中にHoge.phpとError.phpを用意した。
ここで重要なのは、記述する順番である。
上にあるクラスから順に呼ばれていくことを覚えておこう!
以上でLaravel Slack Slash Commandのセットアップは終わりだ。
クラスの書き方
classの説明をしていこう。
<?php
namespace App\SlashCommandHandlers;

use App\SlashCommand\BaseHandler;
use Spatie\SlashCommand\Request;
use Spatie\SlashCommand\Response;

class Hoge extends BaseHandler
{
    /**
     * If this function returns true, the handle method will get called.
     *
     * @param \Spatie\SlashCommand\Request $request
     *
     * @return bool
     */
    public function canHandle(Request $request): bool
    {
        if ($request->text == test) return true;
    }

    /**
     * Handle the given request. Remember that Slack expects a response
     * within three seconds after the slash command was issued. If
     * there is more time needed, dispatch a job.
     *
     * @param \Spatie\SlashCommand\Request $request
     *
     * @return \Spatie\SlashCommand\Response
     */
    public function handle(Request $request): Response
    {
        return $this->respondToSlack("Hoge");
    }
}
<?php
namespace App\SlashCommandHandlers;

use Spatie\SlashCommand\Request;
use Spatie\SlashCommand\Response;
use Spatie\SlashCommand\Handlers\BaseHandler;

class Error extends BaseHandler
{
    /**
     * If this function returns true, the handle method will get called.
     *
     * @param \Spatie\SlashCommand\Request $request
     *
     * @return bool
     */
    public function canHandle(Request $request): bool
    {
        return True;
    }

    /**
     * Handle the given request. Remember that Slack expects a response
     * within three seconds after the slash command was issued. If
     * there is more time needed, dispatch a job.
     *
     * @param \Spatie\SlashCommand\Request $request
     *
     * @return \Spatie\SlashCommand\Response
     */
    public function handle(Request $request): Response
    {
        return $this->respondToSlack("string is not 'test'");
    }
}
$requestについて
token=***
team_id=T0001
team_domain=example
channel_id=C2147483705
channel_name=test
user_id=U2147483697
user_name=Steve
command=/hoge
text=test
response_url=https://hooks.slack.com/commands/1234/5678
という構成のRequest型のデータになっている。
canHandleについて
先程、config/laravel-slack-slash-command.phpには、Hoge.php, Error.php の順で記述した。
つまり、どのように動いているかというと、
-
Hoge.phpのcanHandleがTrue →Hoge.phpのhandleを実行する -
Hoge.phpのcanHandleがFalse→Error.phpを呼ぶ
というような感じで、canHandleが線路の分岐器のような役割をしている。
戻り値は必ず、bool型になるように記述する必要がある。
今回は、Hoge.phpのcanHandleを
public function canHandle(Request $request): bool
{
   if($request->text == 'test') return true;
   return False;
}
と記述し、slackで/hoge ***を送信するとき
- ***がtest →
Hoge.phpのhandleを実行し、「Hoge」をslackで応答させる - ***がtest以外 →
Error.phpを呼び、「string is not test」をslackで応答させる
という感じになっている。
handleについて
ここにはslackの送信に対する応答を記述する。基本的には、
public function handle(Request $request): Response
{
   return $this->respondToSlack("***");
}
***を任意の文字列にすることで、slackの応答を自分好みに設定できる。
今回は「Hoge」と「string is not test」をそれぞれ応答するように設定している。
ちゃんとできているか確認してみよう

 ***
***


という感じで応答してくれるはずだ。
おわりに
何かわからない点などあれば、お気軽にどうぞ。