はじめに
人間は一度学習すると、これに基づいて予測できます。
一方で、機械学習やディープラーニングは教師データが少ししか手に入らない場合は、なかなかうまく予測できません。
人間の様に、1つ、あるいは数個の例を見て、予測することができるモデルが作れないか、というのは古くは1980年代頃から研究されています。この分野はFew shot learning や One shot learning と呼ばれています。
ディープラーニングによるAIブームが起こる以前にも、生成モデルを用いた研究(One-Shot Learning of Object Categories)などがありました。
今日の機械学習の文脈では、Human-level concept learning through probabilistic program inductionがあります。
上記2つの論文はどちらも引用数が1000を超えており、重要な研究となっています。
この記事で扱う内容
この記事では、Siamise Networkを用いた One shot learning にテーマを絞ります。そして、Kerasを使って動かしてみることを目的とします。
オリジナルの論文はこちらです。
Siamese Neural Networks for One-shot Image Recognition
オリジナルの論文以外に、以下の英語記事を参考にしています。
One Shot Learning with Siamese Networks using Keras
使うデータセットはomniglotです。
以下のGitHubで手に入れることができます。
Omniglotデータセット
pythonフォルダにある「images_background」と「images_evaluation」を使います。それぞれ訓練データとテストデータとなります。
環境
私のPCのCPUを使っても計算に時間がかかるので、無料で使えるGoogle Collaboratoryを使って実践します。
上記のデータセットをcollaboratoryで使うため、まずGoogle Driveにアップロードします。
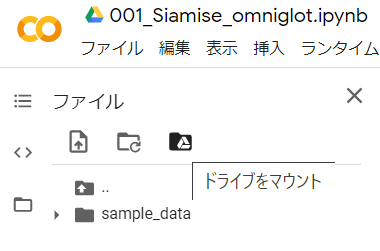
GoogleDriveに入れたファイルをcollaboratoryで使えるようにするため、GoogleDriveをマウントします。マウントするには下図の赤線で囲ったファイルアイコンをクリックして、GoogleDriveを選択します。(以前はAPIを使ってコマンド実行していましたが、簡単になってる!)

Siamese Networkについて
この論文では文字認識に焦点を絞っています。
そして、large siamese convolutional neural networkを採用しています。これの特徴として、以下が挙げられます。
a)少数のサンプルしかない場合でも、未知のクラスの分布を予測するのに有用な画像の特徴を学習することができる
b)サンプルされたペアについて通常の最適化テクニックを使って学習できる
c)ドメイン固有の知識ではなくディープラーニングのテクニックを探索することで他に引けをとらないモデルとなる
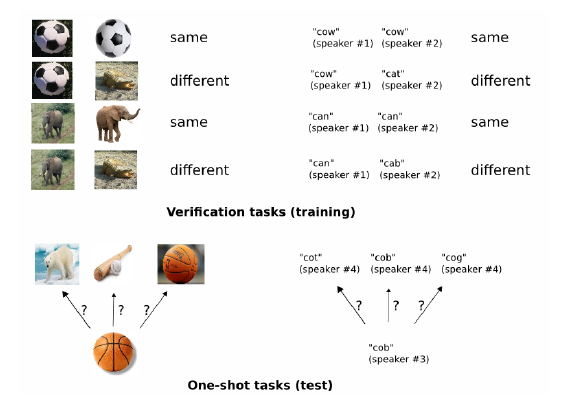
具体的には、シャム(双生児)のようなネットワークを作り、2つの画像をインプットとします。そして、ペアの画像が同じクラスかを識別するモデルを作るという戦略をとります。2つの画像の類似度から、それまで訓練データになかった対象がテストデータに入ってきたことを検知するという、面白い考え方です。
#Siamese Networkの実装
以下の様にKerasで実装しました。
import tensorflow as tf

from keras.models import Sequential
from keras.optimizers import Adam
from keras.layers import Conv2D, ZeroPadding2D, Activation, Input, concatenate
from keras.models import Model

from keras.layers.normalization import BatchNormalization
from keras.layers.pooling import MaxPooling2D
from keras.layers.merge import Concatenate
from keras.layers.core import Lambda, Flatten, Dense
from keras.initializers import glorot_uniform, RandomNormal

from keras.engine.topology import Layer
from keras.regularizers import l2
from keras import backend as K

from sklearn.utils import shuffle

def get_siamese_model(input_shape):
    """
        Model architecture
    """

    # Define the tensors for the two input images
    left_input = Input(input_shape)
    right_input = Input(input_shape)

    initialize_weights = RandomNormal(mean=0.0, stddev=0.01, seed=None)
    initialize_bias = RandomNormal(mean=0.5, stddev=0.01, seed=None)

    # Convolutional Neural Network
    model = Sequential()
    model.add(Conv2D(64, (10,10), activation='relu', input_shape=input_shape,
                   kernel_initializer=initialize_weights, kernel_regularizer=l2(2e-4)))
    model.add(MaxPooling2D())
    model.add(Conv2D(128, (7,7), activation='relu',
                     kernel_initializer=initialize_weights,
                     bias_initializer=initialize_bias, kernel_regularizer=l2(2e-4)))
    model.add(MaxPooling2D())
    model.add(Conv2D(128, (4,4), activation='relu', kernel_initializer=initialize_weights,
                     bias_initializer=initialize_bias, kernel_regularizer=l2(2e-4)))
    model.add(MaxPooling2D())
    model.add(Conv2D(256, (4,4), activation='relu', kernel_initializer=initialize_weights,
                     bias_initializer=initialize_bias, kernel_regularizer=l2(2e-4)))
    model.add(Flatten())
    model.add(Dense(4096, activation='sigmoid',
                   kernel_regularizer=l2(1e-3),
                   kernel_initializer=initialize_weights,bias_initializer=initialize_bias))

    # Generate the encodings (feature vectors) for the two images
    encoded_l = model(left_input)
    encoded_r = model(right_input)

    # Add a customized layer to compute the absolute difference between the encodings
    L1_layer = Lambda(lambda tensors:K.abs(tensors[0] - tensors[1]))
    L1_distance = L1_layer([encoded_l, encoded_r])

    # Add a dense layer with a sigmoid unit to generate the similarity score
    prediction = Dense(1,activation='sigmoid',bias_initializer=initialize_bias)(L1_distance)

    # Connect the inputs with the outputs
    siamese_net = Model(inputs=[left_input,right_input],outputs=prediction)

    # return the model
    return siamese_net
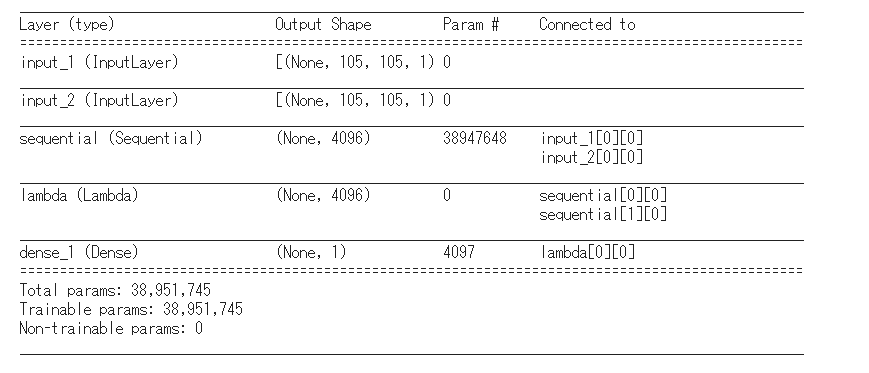
アーキテクチャが定義できたので、このモデルのサマリを出力します。
model = get_siamese_model((105, 105, 1))
model.summary()
One shot learningをして精度を検証した結果です。

精度は80%くらいでした。論文では92%の精度をだしているので、ちょっと再現が悪いですね。原因はさぐっていますが、まだわかっていません。
#さいごに
One shot learingのひとつであるSiamese Networkについて簡単に記述してみました。
Google collaboratory上で動かしたjupyter notebookは以下のGitHubにあげています。
https://github.com/ShinCom1974/OneShotLearning
精度は論文の値に及んでいないので、データの使い方などで違うところがあると思います。もう一度論文を読んで確認してみます。