はじめに
React初心者です。
Reduxについて学んだことをメモとして残しておきます。
なかなかReduxのフローが頭に入らず、勉強している間は
React×Reduxのフロー図を紙に書いて壁に貼っていました😅
0. 何故Reduxを使うのか?
- stateの見通しを良くする
- どこからでもstateを参照/更新可能にするため
- モジュール同士を疎結合にするため(⇄密結合)
0.1 Storeを用いる
Store→プロジェクト内全体のグローバルstate
component同士のstateのバケツリレーをやめることができる。
1. Fluxフローとは
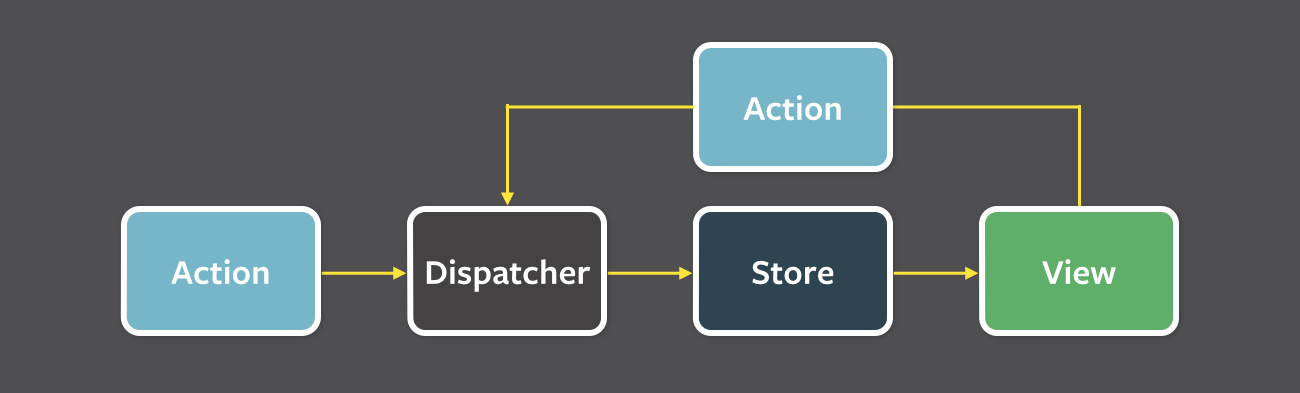
- Reduxの設計思想の根本である考え方
- データが常に1方向に流れる
- イベント駆動(イベント発生によってデータが変更)
- Fluxの思想をReactの状態管理に適用したライブラリがRedux
2. Actionsをつくる
- Viewからの要求を受けてStoreに変更を依頼する
- アプリからStoreへデータを送るためのpayloadを渡す役割
- (Redux thunkを使用する前提)
2.1 何故Actionsを使うのか
- Actionsには純粋に受け取ったデータの転送を記述する
- 受け渡すデータをどう扱うかはReducersの役割
2.2 Actionsを書く
① Action typeを定義してexportする
② typeとpayloadを記述 payloadはプレーンなオブジェクトを返す
// ①
export const SIGN_IN = "SIGN_IN";
export const signInAction = (userState: any): UserActionsFormat => {
  // ②
  return {
    type: "SIGN_IN",
    payload: {
      isSignedIn: true,
      uid: userState.name,
      userName: userState.username
    }
  }
};
3. Reducersをつくる
- Actionsからデータを受け取りStoreのstateをどう変更するか管理
- Store内のstateの状態管理人
3.1 initialStateをかく
- ReducersはStoreの初期状態と現在の状態を知っている
- この初期状態(initialState)をReducers作成前に作る
reducks/store/initialState.tsを作成 - Storeに必要なstateを全て記述しexportしておく
const initialState = {
  users: {
    isSignedIn: false,
    uid: "",
    userName: ""
  }
}
export default initialState
3.2 Reducersをかく
- reducks/users/reducers.tsを作成
- Reducersにデータを渡す場合必ず 元のデータ+新しいデータのデータを渡す
import * as Actions from './actions'
import InitialState from './store/initialState'

export const UsersReducers = (state: any = initialState.users, action: Actions.UserActionsFormat) => {
  switch(action.type) {
    case Actions.SIGN_IN:
      // spread syntax
      // stateとaction.payloadで重複する部分は
      // action.payloadの方で上書きされる。
      return {
        ...state,
        ...action.payload
      }
    case Actions.SIGN_OUT:
      return false;
  }
}
4. Store(Redux)とReactを接続する
4.1 Storeをつくる
reducks/store/store.tsへ記述
4.1.1 モジュール
import {
  createStore as reduxCreateStore,
  combineReducers,
} from 'redux'
// Import Reducers
import {ProductsReducer} from '../products/reducers';
import {UsersReducer} from '../users/reducers';
4.1.2 関数
export default function createStore() {
  return reduxCreateStore(
    // Reducerを纏めて現在のそれぞれのstateを取得する
    combineReducers({
      products: ProductsReducer,
      users: UsersReducer,
    })
  )
4.2 StoreとReducersの関連付け
- src/index.tsxへ追加
import React from 'react';
import ReactDOM from 'react-dom';
import {Provider} from 'react-redux' // ★
import createStore from './reducks/store/store' // ★
import './index.css';
import App from './App';
import reportWebVitals from './reportWebVitals';
// Storeの情報を格納
export const store = createStore(); // ★
ReactDOM.render(
  // Appの中でStoreの情報を参照できる
  <Provider store={store}> // ★
    <App />
  </Provider>, // ★
  document.getElementById('root')
);
Appコンポーネント内から以下でStoreを操作できる
useSelector: Store内のデータの取得
useDispatch: Store内のデータの書き換え
4.3 Storeへルーティング設定する(MiddleWare導入)
ルーティング用ライブラリ
- react-router v4移行
Reactのルーティング用ライブラリ - connected-react-router
ReduxのStoreでルーティングを管理
react-router v4 & v5 と互換性がある
5 re-ducks patternを理解する
- re-ducksパターンはディレクトリ構成の思想
- テンプレートフォルダごとにそれぞれaction,reducers,selectorsなど
を一つずつ置いて管理する - Ducksパターンでは1つのファイルが肥大化しやすかった
5.1 各ファイルの役割
5.1.1 operations
- 複雑な処理を任せられる
- redux-thunkで非同期処理を制御する
- Actionsを呼び出す
- 本来はoperationsからActionsを呼び出す
5.1.2 types
-
TypeScriptで使用する
-
型定義を記述してexportして使う
export interface UserState {
  icon: string;
  isSignedIn: boolean;
  uid: string;
  username: string;
}
5.1.3 selectors
-
Storeで管理しているstateを参照する関数
-
reselectというnpmモジュールを使用する
// stateの中から自分が使いたいstateを抽出できる
import { createSelector } from "reselect"

const usersSelector = (state) => state.users;
const getUserId = createSelector(
  [userSelector],
  state => state.uid
)
6 redux-thunkで非同期処理を制御する
- redux-thunkライブラリを使用することでredux内で非同期処理を待つことができる
→DBへの接続の際など。 - 通常のActionsはaction objectを受け取る
→関数を受け取ることができない
→async/awaitやPromiseを使用することができない - redux-thunkはstoreに導入する
- redux-thunkはMiddleware
6.2 redux-thunkをかく
store.ts
//  ①import
import thunk from 'redux-thunk'
// 中略
export  default function createStore(history) {
  return reduxCreateStore(
    coombineReducers({
      // 中略
    }),
    applyMiddleware(
      routerMiddleware(history),
      // applyMiddlewareに追加
      thunk
    )
  )
}
operations.ts
export const signIn = (email: string, password: string) => {
  return async (dispatch: any, getState: any) => {
    // 現在のStoreの状態を取得
    const state = getState();
    // Storeのusersがサインインしているかどうか
    const isSignedIn: boolean = state.users.isSignedIn;

    if(!isSignedIn) {
      // emailSignInの実行完了を待つ
      const userData = await emailSignIn(email, password);
      // signInActionがDispatch → ActionsがReducersにデータを渡す
      // → ReducersはそのデータでStoreを更新する
      dispatch(signInAction({
        isSignedIn: true,
        uid: '00001',
        username: 'shintaro',
      }))
    }
  }
}
7 コンテナの役割(Storeと接続されたコンテナコンポーネントを作る)
- Redux Hooksでは使用しない
- Storeとコンポーネントの中継役
(StoreからState,Dispatchが送られてきてConnectでフィルタリングしてコンポーネントに渡す) - ReduxとReactをつなぐ
- StoreからDispatchする関数(Actions)をコンポーネントに渡す
8 さいごに
他にも状態管理には方法があります。
(Recoil,useContext,SWR,ApolloClient...etc)
これらについても違いを明確に理解した上でフロントエンド開発に
役立てていきたいと思います。
勉強させていただいた動画
https://www.youtube.com/watch?v=FBMA34gUsgw&list=PLX8Rsrpnn3IWavNOj3n4Vypzwb3q1RXhr&index=1