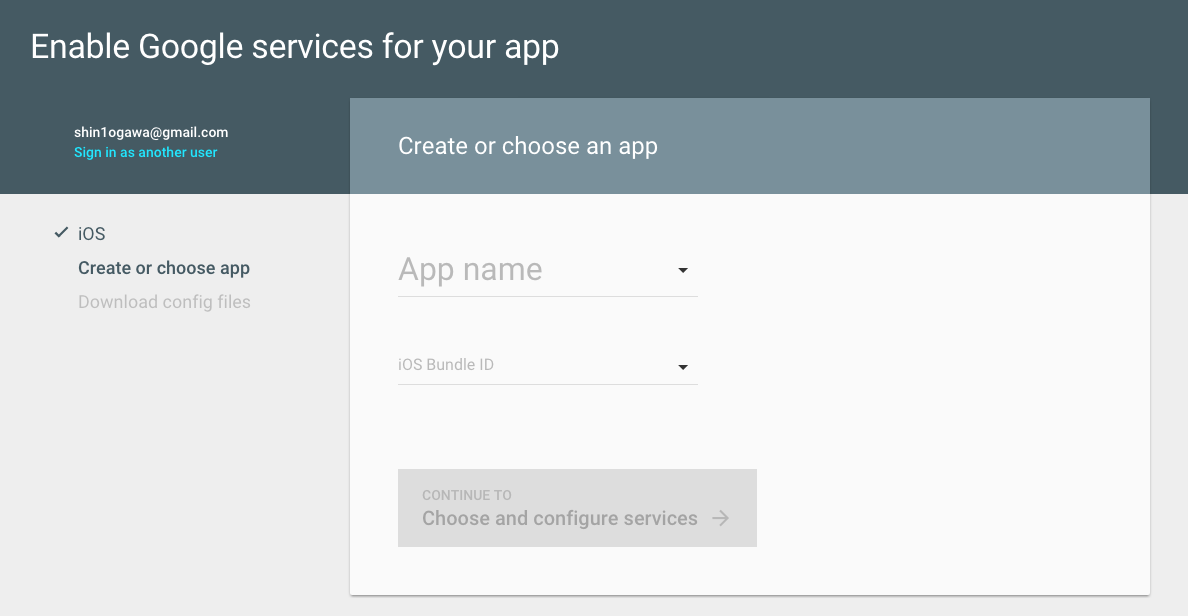
以前から運用しているサーバGAE+クライアントiOSなアプリがあり、クライアントサーバ間の認証にはGAEのOAuth1 Providerを使っている。しかし今OAuth1はないだろう、という事でクライアントサーバ間の認証をGoogle Sign-In for iOSに置き換えることにした。
前提
Xcodeプロジェクトはすでに存在していて、cocoapodsでライブラリ管理をし、言語はSwift。
クライアント側の設定ファイルの生成
iOS Bundle IDとGoogle Developer Console ProjectのCredentiaのペアが記述された plist ファイルが必要になるので、それを生成する。
- 公式リファレンスの Start integrating Google Sign-In into your iOS app にある GET A CONFIGURATION FILE ボタンをクリックする

2. 次のようなポップアップが表示されるので、App nameにはDeveloper Console上の既存のプロジェクトを選択するか、新規プロジェクト名を入力する。なお既存プロジェクトにすでにiOS向けのCredentialsの設定がある場合は、Bundle IDも選択可能。

3. すべて入力したあと、 Generate configuratino files で次へ進めて Download GoogleService-Info.plist ボタンでGoogleService-Info.plistファイルがダウンロードできる。
Xcodeプロジェクトの設定
- Podfileに
pod 'Google/SignIn'を追加してpod installを実行し、Xcodeプロジェクトを開き直す。 - Xcode のプロジェクトにダウンロードした
GoogleService-Info.plistを追加する - プロジェクトの設定の Info タブの URL Types に以下の2つを追加する(URL Schemesに値を設定し、Identifierは入力しなくてOK)
-
GoogleService-Info.plistに含まれている REVERSED_CLIENT_ID - Bundle ID
-
~-Bridging-Header.h に
#import <Google/SignIn.h>を追加する
実装
UIApplicationDelegateの実装をAppDelegate、サインインを起動する画面をMyViewControllerとした場合。基本的にはすべてGIDSignInを通じて操作する。
SignIn関連のDelegateの実装
// MARK: GIDSignInDelegate
extension AppDelegate: GIDSignInDelegate {
  func signIn(signIn: GIDSignIn!, didSignInForUser user: GIDGoogleUser!, withError error: NSError!) {
    if (error == nil) {
      let idToken = user.authentication.idToken // サーバへ送信するトークン
      let name = user.profile.name
      let email = user.profile.email
      let refreshToken = user.authentication.refreshToken
      // ..他にもいろいろ取得できる
    } else {
      println("singIn:didSignInForUser: \(error.localizedDescription)")
    }
  }
}

// MARK: GIDSignInUIDelegate
extension MyViewController: GIDSignInUIDelegate {
  func signInWillDispatch(signIn: GIDSignIn!, error: NSError!) {
    // サインインウインドウの表示前処理
  }

  func signIn(signIn: GIDSignIn!, presentViewController viewController: UIViewController!) {
    // サインインウインドウを表示する処理
    self.presentViewController(viewController, animated: true, completion: nil)
  }

  func signIn(signIn: GIDSignIn!, dismissViewController viewController: UIViewController!) {
    // サインウインドウが閉じたあとの処理
  }
}
起動時の処理
@UIApplicationMain
class AppDelegate: UIResponder, UIApplicationDelegate {

  var window: UIWindow?

  func application(application: UIApplication, didFinishLaunchingWithOptions launchOptions: [NSObject: AnyObject]?) -> Bool {
    // Override point for customization after application launch.

    // GIDSignIn
    var configureError: NSError?
    GGLContext.sharedInstance().configureWithError(&configureError)
    assert(configureError == nil, "Error configuring Google services: \(configureError)")
    GIDSignIn.sharedInstance().delegate = self

    return true
  }

  func application(application: UIApplication, openURL url: NSURL, sourceApplication: String?, annotation: AnyObject?) -> Bool {
    // GIDSignIn
    return GIDSignIn.sharedInstance().handleURL(url, sourceApplication: sourceApplication, annotation: annotation)
  }
}
サインインウインドウを起動する処理
@IBAction func signInButtonClicked(sender: AnyObject) {
  let signIn = GIDSignIn.sharedInstance()
  signIn.uiDelegate = self
  signIn.signIn()
}
上記のように実装しても良いし、GIDSignButtonというUIクラスが含まれているので、Viewを貼り付けてCustom ClassでGIDSignInButtonに変更すると、実行時にGoogleぽいボタンが表示されて、クリックするとサインインウインドウが起動する機能もある。
サインインの状態の確認
自前でサインインの状態を保存しなくても、signInSilently()(いわゆるWebの場合のログインURL生成時のログイン画面のautoモード)を使って次のように実装することも可能。signInSilently()が成功したら、GIDSignInDelegateの実装が呼ばれ、先の実装にあるGIDGoogleUserが受け取れ、idToken等を取得できる。
func signInIfNeeded() {
  let signIn = GIDSignIn.sharedInstance()
  if signIn.hasAuthInKeychain() {
    let user = signIn.currentUser
    if user == nil {
      signIn.uiDelegate = self
      signIn.signInSilently()
    }
  } else {
    signIn.uiDelegate = self
    signIn.signIn()
  }
}
サーバ側の実装
クライアント側で取得したidTokenを次のようにパースできる(com.google.api-client:google-api-client:1.20.0を利用)。
GoogleIdTokenVerifier verifier =
  new GoogleIdTokenVerifier.Builder(new NetHttpTransport(), new JacksonFactory())
    .setAudience(Arrays.asList(CLIENT_ID)).build();
GoogleIdToken idToken = verifier.verify(IDTOKENSTRING);
Payload payload = idToken.getPayload();
// payloadから各種情報を取り出せる