はじめに
React の利用経験がないですが、 React から OpenAI API を叩いてみたくなったので、実施した内容を共有します。
こちらをやってみました
Integrating OpenAI API with a React Application
https://dev.to/jehnz/integrating-openai-api-with-a-react-application-3378
手順
Mac Studio (Apple M1 Max, OS 13.3) で実施
OpenAI の API
こちらの手順で API キーを発行する
Node.jsとnpmをインストール
コマンドラインからbrew(4.3.9)を利用して、Node.jsとnpmをインストールします
次のコマンドをターミナルで実行します。
brew install node
次のコマンドでインストールの確認をします
node -v
v22.4.1
npm -v
10.8.1
React App のセットアップ
create-react-appを利用して、React App をセットアップします。
次のコマンドで実行します。
openai-react-appという名前をつけています。
npx create-react-app openai-react-app
cd openai-react-app
プロジェクトを初期化します。
npm init -y
Axiosのインストール
OpenAI APIへのHTTPリクエストにはAxiosを使います。
npmを使ってAxiosをインストールします。
npm install axios
インストールが成功すると次のように表示されます。
% npm install axios


added 9 packages, and audited 10 packages in 566ms

1 package is looking for funding
  run `npm fund` for details

found 0 vulnerabilities
OpenAIサービスの作成
ReactアプリのsrcディレクトリにopenaiService.jsという新しいファイルを作成します。
このファイルがOpenAIへのAPIリクエストを処理します。
mkdir ./src
nano ./src/openaiService.js
次の内容を書き込みます。
YOUR_OPENAI_API_KEYの部分は自分の持っている APIキー に書き換えます。
import axios from 'axios';

const API_KEY = 'YOUR_OPENAI_API_KEY';

const openai = axios.create({
  baseURL: 'https://api.openai.com/v1',
  headers: {
    'Content-Type': 'application/json',
    'Authorization': `Bearer ${API_KEY}`,
  },
});

export const getOpenAIResponse = async (prompt) => {
  try {
    const response = await openai.post('/completions', {
      model: 'gpt-3.5-turbo-instruct',
      prompt: prompt,
      max_tokens: 100,
    });
    return response.data;
  } catch (error) {
    console.error('Error fetching OpenAI response:', error);
    throw error;
  }
};
OpenAIを使用するコンポーネントを作成
次に、先ほどの src/openaiService.js で定義した getOpenAIResponse 関数を使って、OpenAI からデータを取得する新しいコンポーネントを作成します。
mkdir src/components
nano src/components/OpenAIComponent.js
次の内容を書き込みます。
import React, { useState } from 'react';
import { getOpenAIResponse } from '../openaiService';

const OpenAIComponent = () => {
  const [input, setInput] = useState('');
  const [response, setResponse] = useState('');

  const handleSubmit = async (e) => {
    e.preventDefault();
    const aiResponse = await getOpenAIResponse(input);
    setResponse(aiResponse.choices[0].text);
  };

  return (
    <div>
      <h1>OpenAI Integration with React</h1>
      <form onSubmit={handleSubmit}>
        <textarea
          value={input}
          onChange={(e) => setInput(e.target.value)}
          rows="5"
          cols="50"
          placeholder="Type your prompt here..."
        />
        <br />
        <button type="submit">Get Response</button>
      </form>
      <div>
        <h2>Response:</h2>
        <p>{response}</p>
      </div>
    </div>
  );
};

export default OpenAIComponent;
上記のスクリプトのでの実施内容の解説です。
- Reactのインポート:
- ReactとuseStateフックをインポート
- getOpenAIResponse関数をインポート
- ステートの定義:
- inputステート: ユーザーが入力するテキスト
- responseステート: APIからの応答テキスト
- フォーム送信ハンドラ:
- フォーム送信イベントを防止 (e.preventDefault())
- getOpenAIResponse(input)を呼び出して応答を取得
- 応答テキストをresponseステートに設定
- コンポーネントのレンダリング:
- textareaでユーザーからの入力を受け取る
- 送信ボタンでフォーム送信をトリガー
- 応答テキストを表示するための
<p>要素
- 全体の目的:
- ユーザーが入力したテキストに対して、OpenAIのAPIからの応答を取得し、表示するReactコンポーネント
コンポーネントをアプリに統合
最後に、OpenAIComponent をメインのアプリケーションファイル (App.js) に統合します。
プロジェクト作成時に作成されたデフォルトファイルがあるので、削除してから新しく作成します。
nano src/App.js
次の内容を書き込みます。
import React from 'react';
import OpenAIComponent from './components/OpenAIComponent';

function App() {
  return (
    <div className="App">
      <OpenAIComponent />
    </div>
  );
}

export default App;
Reactアプリケーションを実行
Reactアプリケーションを実行して、統合の動作を確認してください
npm start
上記を実行すると自動的にブラウザが立ち上がります。
コンソールには次のように表示されます。
Compiled successfully!

You can now view openai-react-app in the browser.

  Local:            http://localhost:3000
  On Your Network:  http://192.168.0.1:3000

Note that the development build is not optimized.
To create a production build, use npm run build.

webpack compiled successfully
One of your dependencies, babel-preset-react-app, is importing the
"@babel/plugin-proposal-private-property-in-object" package without
declaring it in its dependencies. This is currently working because
"@babel/plugin-proposal-private-property-in-object" is already in your
node_modules folder for unrelated reasons, but it may break at any time.

babel-preset-react-app is part of the create-react-app project, which
is not maintianed anymore. It is thus unlikely that this bug will
ever be fixed. Add "@babel/plugin-proposal-private-property-in-object" to
your devDependencies to work around this error. This will make this message
go away.
作成したアプリの利用
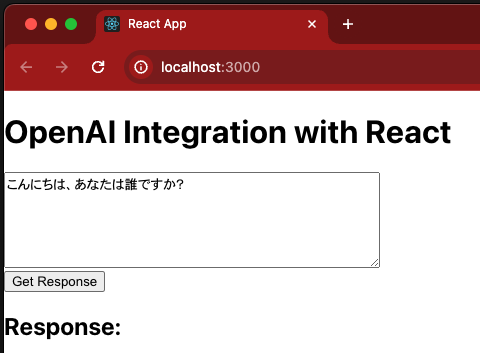
プロンプトを入力し「Get Response」を選択します。
「Response」の下に、結果が返ってきます。
参考


