みなさん、はじめまして。
以前開発エンジニアとして働ていたキャリアがあったものの、
転職をきっかけにしばらく開発の分野から遠ざかっていた現在40代前半の人です。
最近、改めて開発エンジニアとして頑張ってみようと思い、
とりあえずアプリ開発で利用することになる「Flutter」を「VSCode」を利用して開発できる環境を作ってみました。
この記事は、自分の作業記録として残そうと思って記事を初めて記事を投稿してみましたが、
良かったら同じように環境構築をしようとしている方々の手助けになれば幸いです。
ちなみに、私が本記事を記載は以下の記事となります。(ありがとうございます!)
1. 構築環境
- Windows 11
- VS Code ※これからインストール
- Android Studio ※これからインストール
2. 「Flutter」のダウンロード
下記公式サイトから「Flutter」をダウンロードします。
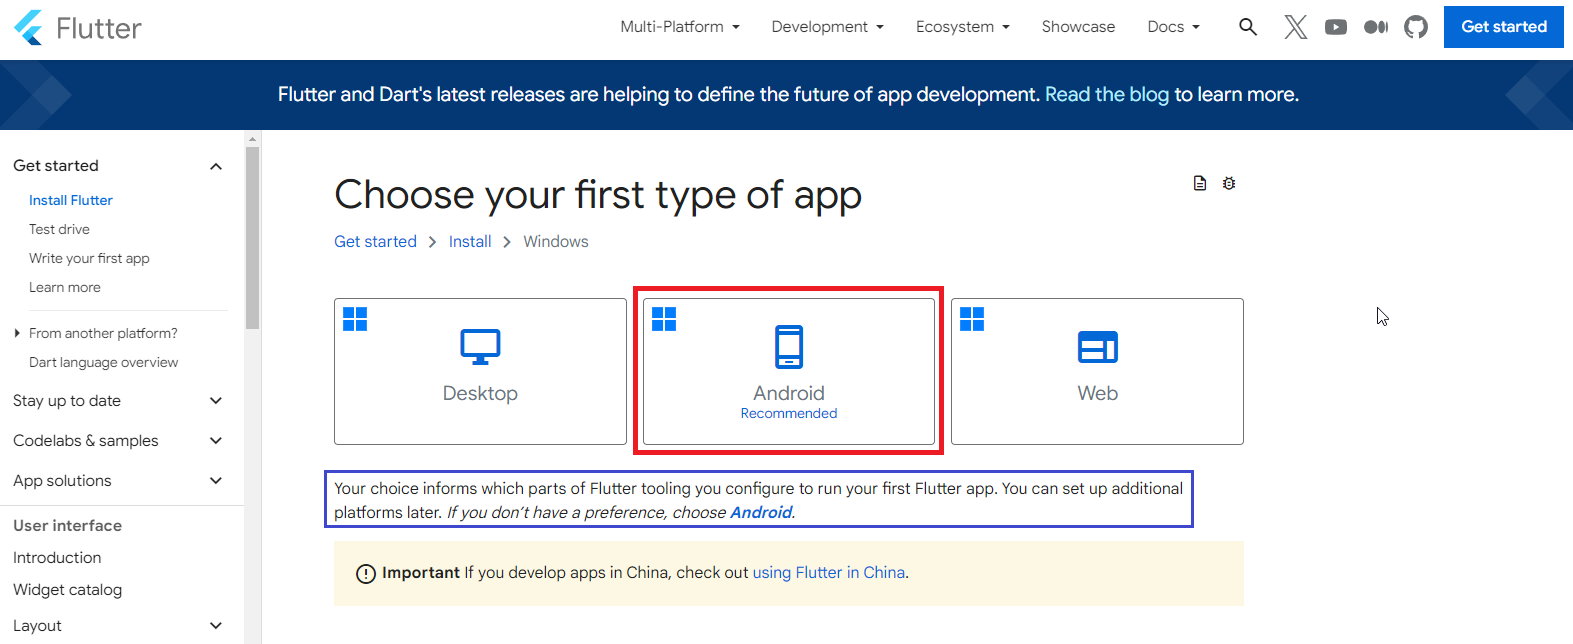
※私が今回構築する環境は「Windows」となるので、下記画像の赤枠をクリックします。
https://docs.flutter.dev/get-started/install
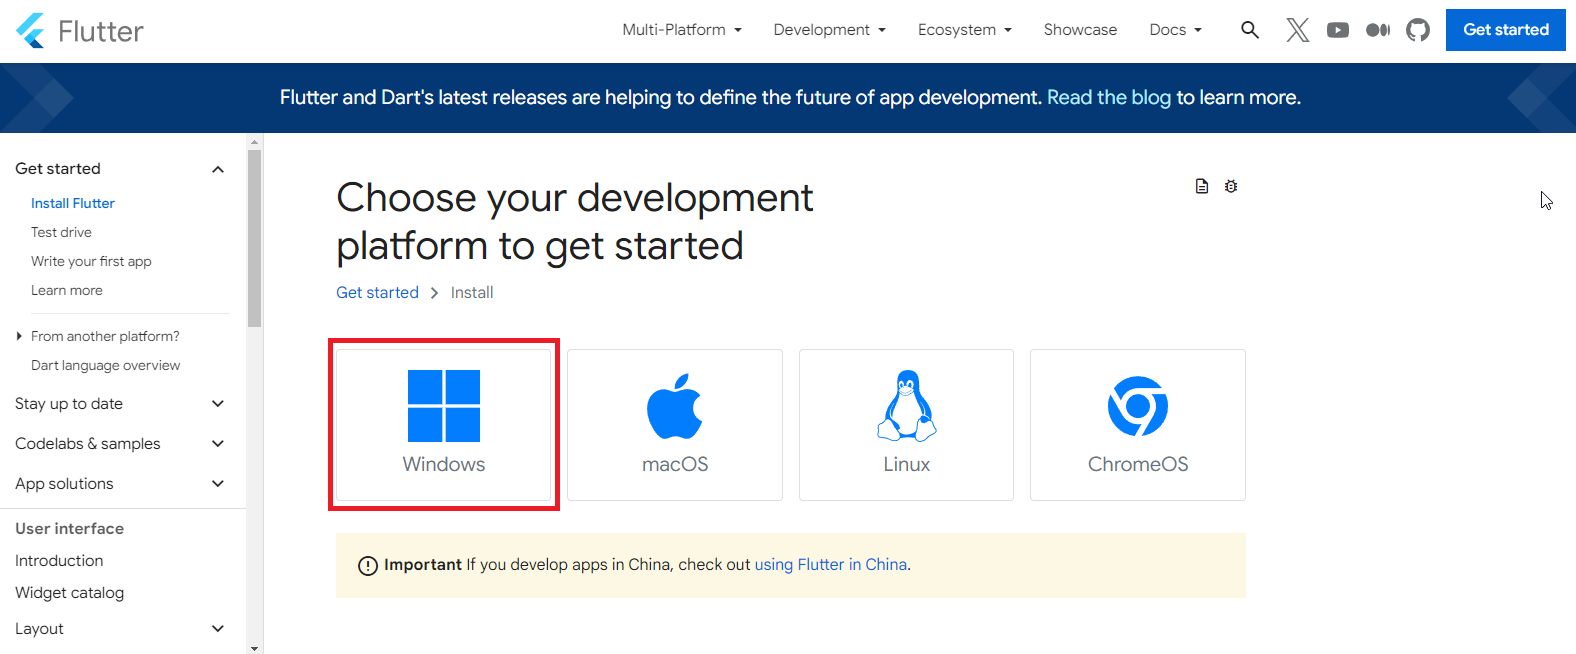
そうしたら、以下の画面に遷移します。
選択肢として
- Desktop
- Android ※Recommended
- Web
が表示されるので、今回は「Android Studio」を利用する想定もあるので、推奨となっている「Android」を選択しておきます。
■ 原文
Your choice informs which parts of Flutter tooling you configure to run your first Flutter app. You can set up additional platforms later. If you don’t have a preference, choose Android.
■ 翻訳
選択によって、最初の Flutter アプリを実行するために Flutter ツールのどの部分を構成するかが決まります。後で追加のプラットフォームをセットアップできます。特にこだわりがない場合は、Android を選択してください。
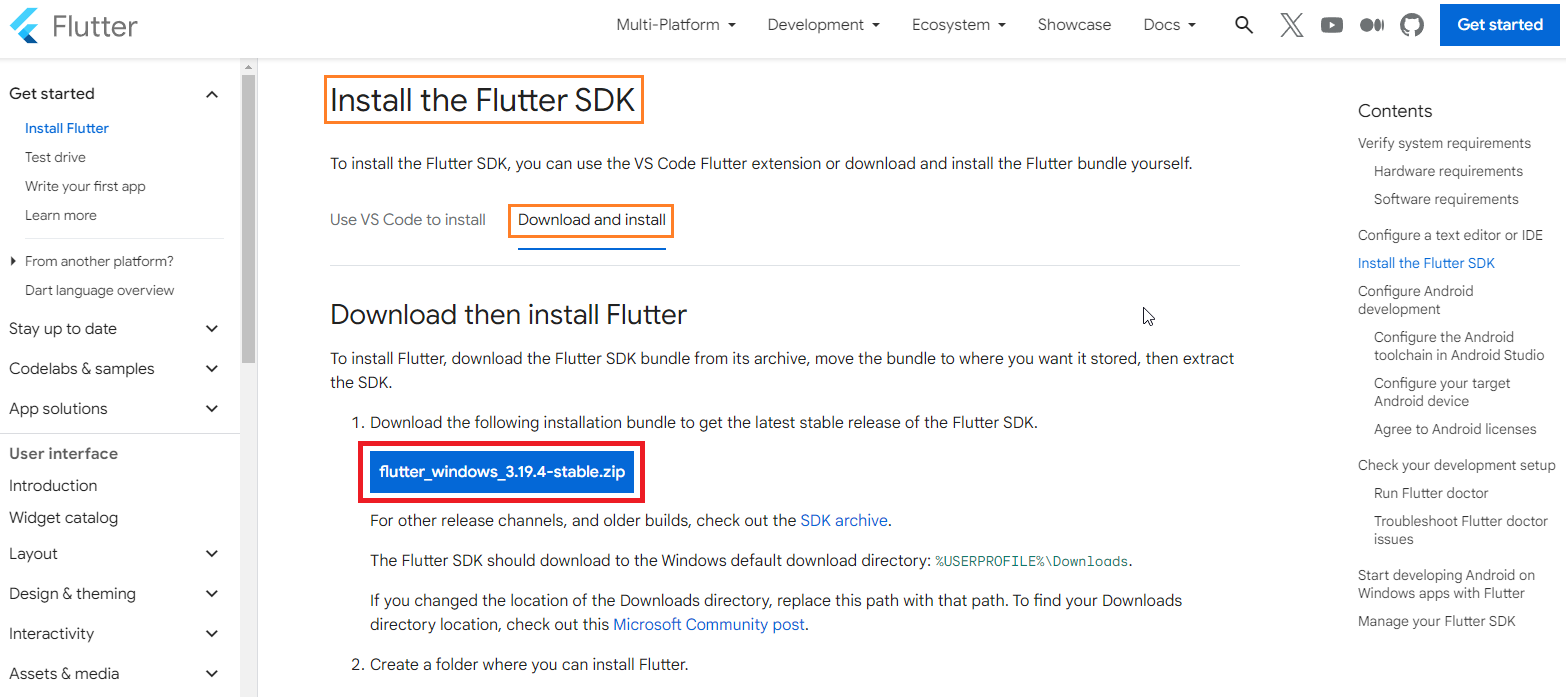
次の画面に遷移後、画面を少し下の方にスクロールし「Install the Flutter SDK」の個所を探します。
その後、「Download and install」のタブの方を選択し、zipファイルのダウンロードボタンをクリックします。
クリック後にダウンロードが実施されるので、ダウンロードが完了するまでいったん待ちましょう。(約1~2分程度)
ダウンロードしたzipファイルは、自分が管理しておきたい所に移動した後、次の手順で利用するので保存した場所はシッカリと覚えておきましょう!
3. 実行「PATH」の設定
先ほどダウンロードしたzipファイルを展開し、自分が管理したい場所に移動しましょう。
私は「C:\Program Files」の配下に置いておきました。
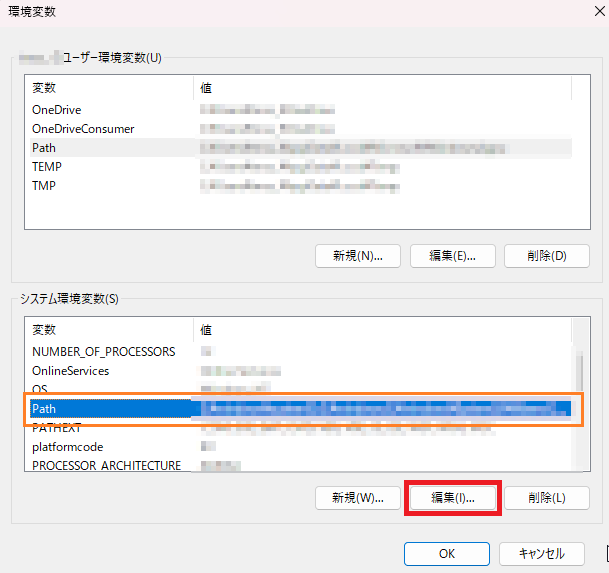
「コマンドプロンプト」や「Power Shell」上でコマンドが認識できるように、環境変数の「PATH」に設定を追加していきましょう。
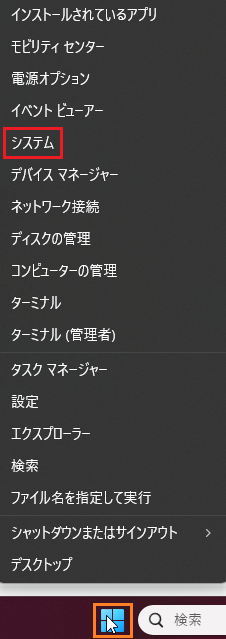
Windowsのバージョンが変わるたびに、「システムのプロパティ」の画面を開く場所が解らなくなるので、画像付きで繊維方法を残しておきます。(今回は「Windows11」のUIバージョン)
Pathを設定(通す)と、「flutterコマンド」が「コマンドプロンプト」または「Power Shell」で利用できるようになります。
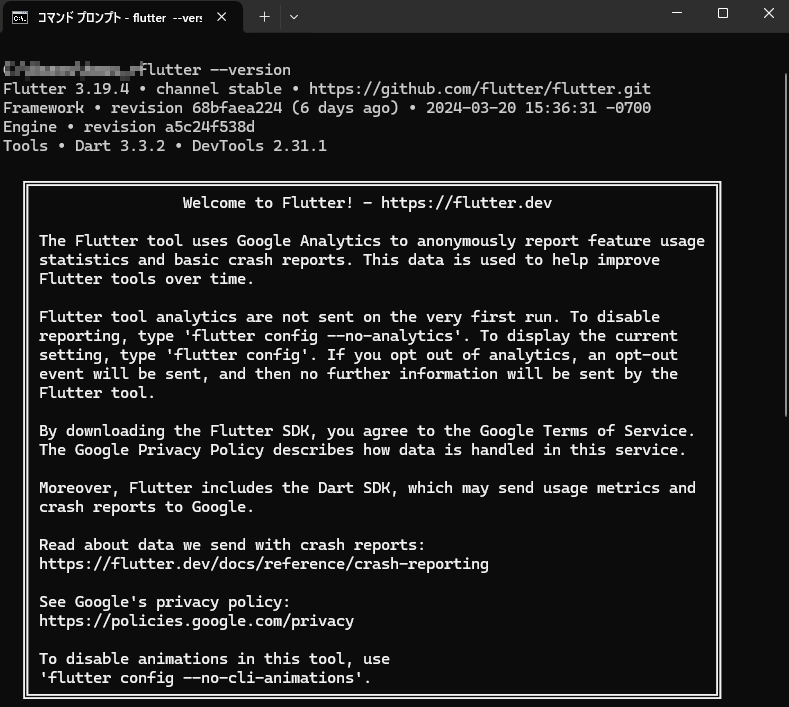
コマンドが利用できるようになっているか、試しに以下のコマンドでバージョンを表示してみましょう。
flutter --version
4. 「flutter doctor」コマンドでセットアップ完了に必要な依存性の確認
以下のコマンドを実行して、セットアップの完了に必要な依存性を確認する事が可能です。
flutter doctor
私の環境での実行結果 ①
PS C:\Users\★★★> flutter doctor
Doctor summary (to see all details, run flutter doctor -v):
[✓] Flutter (Channel stable, 3.19.4, on Microsoft Windows [Version 10.0.22621.3296],
    locale ja-JP)
[✓] Windows Version (Installed version of Windows is version 10 or higher)
[✗] Android toolchain - develop for Android devices
    ✗ Unable to locate Android SDK.
      Install Android Studio from: https://developer.android.com/studio/index.html
      On first launch it will assist you in installing the Android SDK components.
      (or visit https://flutter.dev/docs/get-started/install/windows#android-setup for
      detailed instructions).
      If the Android SDK has been installed to a custom location, please use
      `flutter config --android-sdk` to update to that location.

[✓] Chrome - develop for the web
[✗] Visual Studio - develop Windows apps
    ✗ Visual Studio not installed; this is necessary to develop Windows apps.
      Download at https://visualstudio.microsoft.com/downloads/.
      Please install the "Desktop development with C++" workload, including all of its
      default components
[!] Android Studio (not installed)
[✓] Connected device (3 available)
[✓] Network resources

! Doctor found issues in 3 categories.
- [✓] : 設定完了済み
- [!] : インストールが必須ではないが、設定が未完了の状態
- [✗] : 設定が未完了
実行結果として「Android toolchain」と「Visual Studio」のセットアップが不完全の状態であると出力された。
※今回は「Visual Studio」の代わりに「VS Code」を利用する予定ですが、エラーの内容が「Visual Studio」となっているので、エラーの内容に従い順番にインストールを進めていくことにします。
5. 「Android toolchain」のインストール
まず最初の[✗]の項目となっている「Android toolchain」をインストールしていきます。
■ 原文
✗ Unable to locate Android SDK.
Install Android Studio from: https://developer.android.com/studio/index.html
On first launch it will assist you in installing the Android SDK components.
(or visit https://flutter.dev/docs/get-started/install/windows#android-setup for
detailed instructions).
If the Android SDK has been installed to a custom location, please use
flutter config --android-sdkto update to that location.
■ 翻訳
✗ Android SDK が見つかりません。
Android Studio を次からインストールします: https://developer.android.com/studio/index.html
初回起動時に、Android SDK コンポーネントのインストールを支援します。
(または https://flutter.dev/docs/get-started/install/windows#android-setup にアクセスしてください詳細な手順)。
Android SDK がカスタムの場所にインストールされている場合は、次を使用してください。
flutter config --android-sdkを使用してその場所に更新します。
エラーの内容に記載されている通り、下記のURLにアクセスしてインストールを進めていきます。
インストール手順については、下記の記事を参考にさせていただきました。(ありがとうございます!)
ダウンロードからインストール完了までの時間はだいたい以下の通りです。
- ダウンロード:2~3分
- インストール:8~10分
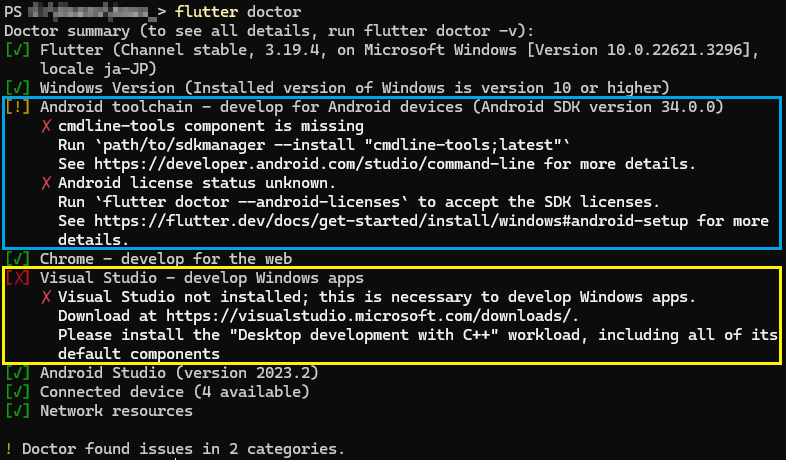
「Android Studio」のインストール完了後に、改めて「flutter doctor」コマンドを実行して状態がどのように変化しているかを確認してみましょう。
私の環境での実行結果 ②
PS C:\Users\tmss_> flutter doctor
Doctor summary (to see all details, run flutter doctor -v):
[✓] Flutter (Channel stable, 3.19.4, on Microsoft Windows [Version 10.0.22621.3296],
    locale ja-JP)
[✓] Windows Version (Installed version of Windows is version 10 or higher)
[!] Android toolchain - develop for Android devices (Android SDK version 34.0.0)
    ✗ cmdline-tools component is missing
      Run `path/to/sdkmanager --install "cmdline-tools;latest"`
      See https://developer.android.com/studio/command-line for more details.
    ✗ Android license status unknown.
      Run `flutter doctor --android-licenses` to accept the SDK licenses.
      See https://flutter.dev/docs/get-started/install/windows#android-setup for more
      details.
[✓] Chrome - develop for the web
[✗] Visual Studio - develop Windows apps
    ✗ Visual Studio not installed; this is necessary to develop Windows apps.
      Download at https://visualstudio.microsoft.com/downloads/.
      Please install the "Desktop development with C++" workload, including all of its
      default components
[✓] Android Studio (version 2023.2)
[✓] Connected device (4 available)
[✓] Network resources

! Doctor found issues in 2 categories.
そうすると「Android toolchain」の状態が[✗]から[!]に変化している。
まだセットアップ完了の状態にはなっていないので、引き続き警告メッセージに従った対応を実施していきます。
なお、対応の進め方は下記のサイト(「Android toolchainのインストール」の部分を参照)を参考にさせていただきました。(ありがとうございます!)
■ 原文
✗ cmdline-tools component is missing
Runpath/to/sdkmanager --install "cmdline-tools;latest"
See https://developer.android.com/studio/command-line for more details.
✗ Android license status unknown.
Runflutter doctor --android-licensesto accept the SDK licenses.
See https://flutter.dev/docs/get-started/install/windows#android-setup for more
details.
■ 翻訳
✗ cmdline-tools コンポーネントがありません
path/to/sdkmanager --install "cmdline-tools;latest"を実行します。
詳細については、https://developer.android.com/studio/command-line を参照してください。
✗ Android ライセンスのステータスは不明です。
「flutter Doctor --android-licenses」を実行して SDK ライセンスを受け入れます。
詳細については、https://flutter.dev/docs/get-started/install/windows#android-setup を参照してください。
詳細。
6. 「Android SDK Command-line Tools」のインストール
Android Studioを起動して(プロジェクトが開かれている時はいったんクローズしてください)、「Projects」⇒「SDK Manager」を選択します。
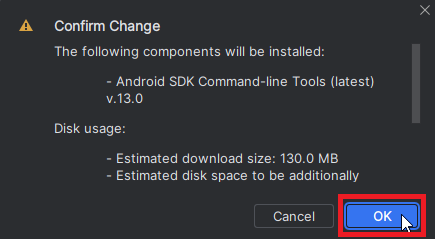
「Settings」画面が表示されるので「Languages & Frameworks」⇒「Android SDK」⇒「SDK Tools」の項目を表示します。下に表示される一覧の中に「Android SDK Command-line Tools (latest)」の項目が存在するのでチェックを入れ、右下の「Apply」をクリックします。
さらに確認画面が表示されるので「OK」をクリックします。
するとダウンロードとインストールが始まるので、完了したら「Finish」をクリックします。
7. ライセンスの同意
もう一つの警告メッセージの内容の通り以下のコマンドを実行します。
flutter doctor --android-licenses
何回(5回ほど)か同意のメッセージが表示されるので、「y」を入力しつづければ問題ありません。
これで「Android toolchain」のセットアップは完了です。
8. 「Visual Studio」のインストール
同じように警告メッセージに従った対応を実施していきます。
参考程度に下記のサイトも少し参考にして進めてみました。(ありがとうございます!)
■ 原文
✗ Visual Studio not installed; this is necessary to develop Windows apps.
Download at https://visualstudio.microsoft.com/downloads/.
Please install the "Desktop development with C++" workload, including all of its
default components
■ 翻訳
✗ Visual Studio がインストールされていません。これは Windows アプリを開発するために必要です。
https://visualstudio.microsoft.com/downloads/ からダウンロードします。
「C++ によるデスクトップ開発」ワークロードを、そのすべての機能を含めてインストールしてください。
デフォルトのコンポーネント
エラーの内容に記載されている通り、下記のURLにアクセスしてインストールを進めていきます。
今回は無料のコミュニティ版を使用していくため、コミュニティの「無料ダウンロード」をクリックします。
ダウンロードファイル(VisualStudioSetup.exe)を実行してインストールを実施した後、以下のような画面が表示されますが、「C++」によるデスクトップ開発とモバイル開発を選択してみました。
これで、すべてのセットアップを完了しました。
私の環境での実行結果 ③
PS C:\Users\tmss_> flutter doctor
Doctor summary (to see all details, run flutter doctor -v):
[✓] Flutter (Channel stable, 3.19.4, on Microsoft Windows [Version 10.0.22621.3296],
    locale ja-JP)
[✓] Windows Version (Installed version of Windows is version 10 or higher)
[✓] Android toolchain - develop for Android devices (Android SDK version 34.0.0)
[✓] Chrome - develop for the web
[✓] Visual Studio - develop Windows apps (Visual Studio Community 2022 17.9.4)
[✓] Android Studio (version 2023.2)
[✓] Connected device (3 available)
[✓] Network resources

• No issues found!
9. 「VS Code」のインストール
「VS Code」のインストールについては、下記の記事を参考にさせていただきました。(ありがとうございます!)
10. 「VSCode」に「Flutter」をインストール
「VSCode」に「Flutter」のプラグインをインストールして使えるようにします。
左メニューの「extensions(拡張機能)」を開いて、検索欄に「flutter」と入力して検索してみましょう。
検索結果で表示された、flutter関連のプラグインの中で一番上の「Flutter」と表示されている箇所の青い「install」ボタンをクリックしましょう。
それで、インストールが実施されます。
他にも関連するプラグインが表示されていますが、必要に応じでインストールを実施してみてください。
これで必要なインストールはすべて完了しました。
10. 「VSCode」上で「Flutter」を実行してみる
10.1. 新規プロジェクトを作成
とりあえずテスト用のプロジェクトを作成するために、プロンプト上で下記のコマンドを実行します。
flutter create test
そうすると、新規のFlutterプロジェクトが作成されます。
10.2. プロジェクトを読み込む
作成したプロジェクトを、VSCode上で開きます。
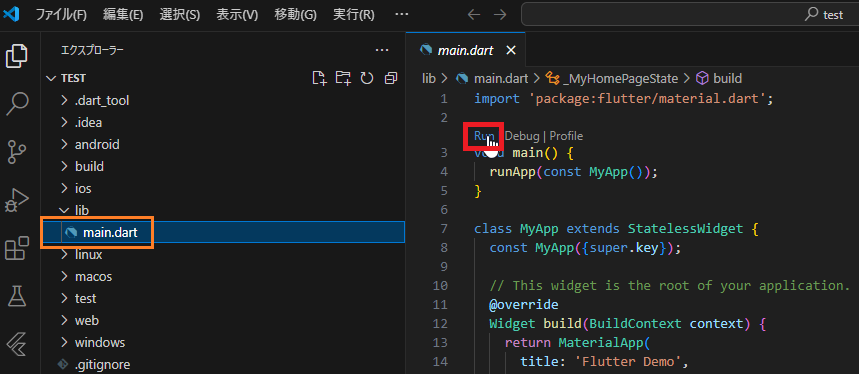
作成したプロジェクト(フォルダ)を選択して開いた後、「main.dart」ファイルを開きます。
作成したプロジェクトを実行するには、ソース上の「Run」をクリックします。
そうすると、しばらくしてChrome上でアプリが実行されます。
画面の右下にある「+」をクリックすると中央の数字がカウントアップするようです。
ちなみに、VSCodeの右下にdeviceを表示している箇所があるのでそこをクリックしてみます。
すると、デバイスを入力できる窓が画面上部に表示されます。
とりあえず、デフォルトで存在しているEmuratorを選択した後、改めて「main.dart」ファイル内の「Run」をクリックします。
そうすると、Androidの画面が表示され、その中で動作している状態を確認する事ができます。(Chromeのアプリ内で表示ができます)
なお「Create Android Emurator」をクリックして様々な機種のEmuratorを作成する事も出来るはずですが、この記事の内容では割愛させていただきます。
最後に
とりあえず「Flutter」に関してもまだよく解らない状態のまま、開発環境の構築方法だけを記事としてまとめてみましたが、これから始めようとしている初心者の方々の手助けになれば幸いです。
また、私の記事は 「自己学習用」 としてまとめているので、記載している内容に不備があっても責任は負いかねますのでご了承ください。
