この記事は、こちらの2日目の記事です。
https://adventar.org/calendars/2530
まえがき
札幌で働いているshimaといいます。Uターンしてもうすぐ1年になります。
寒いです。
http://www.tenki.jp/past/2017/12/01/1/
札幌は北海道では一番温かい地域の1つであり、道東出身の私は正直見下していたのですが、長い内地での生活によりなまってしまったようです。
しかしそもそも、どうも弊社オフィスは夏も冬も寒く、空調の穴は冷風を出すばかりです。最低気温が氷点下になった頃から、日が暮れる時間にはすっかり体が冷え切り、手に息を吹きかけながらタイピングしています。
それでも、いつも暑い東京本社よりは1万倍ましですけど ![]()
そこで、何度になったら私は寒いと感じるのか、ログを取ってみたくなりました。普段使っているC#で簡単に試します。
実行環境
- Windows 10
- .NET Framework 4.7
もっと古いバージョンでも可能です。
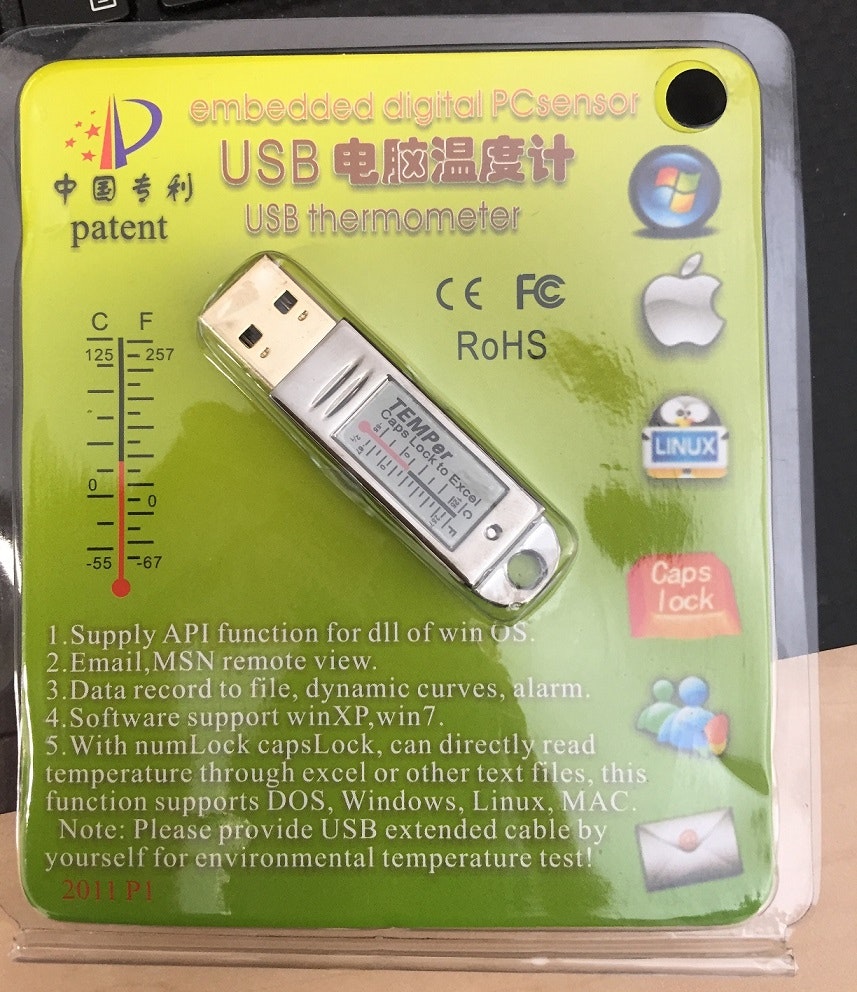
TEMPerとは
こちらで購入しました。https://www.amazon.co.jp//dp/B004FI1570
中国語でやや不安になるモノが送られてきますが、おそらく定番の製品のようです。
懐かしさを覚える8cmのCD-ROMが添付されているものの、21世紀ですので当然USB接続すればドライバは自動でインストールされます。今回はそれで充分です。
HidLibrary
このUSBデバイスは、HIDのAPIで制御します。HIDとは Human Interface Device のことです。温度計がHIDと言われてもあまりピンときませんが、HIDは取り扱いが楽なので幅広く利用されているようです。
HIDは古くからある技術で、当然ながらCで書くのが正統派です。
https://docs.microsoft.com/en-us/windows-hardware/drivers/hid/hid-clients
ただし今回はお手軽にC#から制御するため、HidLibrary を使用します。
https://github.com/mikeobrien/HidLibrary
NuGetパッケージがあり、簡単に導入できます。
https://www.nuget.org/packages/HidLibrary/
Windowsストアアプリの場合
このHidLibraryは、古くからある低レベルなAPIのラッパーです。
UWP (Windowsストアアプリ) であれば、APIがC#で現代的なものに一新されています。こちらを使うべきでしょう。今回は、筆者の私怨によりUWPは無視します。(HIDに限りませんが、UWPだと実装が 簡単になることはあっても何かと制約が多く、つまづくこと多し。)
https://blogs.msdn.microsoft.com/hirosho/2013/10/18/windows-8-1-hid/
実装
デバイスの一覧を列挙
- Visual Studio から、
Windowsクラシックデスクトップ→コンソールアプリケーション (.NET Framework)としてプロジェクトを作成します。 - HidLibrary のNuGetをインストールします。
- 以下のプログラムを実行します。
using HidLibrary;
class Program
{
static void Main()
{
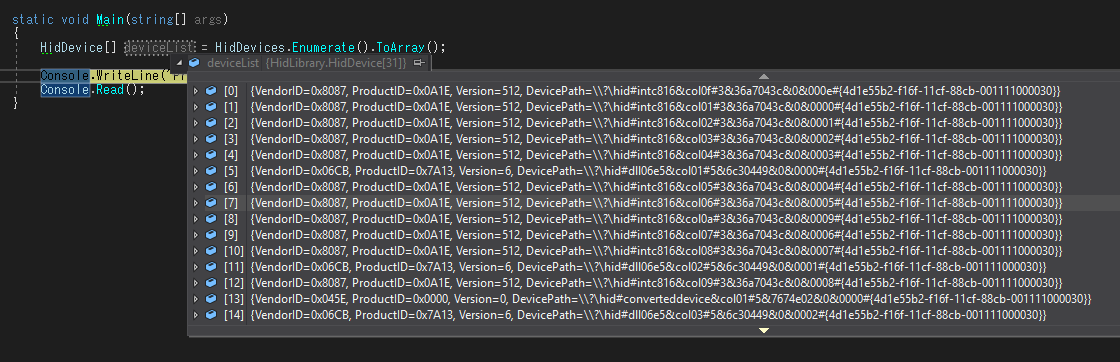
var deviceList = HidDevices.Enumerate().ToArray();
}
}
これで取得できたデバイスを覗くと、筆者の環境では31個ありました。どれがTEMPerでしょう?
TEMPerデバイスを特定する
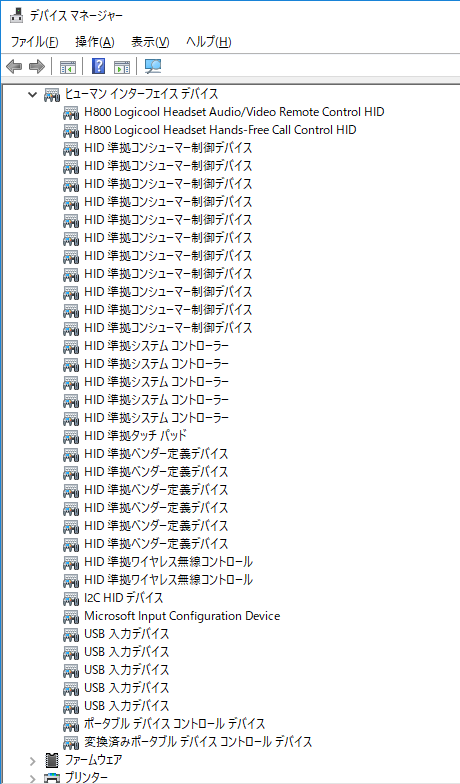
デバイスマネージャのヒューマン インターフェイス デバイスのところを開きます。
TEMPerデバイスを抜き差しすると増えているのが2つほどあるはずです。私の環境では何の変哲もない USB 入力デバイス として表示されます。
そのデバイスのプロパティを表示し、下の画像のように ハードウェアID を選択します。
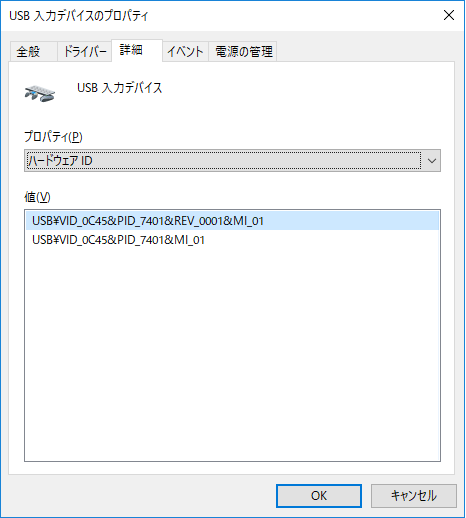
USB\VID_0C45&PID_7401&REV_0001&MI_01 という値がありました。
ここから、以下を読み解きます。
- VID (Vendor ID) =
0x0C45 - PID (Product ID) =
0x7401
また、末尾に MI_01 があります。もう1つ増えたほうのデバイスも同様に見ると、MI_00になっています。これも把握しておきます。
デバイスの絞り込みは、こちらのページの下の方にある方法も参考になります。 https://blogs.msdn.microsoft.com/hirosho/2013/10/18/windows-8-1-hid/
以上の情報を使い、デバイスを絞り込みます。
var temperInterfaces = deviceList
    .Where(x => x.Attributes.ProductHexId == "0x7401" && x.Attributes.VendorHexId == "0x0C45")
    .ToArray();

HidDevice control = temperInterfaces.FirstOrDefault(x => x.DevicePath.Contains("mi_00"));
HidDevice bulk = temperInterfaces.FirstOrDefault(x => x.DevicePath.Contains("mi_01"));
ここで controlかbulkがnullであれば、TEMPerが接続されていないようです。
controllerやbulkとは何か?
こちらが参考になります。
https://www.renesas.com/ja-jp/solutions/key-technology/connectivity-wired/usb/about-usb/usb1-1/usb1-c.html
より詳しくはUSBやHIDの仕様書を参照すると良いでしょう。
TEMPerでは、温度の情報はbulk転送で行います。加えて基本のcontrolを用意するのでこの2つというわけです。
Manufacturer と Product を表示させてみる
controlデバイスから取得します。取得されるバイト列は固定長で、余った領域は0初期化されており、変換すると文字列末尾はヌル文字がたくさん入ることになりますので、TrimEndで除去しています。
control.ReadManufacturer(out byte[] manufacturerRaw);
control.ReadProduct(out byte[] productRaw);
var manufacturer = Encoding.Unicode.GetString(manufacturerRaw).TrimEnd('\0');
var product = Encoding.Unicode.GetString(productRaw).TrimEnd('\0');
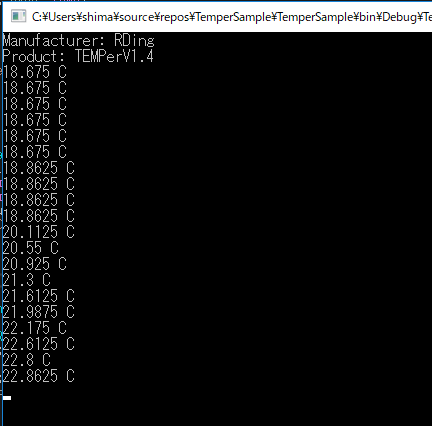
Console.WriteLine("Manufacturer: {0}", manufacturer); // Manufacturer: RDing
Console.WriteLine("Product: {0}", product); // TEMPerV1.4
温度を表示する
これ以降、基本的にはこのページの焼き直しです。細かい解説はこちらに譲り、実装だけ示します。
https://www.codeproject.com/Tips/1007522/Temper-USB-Thermometer-in-Csharp
レポート
HID操作の基本は、レポートと呼ばれるデータのかたまりの送受信です。
https://www.itf.co.jp/tech/road-to-usb-master/hid_class
レポートを送信し、受信可能状態になるまで待ち、受信する。このセットです。
HidReport outData = device.CreateReport();
// ここの2つはデバイス依存
outData.ReportId = 0x01;
outData.Data = new byte[]{ 0x01, 0x01 };
device.WriteReport(outData);

while (outData.ReadStatus != HidDeviceData.ReadStatus.Success)
{
    Thread.Sleep(1);
}
HidReport report = device.ReadReport();
この処理をメソッド化しておきます。
private static HidReport WriteAndReadReport(IHidDevice device, byte reportId, byte[] data)
{
    var outData = device.CreateReport();
    outData.ReportId = reportId;
    outData.Data = data;
    device.WriteReport(outData);
    while (outData.ReadStatus != HidDeviceData.ReadStatus.Success)
    {
        Thread.Sleep(1);
    }
    return device.ReadReport();
}
デバイス初期化
TEMPerを使い始めるにあたっての手続きを行います。
// 初期化に必要なレポートデータ
// 参考:https://www.codeproject.com/Tips/1007522/Temper-USB-Thermometer-in-Csharp
static readonly byte[] ini = { 0x01, 0x01 };
static readonly byte[] temp = { 0x01, 0x80, 0x33, 0x01, 0x00, 0x00, 0x00, 0x00 };
static readonly byte[] ini1 = { 0x01, 0x82, 0x77, 0x01, 0x00, 0x00, 0x00, 0x00 };
static readonly byte[] ini2 = { 0x01, 0x86, 0xff, 0x01, 0x00, 0x00, 0x00, 0x00 };
WriteAndReadReport(control, 0x01, ini);
WriteAndReadReport(bulk, 0x00, ini1);
WriteAndReadReport(bulk, 0x00, ini2);

// 上記で準備完了なのだが、この時点で温度を取得すると75℃といった異常な値が取れる。
// 2回ほど読み捨ててごみを除去する。
for (int i = 0; i < 2; i++)
{
    WriteAndReadReport(bulk, 0x00, temp);
}
温度の取得と表示
// 摂氏で今の温度を取得する
private static double GetTemperatureCelsius(IHidDevice bulk)
{
    var report = WriteAndReadReport(bulk, 0x00, temp);
    int rawReading = (report.Data[3] & 0xFF) + (report.Data[2] << 8);

    const double calibrationOffset = -1.70;
    const double calibrationScale = 1;
    double temperatureCelsius = (calibrationScale * (rawReading * (125.0 / 32000.0))) + calibrationOffset;
    return temperatureCelsius;
}
if (!bulk.IsOpen)
{
    Console.WriteLine("Temper initialization failed");
    return;
}

Console.WriteLine("{0} C", GetTemperatureCelsius(bulk));
これをループで何度も呼び出してあげるのが基本構成になるでしょう。以下は、1秒のスリーブを入れながら温度を表示させた例です。放っておくと数値がなかなか変わらないので、手でTEMPerを握りしめたりしてみましょう。この画像はそうしてみたところで、温度が急上昇しているのがわかります。
Googleスプレッドシートにアップロードする
ここからは、このプログラムを周期的に実行し、気温のログを取っていくことを考えます。様々な方法やサービスがありますが、無料・APIもしっかりしている・可視化もしやすいという点から、Googleのスプレッドシートに記録していきます。
スプレッドシートの作成
普通にGoogleドライブで新規作成します。
https://docs.google.com/spreadsheets/d/[40文字強のid文字列]/ というURLになっているはずで、ここからスプレッドシートIDがわかりますので、把握しておきます。
シートの名前 (初期状態だとシート1) も重要で、プログラムにて指定します。列は2列用意しておき、時刻列と温度列とします。
GoogleAPI認証情報の作成
こちらを参考に。
- https://developers.google.com/sheets/api/v3/authorize
- https://www.twilio.com/blog/2017/03/google-spreadsheets-and-net-core.html
- https://qiita.com/shin1ogawa/items/49a076f62e5f17f18fe5
アップロードの実装 (GoogleSpreadSheetUploader)
Google.Apis.Sheets.v4 のNuGetパッケージをインストールします。
https://www.nuget.org/packages/Google.Apis.Sheets.v4/
以下のようなクラスを作ります。
GoogleはAPIが充実していてドキュメントも一見豊富ですが、バージョンアップが早すぎてすぐ陳腐化していたり、内容が雲をつかむようでなかなか理解が難しいことが常です。以下の実装も相当苦労しています。
using System;
using System.Collections.Generic;
using System.Collections.ObjectModel;
using System.Threading.Tasks;
using Google.Apis.Auth.OAuth2;
using Google.Apis.Auth.OAuth2.Flows;
using Google.Apis.Auth.OAuth2.Responses;
using Google.Apis.Services;
using Google.Apis.Sheets.v4;
using Google.Apis.Sheets.v4.Data;

namespace TemperSample
{
    /// <summary>
    /// Google Driveのスプレッドシートに結果を書き込む
    /// </summary>
    public class GoogleSpreadSheetUploader
    {
        private readonly string spreadSheetKey;
        private readonly SheetsService sheetsService;

        private readonly ReadOnlyCollection<string> scopes = new ReadOnlyCollection<string>(new []
        {
            SheetsService.Scope.Spreadsheets
        });

        /// <summary>
        /// 初期化
        /// </summary>
        /// <param name="clientId">OAuth2.0のCliendID. Developers Consoleで取得する.</param>
        /// <param name="clientSecret">OAuth2.0のClientSecret. Developers Consoleで取得する.</param>
        /// <param name="refreshToken">予めAccessTokenとペアで取得しておくキー.
        /// 参考: https://developers.google.com/google-apps/spreadsheets/authorize </param>
        /// <param name="applicationName">SpreadsheetsServiceの名前</param>
        /// <param name="spreadSheetKey">スプレッドシートのキー (URLからわかります)</param>
        public GoogleSpreadSheetUploader(
            string clientId,
            string clientSecret,
            string refreshToken,
            string applicationName,
            string spreadSheetKey)
        {
            this.spreadSheetKey = spreadSheetKey;
            var userCredentials = GetUserCredential(
                clientId,
                clientSecret,
                scopes,
                refreshToken);
            sheetsService = GetSheetsService(userCredentials, applicationName);
        }

        /// <summary>
        /// 結果をアップロード (汎用)
        /// </summary>
        /// <param name="sheetTitle">シートの名前</param>
        /// <param name="date"></param>
        /// <param name="kpiValues">書き込む値</param>
        public AppendValuesResponse Upload(string sheetTitle, DateTime date, IEnumerable<object> values)
        {
            var range = $"{sheetTitle}!A:B";

            var valuesList = new List<object>{ date.ToString() };
            valuesList.AddRange(values);
            var valueRange = new ValueRange
            {
                Values = new List<IList<object>> { valuesList }
            };

            var appendRequest = sheetsService.Spreadsheets.Values.Append(valueRange, spreadSheetKey, range);
            appendRequest.ValueInputOption =
                SpreadsheetsResource.ValuesResource.AppendRequest.ValueInputOptionEnum.USERENTERED;
            return appendRequest.Execute();
        }

        /// <summary>
        /// 認証情報オブジェクトを生成
        /// </summary>
        /// <param name="clientId"></param>
        /// <param name="clientSecret"></param>
        /// <param name="scopes"></param>
        /// <param name="refreshToken"></param>
        /// <returns></returns>
        private static UserCredential GetUserCredential(
            string clientId,
            string clientSecret,
            IReadOnlyCollection<string> scopes,
            string refreshToken)
        {
            var clientSecrets = new ClientSecrets
            {
                ClientId = clientId,
                ClientSecret = clientSecret
            };

            var token = new TokenResponse { RefreshToken = refreshToken };
            var credentials = new UserCredential(new GoogleAuthorizationCodeFlow(
                new GoogleAuthorizationCodeFlow.Initializer
                {
                    ClientSecrets = clientSecrets,
                    Scopes = scopes
                }), "user", token);
            return credentials;
        }

        /// <summary>
        /// 認証情報を使ってSheetsService取得
        /// </summary>
        /// <returns></returns>
        private static SheetsService GetSheetsService(UserCredential userCredential, string applicationName)
        {
            return new SheetsService(new BaseClientService.Initializer
            {
                HttpClientInitializer = userCredential,
                ApplicationName = applicationName,
            });
        }
    }
}
温度の算出が完了したところでこのクラスを呼び出します。
var googleUploader = new GoogleSpreadSheetUploader(
    "xxxxxxxxxxxxx.apps.googleusercontent.com", // client id
    "abcdefghijklmn", // client secret
    "hogehogehoge", // refresh token
    "Temper", // 適当なapplication name
    "asdfghjkl1234567890qwertyuiop0987654321"); // スプレッドシートのURLに記載のID
googleUploader.Upload("シート名", DateTime.Now, new object[]{temperatureCelsius});
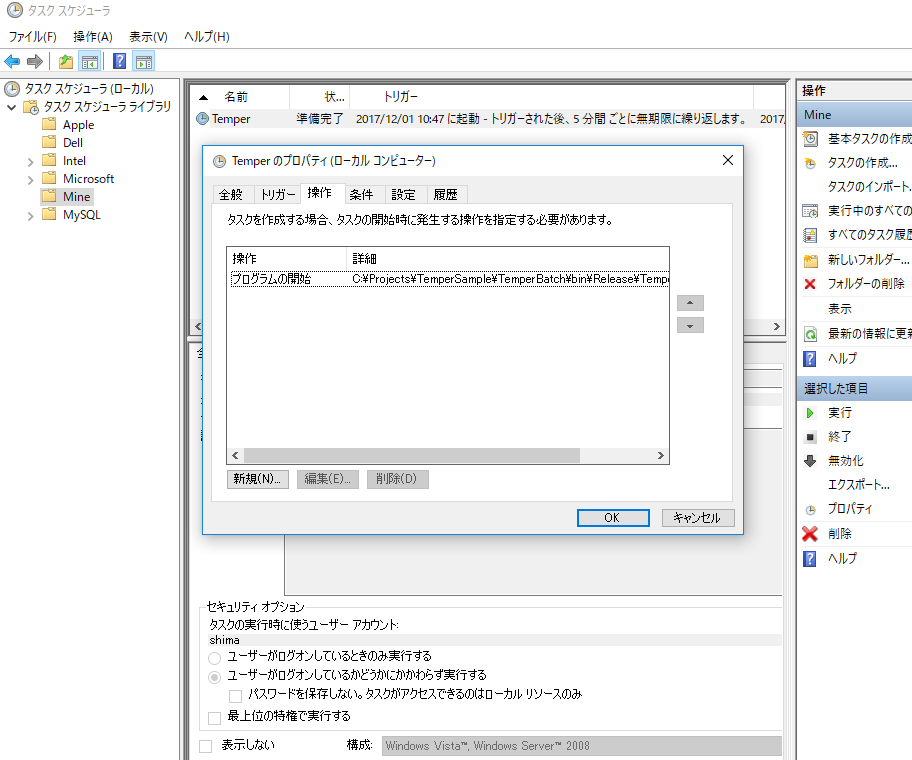
定期的に実行する
最後に定期実行の設定です。Windowsであれば タスクスケジューラ を使い、ここまで作成したプログラムを定期的に呼び出せばよいでしょう。
普通に設定するぶんには5分周期より短くすることができませんが、おそらく充分だと思います。
Googleスプレッドシートへの書き込みと定期実行をあわせて、完成です。
東京本社での実験
じわじわ上がる室温。いつもくそ暑いです
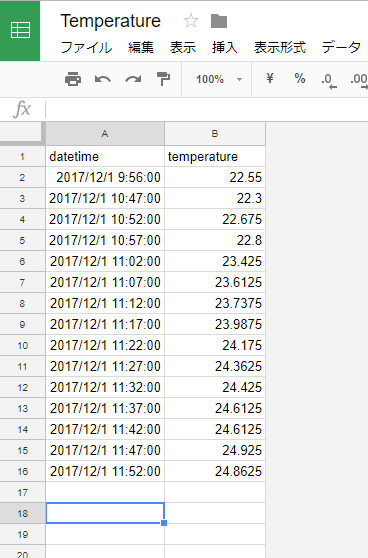
札幌オフィスでの実験
11月以降、だいたい10~12度くらいが多い気がします。

コード一覧
GoogleSpreadSheetUploader は上に記載の通りなので省略
using System;
using System.Collections.Generic;
using System.Linq;
using System.Text;
using System.Threading;
using System.Threading.Tasks;
using HidLibrary;

namespace TemperSample
{
    class Program
    {
        // 初期化に必要なレポートデータ
        // 参考:https://www.codeproject.com/Tips/1007522/Temper-USB-Thermometer-in-Csharp
        static readonly byte[] ini = { 0x01, 0x01 };
        static readonly byte[] temp = { 0x01, 0x80, 0x33, 0x01, 0x00, 0x00, 0x00, 0x00 };
        static readonly byte[] ini1 = { 0x01, 0x82, 0x77, 0x01, 0x00, 0x00, 0x00, 0x00 };
        static readonly byte[] ini2 = { 0x01, 0x86, 0xff, 0x01, 0x00, 0x00, 0x00, 0x00 };

        static void Main(string[] args)
        {
            var deviceList = HidDevices.Enumerate().ToArray();

            var temperInterfaces = deviceList
                .Where(x => x.Attributes.ProductHexId == "0x7401" && x.Attributes.VendorHexId == "0x0C45")
                .ToArray();

            var control = temperInterfaces.FirstOrDefault(x => x.DevicePath.Contains("mi_00"));
            var bulk = temperInterfaces.FirstOrDefault(x => x.DevicePath.Contains("mi_01"));
            if (control == null || bulk == null)
            {
                Console.WriteLine("Temper device not found");
                return;
            }

            control.ReadManufacturer(out byte[] manufacturerRaw);
            control.ReadProduct(out byte[] productRaw);
            var manufacturer = Encoding.Unicode.GetString(manufacturerRaw).TrimEnd('\0');
            var product = Encoding.Unicode.GetString(productRaw).TrimEnd('\0');
            Console.WriteLine("Manufacturer: {0}", manufacturer);
            Console.WriteLine("Product: {0}", product);

            WriteAndReadReport(control, 0x01, ini);
            WriteAndReadReport(bulk, 0x00, ini1);
            WriteAndReadReport(bulk, 0x00, ini2);

            // 上記で準備完了なのだが、この時点で温度を取得すると75℃といった異常な値が取れる。
            // 2回ほど読み捨ててごみを除去する。
            for (int i = 0; i < 2; i++)
            {
                WriteAndReadReport(bulk, 0x00, temp);
            }

            if (!bulk.IsOpen)
            {
                Console.WriteLine("Temper initialization failed");
                return;
            }
            double temperatureCelsius = GetTemperatureCelsius(bulk);
            Console.WriteLine("{0} C", temperatureCelsius);

            var googleUploader = new GoogleSpreadSheetUploader(
                "**************.apps.googleusercontent.com",
                "**************",
                "1/***************-**********",
                "***************",
                "TemperMetrics");
            googleUploader.Upload("シート名", DateTime.Now, new object[]{temperatureCelsius.ToString()});
        }

        private static HidReport WriteAndReadReport(IHidDevice device, byte reportId, byte[] data)
        {
            var outData = device.CreateReport();
            outData.ReportId = reportId;
            outData.Data = data;
            device.WriteReport(outData);
            while (outData.ReadStatus != HidDeviceData.ReadStatus.Success)
            {
                Thread.Sleep(1);
            }
            var report = device.ReadReport();
            return report;
        }

        // 摂氏で今の温度を取得する
        private static double GetTemperatureCelsius(IHidDevice bulk)
        {
            var report = WriteAndReadReport(bulk, 0x00, temp);
            int rawReading = (report.Data[3] & 0xFF) + (report.Data[2] << 8);

            const double calibrationOffset = -1.70;
            const double calibrationScale = 1;
            double temperatureCelsius = (calibrationScale * (rawReading * (125.0 / 32000.0))) + calibrationOffset;
            return temperatureCelsius;
        }
    }
}