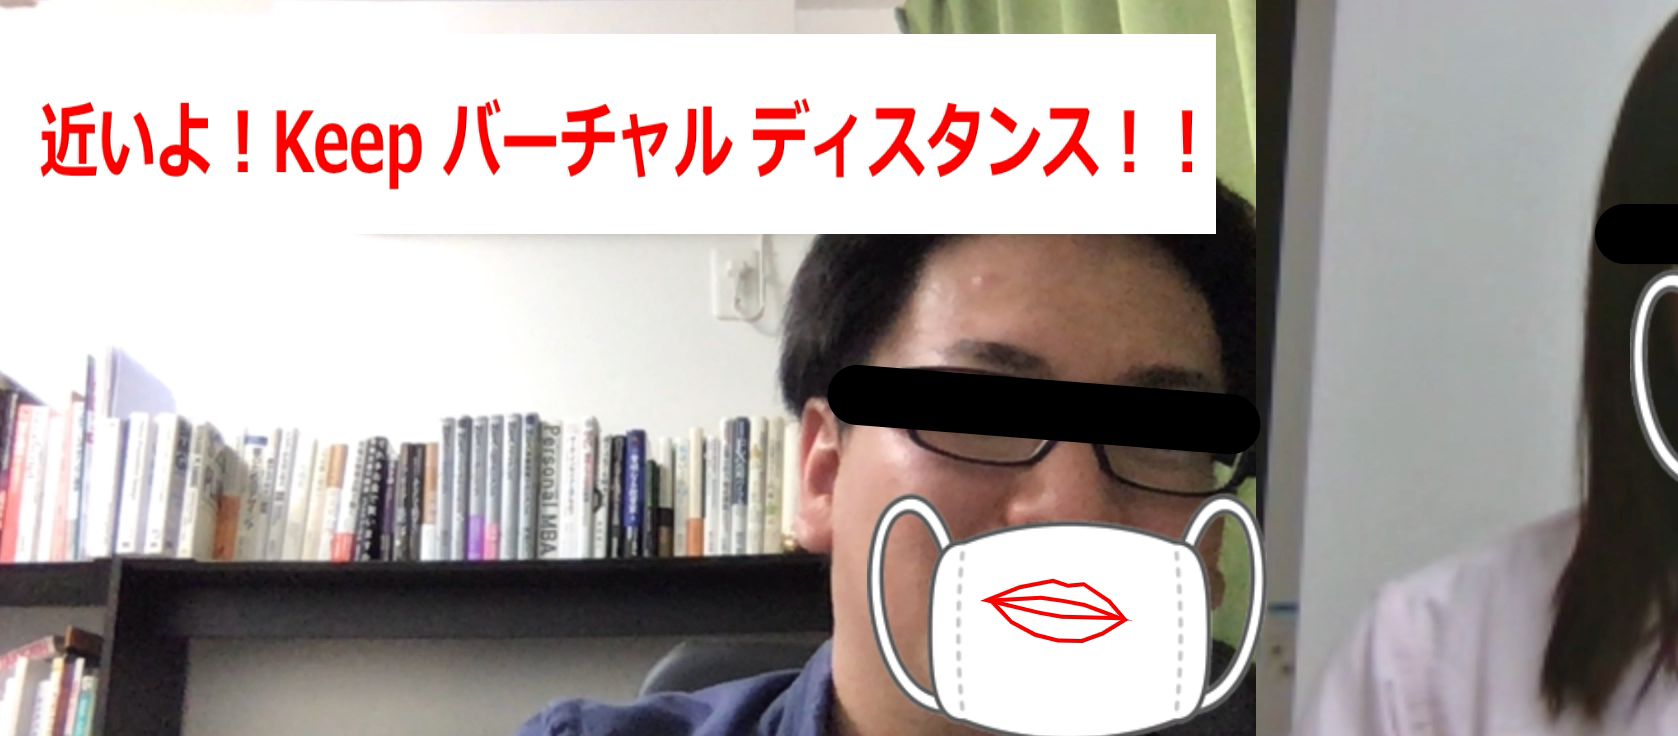
オンライン化で見失うリアルの緊張感
新型コロナウイルスの影響で、在宅ワークやオンラインミーティングの機会が増えました。
テレビをつけると「三蜜を避ける」「マスク着用必須」「ソーシャルディスタンス」と聞かない日はありませんでした。
しかし、実際に在宅ワークをしていると、家ではマスクしないしソーシャルディスタンスなど気にしませんね。そうやってリアル世界との緊張感のズレが生じていきます。。
ということで、
今回作ったもの
sky wayとml5.jsを使ったオンラインミーティングツールです。
ここでは在宅で麻痺してリアル世界とのズレが大きくならないよう、
- オンラインでも近づき過ぎたら「バーチャルディスタンス」違反
- エチケットとしてバーチャル世界でもマスク着用必須
- マスクでオンラインミーティングをしたときの「口の動きが見えないので何か言いたそうな雰囲気が伝わらない」 問題
これら重要な問題を技術の力で解決しました。こうしてリアル世界の緊張感を忘ぬように...。
(無事、リアルの世界に戻れますように。)
サンプル
- 相手側に近づき過ぎたら「Keep バーチャルディスタンス」と警告がでます
- 人の動きに合わせて自動でバーチャルマスクがついてきます
- マスクの上からでも口の動きがわかります(何か言いたげなことに気づくはず)
- (目隠しは不要でしたら消してください)
リモートミーティングにも#バーチャルディスタンス と #バーチャルマナー #ml5js #p5js #skyway pic.twitter.com/FctNmZwzPV
— shima-07 (@y_kawashima_) June 10, 2020
こちらのリンクにこの記事で紹介する機能をのせています。
ぜひお試しください!
https://simasima.work/virtual-distance/index.html
注意!!
・ 処理重いです。PCが唸ります... スペック控えめのPCだとうまく動かないかも。。
・ 動画に適切にマスクや唇が表示されるのに10秒ぐらいかかることもありました。。
利用技術
sky way
https://webrtc.ecl.ntt.com/
今回はブラウザで映像をリアルタイムで送り合う仕組みWebRTC(Web Real-Time Communication)を実現します。
NTT Communicationsが提供しているWebRTCアプリ開発者向けプラットフォームであるsky wayを利用することで非常に簡単にブラウザ間のP2Pの仕組みを作ることができます。
p5.js
https://p5js.org/
processingをjavascriptに移植したもののようです。
p5.js is a JavaScript library for creative coding, with a focus on making coding accessible and inclusive for artists, designers, educators, beginners, and anyone else!
と書いてあるように、グラフィカルな描画に特化していてアーティストやデザイナーにも扱いやすいものにという位置付けです。
ml5.js
Friendly Machine Learning for the Web
ということで、非常に簡単に、全く難しいことを考えることなく、machine learningを使うことができます。
非常に面白いサンプルもたくさんあるのでぜひ見てみてください。
https://learn.ml5js.org/docs/#/reference/sketchrnn
準備をする(sky wayに登録してAPIキーを取得する)
ここでは、skywayでAPIキー取得までの説明をします。
1.下記ページに入り、右上の「無料で始める」をクリックする。そして、メールアドレスとパスワードを入れて登録する。
https://webrtc.ecl.ntt.com/
3.アプリケーション作成画面で「利用可能ドメイン名」にとりあえずlocalhostを追加して保存。(今後、新しくドメインを発行する場合はその時にここでドメインを追加する)
4.このAPIキーをメモっておく。(後ほど下のソースコードの key: " skywayで取得したAPIキーをここに入れる場所 " に入れる)

これで準備は完了です。
コード
構成
今回は全て同じフォルダ内に画像も入れています。
※alert.pngやmask.pngのような画像はご自身で用意してください。

ソースコード
<html>

<head>
  <meta charset="UTF-8">
  <title>Keep virtual distance and manner!</title>
  <script src="https://cdnjs.cloudflare.com/ajax/libs/p5.js/0.9.0/p5.min.js"></script>
  <script src="https://cdnjs.cloudflare.com/ajax/libs/p5.js/0.9.0/addons/p5.dom.min.js"></script>
  <script src="https://unpkg.com/ml5@0.4.3/dist/ml5.min.js"></script>
  <script src="https://cdn.webrtc.ecl.ntt.com/skyway-latest.js"></script>

  <style></style>
</head>

<script src="sketch.js"></script>

<body>
    <h1>Keep virtual distance and manner!</h1>
</body>

</html>
続いて、処理の部分。
目や口の位置の取得はml5.jsのfaceApiを利用しています。
https://learn.ml5js.org/docs/#/reference/face-api
※また、先ほど取得したsky wayのAPIキーを入れることもお忘れなく!
let faceapi;
let faceapi2;
let video;
let detections;
let detections2;
let capture;
let theirVideo;

// by default all options are set to true
const detection_options = {
    withLandmarks: true,
    withDescriptors: false,
}

function setup() {
    createCanvas(1280, 960);

    // load up your video
    capture = createCapture({ video: { width: 640, height: 480 }, audio: false });
    //video.size(width, height);
    // video.hide(); // Hide the video element, and just show the canvas
    capture.hide(); // ビデオを消した
    faceapi = ml5.faceApi(capture, detection_options, modelReady)
    textAlign(RIGHT);


    // skywayのインスタンスを作成
    let peer = new Peer({
        key: " skywayで取得したAPIキーをここに入れる場所 ",
    });
    // skywayでドメインを許可していれば実行される
    peer.on("open", () => {
        console.log("open! id=" + peer.id);
        createP("Your id: " + peer.id);
    });

  // id入力タグの生成
    let idInput = createInput("");

  // 送信ボタンの生成
  createButton("Call").mousePressed(() => {
    // ボタンが押されたら
    const callId = idInput.value(); //id入力欄の値を取得
    console.log("call! id=" + peer.id);
    const call = peer.call(callId, capture.elt.srcObject); //id先を呼び出し
    addVideo(call);
  });

  // // 相手から呼び出された実行される
  peer.on("call", (call) => {
    console.log("be called!");
    call.answer(capture.elt.srcObject); //呼び出し相手に対して返す
    addVideo(call);
  });

  // 相手の映像を追加処理
  function addVideo(call) {
    call.on("stream", (theirStream) => {
      console.log("stream!");
      //相手のビデオを作成
      theirVideo = createVideo();
      theirVideo.elt.autoplay = true;
      theirVideo.elt.srcObject = theirStream;
      theirVideo.hide(); //キャンバスで描くので非表示

      //相手側のビデオ映像に対してfaceAPIをする
      faceapi2 = ml5.faceApi(theirVideo, detection_options, modelReady);
    });
  }

}

function modelReady() {
    console.log('ready!');
    console.log(faceapi);
    console.log(faceapi2);

    faceapi.detect(gotResults);
    if(faceapi2){faceapi2.detect(gotResults2);}
}

// 自分の映像用
function gotResults(err, result) {
    if (err) {
        console.log(err)
        return
    }
    // 自分の映像の情報を取得
    detections = result;
    faceapi.detect(gotResults)
}

// 相手の動画用
function gotResults2(err, result) {
    if (err) {
        console.log(err)
        return
    }
    // 相手の映像の情報を取得する
    detections2 = result;

    faceapi2.detect(gotResults2)
}

function draw(){

    background(255);
    // 自分の映像を表示
    if(capture) image(capture, 0,0, 640, 480);
    // 相手の映像をx軸に640pxずらして表示する
    if (theirVideo) image(theirVideo, 640, 0, 640, 480);

    // 自分の映像に加工を入れる処理
    if (detections) {
        if (detections.length > 0) {
            // 自分の映像の場合は引数で1を渡すことにしてる
            drawLandmarks(detections,1)
        }
    }

    // 自分の映像に加工を入れる処理
    if (detections2) {
        if (detections2.length > 0) {
            // 相手の映像の場合は引数で2を渡すことにしてる
            drawLandmarks(detections2,2)
        }
    }
}

// マスクとバーチャルディスタンスのアラート画像の読み込み
let img;
let img2;
function preload(){
    img = loadImage('mask.png');
    img2 = loadImage('alert.png');
}

// 口の位置や目隠しをする処理
// 引数はそれぞれの映像から得られた情報と自分(1)or相手(2)という情報
function drawLandmarks(detections,part){

    noFill();
    stroke(255, 0, 0)
    strokeWeight(2)

    let mouthx = 0;
    let mouthy = 0;
    let lefteye1x,lefteye1y,righteye1x,righteye1y;
    let lefteye2x,lefteye2y,righteye2x,righteye2y;

    for(let i = 0; i < detections.length; i++){
        const mouth = detections[i].parts.mouth;

        // 口の重心をとるためにトータルを取得する
        mouthx = mouthx + detections[i].parts.mouth[0].x;
        mouthy = mouthy + detections[i].parts.mouth[0].y;

        ///////// とりあえず目を隠す実装をする。不要なら外す /////////
        if(part == 1){ // 1なので自分の映像のとき。
            // 左目
            lefteye1x = detections[i].parts.leftEye[0].x -50 ;
            lefteye1y = detections[i].parts.leftEye[0].y;
            // 右目
            righteye1x = detections[i].parts.rightEye[0].x + 50;
            righteye1y = detections[i].parts.rightEye[0].y;
        }

        //相手がいた時用
        ///////// とりあえず目を隠す実装をする。不要なら外す /////////
        if(part == 2){ // 2なので相手の映像のとき
            lefteye2x = detections[i].parts.leftEye[0].x -50 + 640;
            lefteye2y = detections[i].parts.leftEye[0].y;
            // 右目
            righteye2x = detections[i].parts.rightEye[0].x + 50 + 640;
            righteye2y = detections[i].parts.rightEye[0].y;
        }

        // 口の位置に合わせてマスクを表示する
        if(part == 1) image(img,detections[i].parts.mouth[0].x -60 ,detections[i].parts.mouth[0].y -60,200,170);
        if(part == 2) image(img,detections[i].parts.mouth[0].x + 580 ,detections[i].parts.mouth[0].y -60,200,170);

        // 口の輪郭をかく
        if(part == 1) drawPart(mouth, true);
        if(part == 2) drawPart2(mouth, true);

    }

    // それぞれの重心
    const mouth_px = (mouthx/detections.length) - 50;

    ////////// 目を隠す処理 不要だったら消す//////////
    eyeline(lefteye1x,lefteye1y,righteye1x,righteye1y);
    if (theirVideo) eyeline(lefteye2x,lefteye2y,righteye2x,righteye2y);

    // 画面上で相手に近づき過ぎた時に警告する
    //// 今は自分の画面で右端に240px(640-400)より近づいた時に警告を出す。必要に応じて数字は変える
    if(mouth_px > 400){
        image(img2,20,20,600,100);
    }
}

// 口の輪郭をかく処理(自分用)
function drawPart(feature, closed){

    beginShape();
    for(let i = 0; i < feature.length; i++){
        const x = feature[i]._x;
        const y = feature[i]._y;
        vertex(x, y);
    }

    if(closed === true){
        endShape(CLOSE);
    } else {
        endShape();
    }
}

// 口の輪郭をかく処理(相手用)
function drawPart2(feature, closed){

    beginShape();
    for(let i = 0; i < feature.length; i++){
        const x = feature[i]._x + 640;
        const y = feature[i]._y;
        vertex(x, y);
    }

    if(closed === true){
        endShape(CLOSE);
    } else {
        endShape();
    }
}

// 目線を隠すための関数
function eyeline(x1,y1,x2,y2){
    strokeWeight(30); //線の太さ
    stroke(0, 0, 0); //線の色 R,G,B
    line(
      x1,y1,x2,y2
    );
}
ポイント
・手元でみるときはローカルホスト(localhost)に直すこと
・ドメイン発行するときはskywayのドメイン設定をすること
使い方
相手と通信するときは、「相手側の画面下部に表示されているYour id」を教えてもらい、自分の画面下部からコールします。
終わりに
読んでいただきありがとうございました。
なんとか動くものができました。。。
書き方も最適ではないですし、動きも非常に遅いですが、動く試作品をまず作ってみることは大事ですね!


