この記事の目的
- Figma designのサンプルプラグインを動かしてみる
- プラグインの構造について知る
- プラグインを作ってみる
概要
プロジェクトでFigmaを利用することが多く
作業効率をあげるために独自のプラグイン開発を始めた
プラグインの開発に関する日本語の最新の情報があまりなかったため
備忘録としてFigma design Pluginの基本的な知識についてまとめ記事にした
開発環境
- macOS Big Sur 11.5.2
- Figma Desktop App version 104.1
- Visual Studio Code - Insiders version 1.62.0
Figma designのサンプルプラグインを動かしてみる
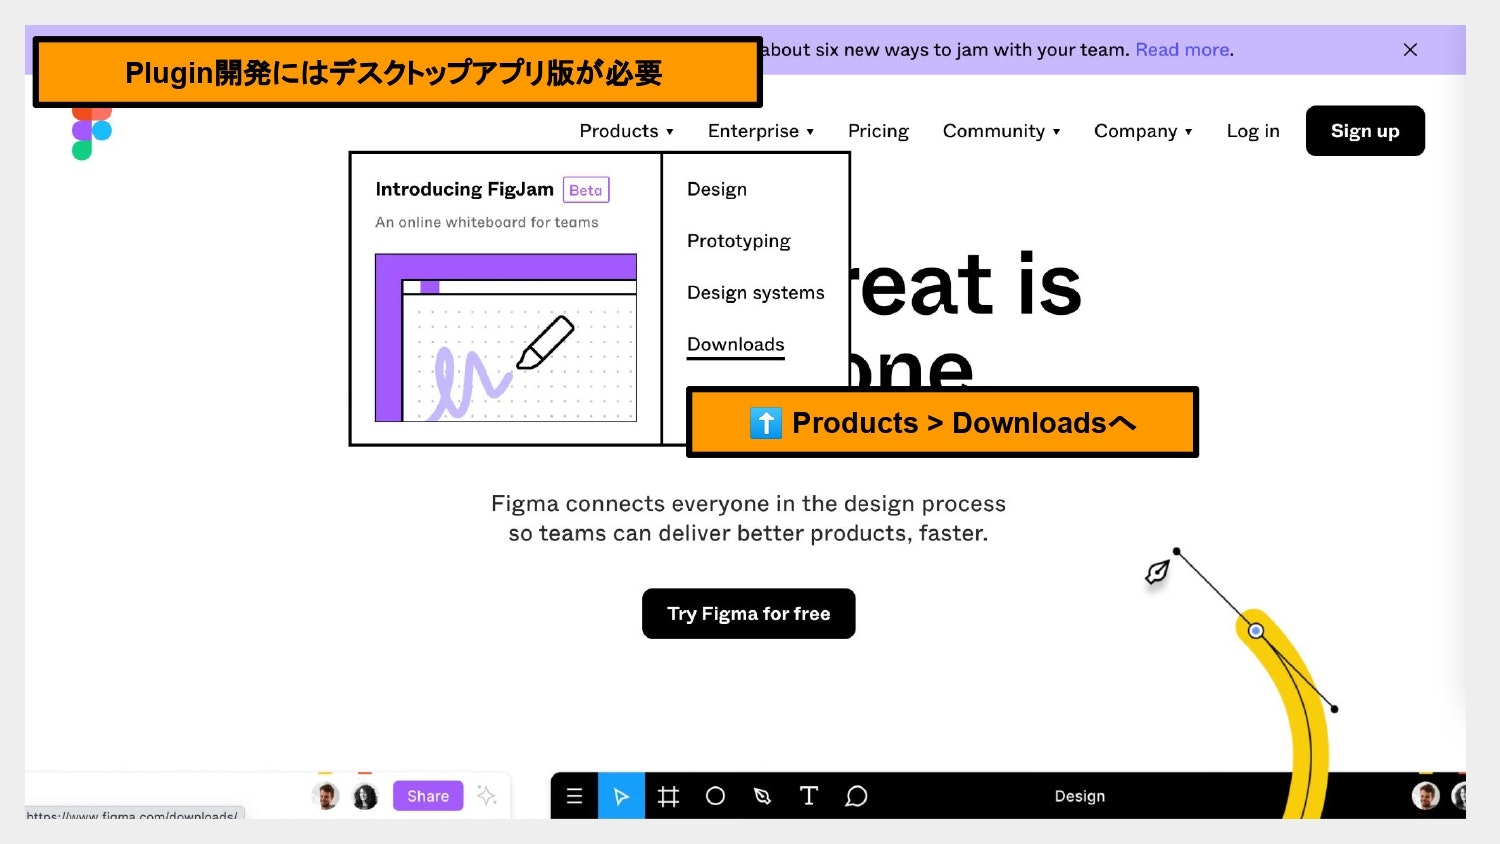
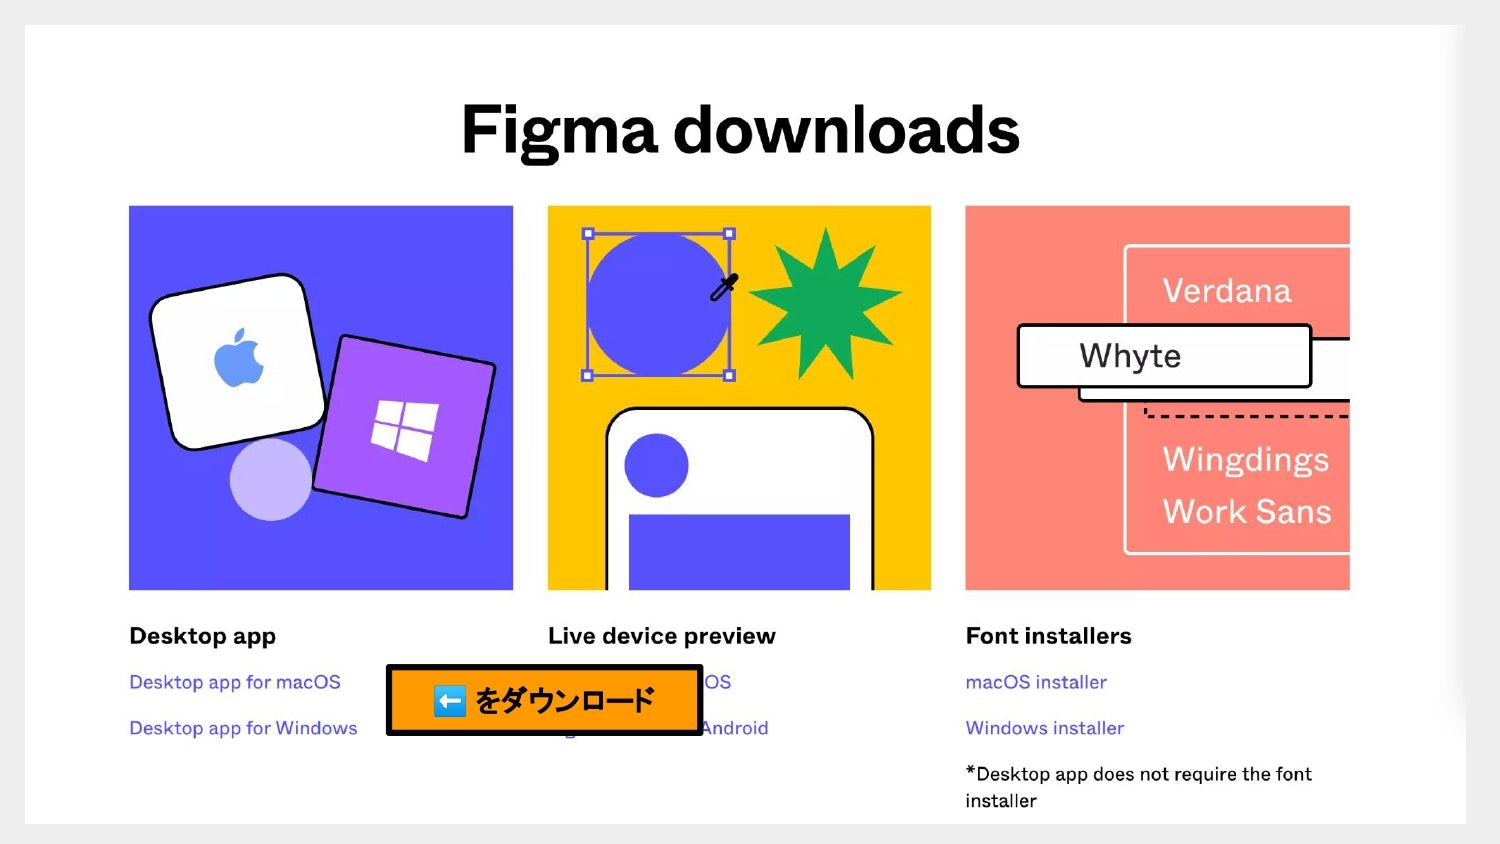
- Figmaのアプリ版をダウンロードする
- FigmaからPluginの新規作成をする
- ローカルでbuildして動かしてみる
[1] Figmaのアプリ版をダウンロードする
localで作成したオリジナルのPluginはFigmaのアプリ版で開発することができる
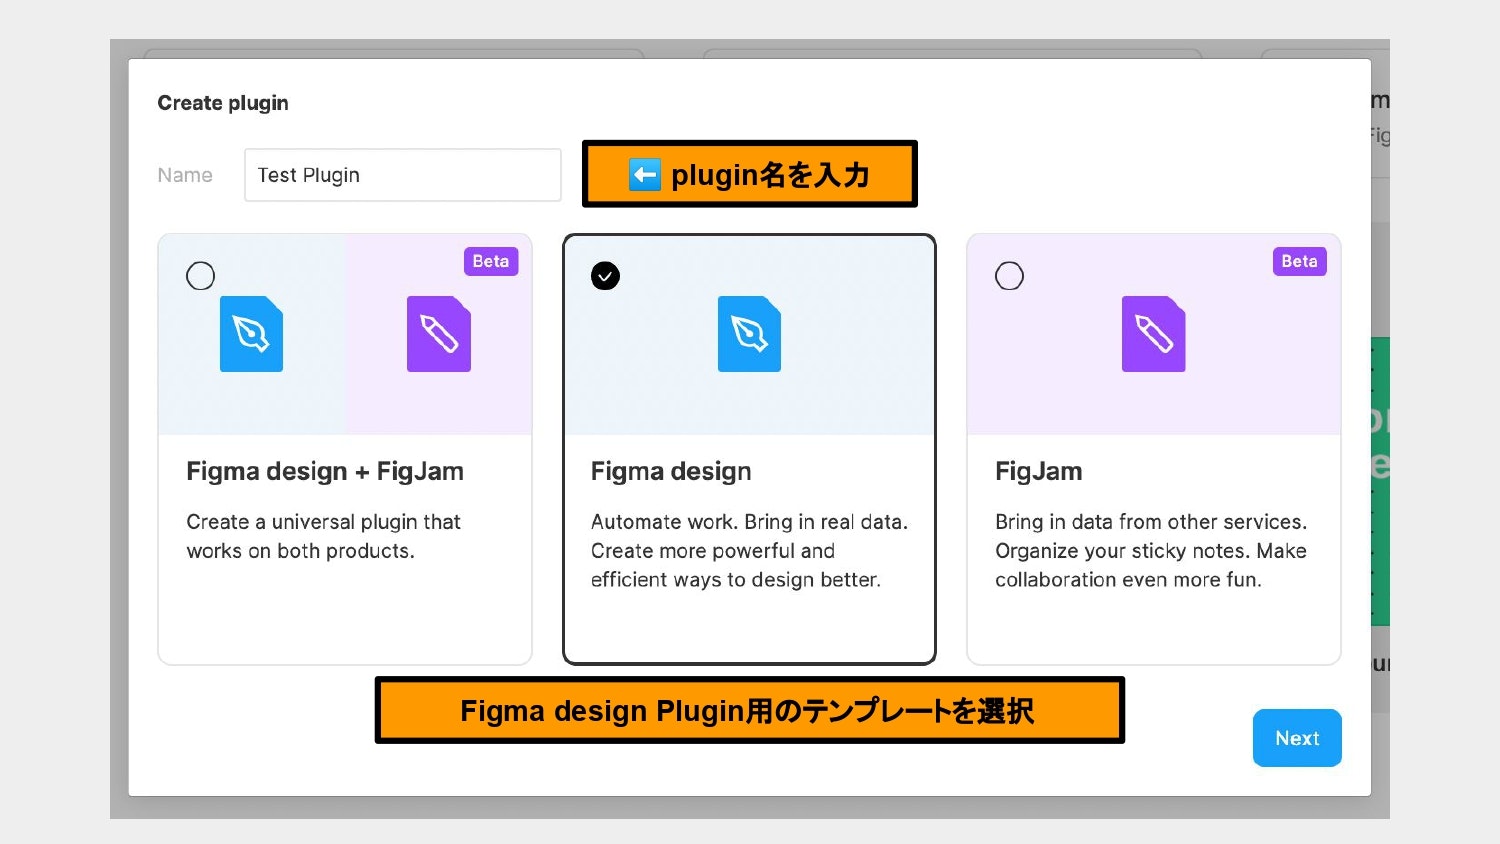
[2] FigmaからPluginの新規作成をする
- 右上メニューから Plugin を選択
- In development から New Plugin を選択
- Figma design のテンプレートを選択
- With UI & browser APIsを選択し保存
[3] ローカルでbuildして動かしてみる
@figma/plugin-typingsをnpm install
typescriptがグローバルにない人は同時にインストール
npm install --save-dev @figma/plugin-typings
npm install --save-dev typescript
⌘⇧B (Ctrl-Shift-B for Windows)を押してtcs:ウォッチを選択
code.tsがコンパイルされてcode.jsが書き変わる

アプリで新規ファイルを作成

メニューから「Plugin > Development > 作成したプラグイン名」を選択して起動

サンプルは、入力した個数分に正方形のオブジェクトを出力するプラグインとなる
これでプラグインを開発できる状態になった

プラグインの構造について知る
ファイル構成
選択した項目で、最初のサンプルコードの内容が変わる
- 選択肢①
- Figma design + FigJam(2021/11/12現在 Bata版)
- Figma design
- FigJam(2021/11/21現在 Bata版)
- 選択肢②
- Empty
- Run once
- With UI & browser APIs
選択肢①
Figmaは「Figma design」と「FigJam」という二つのツールがある
「Figma design」はデザイン作成のためのツール
「FigJam」はボードを共有しコミュニケーションを取るためのツール
今回は「Figma design」のためのプラグイン開発のため
テンプレートの種類も「Figma design」を選んだ
使える関数なども違うので
開発時はどちらのプラグインを作るか把握しておく
選択肢②
サンプルコードのファイル構成が変わる
Empty:サンプルコードなし
Run once:起動時に一度だけ実行するプラグイン
With UI & browser APIs:起動で専用のUIが起動するプラグイン
- ファイル構成(例: With UI & browser APIs)
- code.js
- 実行されるファイル
- code.ts
- 実際の処理を書くコンパイル前のファイル
- manifest.json
- プラグインの定義ファイル
- tsconfig.json
- TypeScriptの設定ファイル
- ui.html
- With UI & browser APIsを選択した場合内包される
- ユーザーインターフェイスの必要なプラグインの場合に作成する
- package.json
- 開発用の定義ファイル
- README.md
- code.js
基本の処理 (例: With UI & browser APIs)
- ui.html から parent.postMessage を飛ばす
- code.tsで msgを受け取る
- code.tsで figma nodeにアクセスし 処理を実行
プラグインを作ってみる
作りたいプラグイン
テーブル状のオブジェクトをCSVとして出力するプラグイン
- 行にしたい要素の名前に
#rowを設定する - セルにしたい要素の名前に
#colを設定する - その構造のままCSV出力する

【想定するFigmaオブジェクトの構造】
- [name 入荷数]
  - [name #row]
    - [name #col] 数
    - [name #col] 分類
    - [name #col] 名前
  - [name #row]
    - [name #col] 1
    - [name #col] 果物
    - [name #col] りんご
  - [name #row]
    - [name #col] 2
    - [name #col] 野菜
    - [name #col] じゃがいも
出力 csv
数,名前,分類
1,果物,りんご
2,野菜,じゃがいも
作成したコードの流れ
- ui.htmlから実行Messageをcode.tsに送信
- code.tsでFigmaのデータを取得
- 取得したデータをCSVに変換
- code.tsからui.htmlに変換したデータを送信
- ui.htmlでダウンロードリンクを表示
① ui.htmlから実行Messageを送信
[code.ts]
figma.showUI(__html__);
[ui.html]
<section>
  <a href="#" class="btn_03" id="download">作成</a>
</section>

<script>
document.getElementById('download').onclick = () => {
  parent.postMessage({ pluginMessage: 'export_table_to_csv' }, '*')
  return false;
}
</script>
② Figmaのデータを取得
figma.currentPage.selectionにより
選択した要素の情報を連想配列で取得できる
- type ノードの種類
- name 要素名
- children 要素の子要素
- characters 要素に入力された文字列
[code.ts]
figma.ui.onmessage = msg => {
  if (msg == 'export_table_to_csv') {
    figma.currentPage.selection.forEach((element :any) => {
      console.log(element.type);
      console.log(element.name);
      console.log(element.children);
      console.log(element.characters);
    });
  }
};
③ 取得したデータをCSVに変換
指定の要素名が取得できる子要素まで再起処理を繰り返し
文字列を取得しcsvの形式に変換する
[code.ts]
function getCols(obj, t = []) {
  let result = [...t];
  obj.forEach((element :any) => {
    if (element.name.indexOf('#col') != -1) {
      result.push(element.characters);
    }
    if (element.children) {
      result = getTd(element.children, result);
    }
  });
  return result;
};

function getCsv(obj, t='') {
  let result = t;
  obj.forEach((element :any) => {
      if (element.name == '#row') {
        result += getCols(element.children).join(',') + '\n';
      }
      if (element.children) {
        result = getCsv(element.children, result)
      }
  });
  return result;
};

figma.ui.onmessage = msg => {
  if (msg == 'export_table_to_csv') {
    const csvDataArray = []
    figma.currentPage.selection.forEach((element :any) => {
      if (element.children) {
        csvDataArray.push({
          name: element.name ? element.name : 'noName',
          csv: getCsv(element.children)
        });
      }
    });
  }
};
④ code.tsからui.htmlに変換したデータを送信
作成したCSV形式の情報をfigma.ui.postMessageでui.htmlに返す
もし選択していない状態で実行していた場合はエラーを返す
    if (csvDataArray.length) {
      figma.ui.postMessage({
        download: csvDataArray,
      });
    } else {
      figma.ui.postMessage({
        error: 'オブジェクトを選択してください'
      });
    }
⑤ ui.htmlでダウンロードリンクを表示
[ui.html]
<div class="caption">
  選択したオブジェクトから<br>
  CSVファイルを作成します
</div>
<section>
  <a href="#" class="btn_03" id="download">作成</a>
</section>

<table id="list" class="list"></table>

<script>
function downloadCSV(data) {
  document.getElementById('list').innerHTML = '';
  data.forEach((element, index) => {
    const filename = `${element.name}.csv`;
    const bom = new Uint8Array([0xef, 0xbb, 0xbf]);
    const blob = new Blob([bom, element.csv], { type: "text/csv" });
    const url = (window.URL || window.webkitURL).createObjectURL(blob);
    const tr = document.createElement("tr");
    const td1 = document.createElement("td");
    const td2 = document.createElement("td");
    const download = document.createElement("a");
    download.href = url;
    download.download = filename;
    download.text = 'download';
    td1.innerText = element.name;
    td2.className = 'test-right';
    td2.appendChild(download);
    tr.appendChild(td1)
    tr.appendChild(td2)
    document.getElementById('list').appendChild(tr);
  });
}

document.getElementById('download').onclick = () => {
  parent.postMessage({ pluginMessage: 'export_table_to_csv' }, '*')
  return false;
}

onmessage = (event) => {
  if (Object.keys(event.data.pluginMessage).indexOf('download') !== -1) {
    console.log(event.data.pluginMessage);
    downloadCSV(event.data.pluginMessage.download)
  }

  if (Object.keys(event.data.pluginMessage).indexOf('error') !== -1) {
    alert(event.data.pluginMessage.error);
  }
}
</script>
コードまとめ
■ code.ts
figma.showUI(__html__);

function getCols(obj, t = []) {
  let result = [...t];
  obj.forEach((element :any) => {
    if (element.name.indexOf('#col') != -1) {
      result.push(element.characters);
    }
    if (element.children) {
      result = getTd(element.children, result);
    }
  });
  return result;
};

function getCsv(obj, t='') {
  let result = t;
  obj.forEach((element :any) => {
      if (element.name == '#row') {
        result += getCols(element.children).join(',') + '\n';
      }
      if (element.children) {
        result = getCsv(element.children, result)
      }
  });
  return result;
};

figma.ui.onmessage = msg => {
  if (msg == 'export_table_to_csv') {
    const csvDataArray = []
    figma.currentPage.selection.forEach((element :any) => {
      if (element.children) {
        csvDataArray.push({
          name: element.name ? element.name : 'noName',
          csv: getCsv(element.children)
        });
      }
    });

    if (csvDataArray.length) {
      figma.ui.postMessage({
        download: csvDataArray,
      });
    } else {
      figma.ui.postMessage({
        error: 'オブジェクトを選択してください'
      });
    }
  }
};
■ ui.html
<div class="caption">
  選択したオブジェクトから<br>
  CSVファイルを作成します
</div>
<section>
  <a href="#" class="btn_03" id="download">作成</a>
</section>

<table id="list" class="list"></table>

<script>
function downloadCSV(data) {
  document.getElementById('list').innerHTML = '';
  data.forEach((element, index) => {
    const filename = `${element.name}.csv`;
    const bom = new Uint8Array([0xef, 0xbb, 0xbf]);
    const blob = new Blob([bom, element.csv], { type: "text/csv" });
    const url = (window.URL || window.webkitURL).createObjectURL(blob);
    const tr = document.createElement("tr");
    const td1 = document.createElement("td");
    const td2 = document.createElement("td");
    const download = document.createElement("a");
    download.href = url;
    download.download = filename;
    download.text = 'download';
    td1.innerText = element.name;
    td2.className = 'test-right';
    td2.appendChild(download);
    tr.appendChild(td1)
    tr.appendChild(td2)
    document.getElementById('list').appendChild(tr);
  });
}

document.getElementById('download').onclick = () => {
  parent.postMessage({ pluginMessage: 'export_table_to_csv' }, '*')
  return false;
}

onmessage = (event) => {
  if (Object.keys(event.data.pluginMessage).indexOf('download') !== -1) {
    console.log(event.data.pluginMessage);
    downloadCSV(event.data.pluginMessage.download)
  }

  if (Object.keys(event.data.pluginMessage).indexOf('error') !== -1) {
    alert(event.data.pluginMessage.error);
  }
}
</script>
参考


