はじめに
今まで通常のROSAは触ったことがありましたが、ランニングコストが高いなーと思っていました。そんな中、12/4になんとROSAのHosted Control PlaneがGAされたので触ってみました。
目次
ROSA(Red Hat OpenShift Service on AWS) とは
ROSA with HCPとは
アーキテクチャー
アーキテクチャーの前提
作ってみた
リソースを見てみた
所感
ROSA(Red Hat OpenShift Service on AWS) とは
一言で言うとAWS上でマネージドで提供さたOpenShiftのことです。
ROSA with HCPとは
Red hHat社の下記サイトによると下記のこと
ホステッドコントロールプレーン (HCP) を備えた Red Hat OpenShift Service on AWS (ROSA) は、マネージド Red Hat OpenShift Service on AWS (ROSA) クラスターを作成するための異なる方法を提供します。HCP を備えた ROSA は、信頼性と効率性に重点を置いた低コストのソリューションを提供します。効率を重視して、新しいクラスターをすばやく作成し、数分でアプリケーションをデプロイできます。
今までのROSA(Classic)の違いは下記のようになっています。ただ12月時点ではこのようになっていますが、今後のアップデートでより利便性は上がってくるのかなと思います。
| HCP | Classic | 感想 | |
|---|---|---|---|
| プロビジョニング時間 | 約 10 分 | 約 40 分 | 早い! |
| アーキテクチャー | コントロールプレーンにはPrivateLink経由でにアクセスします。 | 自身のAWSアカウント内でコントロールプレーンとワーカーノードを運用します。 | ワーカーノードのアーキテクチャーは変わらないが、コントロールプレーンがのアーキテクチャーが変わる感じ。 |
| Amazon EC2 の最小フットプリント | 1 つのクラスターには少なくとも 2 つのノードが必要です。 | 1 つのクラスターには少なくとも 7 つのノードが必要です。 | これはかなりコストインパクトが大きいですね。ROSAを利用した検証などのハードルが下がるかもですね。 |
| Deployment | コントロールプレーンコンポーネントを Red Hat の AWS アカウントにデプロイされ、ワーカーノードは自身のAWSアカウントにデプロイされます。 | 全て自身の AWS アカウントでデプロイされます。 | ここはあまり触らないコンポーネントまで自身のAWSアカウントで見えていたので、便利です。 |
| アップグレード | コントロールプレーンとマシンプールを個別に選択的にアップグレードします。 | クラスター全体が一度にアップグレードされます。 | 試したことはないですが、個別にアップグレードできることで時間が短縮できそうですね。 |
| 地域ごとの可用性 | 日本のリージョンでは未提供です。 | 東京、大阪リージョンで利用可能です。 | 少し試す分にはどこでも良いですが、プロダクション環境で利用するとなるとやはり日本リージョンですかね。待ち遠しいです。 |
| コンプライアンス | コンプライアンス認定と FIPS はまだ利用できません。 | ISO 27001、17、18、SOC 2 Type 2、SOC 3、PCI-DSS、HIPAAの準拠があります。 | ここはプロダクション環境で利用する際に最新状況を要確認ですね。 |
注意事項
Red Hat社のサイトにある通り、「既存の ROSA クラスターをHCPにアップグレードまたは変換することはできないため、HCP を備えた ROSA 機能を使用するには新しいクラスターを作成する必要があります。」とのことです。もし移行するなら、両方のクラスター環境を作ってアプリケーションを徐々に持っていくしかなさそうですね。
アーキテクチャー
「パブリックネットワーク上にデプロイされた HCP を備えた ROSA」か「プライベートネットワーク上にデプロイメントされた HCP を備えた ROSA」の構成をとることができます。
この辺りは会社のAWSのNW構成次第かと思います。昨今、大規模にAWSを展開する場合は、Landing Zoneのような構成を取るかと思いますので、今回は「プライベートネットワーク上にデプロイメントされた HCP を備えた ROSA」で検証して見ようと思います。
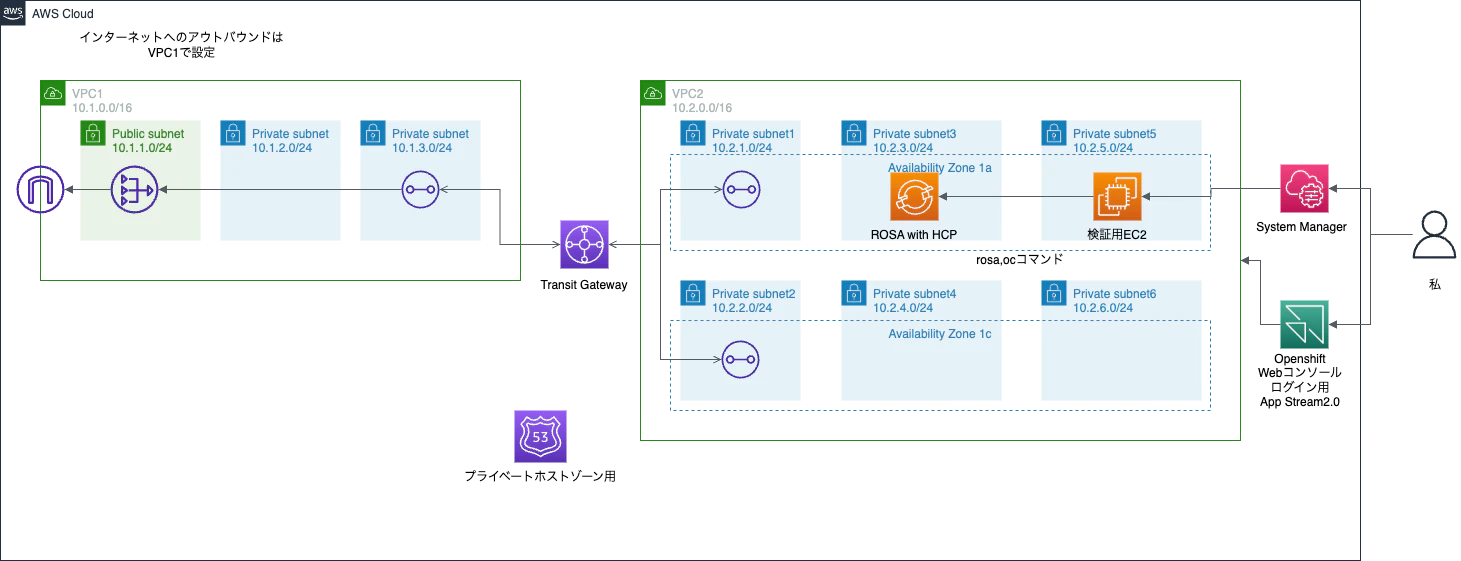
アーキテクチャーの前提
- インターネットへのアクセスはtransit Gateway経由で別VPCで構築します。
- 踏み台環境はCLI操作するEC2とGUI操作できるAppstream2.0を利用します。
- お金の関係でROSAはシングルAZ構成にします。
- Red Hatのアカウントはすでに持っている前提とします。
- AWSを利用するリージョンはROSA with HCPが利用可能な「us-east-1」です。
作ってみた構成は下記です。
作ってみた
VPC1の構築
この辺はCloudFormationで作っていきます。
VPC1を構築するYAML
AWSTemplateFormatVersion: 2010-09-09

Resources:
  CfVPC1:
    Type: AWS::EC2::VPC
    Properties:
      CidrBlock: 10.1.0.0/16
      EnableDnsSupport: "true"
      EnableDnsHostnames: "true"
      Tags:
        -
          Key: Name
          Value: CfVPC1

  CfVPC1PublicSubnet1:
    Type: AWS::EC2::Subnet
    Properties:
      CidrBlock: 10.1.1.0/24
      MapPublicIpOnLaunch: true
      VpcId: !Ref CfVPC1
      AvailabilityZone: "us-east-1a"
      Tags:
        - Key: Name
          Value: CfVPC1PublicSubnet1
  CfVPC1PrivateSubnet1:
    Type: AWS::EC2::Subnet
    Properties:
      CidrBlock: 10.1.2.0/24
      MapPublicIpOnLaunch: false
      VpcId: !Ref CfVPC1
      AvailabilityZone: "us-east-1a"
      Tags:
        - Key: Name
          Value: CfVPC1PrivateSubnet1
  CfVPC1PrivateSubnet2:
    Type: AWS::EC2::Subnet
    Properties:
      CidrBlock: 10.1.3.0/24
      MapPublicIpOnLaunch: false
      VpcId: !Ref CfVPC1
      AvailabilityZone: "us-east-1a"
      Tags:
        - Key: Name
          Value: CfVPC1PrivateSubnet2

  CfVPC1InternetGateway:
    Type: AWS::EC2::InternetGateway
    Properties:
      Tags:
        - Key: Name
          Value: CfVPC1InternetGateway

  AttachCfInternetGateway:
    Type: AWS::EC2::VPCGatewayAttachment
    Properties:
      InternetGatewayId : !Ref CfVPC1InternetGateway
      VpcId: !Ref CfVPC1

  CfVPC1RouteTableForPublicSubnet:
    Type: AWS::EC2::RouteTable
    Properties:
      VpcId: !Ref CfVPC1
      Tags:
        - Key: Name
          Value: CfVPC1RouteTableForPublicSubnet

  CfVPC1RouteForPublicSubnet:
    Type: AWS::EC2::Route
    Properties:
      RouteTableId: !Ref CfVPC1RouteTableForPublicSubnet
      DestinationCidrBlock: 0.0.0.0/0
      GatewayId: !Ref CfVPC1InternetGateway

  CfVPC1AssocciateRouteTableForPublicSubnet:
    Type: AWS::EC2::SubnetRouteTableAssociation
    Properties:
      RouteTableId: !Ref CfVPC1RouteTableForPublicSubnet
      SubnetId: !Ref CfVPC1PublicSubnet1

  NatGatewayEIP:
    Type: AWS::EC2::EIP
    Properties:
      Domain: vpc

  CfVPC1NatGateway:
    Type: AWS::EC2::NatGateway
    Properties:
      AllocationId:
        Fn::GetAtt:
          - NatGatewayEIP
          - AllocationId
      SubnetId: !Ref CfVPC1PublicSubnet1
      Tags:
        - Key: Name
          Value: CfVPC1NatGateway

  CfVPC1RouteTableForPrivateSubnet:
    Type: AWS::EC2::RouteTable
    Properties:
      VpcId: !Ref CfVPC1
      Tags:
        - Key: Name
          Value: CfVPC1RouteTableForPrivateSubnet

  CfVPC1RouteForPrivateSubnet:
    Type: AWS::EC2::Route
    Properties:
      RouteTableId: !Ref CfVPC1RouteTableForPrivateSubnet
      DestinationCidrBlock: 0.0.0.0/0
      NatGatewayId: !Ref CfVPC1NatGateway

  CfVPC1AssocciateRouteTableForPrivateSubnet1:
    Type: AWS::EC2::SubnetRouteTableAssociation
    Properties:
      RouteTableId: !Ref CfVPC1RouteTableForPrivateSubnet
      SubnetId: !Ref CfVPC1PrivateSubnet1

  CfVPC1AssocciateRouteTableForPrivateSubnet2:
    Type: AWS::EC2::SubnetRouteTableAssociation
    Properties:
      RouteTableId: !Ref CfVPC1RouteTableForPrivateSubnet
      SubnetId: !Ref CfVPC1PrivateSubnet2
間にNetwork Firewallを挟もうと思いましたが、諦めました・・・真ん中のPrivate Subnetはその残りです。
VPC2の構築
同じくCloudFormationで作っていきます。
VPC2を構築するYAML
AWSTemplateFormatVersion: 2010-09-09

Resources:
  CfVPC2:
    Type: AWS::EC2::VPC
    Properties:
      CidrBlock: 10.2.0.0/16
      EnableDnsSupport: "true"
      EnableDnsHostnames: "true"
      Tags:
        -
          Key: Name
          Value: CfVPC2

  CfVPC2PrivateSubnet1:
    Type: AWS::EC2::Subnet
    Properties:
      CidrBlock: 10.2.1.0/24
      MapPublicIpOnLaunch: false
      VpcId: !Ref CfVPC2
      AvailabilityZone: "us-east-1a"
      Tags:
        - Key: Name
          Value: CfVPC2PrivateSubnet1

  CfVPC2PrivateSubnet2:
    Type: AWS::EC2::Subnet
    Properties:
      CidrBlock: 10.2.2.0/24
      MapPublicIpOnLaunch: false
      VpcId: !Ref CfVPC2
      AvailabilityZone: "us-east-1c"
      Tags:
        - Key: Name
          Value: CfVPC2PrivateSubnet2

  CfVPC2PrivateSubnet3:
    Type: AWS::EC2::Subnet
    Properties:
      CidrBlock: 10.2.3.0/24
      MapPublicIpOnLaunch: false
      VpcId: !Ref CfVPC2
      AvailabilityZone: "us-east-1a"
      Tags:
        - Key: Name
          Value: CfVPC2PrivateSubnet3

  CfVPC2PrivateSubnet4:
    Type: AWS::EC2::Subnet
    Properties:
      CidrBlock: 10.2.4.0/24
      MapPublicIpOnLaunch: false
      VpcId: !Ref CfVPC2
      AvailabilityZone: "us-east-1c"
      Tags:
        - Key: Name
          Value: CfVPC2PrivateSubnet4

  CfVPC2PrivateSubnet5:
    Type: AWS::EC2::Subnet
    Properties:
      CidrBlock: 10.2.5.0/24
      MapPublicIpOnLaunch: false
      VpcId: !Ref CfVPC2
      AvailabilityZone: "us-east-1a"
      Tags:
        - Key: Name
          Value: CfVPC2PrivateSubnet5

  CfVPC2PrivateSubnet6:
    Type: AWS::EC2::Subnet
    Properties:
      CidrBlock: 10.2.6.0/24
      MapPublicIpOnLaunch: false
      VpcId: !Ref CfVPC2
      AvailabilityZone: "us-east-1c"
      Tags:
        - Key: Name
          Value: CfVPC2PrivateSubnet6
Transit Gatewayの構築
Transit Gatewayを作成してそれぞれのVPCにTransit Gateway アタッチメントを作成しました。
ルートテーブルはAWSの開発ガイドを参考に下記要件を満たせるようにしました。
- VPC1のプライベートサブネットからインターネットに出れること
- VPC1のプライベートサブネットからVPC2にアクセスできること
- VPC2のプライベートサブネットからVPC1を経由してインターネットに出れること
- VPC2のプライベートサブネットからVPC1のプライベートサブネットにアクセスできること
VPC2の踏み台(EC2)の構築
同じくCloudFormationで作っていきます。
VPC2上にEC2を構築するYAML
AWSTemplateFormatVersion:
  "2010-09-09"
Description:
  AWS Private Subnet EC2 Launch and Connect by SSM

Parameters:
  VPCId:
    Type: String
  SubnetId:
    Type: String
  KeyPairName:
    Type: String
  LinuxLatestAmi:
    Description: "EC2 AMI image SSM path"
    Type: AWS::SSM::Parameter::Value<AWS::EC2::Image::Id>
    Default: "/aws/service/ami-amazon-linux-latest/amzn2-ami-hvm-x86_64-gp2"
    AllowedValues:
      - /aws/service/ami-amazon-linux-latest/amzn2-ami-hvm-x86_64-gp2


Resources:
  VPC2EC2SG:
    Type: AWS::EC2::SecurityGroup
    Properties:
      GroupDescription: "Bastion EC2 Security Group"
      VpcId: !Ref VPCId
      Tags:
        - Key: Name
          Value: private-vpc2-ec2-bastion-sg

  VPC2EndpointSG:
    Type: AWS::EC2::SecurityGroup
    Properties:
      GroupDescription: "Bastion Endpoint Security Group"
      VpcId: !Ref VPCId
      SecurityGroupIngress:
        - IpProtocol: tcp
          FromPort: 443
          ToPort: 443
          SourceSecurityGroupId: !Ref VPC2EC2SG
      Tags:
        - Key: Name
          Value: private-vpc2-endpoint-bastion-sg
  IamRole:
    Type: AWS::IAM::Role
    Properties:
      RoleName: private-vpc2-ec2-bastion-role
      AssumeRolePolicyDocument:
        Version: "2012-10-17"
        Statement:
          - Effect: Allow
            Principal:
              Service:
                - ec2.amazonaws.com
            Action:
              - sts:AssumeRole
      ManagedPolicyArns:
        - arn:aws:iam::aws:policy/AmazonSSMManagedInstanceCore

  InstanceProfile:
    Type: AWS::IAM::InstanceProfile
    Properties:
      Path: /
      Roles:
        - !Ref IamRole

  VPC2NewKeyPair:
    Type: "AWS::EC2::KeyPair"
    Properties:
      KeyName: !Ref KeyPairName

  VPC2EC2Instance:
    Type: "AWS::EC2::Instance"
    Properties:
      Tags:
        - Key: Name
          Value: vpc2-private-bastion
      ImageId: !Ref LinuxLatestAmi
      InstanceType: t3.medium
      KeyName: !Ref VPC2NewKeyPair
      DisableApiTermination: false
      EbsOptimized: false
      SecurityGroupIds:
        - !Ref VPC2EC2SG
      SubnetId: !Ref SubnetId
      IamInstanceProfile: !Ref InstanceProfile

  VPC2SSMVPCEndpoint:
    Type: "AWS::EC2::VPCEndpoint"
    Properties:
      VpcEndpointType: Interface
      PrivateDnsEnabled: true
      ServiceName: !Sub 'com.amazonaws.${AWS::Region}.ssm'
      VpcId: !Ref VPCId
      SubnetIds:
      - !Ref SubnetId
      SecurityGroupIds:
        - !Ref VPC2EndpointSG

  VPC2SSMMessagesVPCEndpoint:
    Type: "AWS::EC2::VPCEndpoint"
    Properties:
      VpcEndpointType: Interface
      PrivateDnsEnabled: true
      ServiceName: !Sub 'com.amazonaws.${AWS::Region}.ssmmessages'
      VpcId: !Ref VPCId
      SubnetIds:
      - !Ref SubnetId
      SecurityGroupIds:
        - !Ref VPC2EndpointSG

  VPC2EC2MessagesVPCEndpoint:
    Type: "AWS::EC2::VPCEndpoint"
    Properties:
      VpcEndpointType: Interface
      PrivateDnsEnabled: true
      ServiceName: !Sub 'com.amazonaws.${AWS::Region}.ec2messages'
      VpcId: !Ref VPCId
      SubnetIds:
      - !Ref SubnetId
      SecurityGroupIds:
        - !Ref VPC2EndpointSG
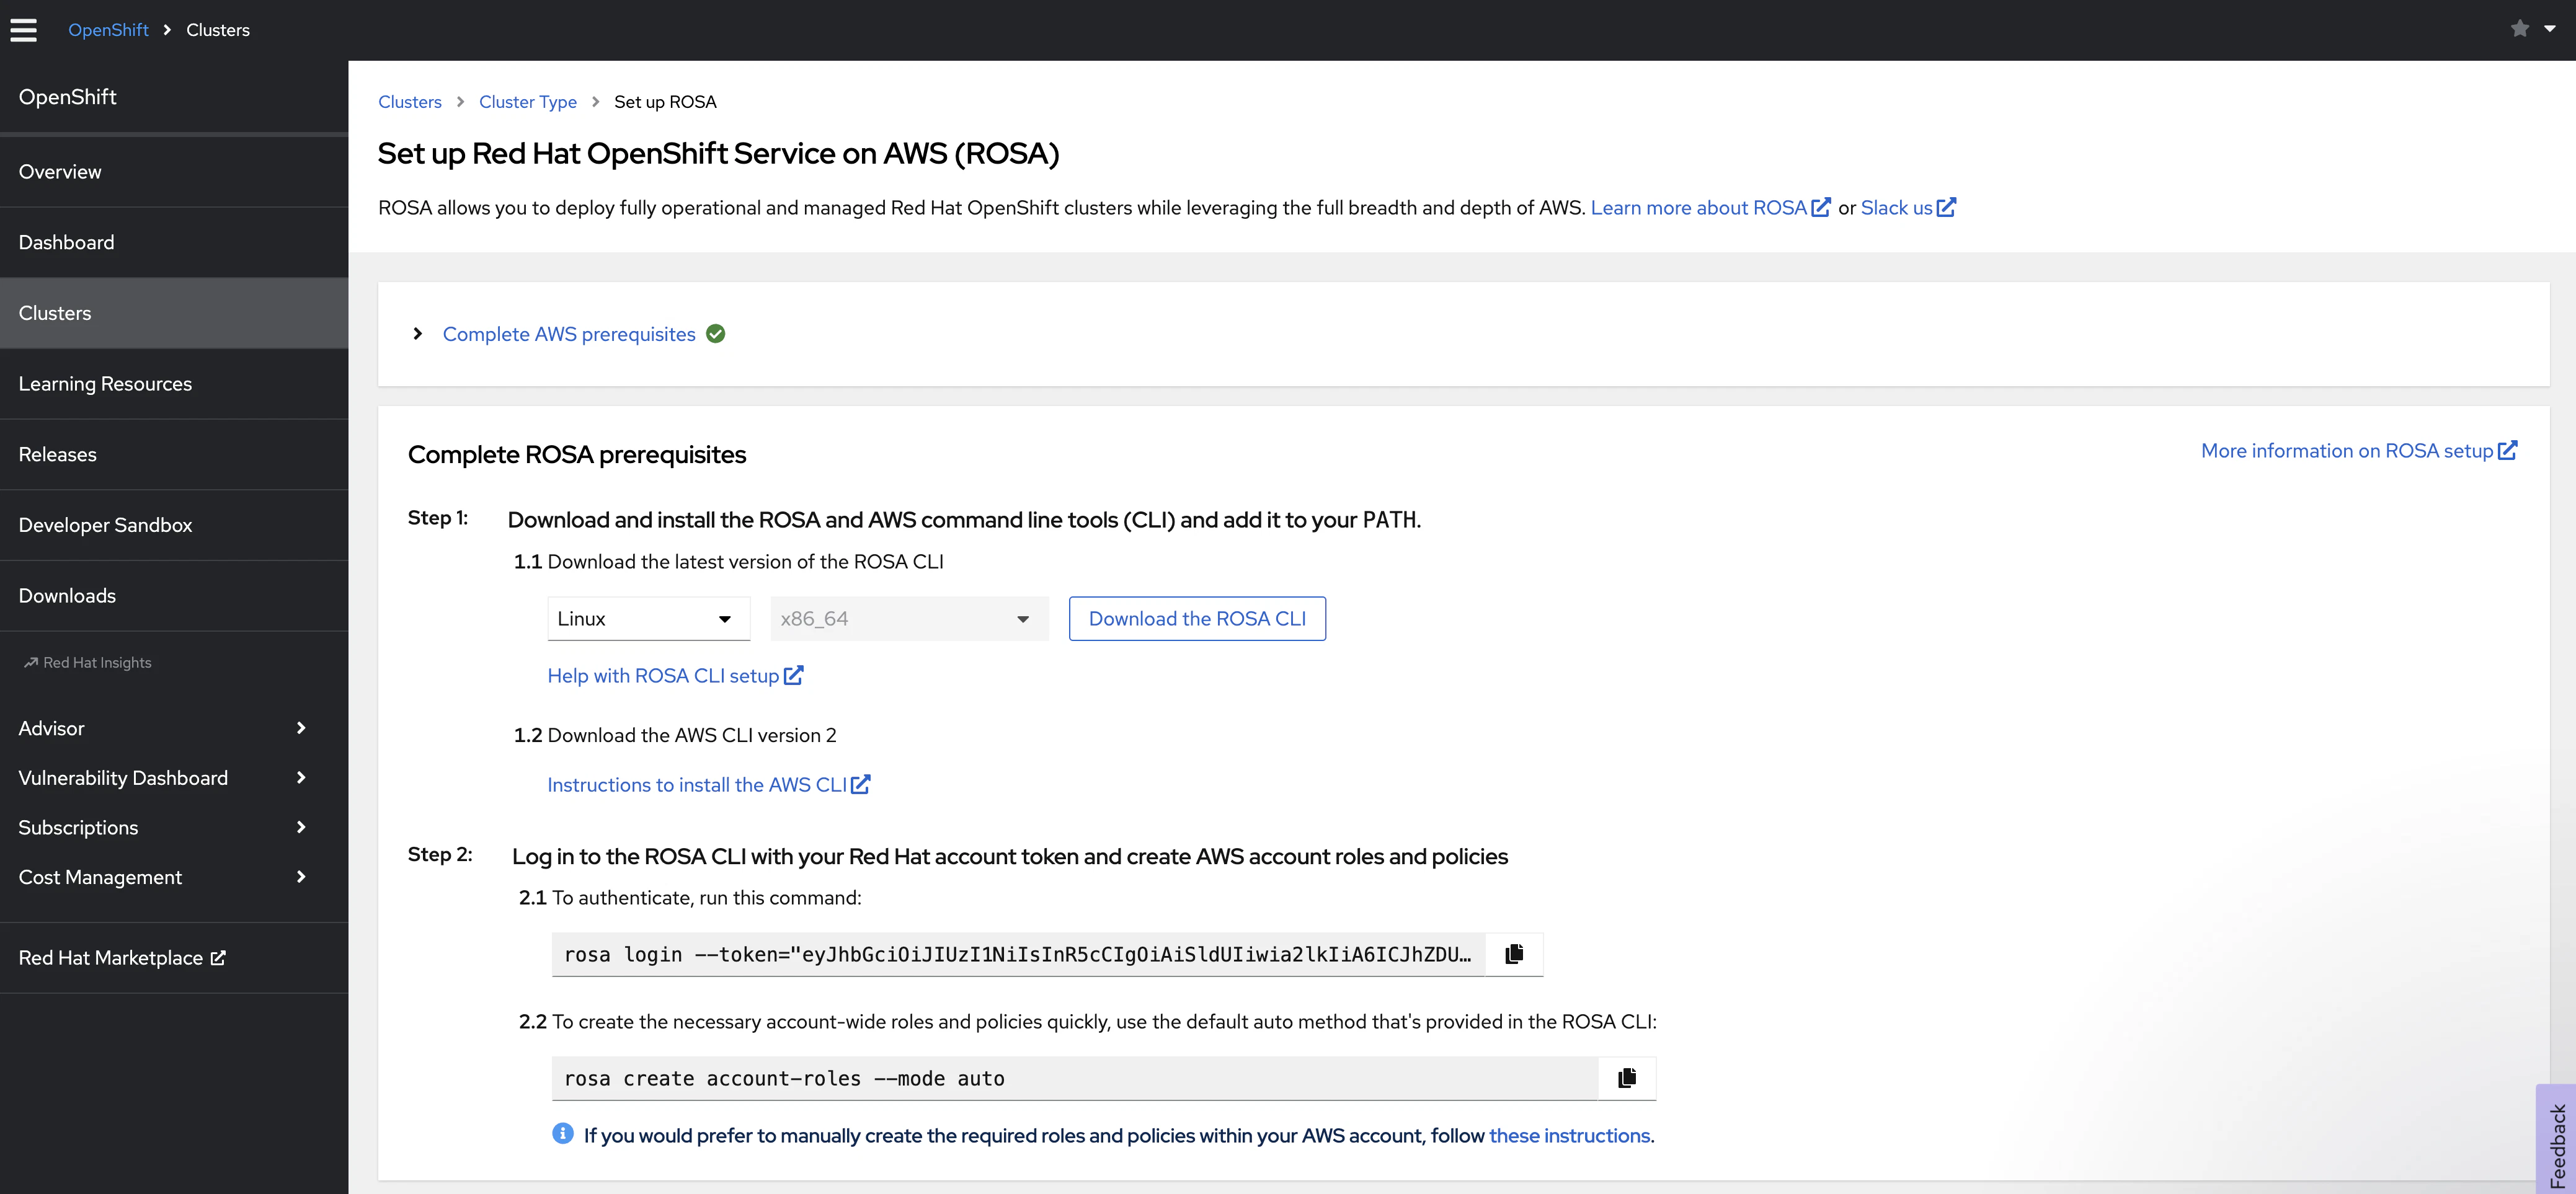
ROSAのインストールに必要なツールをインストールします。
- ROSA CLIのインストール
下記を参考にインストールしました。
- AWS CLI v2のインストール
CLIはv2が必要なので、v1がインストールされていれば、下記を参考に入れ替えをします。
- ocのインストール
rosaコマンドからダウンロードしてインストールします。
[root@ip-10-2-6-79 ~]# rosa download oc
I: Verifying whether OpenShift command-line tool is available...
W: OpenShift command-line tool is not installed.
Run 'rosa download oc' to download the latest version, then add it to your PATH.
I: Downloading https://mirror.openshift.com/pub/openshift-v4/clients/ocp/latest/openshift-client-linux.tar.gz
Downloading... 64 MB complete
I: Successfully downloaded openshift-client-linux.tar.gz
[root@ip-10-2-6-79 ~]# ls -l
total 62440
-rw-r--r-- 1 root root 63934984 Dec 13 07:42 openshift-client-linux.tar.gz
drwxr-xr-x 3 root root       62 Dec 13 06:16 work
[root@ip-10-2-6-79 ~]# tar zxvf openshift-client-linux.tar.gz -C /usr/local/bin/
README.md
oc
kubectl
[root@ip-10-2-6-79 ~]#
[root@ip-10-2-6-79 ~]# oc version
Client Version: 4.14.6
Kustomize Version: v5.0.1
[root@ip-10-2-6-79 ~]#
もしPATHが通ってなかったらプロファイルに追加します。
[root@ip-10-2-6-79 ~]# echo export PATH='/usr/local/bin:$PATH' >> ~/.bash_profile
[root@ip-10-2-6-79 ~]# source ~/.bash_profile
VPC2の踏み台(Appstreams2.0)の構築
Appstreams2.0の作り方は、さらっとにします。
作成する流れはこのような感じです。
-
VPCエンドポイントの作成
今回はVPC2のプライベートサブネット(10.2.5.0/24、10.2.6.0/24)経由でのアクセスにするので「com.amazonaws.us-east-1.appstream.streaming」のVPCエンドポイントを配置します。 -
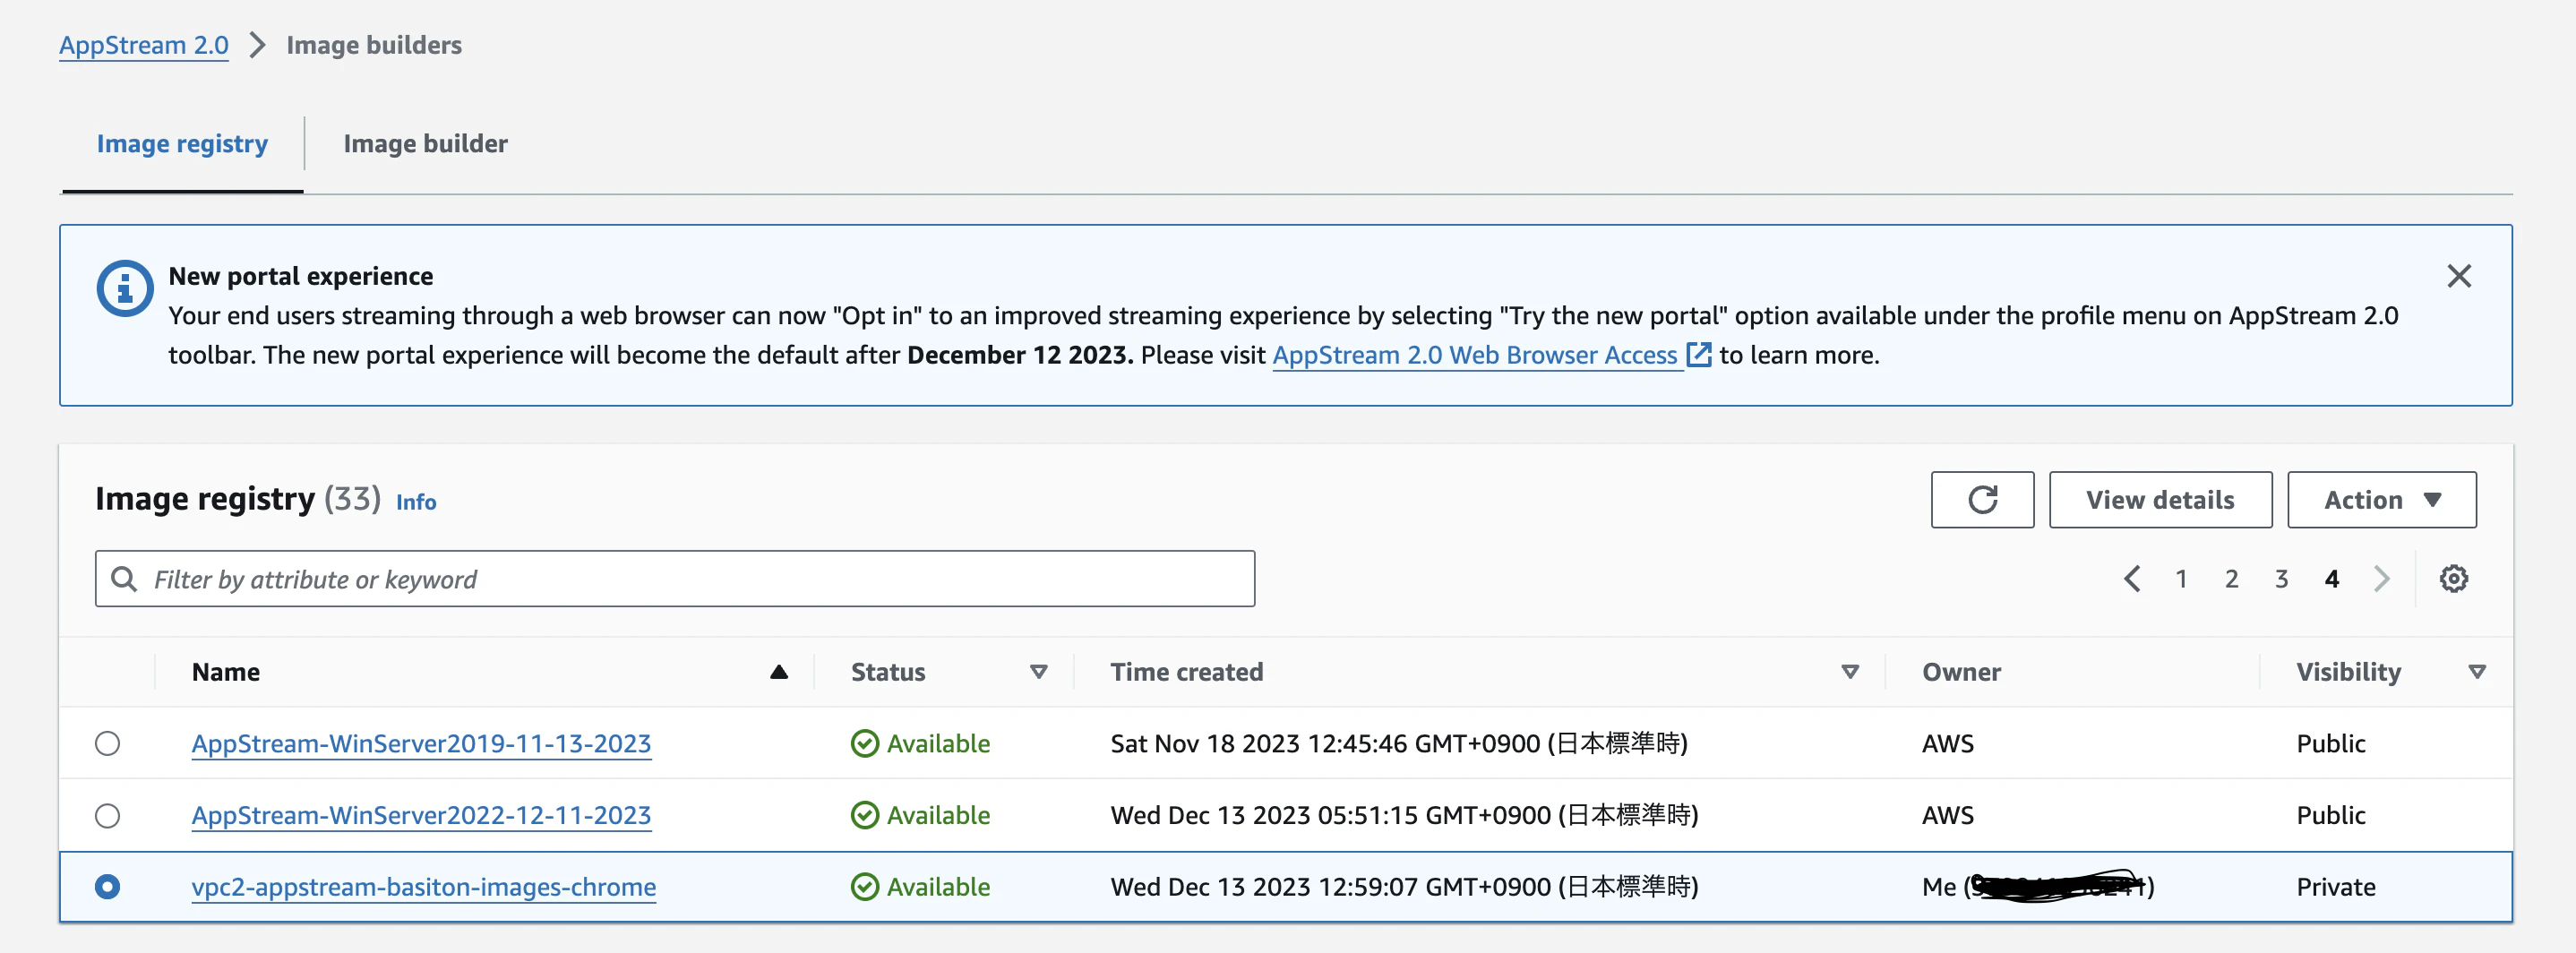
AppStreamでImage Builder作成
デフォルトでもいいのですが、なんとなくChormeを使いたかったのでChomeを入れたWindows Serverのイメージを作成しました。Image BuilderからGeneral Purpose用途のWindows Serverを選択して、Chromeをインストールしてアプリケーションを作りました。
そうするとImage registryに専用のイメージができました。
-
AppStreamでFleetの作成
上記で作ったImageを紐付けてFleetを作ります。
ネットワークはVPC2のプライベートサブネット(10.2.5.0/24、10.2.6.0/24)を選択します。
シングルAZでよかったのですが、複数サブネットを選択しないと次に進めなかったので、マルチAZで選択しています。 -
AppStreamでStackの作成
上記で作ったFleet紐付けてStackを作ります。 -
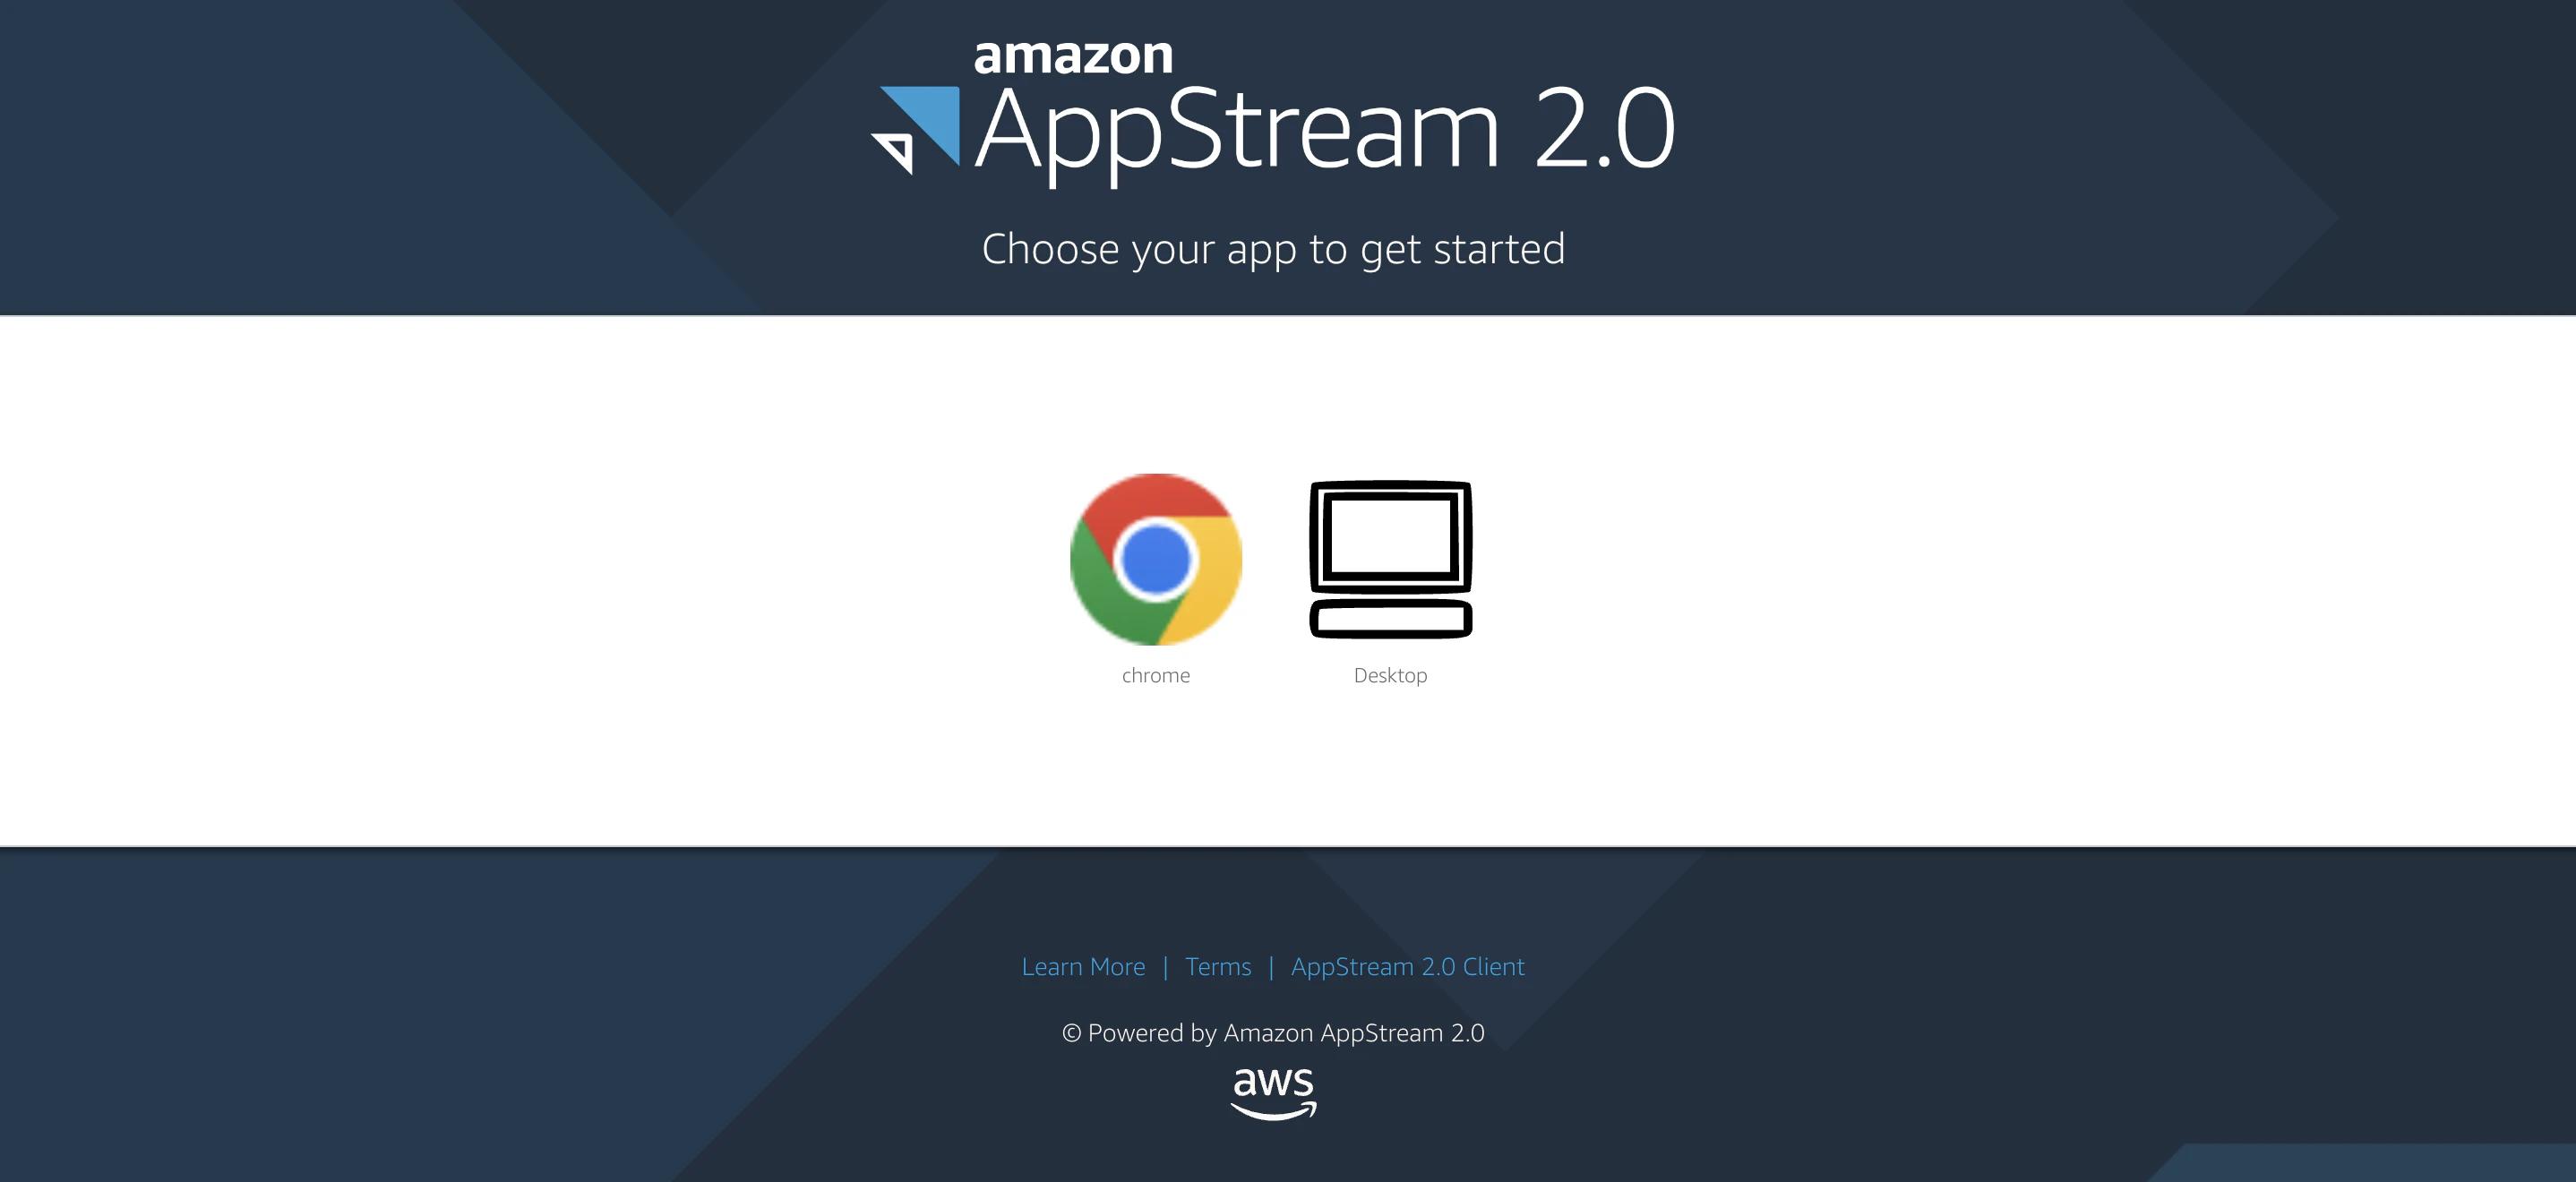
AppStreamでユーザの作成
今回は特にSAML連携しないので、自分のメールアドレスでユーザを作成して上記のStackに紐付けます。
メールアドレス宛にログインURLが飛んでくるので、ログインするとVPC内のリソースにアクセスできつつ、インターネットにもアクセスできる踏み台環境の完成です。先ほどインストールしたChromeが利用できるデスクトップ環境ができました。
サーバワークスさんの記事がかなり、細かく書かれていたので、こちらを見る方が良いかもです。
ROSA with HCPモードのデプロイ
やっとインストールするための環境が整ったので、今回は下記URLの「カスタム AWS KMS 暗号化キーを使用した HCP クラスターでの ROSA の作成」を参考に作っていこうと思います。このURLではTerraform テンプレートを使ってVPC環境を作っておりますが、自分のNW環境に合わせて作りたかったので、手動で作りました。
今回のように手動で作る場合は、URLに記載のあるVPC要件にあっているかご確認ください。
| 要件 | 詳細 | 今回の構成 |
|---|---|---|
| VPC名 | クラスターを作成するときは、特定の VPC 名と ID が必要です。 | 今回はVPC2が該当です。 |
| CIDR範囲 | VPC CIDR 範囲はマシンの CIDR と一致する必要があります。 | 今回はVPC2のCIDRになります。 |
| アベイラビリティゾーン | 単一ゾーンの場合は 1 つの可用性ゾーンが必要で、マルチゾーンの場合は 3 つの可用性ゾーンが必要です。 | 今回はシングルAZ構成です。 |
| パブリックサブネット | NAT ゲートウェイを備えたパブリック サブネットが 1 つ必要です。 | 今回はVPC1側で実装しています。 |
| DNS ホスト名と解決 | DNS ホスト名と解決が有効になっていることを確認する必要があります。 | よくあるVPCの設定ですね。 |
- 作業前提
マネジメントコンソールでROSAの有効化やService Quotasは上げておくことが必要です。
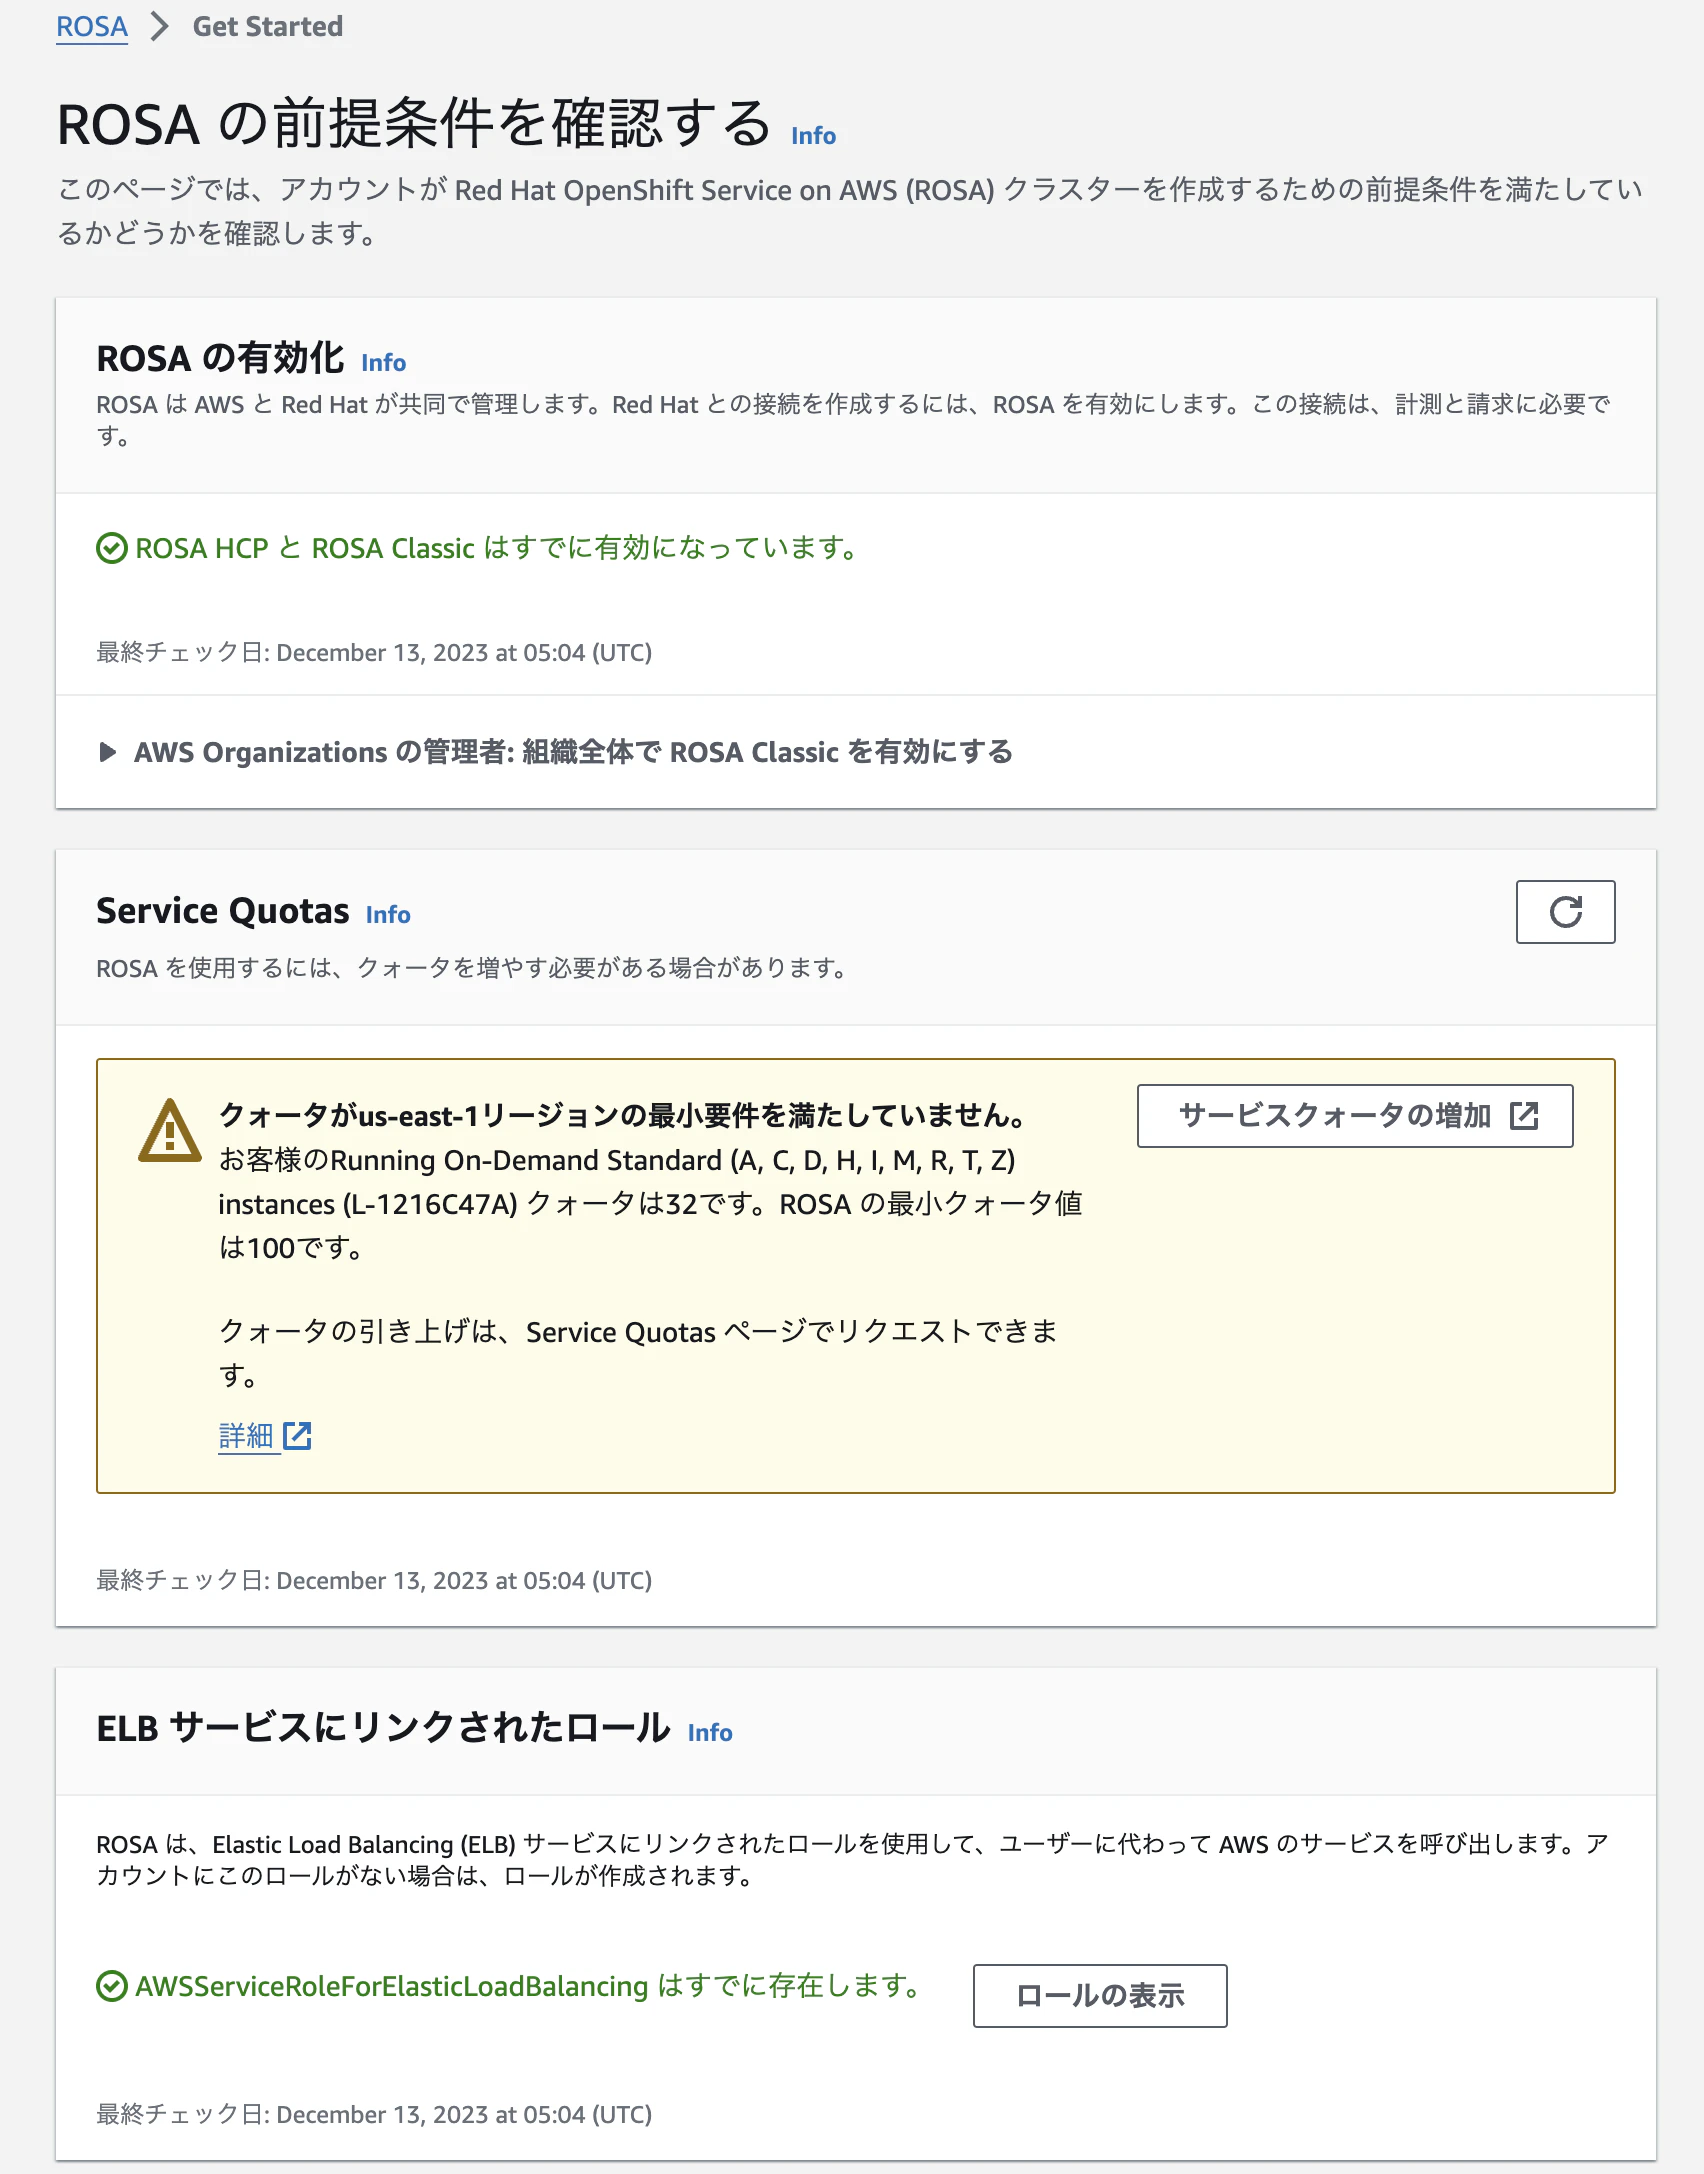
ここでは起動できるインスタンス数のクォータにかかったので、Service Quotasで引き上げ申請をしました。
大体30分くらいで承認されました。
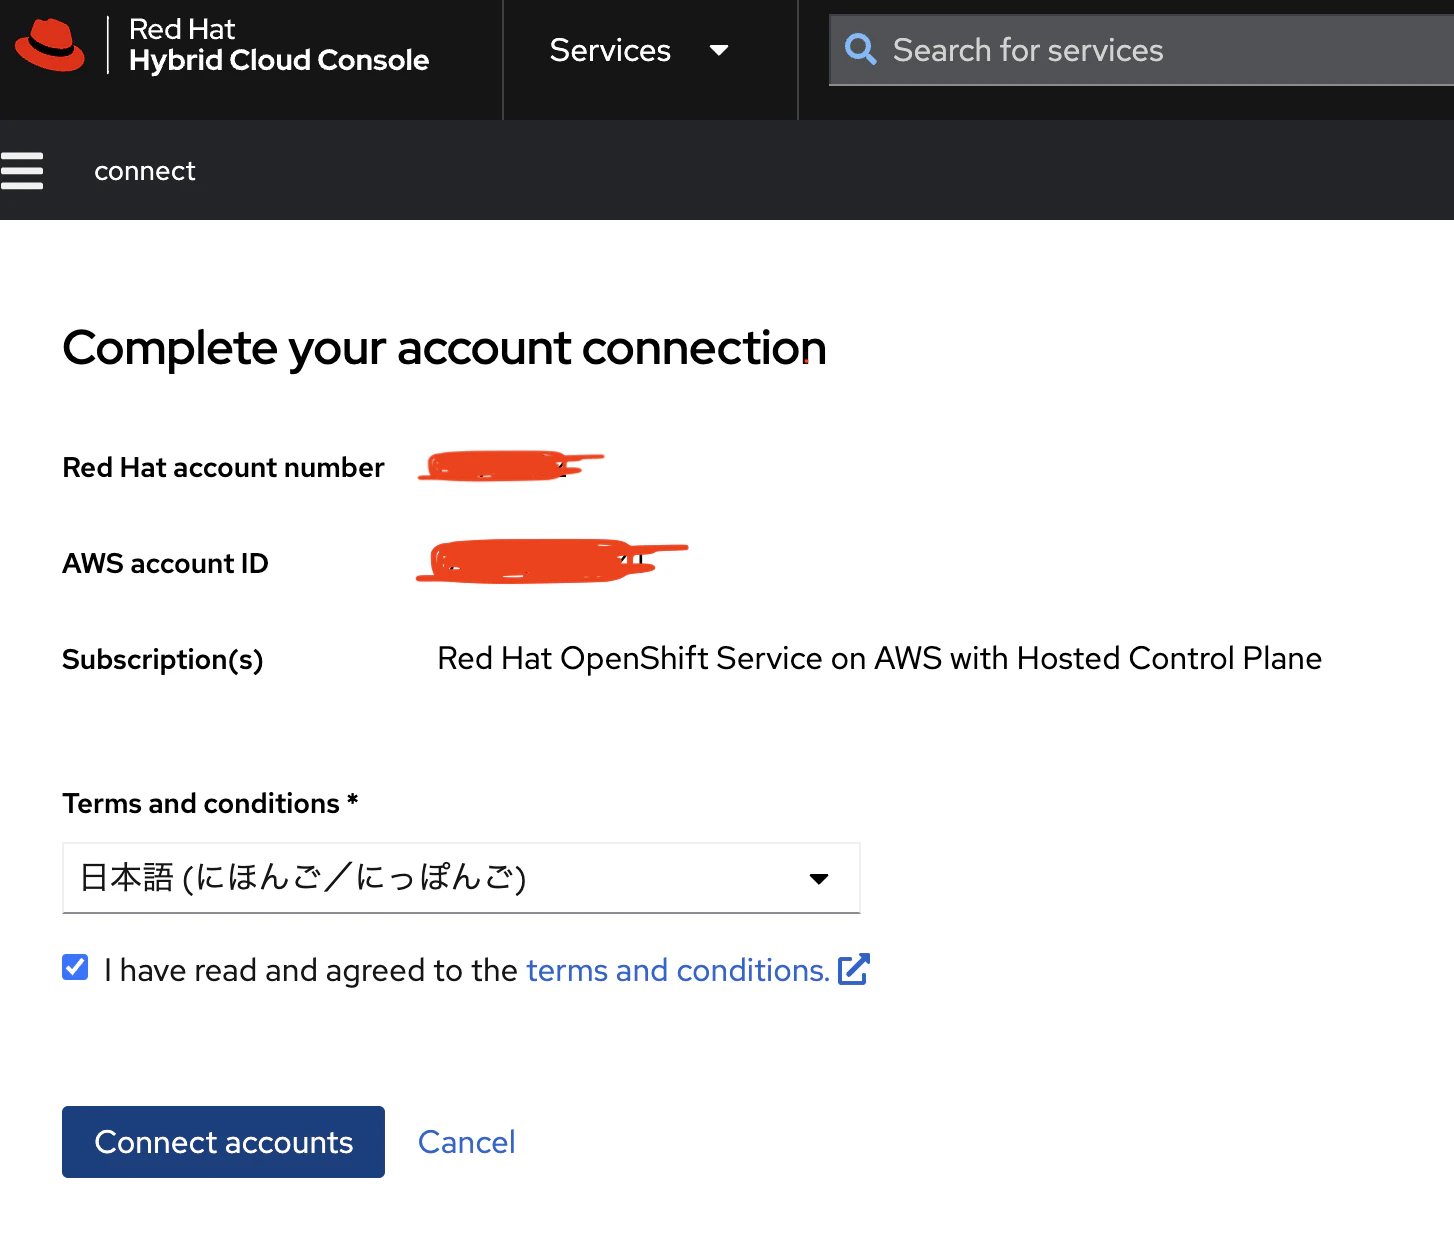
その後、画面を進むとRed Hatアカウントとの紐付けがあるので、Red Hatアカウントでログインします。
メールが飛んでくるので、そのメールでリンクを飛ぶと紐付けできます
先ほど踏み台サーバにCLI系のツールは入れたので、飛ばします。
- rosaコマンドでログイン
rosaコマンドでログインして作業を進めていきます。
この後の処理で、AWSアカウント、token、IDなどは「xxxxxxxxxxxxxx」でマスキングしています。
[root@ip-10-2-6-79 ~]# rosa login --token="xxxxxxxxxxxxxx"
I: Logged in as 'xxxxxxxxx' on 'https://api.openshift.com'
[root@ip-10-2-6-79 ~]#
- AWSアカウント全体の STS ロールとポリシーの作成
[root@ip-10-2-6-79 ~]# rosa create account-roles --hosted-cp
I: Logged in as 'xxxxxxxxxx' on 'https://api.openshift.com'
I: Validating AWS credentials...
I: AWS credentials are valid!
I: Validating AWS quota...
I: AWS quota ok. If cluster installation fails, validate actual AWS resource usage against https://docs.openshift.com/rosa/rosa_getting_started/rosa-required-aws-service-quotas.html
I: Verifying whether OpenShift command-line tool is available...
W: OpenShift command-line tool is not installed.
Run 'rosa download oc' to download the latest version, then add it to your PATH.
I: Creating account roles
? Role prefix: ManagedOpenShift
? Permissions boundary ARN (optional):
? Path (optional):
? Role creation mode: auto
? Create Classic account roles: No
I: Creating hosted CP account roles using 'arn:aws:iam::xxxxxxxxxx:role/private-vpc2-ec2-bastion-role'
I: Created role 'ManagedOpenShift-HCP-ROSA-Installer-Role' with ARN 'arn:aws:iam::xxxxxxxxxx:role/ManagedOpenShift-HCP-ROSA-Installer-Role'
I: Created role 'ManagedOpenShift-HCP-ROSA-Support-Role' with ARN 'arn:aws:iam::xxxxxxxxxx:role/ManagedOpenShift-HCP-ROSA-Support-Role'
I: Created role 'ManagedOpenShift-HCP-ROSA-Worker-Role' with ARN 'arn:aws:iam::xxxxxxxxxx:role/ManagedOpenShift-HCP-ROSA-Worker-Role'
I: To create an OIDC Config, run the following command:
        rosa create oidc-config
[root@ip-10-2-6-79 ~]#
prefixはデフォルトの「ManagedOpenShift」にしています。あとは基本autoかyesで進めました。
- OpenID Connect 構成の作成
[root@ip-10-2-6-79 ~]# rosa create oidc-config --mode=auto  --yes
I: Setting up managed OIDC configuration
I: To create Operator Roles for this OIDC Configuration, run the following command and remember to replace <user-defined> with a prefix of your choice:
        rosa create operator-roles --prefix <user-defined> --oidc-config-id 283gbg06toka7vrqu3agasd047r9831q
If you are going to create a Hosted Control Plane cluster please include '--hosted-cp'
I: Creating OIDC provider using 'arn:aws:iam::xxxxxxxxxx:role/private-vpc2-ec2-bastion-role'
I: Created OIDC provider with ARN 'arn:aws:iam::xxxxxxxxxx:oidc-provider/rh-oidc.s3.us-east-1.amazonaws.com/xxxxxxxxxx'
[root@ip-10-2-6-79 ~]#
[root@ip-10-2-6-79 ~]# rosa list oidc-config
ID                                MANAGED  ISSUER URL                                                                   SECRET ARN
xxxxxxxxxx  true     https://rh-oidc.s3.us-east-1.amazonaws.com/xxxxxxxxxx
[root@ip-10-2-6-79 ~]#
問題なくOIDC providerができました。
- Operator用のIAM ロール作成
HCP クラスターで ROSA を使用する場合は、必要な Operator IAM ロールを作成する必要があるようです。
[root@ip-10-2-6-79 ~]# rosa create operator-roles --hosted-cp --prefix rosa-hcp-operator --oidc-config-id xxxxxxxxxx --installer-role-arn arn:aws:iam::xxxxxxxxxx:role/ManagedOpenShift-HCP-ROSA-Installer-Role
? Role creation mode: auto
? Operator roles prefix: rosa-hcp-operator
? Create hosted control plane operator roles: Yes
I: Using arn:aws:iam::xxxxxxxxxx:role/ManagedOpenShift-HCP-ROSA-Installer-Role for the Installer role
? Permissions boundary ARN (optional):
I: Reusable OIDC Configuration detected. Validating trusted relationships to operator roles:
I: Creating roles using 'arn:aws:iam::xxxxxxxxxx:role/private-vpc2-ec2-bastion-role'
I: Created role 'rosa-hcp-operator-openshift-cloud-network-config-controller-clou' with ARN 'arn:aws:iam::xxxxxxxxxx:role/rosa-hcp-operator-openshift-cloud-network-config-controller-clou'
I: Created role 'rosa-hcp-operator-openshift-image-registry-installer-cloud-crede' with ARN 'arn:aws:iam::xxxxxxxxxx:role/rosa-hcp-operator-openshift-image-registry-installer-cloud-crede'
I: Created role 'rosa-hcp-operator-kube-system-kube-controller-manager' with ARN 'arn:aws:iam::xxxxxxxxxx:role/rosa-hcp-operator-kube-system-kube-controller-manager'
I: Created role 'rosa-hcp-operator-kube-system-capa-controller-manager' with ARN 'arn:aws:iam::xxxxxxxxxx:role/rosa-hcp-operator-kube-system-capa-controller-manager'
I: Created role 'rosa-hcp-operator-kube-system-control-plane-operator' with ARN 'arn:aws:iam::xxxxxxxxxx:role/rosa-hcp-operator-kube-system-control-plane-operator'
I: Created role 'rosa-hcp-operator-kube-system-kms-provider' with ARN 'arn:aws:iam::xxxxxxxxxx:role/rosa-hcp-operator-kube-system-kms-provider'
I: Created role 'rosa-hcp-operator-openshift-ingress-operator-cloud-credentials' with ARN 'arn:aws:iam::xxxxxxxxxx:role/rosa-hcp-operator-openshift-ingress-operator-cloud-credentials'
I: Created role 'rosa-hcp-operator-openshift-cluster-csi-drivers-ebs-cloud-creden' with ARN 'arn:aws:iam::xxxxxxxxxx:role/rosa-hcp-operator-openshift-cluster-csi-drivers-ebs-cloud-creden'
I: To create a cluster with these roles, run the following command:
        rosa create cluster --sts --oidc-config-id xxxxxxxxxx --operator-roles-prefix rosa-hcp-operator --hosted-cp
[root@ip-10-2-6-79 ~]#
[root@ip-10-2-6-79 ~]# rosa list operator-roles
I: Fetching operator roles
ROLE PREFIX        AMOUNT IN BUNDLE
rosa-hcp-operator  8
? Would you like to detail a specific prefix Yes
? Operator Role Prefix: rosa-hcp-operator
OPERATOR NAME                OPERATOR NAMESPACE                         ROLE NAME                                                         ROLE ARN
      CLUSTER ID  VERSION  POLICIES                                AWS Managed  IN USE
capa-controller-manager      kube-system                                rosa-hcp-operator-kube-system-capa-controller-manager             arn:aws:iam::xxxxxxxxx:role/rosa-hcp-operator-kube-system-capa-controller-manager                           [ROSANodePoolManagementPolicy]          Yes          No
control-plane-operator       kube-system                                rosa-hcp-operator-kube-system-control-plane-operator              arn:aws:iam::xxxxxxxxx:role/rosa-hcp-operator-kube-system-control-plane-operator                           [ROSAControlPlaneOperatorPolicy]        Yes          No
kms-provider                 kube-system                                rosa-hcp-operator-kube-system-kms-provider                        arn:aws:iam::xxxxxxxxx:role/rosa-hcp-operator-kube-system-kms-provider                           [ROSAKMSProviderPolicy]                 Yes          No
kube-controller-manager      kube-system                                rosa-hcp-operator-kube-system-kube-controller-manager             arn:aws:iam::xxxxxxxxx:role/rosa-hcp-operator-kube-system-kube-controller-manager                           [ROSAKubeControllerPolicy]              Yes          No
cloud-credentials            openshift-cloud-network-config-controller  rosa-hcp-operator-openshift-cloud-network-config-controller-clou  arn:aws:iam::xxxxxxxxx:role/rosa-hcp-operator-openshift-cloud-network-config-controller-clou                       [ROSACloudNetworkConfigOperatorPolicy]  Yes          No
ebs-cloud-credentials        openshift-cluster-csi-drivers              rosa-hcp-operator-openshift-cluster-csi-drivers-ebs-cloud-creden  arn:aws:iam::xxxxxxxxx:role/rosa-hcp-operator-openshift-cluster-csi-drivers-ebs-cloud-creden                       [ROSAAmazonEBSCSIDriverOperatorPolicy]  Yes          No
installer-cloud-credentials  openshift-image-registry                   rosa-hcp-operator-openshift-image-registry-installer-cloud-crede  arn:aws:iam::xxxxxxxxx:role/rosa-hcp-operator-openshift-image-registry-installer-cloud-crede                       [ROSAImageRegistryOperatorPolicy]       Yes          No
cloud-credentials            openshift-ingress-operator                 rosa-hcp-operator-openshift-ingress-operator-cloud-credentials    arn:aws:iam::xxxxxxxxx:role/rosa-hcp-operator-openshift-ingress-operator-cloud-credentials                         [ROSAIngressOperatorPolicy]             Yes          No
[root@ip-10-2-6-79 ~]#
prefixは「rosa-hcp-operator」としました。問題なくIAMロールができていました。
- KMS作成
ROSA内のノードやデータベースの暗号化にKMSを利用するようなので、そのKMSを作成します。
[root@ip-10-2-6-79 ~]# KMS_ARN=$(aws kms create-key --region us-east-1 --description 'Custom ROSA Encryption Key' --tags TagKey=red-hat,TagValue=true --query KeyMetadata.Arn --output text)
[root@ip-10-2-6-79 ~]#
作成したKMSに対してRed Hat社のリンクにある通り、コマンドもしくはマネジメントコンソール上で必要なポリシーを付与します。
{
  "Version": "2012-10-17",
  "Id": "key-rosa-policy-1",
  "Statement": [
  {
              "Sid": "Enable IAM User Permissions",
              "Effect": "Allow",
              "Principal": {
                  "AWS": "arn:aws:iam::${AWS_ACCOUNT_ID}:root"
              },
              "Action": "kms:*",
              "Resource": "*"
          },
        {
              "Sid": "Installer Permissions",
              "Effect": "Allow",
              "Principal": {
                  "AWS": "arn:aws:iam::${AWS_ACCOUNT_ID}:role/ManagedOpenShift-HCP-ROSA-Installer-Role"
              },
              "Action": [
                  "kms:CreateGrant",
                  "kms:DescribeKey",
                  "kms:GenerateDataKeyWithoutPlaintext"
              ],
              "Resource": "*"
          },
          {
              "Sid": "ROSA KubeControllerManager Permissions",
              "Effect": "Allow",
              "Principal": {
                  "AWS": "arn:aws:iam::${AWS_ACCOUNT_ID}:role/<operator_role_prefix>-kube-system-kube-controller-manager"

              },
              "Action": "kms:DescribeKey",
              "Resource": "*"
          },
          {
              "Sid": "ROSA KMS Provider Permissions",
              "Effect": "Allow",
              "Principal": {
                  "AWS": "arn:aws:iam::${AWS_ACCOUNT_ID}:role/<operator_role_prefix>-kube-system-kms-provider"
              },
              "Action": [
                  "kms:Encrypt",
                  "kms:Decrypt",
                  "kms:DescribeKey"
              ],
              "Resource": "*"
          },
          {
              "Sid": "ROSA NodeManager Permissions",
              "Effect": "Allow",
              "Principal": {
                  "AWS": "arn:aws:iam::${AWS_ACCOUNT_ID}:role/<operator_role_prefix>-kube-system-capa-controller-manager"
              },
              "Action": [
                  "kms:DescribeKey",
                  "kms:GenerateDataKeyWithoutPlaintext",
                  "kms:CreateGrant"
              ],
              "Resource": "*"
          }
      ]
  }
- クラスター作成
これで準備が整ったので、クラスターの構築に入ります。今回はprivate環境なので「--private」オプションを利用しています。サブネットやmachine-cidrは今回構築したVPC2の環境を設定します。
[root@ip-10-2-6-79 ~]# rosa create cluster --private --cluster-name hcp-cluster \
> --subnet-ids subnet-0f682f15e7fb93189 \
> --sts \
> --mode auto \
> --machine-cidr 10.2.0.0/16 \
> --compute-machine-type m5.xlarge \
> --hosted-cp \
> --region us-east-1 \
> --oidc-config-id xxxxxxxxxx \
> --kms-key-arn arn:aws:kms:us-east-1:xxxxxxxxxx:key/xxxxxxxxxx \
> --operator-roles-prefix rosa-hcp-operator
I: Using '579841936241' as billing account
I: To use a different billing account, add --billing-account xxxxxxxxxx to previous command
I: Using arn:aws:iam::xxxxxxxxxx:role/ManagedOpenShift-HCP-ROSA-Installer-Role for the Installer role
I: Using arn:aws:iam::xxxxxxxxxx:role/ManagedOpenShift-HCP-ROSA-Worker-Role for the Worker role
I: Using arn:aws:iam::xxxxxxxxxx:role/ManagedOpenShift-HCP-ROSA-Support-Role for the Support role
I: Reusable OIDC Configuration detected. Validating trusted relationships to operator roles:
I: Creating cluster 'hcp-cluster'
I: To view a list of clusters and their status, run 'rosa list clusters'
I: Cluster 'hcp-cluster' has been created.
I: Once the cluster is installed you will need to add an Identity Provider before you can login into the cluster. See 'rosa create idp --help' for more information.

Name:                       hcp-cluster
ID:                         283gqruc5pd01jrhmjirue9s9viusb3j
External ID:                f990750c-759f-4508-a3e0-6854917e00c7
Control Plane:              ROSA Service Hosted
OpenShift Version:          4.14.5
Channel Group:              stable
DNS:                        Not ready
AWS Account:                xxxxxxxxxx
AWS Billing Account:        xxxxxxxxxx
API URL:
Console URL:
Region:                     us-east-1
Availability:
 - Control Plane:           MultiAZ
 - Data Plane:              SingleAZ
Nodes:
 - Compute (desired):       2
 - Compute (current):       0
Network:
 - Type:                    OVNKubernetes
 - Service CIDR:            172.30.0.0/16
 - Machine CIDR:            10.2.0.0/16
 - Pod CIDR:                10.128.0.0/14
 - Host Prefix:             /23
Workload Monitoring:        Enabled
Ec2 Metadata Http Tokens:   optional
STS Role ARN:               arn:aws:iam::xxxxxxxxxx:role/ManagedOpenShift-HCP-ROSA-Installer-Role
Support Role ARN:           arn:aws:iam::xxxxxxxxxx:role/ManagedOpenShift-HCP-ROSA-Support-Role
Instance IAM Roles:
 - Worker:                  arn:aws:iam::xxxxxxxxxx:role/ManagedOpenShift-HCP-ROSA-Worker-Role
Operator IAM Roles:
 - arn:aws:iam::xxxxxxxxxx:role/rosa-hcp-operator-kube-system-kube-controller-manager
 - arn:aws:iam::xxxxxxxxxx:role/rosa-hcp-operator-kube-system-capa-controller-manager
 - arn:aws:iam::xxxxxxxxxx:role/rosa-hcp-operator-openshift-ingress-operator-cloud-credentials
 - arn:aws:iam::xxxxxxxxxx:role/rosa-hcp-operator-openshift-cluster-csi-drivers-ebs-cloud-creden
 - arn:aws:iam::xxxxxxxxxx:role/rosa-hcp-operator-openshift-cloud-network-config-controller-clou
 - arn:aws:iam::xxxxxxxxxx:role/rosa-hcp-operator-openshift-image-registry-installer-cloud-crede
 - arn:aws:iam::xxxxxxxxxx:role/rosa-hcp-operator-kube-system-control-plane-operator
 - arn:aws:iam::xxxxxxxxxx:role/rosa-hcp-operator-kube-system-kms-provider
Managed Policies:           Yes
State:                      waiting (Waiting for user action)
Private:                    Yes
Created:                    Dec 13 2023 07:21:21 UTC
Details Page:               https://console.redhat.com/openshift/details/s/xxxxxxxxxx
OIDC Endpoint URL:          https://rh-oidc.s3.us-east-1.amazonaws.com/xxxxxxxxxx (Managed)
Audit Log Forwarding:       disabled

I: Preparing to create operator roles.
I: Reusable OIDC Configuration detected. Validating trusted relationships to operator roles:
I: Cluster 'hcp-cluster' is using reusable OIDC Config and operator roles already exist.
I: Preparing to create OIDC Provider.
I: OIDC provider already exists.
I: To determine when your cluster is Ready, run 'rosa describe cluster -c hcp-cluster'.
I: To watch your cluster installation logs, run 'rosa logs install -c hcp-cluster --watch'.
[root@ip-10-2-6-79 ~]#
問題なく作成されました。
クラスターの名前は15文字以内にしないとエラーになるので、ご注意ください。
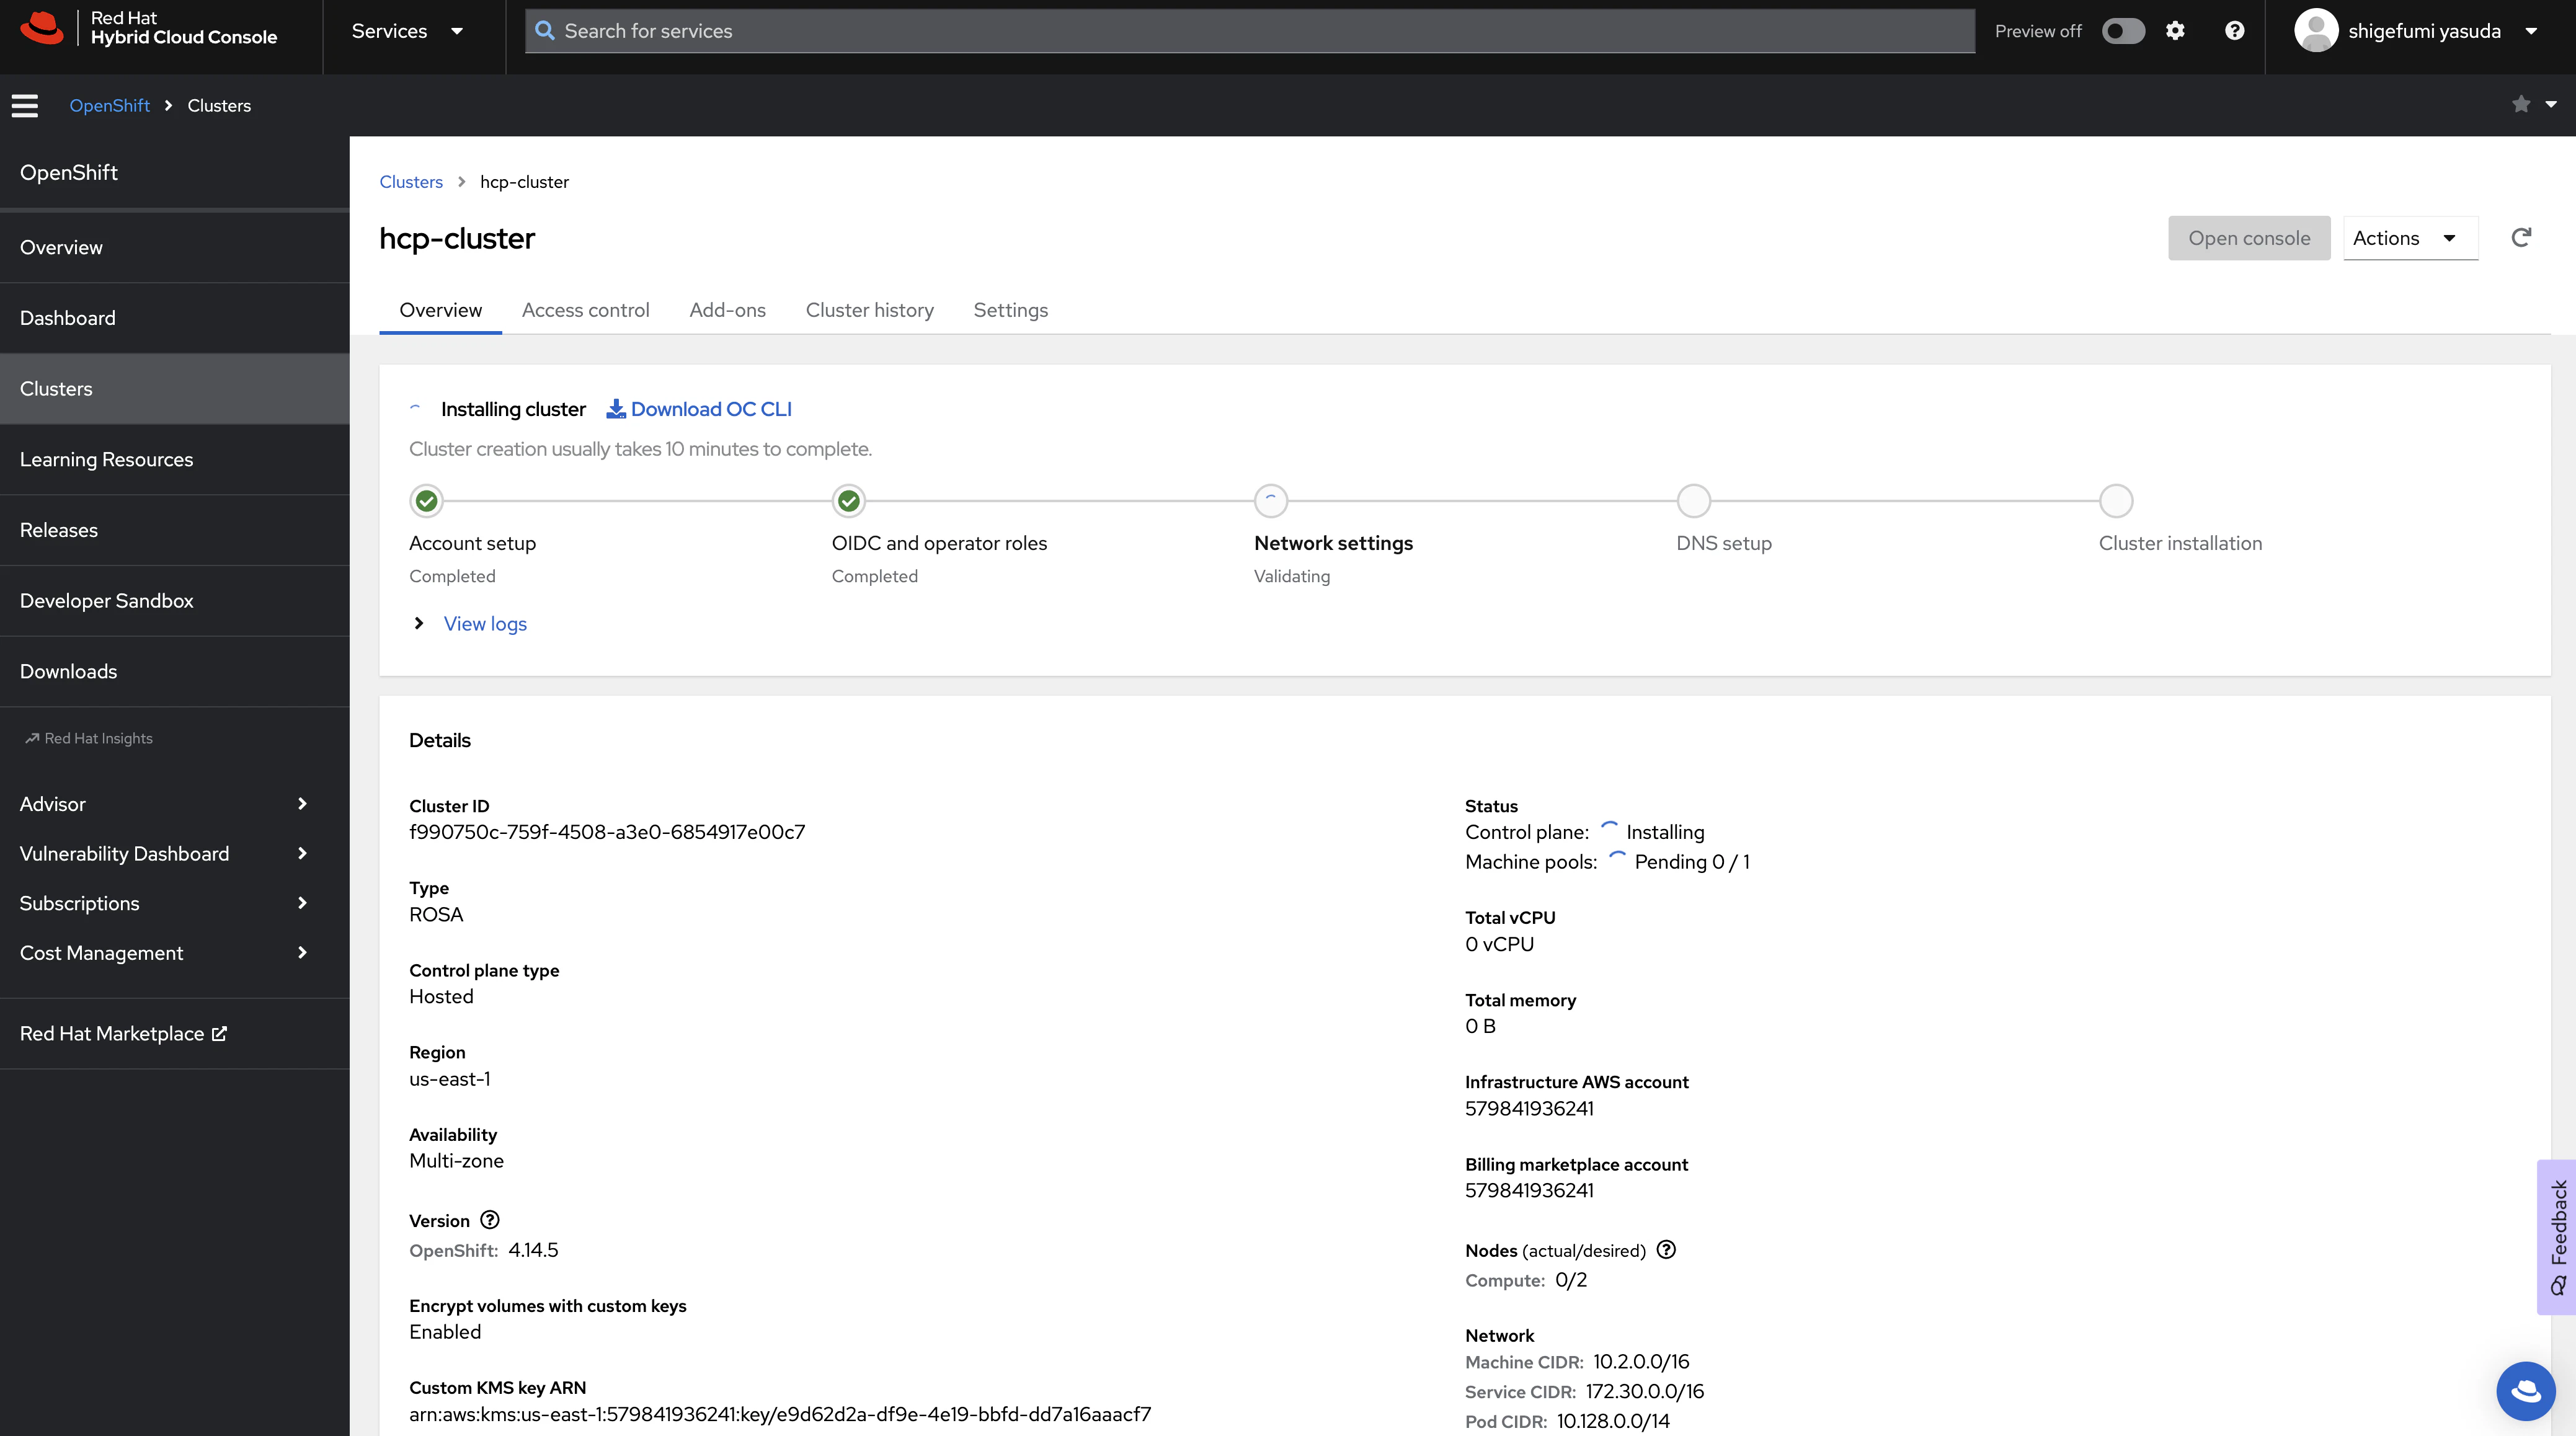
Red Hatのコンソールで確認すると、クラスター構築が進んでいます。
ドキュメントにあったように10分ほどでインストールが終わりました。早いです。
- cluster-admin作成
cluster-adminユーザを作っていきます。
[root@ip-10-2-6-79 ~]# rosa create admin --cluster=hcp-cluster
I: Admin account has been added to cluster 'hcp-cluster'.
I: Please securely store this generated password. If you lose this password you can delete and recreate the cluster admin user.
I: To login, run the following command:

   oc login https://api.hcp-cluster.hqfp.p3.openshiftapps.com:443 --username cluster-admin --password xxxxxxxxxx

I: It may take several minutes for this access to become active.
[root@ip-10-2-6-79 ~]#
上記の表示された情報からocコマンドでログインしていきます。
[root@ip-10-2-6-79 ~]# oc login https://api.hcp-cluster.hqfp.p3.openshiftapps.com:443 --username cluster-admin --password xxxxxxxxxx
Login successful.

You have access to 77 projects, the list has been suppressed. You can list all projects with 'oc projects'

Using project "default".
Welcome! See 'oc help' to get started.
[root@ip-10-2-6-79 ~]#
問題なくアクセスできました。
- WEBログイン
次にWEBコンソールにログインしようと思います。クラスターの詳細情報からConsole URLを確認します。
[root@ip-10-2-6-79 ~]# rosa describe cluster --cluster=hcp-cluster

Name:                       hcp-cluster
ID:                         xxxxxxxxxx
External ID:                xxxxxxxxxx
Control Plane:              ROSA Service Hosted
OpenShift Version:          4.14.5
Channel Group:              stable
DNS:                        hcp-cluster.hqfp.p3.openshiftapps.com
AWS Account:                xxxxxxxxxx
AWS Billing Account:        xxxxxxxxxx
API URL:                    https://api.hcp-cluster.hqfp.p3.openshiftapps.com:443
Console URL:                https://console-openshift-console.apps.rosa.hcp-cluster.hqfp.p3.openshiftapps.com
Region:                     us-east-1
Availability:
 - Control Plane:           MultiAZ
 - Data Plane:              SingleAZ
Nodes:
 - Compute (desired):       2
 - Compute (current):       2
Network:
 - Type:                    OVNKubernetes
 - Service CIDR:            172.30.0.0/16
 - Machine CIDR:            10.2.0.0/16
 - Pod CIDR:                10.128.0.0/14
 - Host Prefix:             /23
Workload Monitoring:        Enabled
Ec2 Metadata Http Tokens:   optional
STS Role ARN:               arn:aws:iam::xxxxxxxxxx:role/ManagedOpenShift-HCP-ROSA-Installer-Role
Support Role ARN:           arn:aws:iam::xxxxxxxxxx:role/ManagedOpenShift-HCP-ROSA-Support-Role
Instance IAM Roles:
 - Worker:                  arn:aws:iam::xxxxxxxxxx:role/ManagedOpenShift-HCP-ROSA-Worker-Role
Operator IAM Roles:
 - arn:aws:iam::xxxxxxxxxx:role/rosa-hcp-operator-kube-system-kube-controller-manager
 - arn:aws:iam::xxxxxxxxxx:role/rosa-hcp-operator-kube-system-capa-controller-manager
 - arn:aws:iam::xxxxxxxxxx:role/rosa-hcp-operator-openshift-ingress-operator-cloud-credentials
 - arn:aws:iam::xxxxxxxxxx:role/rosa-hcp-operator-openshift-cluster-csi-drivers-ebs-cloud-creden
 - arn:aws:iam::xxxxxxxxxx:role/rosa-hcp-operator-openshift-cloud-network-config-controller-clou
 - arn:aws:iam::xxxxxxxxxx:role/rosa-hcp-operator-openshift-image-registry-installer-cloud-crede
 - arn:aws:iam::xxxxxxxxxx:role/rosa-hcp-operator-kube-system-control-plane-operator
 - arn:aws:iam::xxxxxxxxxx:role/rosa-hcp-operator-kube-system-kms-provider
Managed Policies:           Yes
State:                      ready
Private:                    Yes
Created:                    Dec 13 2023 07:21:21 UTC
Details Page:               https://console.redhat.com/openshift/details/s/xxxxxxxxxx
OIDC Endpoint URL:          https://rh-oidc.s3.us-east-1.amazonaws.com/xxxxxxxxxx (Managed)
Audit Log Forwarding:       disabled

[root@ip-10-2-6-79 ~]#
先ほど構築したAppstream2.0からURLにアクセスして、cluster-adminでログインします。
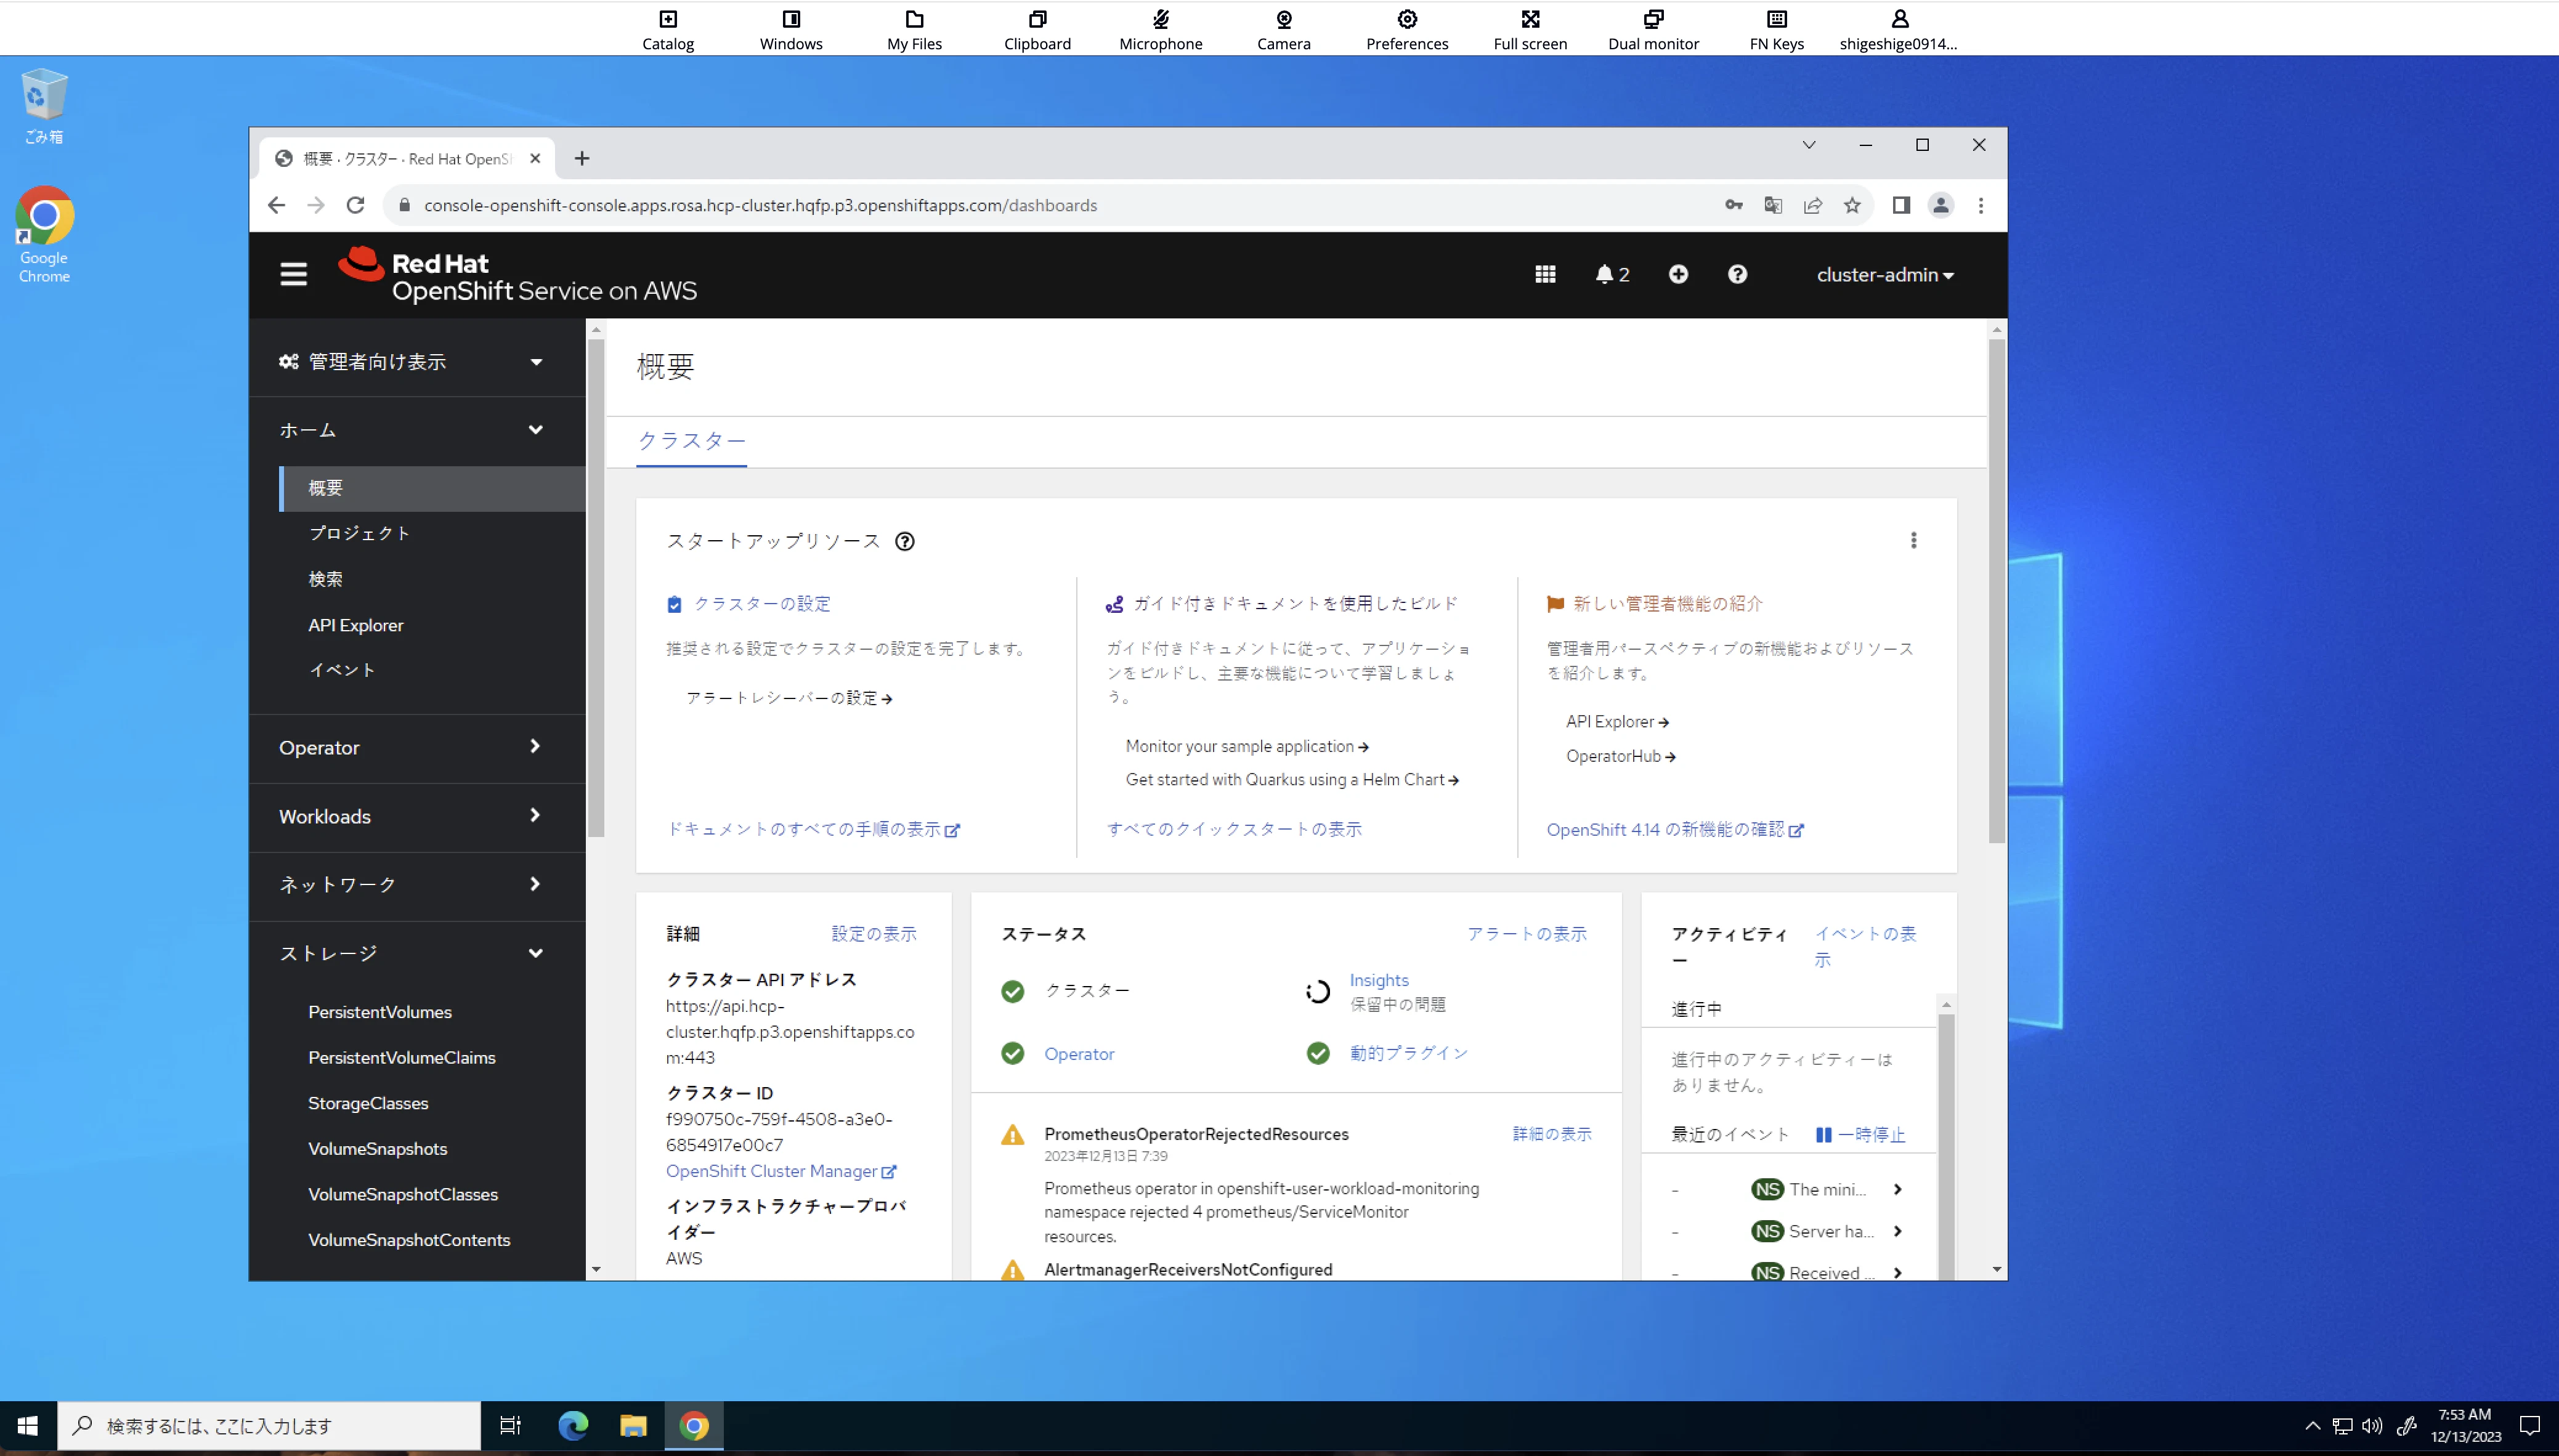
問題なくアクセスできました。
もちろんPrivate環境なので、インターネット経由で該当のURLにはアクセスできません。
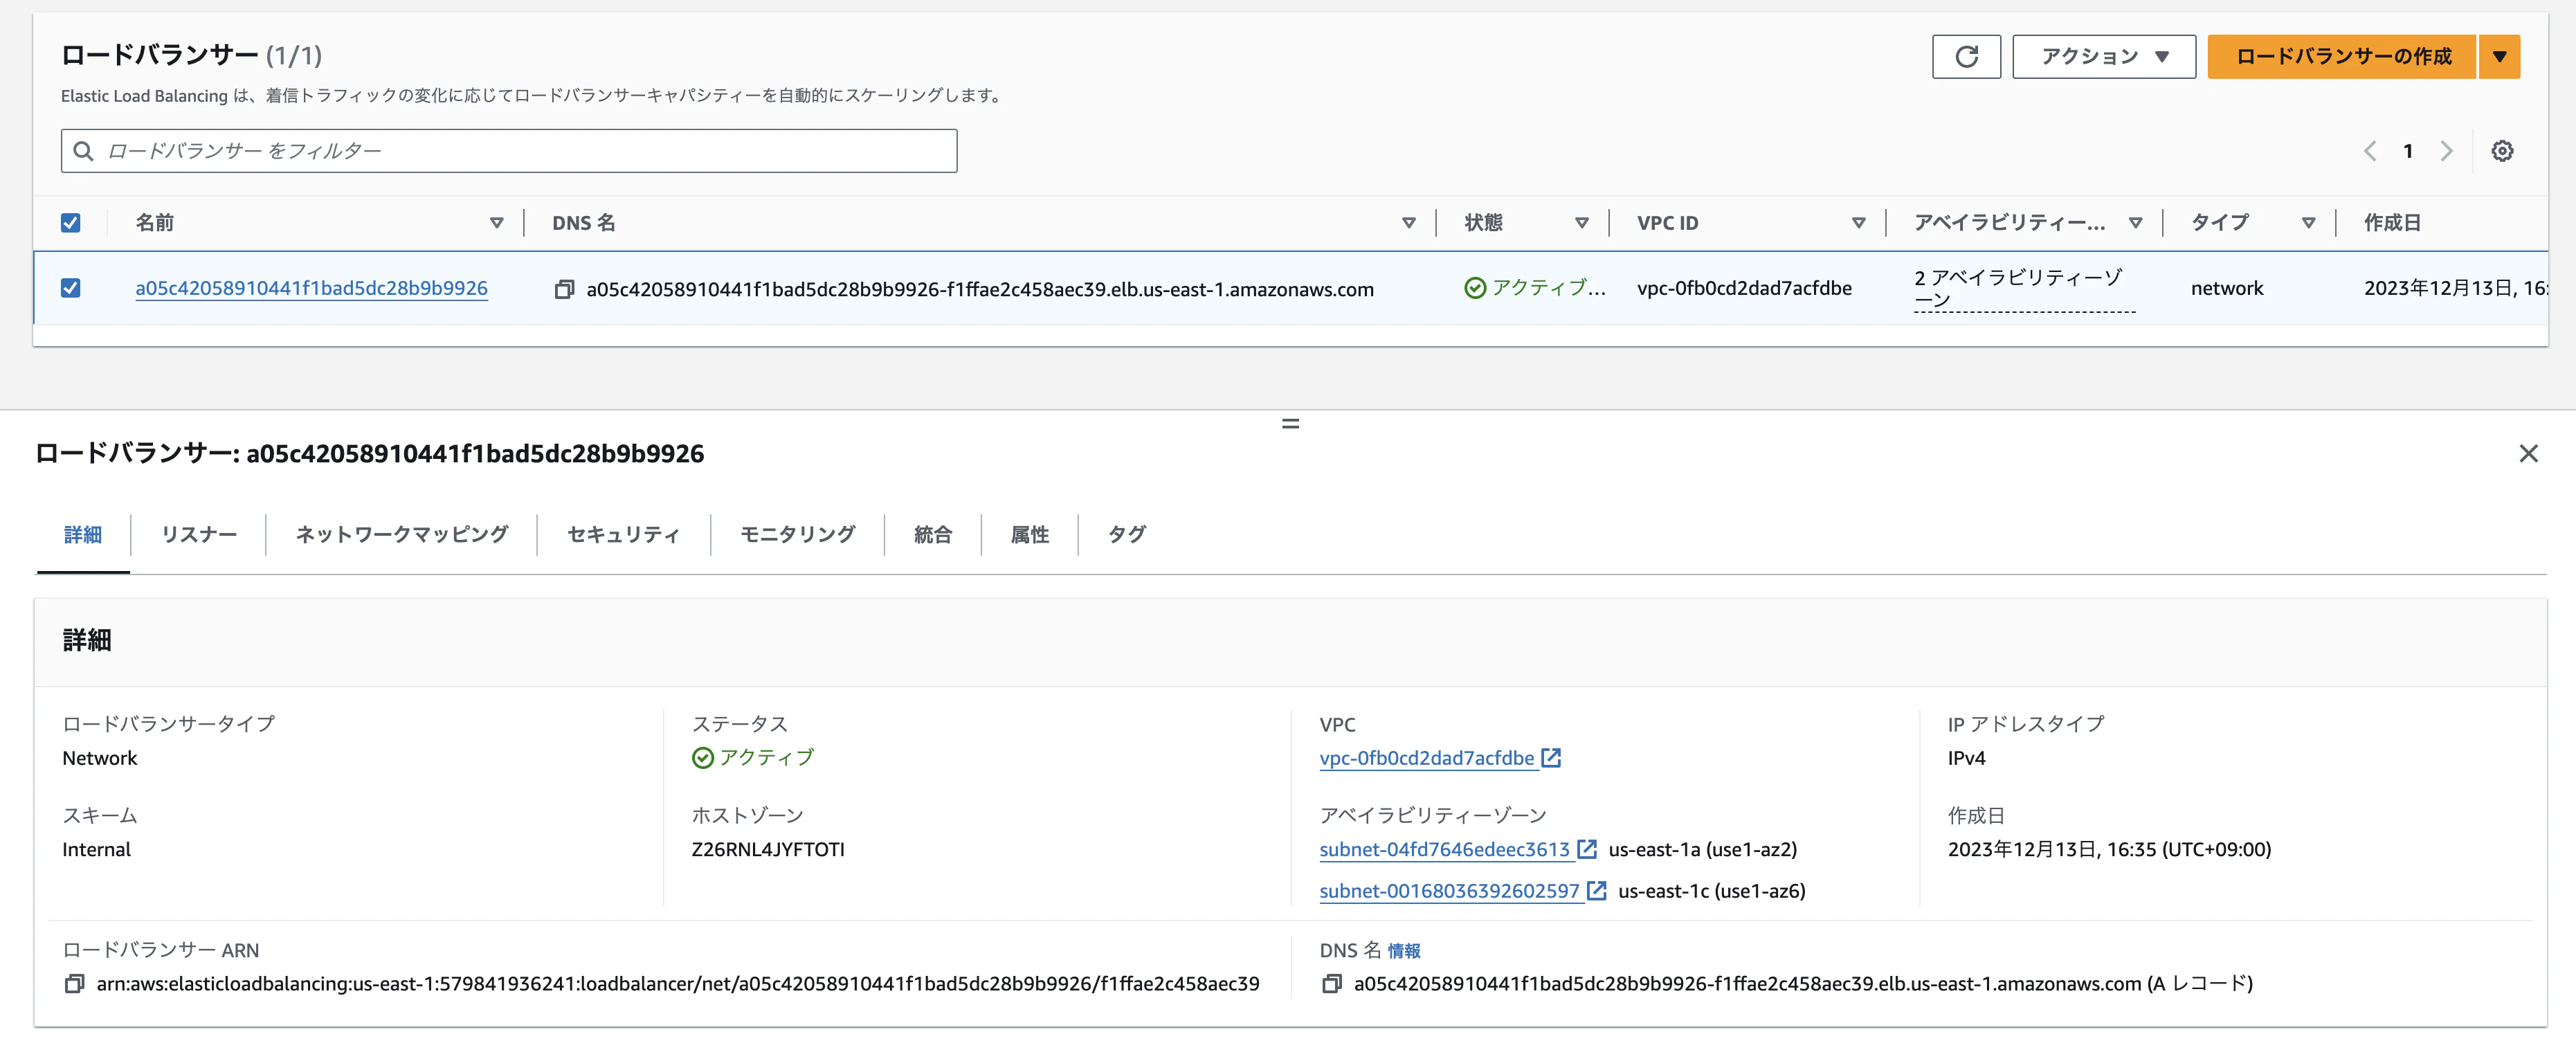
リソースを見てみた
マネジメントコンソールでEC2を見るとWorker nodeだけが表示されていました。シンプルですね。

ロードバランサもNLBだけ出来上がっていましたが、別のサブネット(今回の構成だとPrivate1とPrivate4)に配置されていました。ここは同じサブネットにシングルAZで配置されるかと思っていたので、要調査です。(インストールで指定できるのか、そもそもサブネットの構成が良くないのか・・・)
アーキテクチャー上、PrivateLinkでControl planeにアクセスしているのようなので、やはりVPCエンドポイントはできていました。
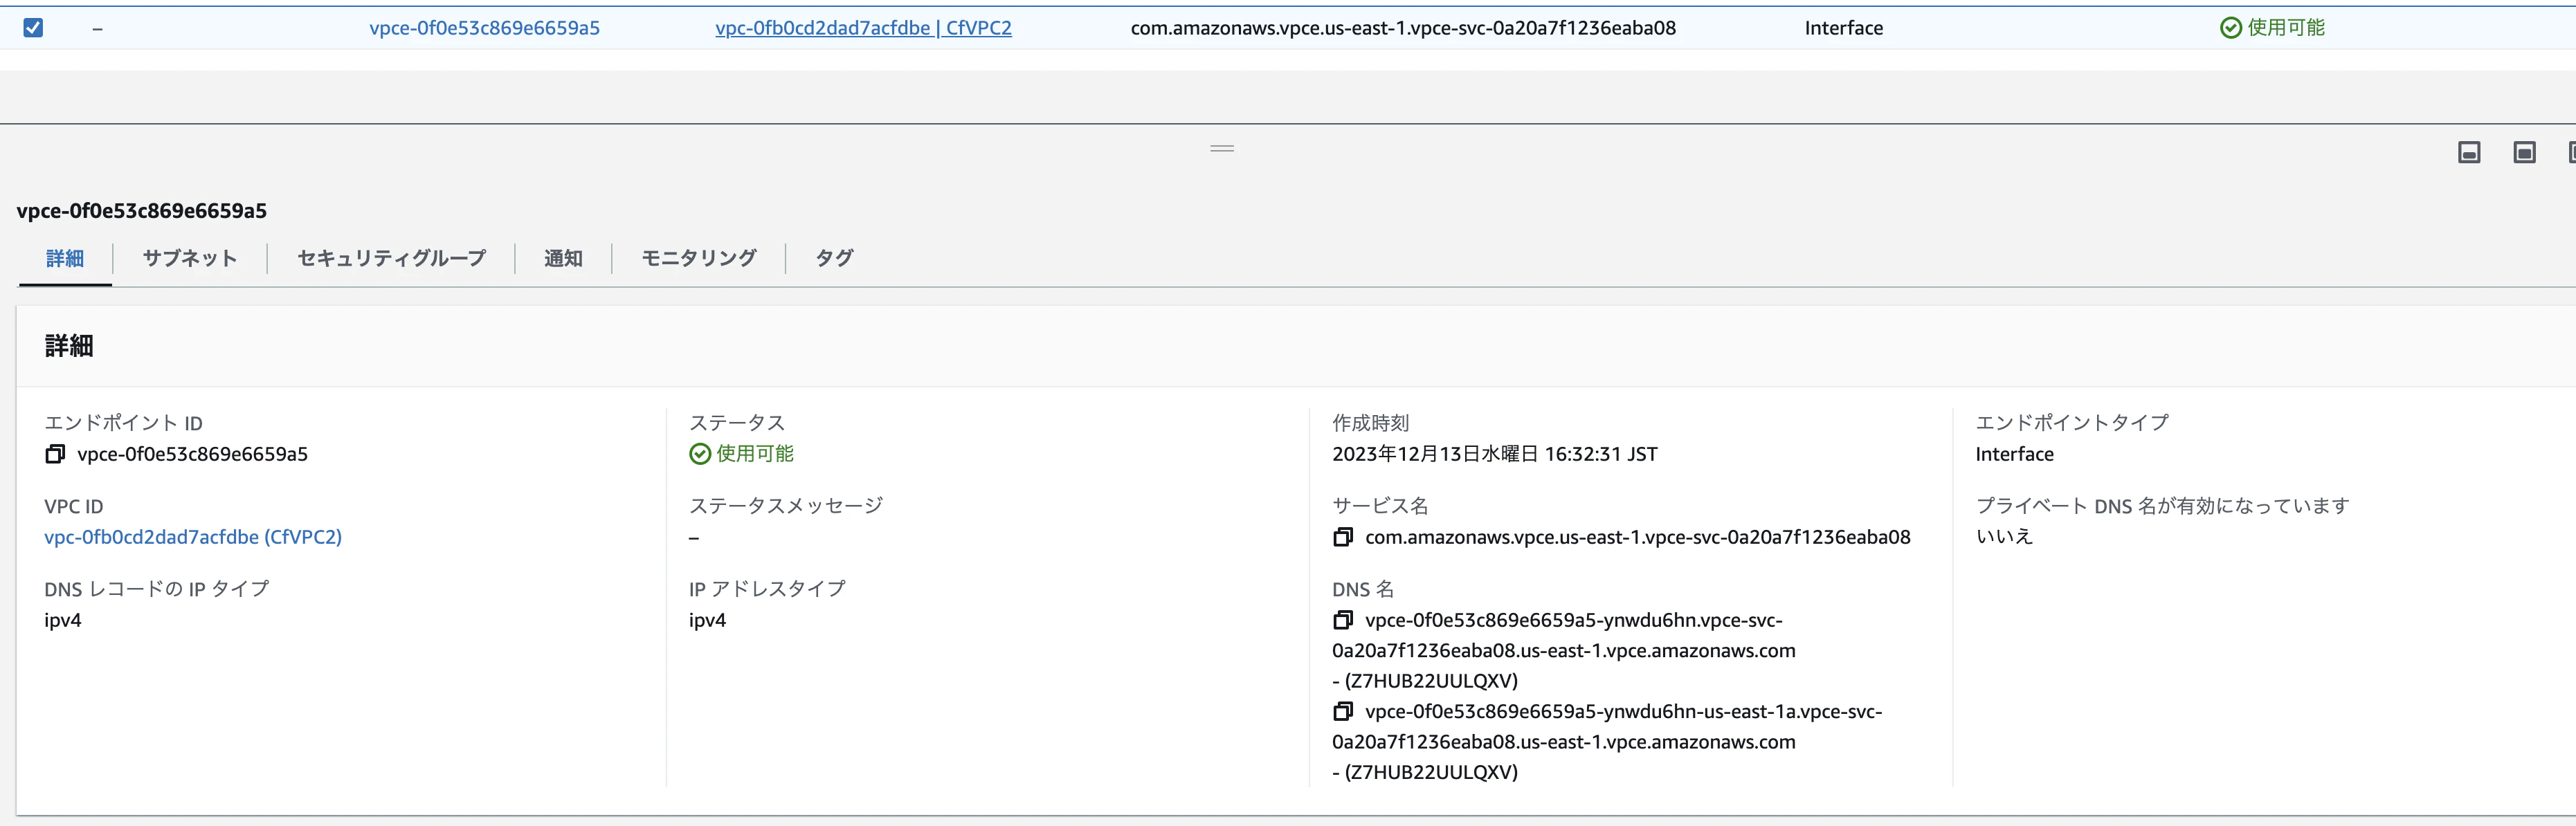
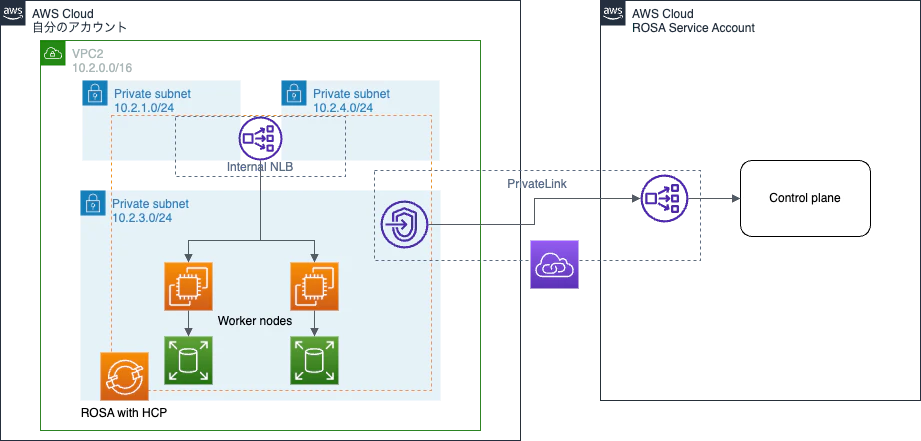
なので今回作った環境はこのようになっています。
先ほどの構成図のROSAがデプロイされたサブネット部分を詳細化してみました。
もちろんROSA Service Account側は一切見れないものになっています。かろうじてPrivateLink経由となっているので、どこかにNLBはいるのは想像つきますが、それ以外の環境はいい意味でブラックボックスになりました。
今回のInternal NLBは想定外のサブネットに配置されていたので、もう少し調べてみようと思います。
所感
通常のROSAに比べてインストールが早く、かつ最小構成でデプロイできるため、かなり便利になった印象です。どちらかというと小規模なコンテナ環境ではコスト面からEKSやECSを選びがちでしたが、これからはROSAという選択肢も出てきそうですね。
次回ROSA with HCPの環境で色々なオペレーターを入れて、CICDの環境を作ってみようと思います。また4.14になってからはロギングは、Loki+Vectorが推奨になっているのでその辺も確認してみたいと思います。