何がしたいのか?
Excelは表計算ソフトです。表形式のデータを計算して出力することが得意です。しかし、Excelを表計算以外の目的で使用することはよくあります。そういう場合、VBAで処理して特定の出力を行うのが普通です。
PythonはExcelファイルを読み込むことができます。
VBAではなくPythonを使う理由は既に公開されている様々なライブラリを利用してデータを処理できる点にあります。なんといってもAIといえばPythonです。データの活用範囲が大きく広がるのです。
準備
ここではPythonのプログラムを作るので、当然Pythonが必要となります。
開発環境としては Visual Studio Code (VSCode)を使用します。ほかのエディタを使っても良いのですが、拡張機能で様々なことが実現できるVSCodeを活用すると大いに開発しやすくなります。
PythonでExcelファイルを扱うためには外部ライブラリの openpyxl を使用します。
開発対象はWindows 10搭載のPCとします。
Pythonのインストール
Pythonのインストールは以下を参照してください。
Visual Studio Code のインストール
Visual Studio Code のインストールは以下を参照してください。
openpyxlのインストール
openpyxlをインストールするには、PowerShellで以下のコマンドを入力します。
C:\ws\excel> pip install openpyxl
PythonとExcelファイル
Excelファイルの読み込み
PythonでExcelファイルを利用するには、openpyxlを使用します。
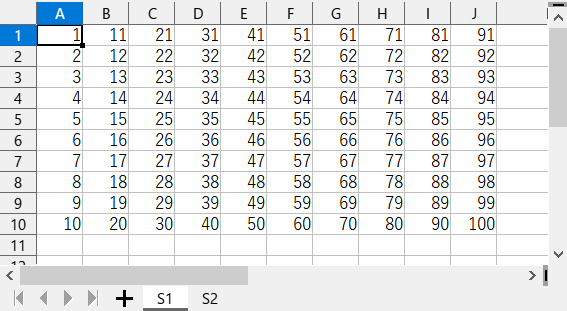
テストのために、test.xlsxというファイルに、10×10のセルに1~100を記入したS1シートと、
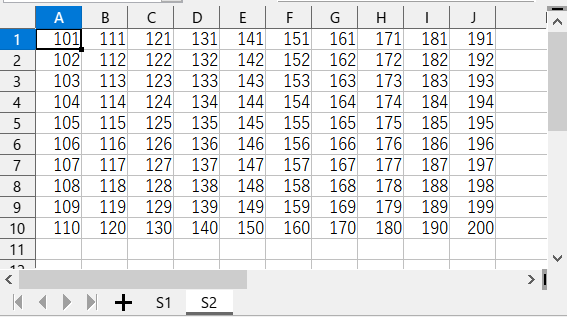
101~200を記入したS2シートを作成します。
まずは、A列を読み出して表示してみます。
import openpyxl

wb = openpyxl.load_workbook(r"test.xlsx")
sh = wb["S1"]

for row in range(1, sh.max_row + 1 ):
    print(sh["A" + str(row)].value)
C:\ws\excel> python .\test.py
1
2
3
4
5
6
7
8
9
10
wb = openpyxl.load_workbook(r"test.xlsx") でファイルを読み込み、sh = wb["S1"]でワークシートS1を取得しています。
sh.max_row + 1 は最後の行を示します。
sh["A" + str(row)].value は A1セルからA10セルまでのセルの値となります。
行方向に取得する場合は以下のようになります。
import openpyxl

wb = openpyxl.load_workbook(r"test.xlsx")
sh = wb["S1"]

for column in range(1, sh.max_column + 1):
    print(sh.cell(1, column).value)
C:\ws\excel> python .\test2.py
1
11
21
31
41
51
61
71
81
91
シートの選択
シートはwb["S1"]のように指定できますが、インデックスで取得することもできます。
wb.worksheets[0]で先頭のシートになります。
import openpyxl

wb = openpyxl.load_workbook(r"test.xlsx")
sh = wb.worksheets[1]

for row in range(1, sh.max_row + 1):
    for column in range(1, sh.max_column + 1):
        print(sh.cell(row, column).value, end=' ')
    print('')
C:\ws\excel> python .\test3.py
101 111 121 131 141 151 161 171 181 191
102 112 122 132 142 152 162 172 182 192
103 113 123 133 143 153 163 173 183 193
104 114 124 134 144 154 164 174 184 194
105 115 125 135 145 155 165 175 185 195
106 116 126 136 146 156 166 176 186 196
107 117 127 137 147 157 167 177 187 197
108 118 128 138 148 158 168 178 188 198
109 119 129 139 149 159 169 179 189 199
110 120 130 140 150 160 170 180 190 200
新しいシートを作りファイルを保存
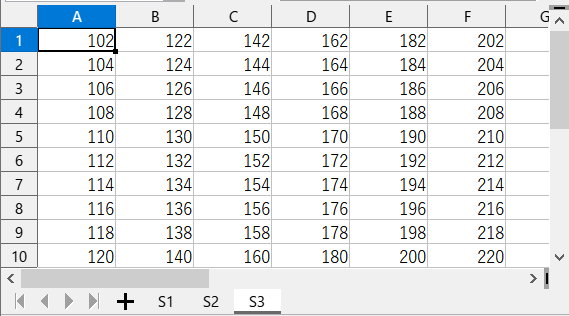
S3シートを新しく作り、S1シートとS2シートの各セルの和を作ります。
最後にファイルを別名保存して終わります。
import openpyxl

wb = openpyxl.load_workbook(r"test.xlsx")
sh1 = wb.worksheets[0]
sh2 = wb.worksheets[1]
sh3 = wb.create_sheet(title="S3")

for row in range(1, sh1.max_row + 1):
    for column in range(1, sh1.max_column + 1):
        sh3.cell(row, column).value = sh1.cell(row, column).value + sh2.cell(row, column).value

wb.save("out.xlsx")
実は・・・
Excelファイルを扱うとという題目なのですが、実はここで使っている表計算ソフトはLibreOfficeのcalcです。LibreOfficeでもxlsxファイルの読み書きができるのでExcel代わりに使っています。
ExcelでもLibreOfficeでも同じPythonのプログラムで処理できるのでその点でも便利ですね。


