ちょっとした検証などのために、イントラネットなどにプライベートなDocker Registryを構築する手順をまとめました。
自己証明書によるTLS、BASIC認証によるアクセス制限、CraneOperatorによるWeb UI付きです。
もっと手軽にRegistryを準備するにはクラウドで提供されているサービスを利用した方が楽ですね。Oracle Cloud Infrastructure Registry (OCIR)を使う手順を別の記事にまとめました。(2019/1/15 追記)
TL;DR (要約)
手順をスクリプト化して https://github.com/shakiyam/registry にアップしています。
要件
Docker EngineとDocker Composeが必要です。
Oracle Linux 7.6とUbuntu 16.04で確認済みです。Oracle LinuxはRHEL互換なので、CentOS 7等でも動作するでしょう。
手順1. ローカル実行
Docker Hubで公開されているDocker Registryイメージを使って、ローカル環境でレジストリを起動します。
docker container run -d -p 5000:5000 --restart=always --name registry registry:2
これでレジストリが使えるようになりました。
Docker Hubからイメージを手に入れ、自分のレジストリ上にタグ付けします。
docker image pull hello-world:latest
docker image tag hello-world:latest localhost:5000/hello-world:latest
タグ付けしたイメージをpushします。
docker push localhost:5000/hello-world:latest
curlでAPIを呼び出し、hello-worldが登録されていることを確認します。
$ curl http://localhost:5000/v2/_catalog
{"repositories":["hello-world"]}
レジストリを停止するには、次のようにします。
docker container stop registry && docker container rm -v registry
手順2. 自己証明書によるTLS
他のホストから接続できるように、TLSを使用できるようにします。
サーバー側の作業
まず、自己証明書を作成します。
Country Nameなど入力項目がありますが、Common Name以外は空で問題ありません。
Common Nameにはホスト名(下記の例では registry.example.com)を入れます。
$ mkdir -p certs
$ openssl req -newkey rsa:2048 -nodes -sha256 -keyout certs/ca.key -x509 -days 3650 -out certs/ca.crt
Generating a 2048 bit RSA private key
.....................+++
.........................+++
writing new private key to 'certs/ca.key'
-----
You are about to be asked to enter information that will be incorporated
into your certificate request.
What you are about to enter is what is called a Distinguished Name or a DN.
There are quite a few fields but you can leave some blank
For some fields there will be a default value,
If you enter '.', the field will be left blank.
-----
Country Name (2 letter code) [AU]:
State or Province Name (full name) [Some-State]:
Locality Name (eg, city) []:
Organization Name (eg, company) [Internet Widgits Pty Ltd]:
Organizational Unit Name (eg, section) []:
Common Name (e.g. server FQDN or YOUR name) []:registry.example.com
Email Address []:
次に、作成された証明書を指定してレジストリを起動します。
docker container run -d \
  -p 443:443 \
  --restart=always \
  --name registry \
  -v $(pwd)/certs:/certs \
  -e REGISTRY_HTTP_ADDR=0.0.0.0:443 \
  -e REGISTRY_HTTP_TLS_CERTIFICATE=/certs/ca.crt \
  -e REGISTRY_HTTP_TLS_KEY=/certs/ca.key \
  registry:2
クライアント側の作業
サーバーで作成した証明書をクライアントに追加します。Oracle Linux 7とUbuntuとで手順が異なります。
Oracle Linux 7の場合は、/usr/share/pki/ca-trust-source/anchorsに証明書を配置し、update-ca-trustを実行します。
sudo scp registry@registry.example.com:/home/registry/certs/ca.crt /etc/pki/ca-trust/source/anchors/registry.example.com.crt
sudo update-ca-trust
Ubuntuの場合は、/usr/share/ca-certificatesに証明書を配置し、/etc/ca-certificates.confに/usr/share/ce-certificetsからの相対パスでファイル名を追記してから、update-ca-trustを実行します。
sudo scp registry@registry.example.com:/home/registry/certs/ca.crt /usr/share/ca-certificates/registry.example.com.crt
echo registry.example.com.crt | sudo tee -a /etc/ca-certificates.conf >/dev/null
sudo update-ca-certificates
証明書の追加が終わったら、Docker Engineを再起動します。
sudo systemctl restart docker
手順1と同様にイメージにタグ付を行い、pushと確認を行います。
docker image tag hello-world:latest registry.example.com/hello-world:latest
docker push registry.example.com/hello-world:latest
curl https://registry.example.com/v2/_catalog
手順3. BASIC認証によるアクセス制限
このままでは誰でもアクセスできてしまいますので、BASIC認証によるアクセス制限を設定します。
サーバー側の作業
まず、htpasswdコマンドを使ってユーザにパスワードを発行します。htpasswdコマンドはDocker Registryイメージに含まれているので、これを利用します。下記の例では、ユーザー名がusername、パスワードがpasswordとなっています。
mkdir -p auth
docker run \
  --rm \
  --entrypoint htpasswd \
  registry:2 \
  -nb -B username password > auth/htpasswd
次に、作成されたhtpasswdを指定してレジストリを起動します。
docker container run -d \
  -p 443:443 \
  --restart=always \
  --name registry \
  -v $(pwd)/auth:/auth \
  -v $(pwd)/certs:/certs \
  -v REGISTRY_AUTH=htpasswd \
  -v REGISTRY_AUTH_HTPASSWD_REALM="Registry Realm" \
  -v REGISTRY_AUTH_HTPASSWD_PATH=/auth/htpasswd \
  -e REGISTRY_HTTP_ADDR=0.0.0.0:443 \
  -e REGISTRY_HTTP_TLS_CERTIFICATE=/certs/ca.crt \
  -e REGISTRY_HTTP_TLS_KEY=/certs/ca.key \
  registry:2
クライアント側の作業
docker loginでログインします。
echo password | docker login registry.example.com --password-stdin -u username
手順2と同様にpushと確認を行います。
docker push registry.example.com/hello-world:latest
curl https://registry.example.com/v2/_catalog
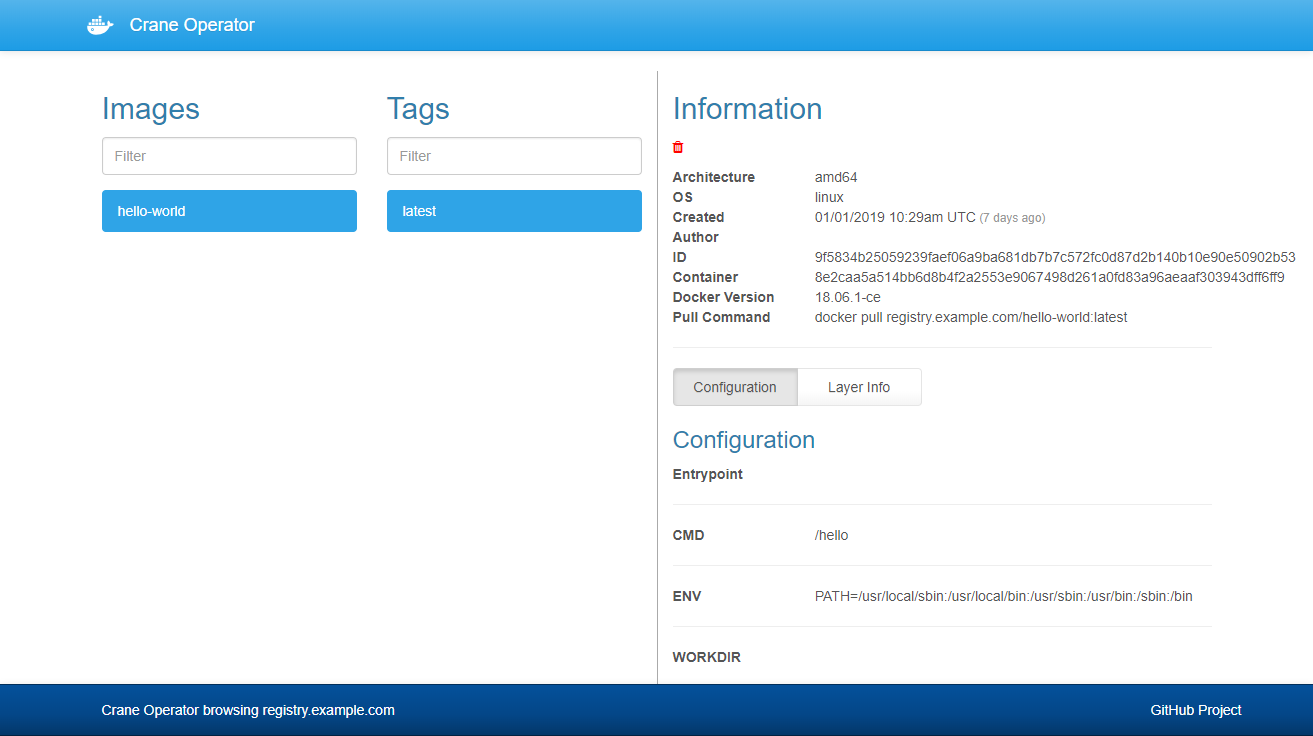
手順4. CraneOperatorによるWeb UI
curlでAPIを呼びだすのも大変なので、CraneOperatorによるWeb UIを構築します。
サーバー側の作業
Docker RegistryとCraneOperatorの2つのコンテナを起動しますので、Dokcer Composeを使用します。
下記のようなdocker-compose.ymlを用意します。
この例では、Docker RegistryとCraneOperatorの設定でイメージの削除を有効化しています。
また、レジストリのデータを格納するdocker volumeにregistryという名前を付けています。
なお、REGISTRY_HOSTはレジストリのコンテナを指していますので、registry.example.comではなくregistryを指定しています。
version: '3'
services:
  registry:
    image: registry:2
    volumes:
      - ./auth:/auth
      - ./certs:/certs
      - registry:/var/lib/registry
    ports:
      - "443:443"
    environment:
      - REGISTRY_AUTH=htpasswd
      - REGISTRY_AUTH_HTPASSWD_REALM="Registry Realm"
      - REGISTRY_AUTH_HTPASSWD_PATH=/auth/htpasswd
      - REGISTRY_HTTP_ADDR=0.0.0.0:443
      - REGISTRY_HTTP_TLS_CERTIFICATE=/certs/ca.crt
      - REGISTRY_HTTP_TLS_KEY=/certs/ca.key
      - REGISTRY_STORAGE_DELETE_ENABLED=true
    restart: always
  web:
    depends_on:
      - registry
    image: parabuzzle/craneoperator:latest
    ports:
      - "8000:80"
    environment:
      - REGISTRY_HOST=registry
      - REGISTRY_PORT=443
      - REGISTRY_PROTOCOL=https
      - SSL_VERIFY=false
      - REGISTRY_PUBLIC_URL=registry.example.com
      - REGISTRY_USERNAME=username
      - REGISTRY_PASSWORD=password
      - USERNAME=username
      - PASSWORD=password
      - REGISTRY_ALLOW_DELETE=true
    restart: always
volumes:
  registry:
docker-compose.ymlが用意できたのでレジストリとWeb UIを起動します。
docker-compose up -d
クライアント側の作業
手順3と同様にpushします。
docker push registry.example.com/hello-world:latest
ブラウザで http://registry.example.com:8000/ にアクセスします。