はじめに
本投稿では、初めてスマホアプリを制作するにあたっての準備について書いていきます。
業務ではWebアプリの制作しかやったことがなく、スマホアプリの制作は超初心者ですが、
簡単なアプリなら一人で作れるようになるために、しっかり勉強していきます。
(熟練の技術者の方々なら、何をいまさらというような内容かもしれませんが、ご容赦ください...)
React Nativeとは?
まず、スマホアプリを制作するにあたり、何を使えばいいかを検索するとReactNativeがヒットした。

React Native
React Nativeは、Facebookが作成したオープンソースのモバイルアプリケーションフレームワークである。開発者がネイティブプラットフォーム機能とともにReactを使用できるようにすることで、Android、iOS、WebおよびUWPアプリケーションを開発するために使用される。
ウィキペディアより
Javascript、Reactを使うことで、クロスプラットフォームなアプリを作ることができます。
クロスプラットフォームアプリは他に、Córdoba、Monacaなどがあるようですが、
今回は、Reactの勉強も兼ねて、ReactNativeで試してみることにします。
環境構築
こちら を参考に環境構築を行いました。
必要なもの
- Chocolatey ・・・パッケージ管理のツール。コマンドラインで必要なものをインストールできる。
- Node.js ・・・ReactNative(JavaScript)のランタイムに必要
- Python ・・・ReactNativeのビルドに必要
- React Native CLI
- JDK(Androidの場合)
- アンドロイドスタジオ(Androidの場合)
- XCode(IOSの場合)※今回は使用しない
※注意※
Node.jsのバージョンによっては動かないことがあるようです。
(私はv16.13.0で動きました。)
ソースを読んでみる
index.js
import {AppRegistry} from 'react-native';
import App from './App';
import {name as appName} from './app.json';

AppRegistry.registerComponent(appName, () => App);
アプリ起動時に最初に呼ばれる部分
app.jsonのNameを取得して、App.jsを実行
app.json
{
  "name": "SampleApp",
  "displayName": "SampleApp"
}
アプリ名、画面名の設定部分
App.js
メインの描画を担当する部分
import React from 'react';
Reactを使うための準備
import {
  SafeAreaView,
  ScrollView,
  StatusBar,
  StyleSheet,
  Text,
  useColorScheme,
  View,
} from 'react-native';

import {
  Colors,
  DebugInstructions,
  Header,
  LearnMoreLinks,
  ReloadInstructions,
} from 'react-native/Libraries/NewAppScreen';
コンポーネントの宣言
node_modules配下の'react-native','react-native/Libraries/NewAppScreen'からそれぞれ取得
  return (
    <SafeAreaView style={backgroundStyle}>
      <StatusBar barStyle={isDarkMode ? 'light-content' : 'dark-content'} />
      <ScrollView
        contentInsetAdjustmentBehavior="automatic"
        style={backgroundStyle}>
        <Header />
        <View
          style={{
            backgroundColor: isDarkMode ? Colors.black : Colors.white,
          }}>
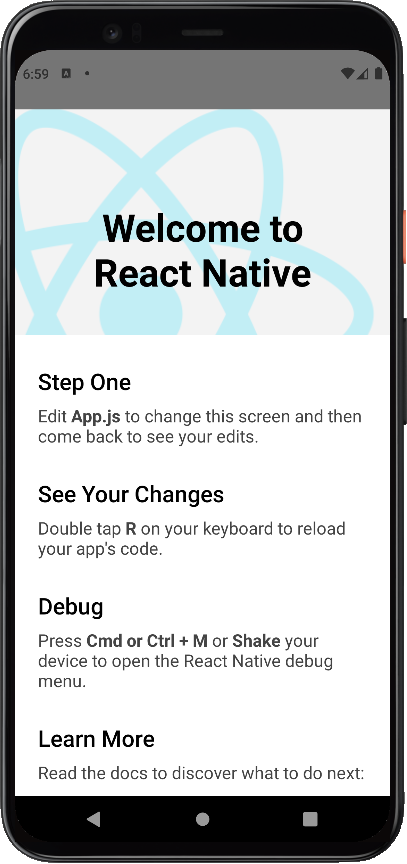
          <Section title="Step One">
            Edit <Text style={styles.highlight}>App.js</Text> to change this
            screen and then come back to see your edits.
          </Section>
          <Section title="See Your Changes">
            <ReloadInstructions />
          </Section>
          <Section title="Debug">
            <DebugInstructions />
          </Section>
          <Section title="Learn More">
            Read the docs to discover what to do next:
          </Section>
          <LearnMoreLinks />
        </View>
      </ScrollView>
    </SafeAreaView>
  );
画面表示部分、HTMLでいうところの<body>にあたる
- <SafeAreaView>・・・コンテンツを描画するエリア
- <ScrollView>・・・スクロール可能な範囲
- <Header />・・・コンポーネントの宣言で読み込んだヘッダーを描画
- <View>・・・HTMLでいうところの<div>
- <Text>・・・HTMLでいうところの<p>
- <Section>・・・タイトルを付けられる
さいごに
Reactも未経験で、記述方法がJavaやC#を普段扱っている身からするとかなり慣れないものでした。
勉強する順番を間違えたかなと少し思います。Reactに明るい方ならすぐ始められるかもしれませんね。
しかし、普段から触っているスマホで動かせるアプリということで、やりがいや楽しさは感じられそうです。
(実際に、サンプルではありますが起動できた時はテンションが上がりました!)
今後は実機で、自分で作ったアプリを動かせるところまでいきたいので、勉強を続けようと思います。
最先端な技術のアイデアをプレゼントすることはできなかったかもしれませんが、
私と同じように「スマホアプリ開発未経験!」というような方に、少しでも面白そうと思っていただけていたら嬉しいです。
