この記事はSmartHR Advent Calendar 2021 18日目の記事です。
なお、記事は全て個人の見解です。会社・組織を代表するものではありません。
はじめに
みなさんはterraformをご存じでしょうか?
Terraformは、HashiCorp社が開発したオープンソースのIaC(Infrastructure as a Code)ツールです。
Terraformではインフラの構成をコードで宣言します。
AWS, GCP, Azureといった各インフラの状態をコードとして表現することで、今どうなっているかという現状を可視化でき、さらには自動的なプロビジョニングを行うことができます。
このように便利なterraformですが、本当に各コマンドによって何が起こるか理解して使っていますでしょうか?
なんとなくの雰囲気で使ったりしていませんか?
(ちなみに私は雰囲気で使っています←)
そこで今回はよりterraformに詳しくなるために、実際にシンプルなCustom providerを作って、そこからterraformの各コマンドがどのように動くのかを解説します。
今回作成したCustom provider
想定対象者
- terraform 初級~中級者
- terraformがざっくりどんなものかを知っている人が対象
Custom Providerとは?
そもそもCustom Providerとはなんでしょうか?
Custom Providerはterraformにおけるプラグインのようなもので、SaaSやほかのAPIなどをterraformコマンドから操作するためのものです。
例えばGoogle Cloud Platform ProviderはterraformからGCPのリソースを制御するためのプラグインになります。
動作イメージとしては下図のような感じです
terraform core(terraformコマンド)からRPC経由でCustom Providerを呼び出し、Custom Provider内で操作したいインフラのAPIを叩きます
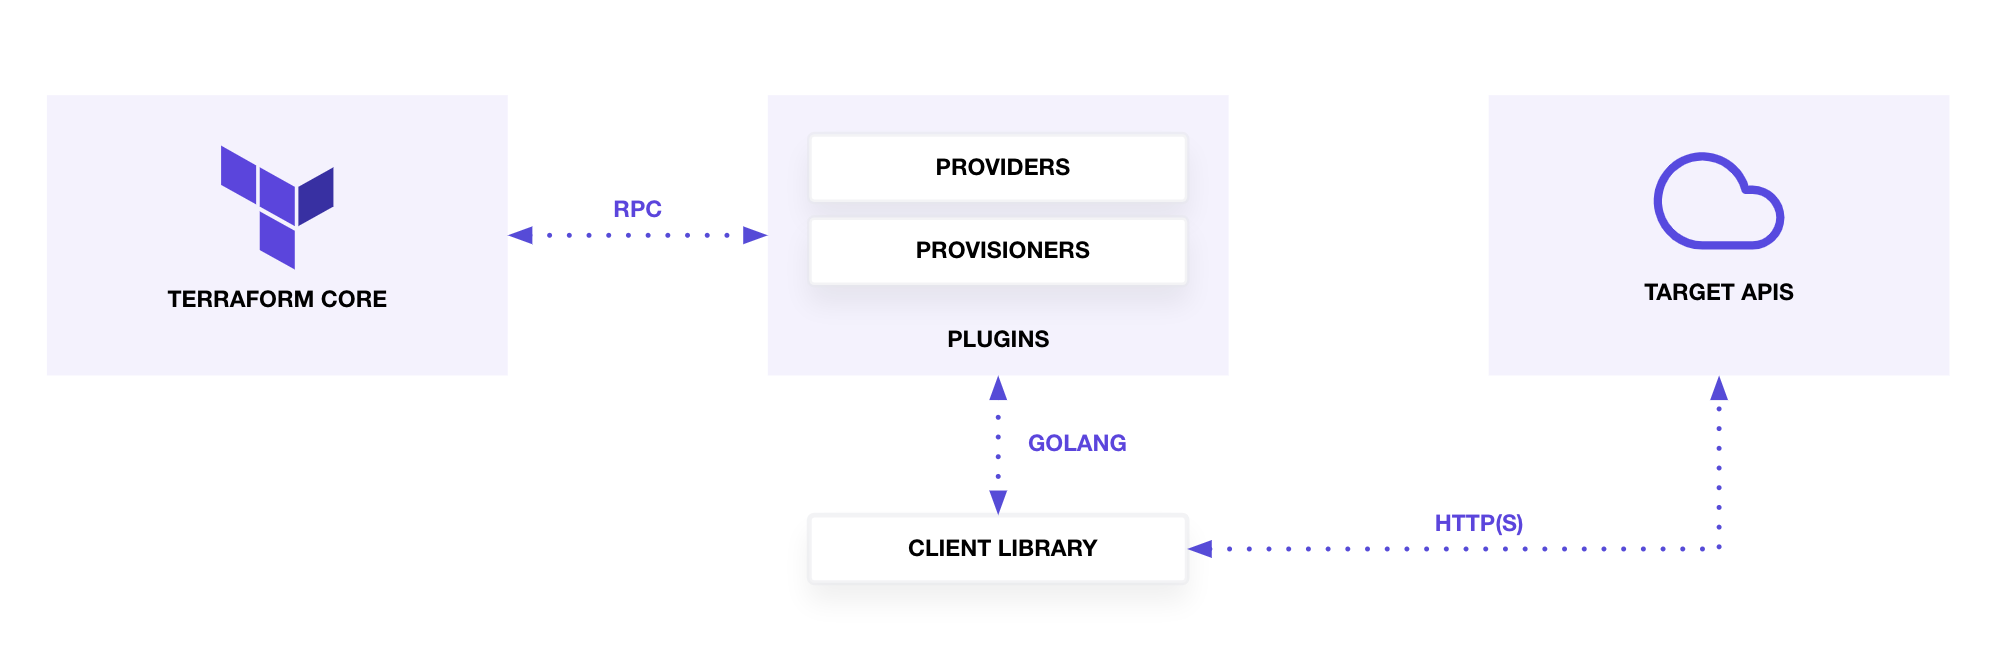
※terraform公式ページから引用
公式に使えるproviderはregistry.terraform.ioで公開されています。
providerはもちろん自分で作成することもできますので、今回はシンプルなCustom Providerを作ってterraformの動作を追っていこうと思います。
今回作成するCustom Providerとサンプルアプリについて
terraformから操作するものはどんなアプリでもいいのですが、今回はterraformがよくクラウドの管理ツールとして使用されるということを考慮してこんな感じのアプリを作りました
ソースコード: https://github.com/sh-miyoshi/terraform-provider-sample/tree/master/app/main.rb
内容としてはvmとstorageという二つのリソースを持っており、それぞれに対してCRUD(Create, Read, Update, Delete)が定義されているような雑なものとなっております

Custom Providerについても簡単に解説しておきます
Custom ProviderはGo言語で書かれており、ソースコードの基本形は以下のようになっています
terraform-provider-sample
├── main.go
└── sample
    ├── provider.go
    ├── data_source_xxx.go
    └── resource_xxx.go
main.goではterraformコマンドから呼ばれた際のentry pointが書かれています
main.goからprovier.goがよばれ、provier.goに定義が書いてある感じですね
リソースの定義は例えばresource_vm.goにありますが、terraformで書ける各スキーマの定義とそれにたいするCRUDの動作が定義されています。
CRUDの各callback関数にアプリに向けてのAPIリクエストを書いていけば動作するという感じです
今回私が書いているCustom Providerはterraformからそれぞれの動作が呼ばれた際に下のようなデバッグメッセージを表示しているので、どの動作がいつ呼ばれたかがわかりやすくなるようにしています。

詳しくは公式ページにきれいにまとまっているのでそちらをご覧ください。
URL: https://learn.hashicorp.com/collections/terraform/providers
Data sourceとResource
コマンドの解説をする前にData sourceとResourceについて説明します。
terraformのソースファイル(以後tfファイルとします)にはresourceブロックとdataブロックを書くことができます。
resourceブロックはその名の通りアプリのリソース(VMやstorageなど)を定義するためのブロックです。
それぞれのリソースに対してCreate, Read, Update, Deleteができます。
それに対してdataブロックはRead onlyなリソースです。
これは別のtfファイルで管理しているリソースのIDなどの値を使いたい場合や、terraformで管理していないリソース(秘密情報など)を使いたい場合などに使用します。
例えば、サンプルアプリではVMリソースにexternal_storageとしてstorageをアタッチできるとしましょう。
そして、tfファイルは以下のようにリソースごとに管理したいとしましょう。
myresources
├── main.tf    # providerとかを記述
├── storage.tf # storageのリソース定義
└── vm.tf      # VMのリソース定義
vm.tfでstorage.tfで作成したリソースを参照したいときに以下のようにdata sourceを使います。
data "sample_storage" "storage1" {
  name = "storage1"
}

resource "sample_vm" "vm1" {
  name                = "vm1"
  cpu                 = 2
  memory              = 4096
  external_storage_id = data.sample_storage.storage1.id
}
各コマンドの解説
それではterraformの各コマンドを解説していきたいと思います。
terraform init
まずはinitコマンドです。
initコマンドはtfファイルにあるterraformのブロックから必要なcustom providerを準備する処理を行っています。
そのため、最初に一回は呼び出す必要があるのです。
これは今回のサンプルアプリ用のproviderの情報です。
terraform {
  required_providers {
    sample = {
      source = "github.com/sh-miyoshi/sample"
      version = "0.0.1"
    }
  }
}
terraformブロックの中に必要なproviderの情報(今回はsample)が書かれています
sourceはproviderをどこから取得するかが書かれており、例えば公式リポジトリにあるGCP providerを取得したい場合はsource = "hachicorp/google"となります。
※この値は省略することができ、その場合は公式リポジトリから取得します
実際に実行してみます
$ git clone https://github.com/sh-miyoshi/terraform-provider-sample.git
$ cd terraform-provider-sample
$ terraform init

Initializing provider plugins...
- Finding github.com/sh-miyoshi/sample versions matching "0.0.1"...
- Installing github.com/sh-miyoshi/sample v0.0.1...
- Installed github.com/sh-miyoshi/sample v0.0.1 (unauthenticated)

・・・

Terraform has been successfully initialized!

・・・
initコマンドのログを見るとgithub.com/sh-miyoshi/sampleの0.0.1を探そうとしているのが見えますね。
initコマンドではsourceに書かれている場所からバイナリを取得し、カレントディレクトリに配備します。
場所はGCPの場合、./.terraform/providers/registry.terraform.io/hashicorp/google/4.3.0/linux_amd64/みたいな感じです
なお今回のsample providerの場合、どこかのリモートのリポジトリにバイナリをおいてはいません。
その場合は、あらかじめビルドしたバイナリを自分で特定のディレクトリに配備しておく必要があります。
置く場所はLinuxですと~/.terraform.d/plugins/github.com/sh-miyoshi/sample/<version>/linux_amd64/配下となります。
※make installでその処理をやっています
terraform plan
次はplanコマンドについて説明します
planコマンドは現在のアプリの状態とtfファイルに書かれている内容を比べて、その差分を表示してくれるコマンドです。
後述のapplyコマンドで実行する際の実行計画を表示してくれるコマンドですね。
まぁ四の五の言わずにまずは実行してみましょう。
$ terraform plan

Terraform used the selected providers to generate the following execution plan.
Resource actions are indicated with the following symbols:
  + create

Terraform will perform the following actions:

  # sample_storage.storage1 will be created
  + resource "sample_storage" "storage1" {
      + id   = (known after apply)
      + name = "storage1"
      + size = 50
    }

  # sample_vm.vm1 will be created
  + resource "sample_vm" "vm1" {
      + cpu    = 1
      + id     = (known after apply)
      + memory = 2048
      + name   = "vm1"
    }

Plan: 2 to add, 0 to change, 0 to destroy.
初めてplanを実行した際にはproviderのRead handlerが呼ばれません。
これはterraformがどのリソースがアプリのどのリソースと紐づいているかがわからないからです。
後述のapplyコマンドを実施した後に再度planコマンドを実施するとplan実施時にRead handlerが呼ばれていることを確認できるかと思います。
providerのCreate handlerが呼ばれた際にterraform上でリソースを管理するためのIDがセットされるため、つぎからは識別できるようになるからです。
# こんな感じ
$ terraform plan
sample_vm.vm1: Refreshing state... [id=b33ec0b0-242f-470b-8d38-6104c90adb2c]
sample_storage.storage1: Refreshing state... [id=4087d043-32cd-4e70-b0b7-9596483a1fd5]

No changes. Your infrastructure matches the configuration.

╷
│ Warning: Call read handler
│
│   with sample_storage.storage1,
│   on test.tf line 18, in resource "sample_storage" "storage1":
│   18: resource "sample_storage" "storage1" {
│
│ Debug message: Call read handler
│
terraformの現在の状態の管理方法
terraformの現状はterraform.tfstateというファイルに書かれます。
terraformはこのterraform.tfstateの中身とRead handler経由で得たアプリの状況を比べて差分を表示してくれるんですね。
※そのため、このファイルをいじるといろいろterraformをだますこともできます
{
  // 略
  "resources": [
    {
      "mode": "managed",
      "type": "sample_storage",
      "name": "storage1",
      "provider": "provider[\"github.com/sh-miyoshi/sample\"]",
      "instances": [
        {
          "schema_version": 0,
          "attributes": {
            "id": "fc87b281-c659-4254-8842-a384b5bf2049", // 管理用ID
            "name": "storage1",
            "size": 50
          },
          // 略
        }
      ]
    }
  ]
}
ちなみにterraform管理外のアプリのリソースをterraform管理下に置く、つまりterraform.tfstateファイルに反映させるにはterraform importコマンドを使用します。
今回は解説できなかったので、興味のある方はぜひドキュメントを読んでみてください。
terraform apply
次はapplyコマンドについて説明します。
applyコマンドはplanコマンドで出た差分を実際に実行するコマンドです。
引数なしにapplyコマンドを実行すると、中で一度planコマンドと同等な処理が走り、その後実行していいかが聞かれ、yesなら実行されます。
CIで実行したいときには-auto-approveをつけるとインタラクションなしで実行してくれます。
main.tfを変更してみてapplyを試してみます。
実行ログは少し長くなってしまったので、抜粋して解説します
まず、apply前にplanが走るためRead handlerが呼ばれていますね。
その後yesと入力したタイミングで、1件の更新と1件の作成があったので、それぞれUpdateとCreate handlerが呼ばれていることがわかると思います。
逆に言うとこれ以外は呼ばれていないので、すごくシンプルなシステムであることがわかるかと思います。
全ての実行結果ログ
$ terraform apply
sample_storage.storage1: Refreshing state... [id=4087d043-32cd-4e70-b0b7-9596483a1fd5]
sample_vm.vm1: Refreshing state... [id=b33ec0b0-242f-470b-8d38-6104c90adb2c]

Terraform used the selected providers to generate the following execution plan. Resource actions
are indicated with the following symbols:
  + create
  ~ update in-place

Terraform will perform the following actions:

  # sample_vm.vm1 will be updated in-place
  ~ resource "sample_vm" "vm1" {
      ~ cpu    = 1 -> 2
        id     = "b33ec0b0-242f-470b-8d38-6104c90adb2c"
      ~ memory = 2048 -> 4096
        name   = "vm1"
    }

  # sample_vm.vm2 will be created
  + resource "sample_vm" "vm2" {
      + cpu    = 1
      + id     = (known after apply)
      + memory = 2048
      + name   = "vm2"
    }

Plan: 1 to add, 1 to change, 0 to destroy.
╷
│ Warning: Call read handler
│
│   with sample_storage.storage1,
│   on test.tf line 18, in resource "sample_storage" "storage1":
│   18: resource "sample_storage" "storage1" {
│
│ Debug message: Call read handler
│
│ (and one more similar warning elsewhere)
╵

Do you want to perform these actions?
  Terraform will perform the actions described above.
  Only 'yes' will be accepted to approve.

  Enter a value: yes

sample_vm.vm2: Creating...
sample_vm.vm1: Modifying... [id=b33ec0b0-242f-470b-8d38-6104c90adb2c]
sample_vm.vm2: Creation complete after 0s [id=37389411-cccf-4db6-a9df-3ff10409dd66]
sample_vm.vm1: Modifications complete after 0s [id=b33ec0b0-242f-470b-8d38-6104c90adb2c]
╷
│ Warning: Call update handler
│
│   with sample_vm.vm1,
│   on test.tf line 23, in resource "sample_vm" "vm1":
│   23: resource "sample_vm" "vm1" {
│
│ Debug message: Call update handler
╵
╷
│ Warning: Call create handler
│
│   with sample_vm.vm2,
│   on test.tf line 29, in resource "sample_vm" "vm2":
│   29: resource "sample_vm" "vm2" {
│
│ Debug message: Call create handler
╵

Apply complete! Resources: 1 added, 1 changed, 0 destroyed.
terraform destroy
destroyコマンドはapplyコマンドの逆です
tfファイルに書かれているリソースを削除します
ちなみにdestroyコマンドのplanを確認したい場合はterraform plan -destroyとやるとできます
applyの時と同じように実行ログは下に置いておきますが、planのタイミングでRead handlerが呼ばれて、yesを押すとDelete handlerがそれぞれのresourceに対して呼ばれていることがわかるかと思います。
全ての実行結果ログ
$ terraform destroy
sample_vm.vm2: Refreshing state... [id=37389411-cccf-4db6-a9df-3ff10409dd66]
sample_storage.storage1: Refreshing state... [id=4087d043-32cd-4e70-b0b7-9596483a1fd5]
sample_vm.vm1: Refreshing state... [id=b33ec0b0-242f-470b-8d38-6104c90adb2c]

Terraform used the selected providers to generate the following execution plan. Resource actions
are indicated with the following symbols:
  - destroy

Terraform will perform the following actions:

  # sample_storage.storage1 will be destroyed
  - resource "sample_storage" "storage1" {
      - id   = "4087d043-32cd-4e70-b0b7-9596483a1fd5" -> null
      - name = "storage1" -> null
      - size = 50 -> null
    }

  # sample_vm.vm1 will be destroyed
  - resource "sample_vm" "vm1" {
      - cpu    = 2 -> null
      - id     = "b33ec0b0-242f-470b-8d38-6104c90adb2c" -> null
      - memory = 4096 -> null
      - name   = "vm1" -> null
    }

  # sample_vm.vm2 will be destroyed
  - resource "sample_vm" "vm2" {
      - cpu    = 1 -> null
      - id     = "37389411-cccf-4db6-a9df-3ff10409dd66" -> null
      - memory = 2048 -> null
      - name   = "vm2" -> null
    }

Plan: 0 to add, 0 to change, 3 to destroy.
╷
│ Warning: Call read handler
│
│   with sample_storage.storage1,
│   on test.tf line 18, in resource "sample_storage" "storage1":
│   18: resource "sample_storage" "storage1" {
│
│ Debug message: Call read handler
│
│ (and 2 more similar warnings elsewhere)
╵

Do you really want to destroy all resources?
  Terraform will destroy all your managed infrastructure, as shown above.
  There is no undo. Only 'yes' will be accepted to confirm.

  Enter a value: yes

sample_vm.vm2: Destroying... [id=37389411-cccf-4db6-a9df-3ff10409dd66]
sample_storage.storage1: Destroying... [id=4087d043-32cd-4e70-b0b7-9596483a1fd5]
sample_vm.vm1: Destroying... [id=b33ec0b0-242f-470b-8d38-6104c90adb2c]
sample_vm.vm1: Destruction complete after 1s
sample_storage.storage1: Destruction complete after 1s
sample_vm.vm2: Destruction complete after 1s
╷
│ Warning: Call delete handler
│
│ Debug message: Call delete handler
╵
╷
│ Warning: Call delete handler
│
│ Debug message: Call delete handler
╵
╷
│ Warning: Call delete handler
│
│ Debug message: Call delete handler
╵

Destroy complete! Resources: 3 destroyed.
さいごに
terraformは公式のドキュメントがかなりしっかり書かれているので、それを読むだけでもかなり詳しくなれます。
また、今回のようにシンプルなproviderでしたらすぐに書けますので、みなさんもぜひ一度トライしてみて素敵なterraformライフを送りましょー!