この記事の目的
- Livewireの紹介
- 個人的によく使うlivewire逆引きリファレンス。
どういう事が出来るのか知った上でドキュメントを見ると読みやすいと思います。
使い慣れてる人はここを見た方が早いです
Livewireって何
- Laravel7.x~ から使えるBladeとPHPの記述で動的な機能を作れるライブラリ
- jsを書かずに良い感じのUIが作れる。
- 学習コストも低く導入しやすい。
以前に布教目的で書いた記事
紹介サンプル
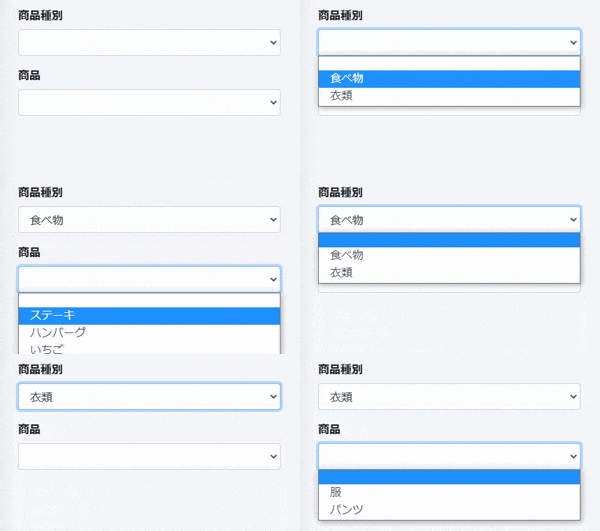
こういうのをjavascript書かずに簡単に実装出来ます。

クリックでコード表示
class Sample0602 extends Component
{
    public $productTypes = ['食べ物', '衣類'];
    public $selectProductType;
    public $products = [];

    public function updatedselectProductType()
    {
        if ($this->selectProductType === '食べ物') {
            $this->products = ['ステーキ', 'ハンバーグ', 'いちご'];
        } elseif ($this->selectProductType === '衣類') {
            $this->products = ['服', 'パンツ'];
        } else {
            $this->products = [];
        }

    }

    public function render()
    {
        return view('livewire.sample0602');
    }
}
<div class="col-3 pt-3">
    <div class="form-group">
        <label>商品種別</label>
        <select class="form-control" wire:model="selectProductType">
            <option value=""></option>
            @foreach($productTypes as $productType)
                <option value="{{ $productType }}">{{ $productType }}</option>
            @endforeach
        </select>
    </div>

    <div class="form-group">
        <label>商品</label>
        <select class="form-control">
            <option value=""></option>
            @foreach($products as $product)
                <option value="{{ $product }}">{{ $product }}</option>
            @endforeach
        </select>
    </div>
</div>
大まかな仕組み
例としてデータを非同期通信で取得して、描画する処理を図に表します。
jsを使って動的な機能を作る場合
Livewireの場合
このような機能を実装する場合、Livewireだと書く処理が大幅に減少します
書かなくて良い処理
- Ajaxリクエスト処理
- レスポンス処理
- HTML生成処理
- HTML差し替え処理
殆どの場合BladeとPHPの記述で実現出来ます。
詳しい仕組み
以下のようなlivewireコンポーネントがあるとします。
class Sample extends Component
{
    public $datas = [];

    public function render()
    {
        return view('livewire.sample')
    }

    public function getDatas()
    {
        $this->datas = [
            'data1','data2'
        ];
    }
}
<div class="pt-2">
    <button wire:click="getDatas">データ取得</button>
    @forelse($datas as $data)
        {{ $data }}
    @empty
        何もない
    @endforelse
</div>
ボタンクリック時にgetDatasメソッドが非同期で発火して、生成したHTMLと変更があったphp変数をjsonに変換します。
それらをレスポンスとしてView側に返しています。
{
	"effects": {
		"html": "<div wire:id=\"wp3eLCX2iVb6Ssjp9XIO\" class=\"pt-2\">\n    <button wire:click=\"getDatas\">データ取得</button>\n            data1\n            data2\n    </div>",
		"dirty": []
	},
	"serverMemo": {
		"htmlHash": "67564d1e",
		"data": {
			"datas": [
				"data1",
				"data2"
			]
		},
		"checksum": "897cf622714b04b69526c4c06168e5b1d933f25478de4c93d785e1d1ba3984e1"
	}
}
図にするとこんな感じです
あたかもリアルタイムにDOMが書き換わっているように見えます。
逆引きリファレンス
注意
この項目内で表記している図は、livewireを使う側の概念的な図です。
クラスフック
class HelloWorld extends Component
{
    public $foo;
    public $fooBar;


    public function mount()
    {
        //コンストラクタの役割
    }

    public function hydrateFoo($value)
    {
        //リクエスト時にjs側の{ foo }を$fooに変換した後に行う
    }

    public function dehydrateFoo($value)
    {
        //HTMLを生成した後に$fooをjson形式で渡すために{foo}へ変換する前に行われる
    }

    public function updating($name, $value)
    {
        //wire:model によって何かしらプロパティの値が更新する前に実行される
        // 配列の場合、$key配列内の変更要素を指定するためにこの関数に渡される追加の引数があります。
    }

    public function updated($name, $value)
    {
        //wire:model によって何かしらプロパティの値が変動された後に実行される
        // 配列の場合、$key配列内の変更要素を指定するためにこの関数に渡される追加の引数があります。
    }

    public function updatingFoo($value)
    {
        //動きはupdatingと同じ、動くタイミングは$fooの値が更新される前
    }

    public function updatedFoo($value)
    {
        //動きはupdatedと同じ、動くタイミングは$fooの値が更新された後
    }

    public function updatingFooBar($value)
    {
        //動きはupdatingと同じ、動くタイミングは$fooBarの値が更新される前
    }

    public function updatedFooBar($value)
    {
        //動きはupdatedと同じ、動くタイミングは$fooBarの値が更新された後
    }

}
hydrate、dehydrateに関する記事
アクション
<!-- クリック -->
<button wire:click="hoge">DoHoge</button>

<!-- キーダウン -->
<input wire:keydown="hoge">
<!-- 修飾子でキーを指定可能、以下例 -->
<input wire:keydown.backspace="hoge">
<input wire:keydown.escape="hoge">
<input wire:keydown.shift="hoge">
<input wire:keydown.tab="hoge">
<input wire:keydown.page-down="hoge">
<input wire:keydown.arrow-right="hoge">
<input wire:keydown.enter="hoge">

<!-- サブミット -->
<form wire:submit.prevent="save">
    <button>Save</button>
</form>
サブミット処理にあるprevent修飾子は
form要素に送信先が指定されていない場合に現在のURLに対してフォームの内容を送信するのを防ぎます。
バインディング
Blade
<!-- リアルタイム同期 -->
<input type="text" wire:model="hoge">
<select name="fruit" wire:model="fruit">
    <option value="りんご">りんご</option>
    <option value="いちご">いちご</option>
    <option value="めろん">めろん</option>
</select>
<input type="radio" name="hogeRadio" value="1" wire:model="hoge">oneHoge
<input type="radio" name="hogeRadio" value="2" wire:model="hoge">tweHoge

<!-- プロパティがネストしている場合 -->
<input type="text" wire:model="hoge.huga">

<!-- フォーカスが外れた時、またはアクション時に同期 -->
<input type="text" wire:model.lazy="hoge">

<!-- コンポーネント内のメソッドが発火、または他のプロパティが同期された時に同期 -->
<input type="text" wire:model.defer="hoge">

<!-- ボタンクリック時にhogeプロパティに'Hello'文字列をバインド -->
<button wire:click="$set('hoge', 'Hello')">setHoge</button>

<!-- ボタンクリック時にisShowプロパティの値をtrue,false交互に切替 -->
<button wire:click="$toggle('isShow')">toggleIsShow</button>
JavaScript
//setHoge()実行時にhogeプロパティに'Hello'文字列をセット
function setHoge() {
    @this.set('hoge' , 'Hello');
}

//プロパティがネストしている場合 例※$food['orange']
//$food['orange']に'delicious'文字列をバインド
function setNestHoge() {
    @this.set('food.orange','delicious');
}
PHP
//hogeプロパティに'Hello'文字列をセット
$this->hoge = 'Hello';

/*複数のプロパティに値をセットする時に使うとコードが見やすくなる。
hogeプロパティに'Hello'文字列をバインド、hugaプロパティに'Hell'文字列をバインド */
$this->fill(['hoge' => 'Hello','huga' => 'Hell']);
イベント
プリフェッチイベント
マウスオーバー時に指定されたメソッドを実行し、クリックされた場合にのみイベントの結果を反映します。
[ボタンクリック時にDBからデータを取得して表示する]ような場合に高速に動作します。
メソッドにセッションやデータベースへの書き込みなどが書かれている場合は、
クリックをしなかった場合に破棄されません。
<button wire:click.prefetch="setText()">DoSetText</button>
{{ $text }}
public function setText()
{
    $this->text = 'Hello';
}
HTML側からPHPメソッド発火
例 : 数値プロパティの値を2倍にする
<button wire:click="twice()">exetwice</button>
public $number = 5;

public function twice()
{
    $this->number = $this->number * 2;
}
PHP側からJavaScplitイベント発火
例 : アラート表示
<button wire:click="showAlert()">showAlert</button>
public function showAlert()
{
    $this->dispatchBrowserEvent('alertEvent',['name' => 'ポッチャマ']);
}
<script>
    window.addEventListener('alertEvent', event => {
        alert(event.detail.name);
    })
</script>
JavaScplit側からPHPメソッド発火
例 : セッションメッセージを表示
<button onClick="flashMessage()">showFlashMessage</button>
@if (session()->has('message'))
    <div class="alert alert-success">
        {{ session('message') }}
    </div>
@endif
public function setFlashMessage()
{
    session()->flash('message', 'メッセージ');
}
<script>
    function flashMessage() {
        @this.setFlashMessage();
    }
</script>
因みにこう書くと一発です。一例としてjavaScriptを咬ませました。
- <button onClick="flashMessage()">showFlashMessage</button>
+ <button wire:click="setFlashMessage()">showFlashMessage</button>
@if (session()->has('message'))
    <div class="alert alert-success">
        {{ session('message') }}
    </div>
@endif
コンポーネント間でのイベント
注意
イベントを発火させる側のコンポーネントにイベントリスナーを設定していないとコンポーネント間でイベントを発火させられません
| PHP側の記法 | Blade側の記述 | 説明 |
|---|---|---|
| $this->emit('hoge', "引数"); | $emit() | ページ上に存在する全てのコンポーネントにイベントを発行 |
| $this->emitUp('hoge',"引数"); | $emitUp() | 親コンポーネントのみに「hoge」イベントを発行 |
| $this->emitTo('fuga', 'hoge',"引数"); | $emitTo() | fugaコンポーネントに「hoge」イベントを発行 |
| $this->emitSelf('hoge',"引数"); | $emitSelf() | 自分自身に「hogeイベントを発行」 |
子→親コンポーネント
例 : 子から親のプロパティの値を変更
<div>
    {{ $text }}
    <livewire:child-component />
</div>
class ParentComponent extends Component
{
    public $text;

    protected $listeners = ['setText' => 'updateText'];

    public function render()
    {
        return view('livewire.parent-component');
    }

    public function updateText($value)
    {
        $this->text = $value;
    }
}
<div>
    <button wire:click="setParentText()">setText</button>
</div>
class ChildComponent extends Component
{
    public function render()
    {
        return view('livewire.child-component');
    }

    public function setParentText()
    {
        $this->emitUp('setText', 'Hello!!');
    }
}
Blade側から直接実行も可能
<div>
-     <button wire:click="setParentText()">setText</button>
+     <button wire:click="$emitUp('setText','Hello')">setText</button>
</div>
コンポーネント未指定
注意
同じページ内の他のコンポーネントにもsetTextがイベントリスナーに登録されていた場合
両方発火します。
例 : 親から子のプロパティの値を変更
<div>
    <button wire:click="$emit('setText','Hello')">setText</button>
    <livewire:child-component />
</div>
class ParentComponent extends Component
{
    public function render()
    {
        return view('livewire.parent-component');
    }
}
<div>
    {{ $text }}
</div>
class ChildComponent extends Component
{
    public $text;

    protected $listeners = ['setText' => 'updateText'];

    public function render()
    {
        return view('livewire.child-component');
    }

    public function updateText($value)
    {
        $this->text = $value;
    }
}
コンポーネント指定
例 : 子から兄弟のプロパティの値を変更
親コンポーネント:PHP側にはrender()があるのみなので省略
<div>
    <livewire:child-component/>
    <livewire:brother/>
</div>
子コンポーネント : PHP側にはrender()があるのみなので省略
<div>
    <button wire:click="$emitTo('brother','updateText')">setText</button>
</div>
<div>
    {{ $text }}
</div>
class Brother extends Component
{
    protected $listeners = ['updateText'];

    public $text;

    public function updateText()
    {
        $this->text = 'fromChild';
    }

    public function render()
    {
        return view('livewire.brother');
    }
}
PHP側で兄弟コンポーネントにイベントを発火させる場合は
$this->emitTo('コンポーネント名','イベント名','引数');
親→子jsイベント→子phpイベント
先にjavaScriptイベントが発火
サイクルとしては
- 親コンポーネントのボタンクリック
- (js)アラート表示スクリプト
- (php)プロパティに値を代入
- Bladeに描画
<div>
    <button wire:click="$emit('updateText','hogeeee')">setText</button>
    <livewire:child-component/>
</div>
<div>
    {{ $text }}

    <script>
        //livewire読み込み時に動く
        document.addEventListener('livewire:load', function () {
            Livewire.on('updateText', text => {
                alert('$textの中身が' + text + 'に変更されます。');
            });
        })
    </script>
</div>
class ChildComponent extends Component
{
    protected $listeners = ['updateText'];

    public $text;

    public function updateText($text)
    {
        $this->text = $text;
    }

    public function render()
    {
        return view('livewire.child-component');
    }
}
ブラウザイベントとLivewireとしてのイベントが若干ややこしい。
Livewire.on('updateText', text => {
    alert('$textの中身が' + text + 'に変更されます。');
});
Livewire.onは、コンポーネントから発行されるイベントをリッスンする為の構文です。
動的に変更したDOMを保持する
レンダリング後のDOMに対して変更を加えた後、再度レンダリングされると加えた変更が消えてしまいます。
特定の要素に対して更新しないように制御する事が可能です。
| ディレクティブ | 説明 |
|---|---|
| wire:ignore | サーバーリクエストでDOMが更新されるときに、要素またはその子を更新しないようにLivewireに指示します。Livewireコンポーネント内でサードパーティのJavaScriptライブラリを使用する場合に便利です。 |
| wire:ignore.self | "self"修飾子は、要素自体の更新を制限しますが、その子の変更は許可します。 |
wire:ignore
例として、このようなlivewireコンポーネントがあるとします
class Sample0518 extends Component
{
    public $hoge;

    public function render()
    {
        return view('livewire.sample0518');
    }
}
<div>
    <input type="text" wire:model="hoge"/>

    <h1 id="insert_area"></h1>

    <a onclick="insertText()">クリック</a>

    <script>
        function insertText() {
            document.getElementById('insert_area').innerHTML = '後から入れたテキスト';
        }
    </script>
</div>

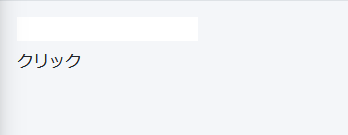
aタグをクリックするとテキストが書き換わります

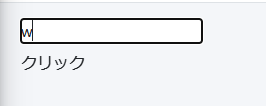
この状態でテキストボックスに何か値を入力すると

このように消えてしまいますが、wire:ignoreを要素に加えてあげると
<div class="pt-3">
    <input type="text" wire:model="hoge"/>
-    <h1 id="insert_area"></h1>
+    <h1 id="insert_area" wire:ignore></h1>

    <a onclick="insertText()">クリック</a>

    <script>
        function insertText() {
            document.getElementById('insert_area').innerHTML = '後から入れたテキスト';
        }
    </script>
</div>
消えないようになります。
wire:ignore.self
self修飾子は、子要素の変更は許可したい時に使用します。
例としてBootStrap4のモーダルに使います
class Sample0518 extends Component
{
    public $hoge;

    public function render()
    {
        return view('livewire.sample0518');
    }
}
<div class="pt-3">
<!-- Button trigger modal -->
<button type="button" class="btn btn-primary" data-toggle="modal" data-target="#exampleModal">
Launch demo modal
</button>
<!-- Modal -->
<div class="modal fade" wire:ignore.self id="exampleModal" tabindex="-1" role="dialog"
aria-labelledby="exampleModalLabel" aria-hidden="true">
<div class="modal-dialog" role="document">
<div class="modal-content">
<div class="modal-header">
<h5 class="modal-title" id="exampleModalLabel">Modal title</h5>
<button type="button" class="close" data-dismiss="modal" aria-label="Close">
<span aria-hidden="true">×</span>
</button>
</div>
<div class="modal-body">
<div class="form-group">
<input type="text" class="form-control" wire:model="hoge">
</div>
<p>{{ $hoge }}</p>
</div>
<div class="modal-footer">
<button type="button" class="btn btn-secondary" data-dismiss="modal">Close</button>
<button type="button" class="btn btn-primary">Save changes</button>
</div>
</div>
</div>
</div>
</div>
何故.selfを付けるか
selfが無い場合
モーダル内全ての要素を更新しないようにしている為、$hogeの値が変わっても
<p>{{ $hoge }}</p>
出力している部分は書き換わらない
self有りの場合
下記のdivタグのみ更新しないようになるので
- モーダルの展開している状態を保持できる
- 子要素は更新される
<div class="modal fade" wire:ignore.self id="exampleModal" tabindex="-1" role="dialog"
     aria-labelledby="exampleModalLabel" aria-hidden="true">

</div>
URLパラメータ非同期更新
public $param1;
public $param2;

protected $queryString = ['param1', 'param2'];

public function mount(Request $request)
{
    $this->param1 = $request->param1 ?? 'hoge';
    $this->param2 = $request->param2 ?? 'huga';
}
アクセス時URLにパラメータが付属する。
/?param1=hoge¶m2=huga
$queryStringで指定したプロパティに変動があると同時にURLのパラメータも書き換わります。
param1,param2の値が変動している状態でページをリロードしても
GETパラメータに存在しているので値が保持される。
パラメータ名を省略させる事も可能
public $param1;
public $param2;

- protected $queryString = ['param1', 'param2'];
+ protected $queryString = [
    'param1' => ['as' => 'p1'],
    'param2' => ['as' => 'p2']
];

public function mount(Request $request)
{
    $this->param1 = $request->p1 ?? 'hoge';
    $this->param2 = $request->p2 ?? 'huga';
}
URLが/?p1=hoge&p2=huga と表記される。
ページネーション
使い方
WithPaginationトレイトを読み込んでページネーションを使用できるようにします。
ページネーションのCSSはデフォルトだとTailwindになっています。
+ use Livewire\WithPagination;

class ShowPosts extends Component
{
+    use WithPagination;

    public function render()
    {
        return view('livewire.show-posts', [
            'posts' => Post::paginate(10),
        ]);
    }
}
<div>
    @foreach ($posts as $post)
        ...
    @endforeach

    {{ $posts->links() }}
</div>
CSSをBootstrapに変更
 use Livewire\WithPagination;

class ShowPosts extends Component
{
    use WithPagination;

+   protected $paginationTheme = 'bootstrap';
独自のページネーションを使う
class ShowPosts extends Component
{
    use WithPagination;

    ...

+    public function paginationView()
+    {
+        return 'custom-pagination-links-view';
+    }

    ...
}
通常のカスタムページネーションの作りと違う部分があるので注意。詳しくはwikiへ。
他にも方法があります
同じページに複数のページャーがある場合
URLのページ数を表すパラメータが?page=2となるので
2つのページャーが同じページにある場合競合します。
paginate()の第三引数にカスタムパラメータを設定しましょう
class ListPostComments extends Livewire\Component
{
    use WithPagination;

    public Post $post;

    public function render()
    {
        return view('livewire.show-posts', [
+            'posts' => $post->comments()->paginate(10, ['*'], 'commentsPage'),
        ]);
    }
}
バリデーション
ルール宣言
配列定義
public $name;
public $email;

protected $rules = [
    'name' => 'required|min:6',
    'email' => 'required|email',
];
メソッドとして定義
public $name;
public $email;

protected function rules()
{
    return [
        'name' => 'required|min:6',
        'email' => ['required', 'email', 'not_in:' . auth()->user()->email],
    ];
}
バリデーション対象に名称を付ける
protected $validationAttributes = [
    'name' => '名前'
    'email' => 'メールアドレス'
];
エラーメッセージ変更
protected $messages = [
    'email.required' => 'メールアドレスは必ず必要です',
    'email.email' => 'メールアドレスの形式で記入してください',
];
バリデーション実行
$this->validate();
任意のタイミングで特定のエラーメッセージを出す
何らかの処理の中に記述します。
$this->addError('name', '早く名前を入力してください');
@error('name')
<span class="invalid-feedback d-block" role="alert">
    <strong>{{ $errors->first('name') }}</strong>
</span>
@enderror
サンプル
ボタンクリックでエラー表示
class Sample0523 extends Component
{
    public function getError()
    {
        $this->addError('name', '早く名前を入力してください');
    }

    public function render()
    {
        return view('livewire.sample0523');
    }
}
<div>
    <button type="button" class="btn btn-primary mb-3" wire:click="getError()">
        エラー表示
    </button>
    @error('name')
    <span class="invalid-feedback d-block" role="alert">
            <strong>{{ $errors->first('name') }}</strong>
    </span>
    @enderror
</div>


